DFS Namespaces are not a new item with 2012R2, they have been around for a long time. In fact DFS existed all of the way back to the NT4 and Windows 95 days.
So what is DFS? DFS stands for Distributed File System.
Sounds fancy but why do I care? Anyone who has ever gone through a file migration or maintains multiple file servers or NAS servers will want to pay attention to this article because it will greatly reduce the impact to your users as files and servers are moved around.
DFS is a collection of folders and targets of those folders.
Let’s walk through a hypothetical scenario, and then I will walk through the implementation of it.
Let’s walk through a hypothetical scenario, and then I will walk through the implementation of it.
Hypothetical scenario:
You are the administrator for Matrix.local….. Just kidding, but let’s pretend the company you work for has multiple file servers or NAS/SAN servers where users access CIFS shares. Sure, in many environments a logon script will work fine map a drive for the users. That’s great until you have to buy a new NAS because the users have filled up the old san with “important” data like pictures of the kids, mp3 files, and sometimes even actual work-related files. Now you need to move half that data to the new san, which means changing every instance where the old server is defined – This means logon scripts have to be analyzed and modified after the data is copied and permissions are reset up, applications that hit the old share now have to be modified to go to the new share, and on and on. You can see where just the planning and implementation of getting that data moved can turn into quite the chore. So how does DFS help me solve this?
Let’s set it up and as we go I can highlight the benefits of using DFS
Open up Server Manager
- Open up Server Manager
- Click Manage, Add Roles and Features

- Click Next on the Before You Begin screen
- Click Next on the Select installation type
- Validate your server is selected and click Next
- Expand File and Storage Services
Expand File and iSCSI Services
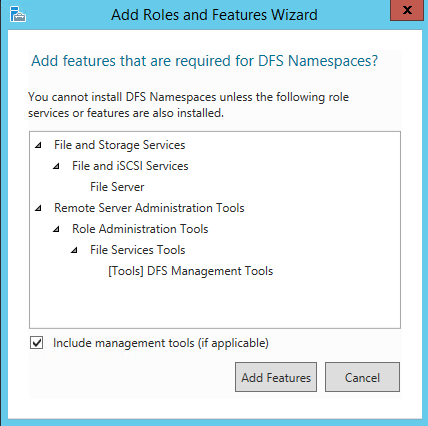
Click DFS Namespaces
- Click Add Features in the popup window for the features that are required
- Click Next and then Install
- Once the install is done click the close button
Configure the Namespace
When the DFS Management console comes up essentially empty and will look a lot like:

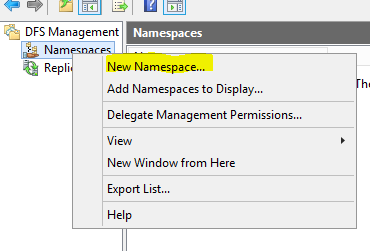
- Add a Namespace by right clicking the Namespaces node underneath the DFS Management console or clicking the New Namespace link on the right pane.
- In the wizard that comes up select the name of the server you want to host the namespace, Click next

- Select the name that you want for the namespace and click next

NOTE: You can clicked the edit settings to see or change the path where the folder is created and edit the permissions if necessary but in my example we don’t need to. - On the Namespace type select the type of namespace – I recommend Domain-based in Windows 2008 mode. This will give you the flexibility of adding more root servers, DFS replication, scalability and access-based enumeration. Standalone is the only option when there is no Active Directory or the server is not a member of the domain.

- Once the namespace is selected, Click Next and then click Create
Create a Folder (Simple Example)
- Highlight your new namespace and right click and select new folder

- In my example I am creating a folder for user data so my folder will be \\matrix.local\data\users

You could add targets now if you wanted too but will do that as a separate step to demonstrate functionality - Right click on the folder you just created and select new folder target
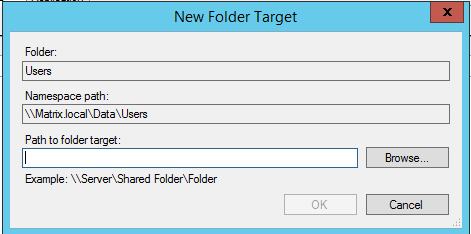
Add the path to the folder target – in my case its \\DC01\Data1\Users
In this simple example the benefit is now user folders can be mapped using manual mappings, Login Scripts or GPO Preferences by utilizing the \\Matrix.local\Data\Users path. Data on the backend can move and once the target is up dated to the new location, users will then start picking up the new location. While in this example there is a flaw, what about departmental user data where user data is held in different shares? Well here is where the power of DFS comes to the rescue.
Creating an Advanced Folder Structure
- Let’s delete the folder users

This will get us back to a clean slate - We are going to create a new namespace called UserData$
Adding the $ sign to the end will make it a hidden namespace
Should appear once the wizard is done like: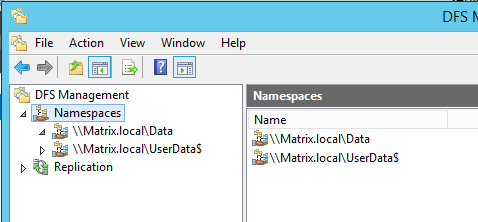
- Under User data we are going to add our departmental shares. In my case Marketing and Engineering
Marketing is stored in our previous location \\dc01\data1\users
Engineering is stored in \\dc01\data2\users
Should appear as below:
- Under the original \\matrix.local\data namespace – I will create a folder for users with a folder target of our new namespace \\matrix.local\UserData$ as below

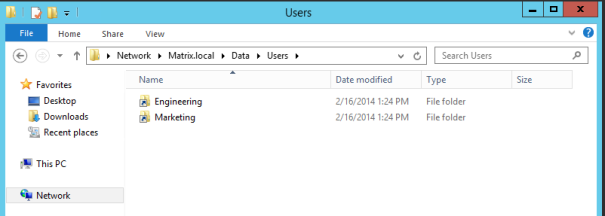
- The results of this make the data appear as if they are in the same folder structure
No comments:
Post a Comment