Showing posts with label Troubleshooting. Show all posts
Showing posts with label Troubleshooting. Show all posts
Sunday, May 3, 2020


Monday, June 7, 2010
QA-(Tesda)
1. Why is it Windows 98 OS can't open Windows 2000 installed partition?
Ans: Windows 98 is using FAT32 file system while Windows 2000 is using NTFS. One word to describe is "incompatible". Inversely, Windows 2000 or higher can use FAT32 file system.
Read this: FAT32 vs. NTFS
2. msav is the command of Microsoft Anti-Virus.(obsolete)
3. Safe mode is a diagnostic mode of a computer operating system (OS). It can also refer to a mode of operation by application software. Safe mode is intended to fix most, if not all problems within an operating system.
To run safe mode from computer start up process press F8 to view advanced menu then select Safe mode.
Safe mode commonly used:
a)when computer can't load OS normally, type at run cmd then type "chkdsk /f" to check and fix disk errors.
b)when device driver causes hang-up and you need to uninstall the driver.
4. How to create start-up disk(diskette) in Windows 98 environment? (obsolete)
How to create a boot disk
4-a) Create A XP Boot Disk from System Files
5. What is HP Laserjet printer error code 50?
- Fuser roller malfunction.
How laser printer works? read this
6. Interprets the IBM machines start up error code 201, error code 108 and error code 240?
Answer: IBM error codes
7. Booting files for DOS(FAT) and Win9x(FAT/FAT32) are:IO.sys, msdos.sys, command.com (research on it's functions)
Start up files for WinNT, Win2k, WinXP, Win 2003, and higher are: config.sys, ntldr.exe, boot.ini, etc.
The BOOT.INI File of
Microsoft® Windows™ NT/2000/XP/2003 read more
How to edit the Boot.ini file in Windows XP
BootDisks - PC Support - Essential Utilities
8. How to fix noisy power supply?
- Clean the fan, if still noisy replace the fan.
9.What IP address?
10.Microsoft DOS ipconfig command. Try to differentiate the ipconfig and ipconfig /all command.
11. Ex. If the sound card and LAN card are not working properly or not working at all. The tendency is IRQ conflict.What is IRQ?
IRQ assignments and resolve IRQ conflicts
12. What are the causes of random reboot or phantom reboot?
- It's either virus infected, RAM problem, device driver problem or power supply power shortage.
13. What is Blue Screen of Death?
14. Mising command.com error message
NTLDR is Missing.
15.What is TCP/IP? TCP/IP Tutorials
16. What is ElectroStatic Discharge(ESD)
Read this: FAT32 vs. NTFS
2. msav is the command of Microsoft Anti-Virus.(obsolete)
3. Safe mode is a diagnostic mode of a computer operating system (OS). It can also refer to a mode of operation by application software. Safe mode is intended to fix most, if not all problems within an operating system.
To run safe mode from computer start up process press F8 to view advanced menu then select Safe mode.
Safe mode commonly used:
a)when computer can't load OS normally, type at run cmd then type "chkdsk /f" to check and fix disk errors.
b)when device driver causes hang-up and you need to uninstall the driver.
4. How to create start-up disk(diskette) in Windows 98 environment? (obsolete)
How to create a boot disk
4-a) Create A XP Boot Disk from System Files
5. What is HP Laserjet printer error code 50?
- Fuser roller malfunction.
How laser printer works? read this
6. Interprets the IBM machines start up error code 201, error code 108 and error code 240?
Answer: IBM error codes
7. Booting files for DOS(FAT) and Win9x(FAT/FAT32) are:IO.sys, msdos.sys, command.com (research on it's functions)
Start up files for WinNT, Win2k, WinXP, Win 2003, and higher are: config.sys, ntldr.exe, boot.ini, etc.
The BOOT.INI File of
Microsoft® Windows™ NT/2000/XP/2003 read more
How to edit the Boot.ini file in Windows XP
BootDisks - PC Support - Essential Utilities
8. How to fix noisy power supply?
- Clean the fan, if still noisy replace the fan.
9.What IP address?
10.Microsoft DOS ipconfig command. Try to differentiate the ipconfig and ipconfig /all command.
11. Ex. If the sound card and LAN card are not working properly or not working at all. The tendency is IRQ conflict.What is IRQ?
IRQ assignments and resolve IRQ conflicts
12. What are the causes of random reboot or phantom reboot?
- It's either virus infected, RAM problem, device driver problem or power supply power shortage.
13. What is Blue Screen of Death?
14. Mising command.com error message
NTLDR is Missing.
15.What is TCP/IP? TCP/IP Tutorials
16. What is ElectroStatic Discharge(ESD)
17. How to check if computer1 is connecting to the server or other device/computer?
Ans. Ping the IP address of the server or other devices.
Ex. C:\>ping 172.16.0.3
Monday, April 19, 2010
Visio viewer 2007 can't open visio file (.vsd)
I downloaded and installed Visio Viewer 2007 but the program can't be found at program files. I just learned that visio file (.vsd) ext. is already associated in IE 7 but the IE7 can't open the visio file. I searched some blog and I found the solution.
The solution was to uninstall a security update "Cumulative Security Update for ActiveX Killbits for Windows 'Your Version of Windows Here' (KB973525)"
The link to the update is here: http://go.microsoft.com/fwlink/?LinkId=158202. It appears that Microsoft in it's infinite wisdom accidentally put the Visio Viewer's CLSID in the kill list. Uninstalling this update, resolved the issue and I can now open Visio documents in IE.
Wednesday, February 3, 2010
Your user profile was not loaded correctly! You have been logged on with a temporary profile.
Try these steps:
- Log on with local administrator account, preferably in safe mode. To boot the machine in safe mode, Click F8 during boot.
- Click Start + Run and type in regedit and then Enter.
- Open HKEY_LOCAL_MACHINE
- Open Software
- Open Microsoft
- Open Windows NT
- Open Current Version
- Open ProfileList
- Here you will see keys that belong to each profile. To find your problematic profile navigate to each key and refer to the ProfileImagePath entry on the right hand side.
- Once you find your problematic profile, just delete the key. This means delete the folder on the left hand side tree view that contains your alias in the ProfileImagePath entry.
- Restart machine.
There is another way you can actually backup your profile and create a new one.
Click on “Start”, Right click “Computer” and go to “properties”
Click on “Change Settings”

Go to the “Advanced” tab and click on User Profiles “Settings” button


“Change type” will allow you to change your profile type between Roaming and Local Profiles
“Delete” will delete that profile. Including the registry entries and everything.
“Copy To” will back up your profile. It is always advisable to backup your profile from here rather than from anywhere else. Your profile contains more than you can see. Hidden Files, System Files, etc. This takes care of everything in a safe manner.
Sunday, January 31, 2010
Windows Vista issue - can't open control panel, computer details...
Solution:
1. Click on the Start button and in the Start Search box type in: services.msc
2. Press the Enter key on your keyboard.
3. The Services window should now open.
4. Scroll down to Software Licensing, then right-click on it and select Properties.
5. Under the General tab, click on the Stop button.
6. Set the Startup Type to Automatic, then click Apply.
7. Next, click on the Start button under Service Status.
8. Last, restart your computer. Control Panel should now open normally.
Monday, November 30, 2009
Fix a corrupted user profile
If you tried to log on to Windows and received an error message telling you that your user profile might be corrupted, you can try to repair it. You will need to create a new profile, and then copy the files from the existing profile to the new one.
To create a new user profile
To create a new profile, you must first create a new user account. When the account is created, a profile will also be created.
Open User Accounts by clicking the Start button
 , clicking Control Panel, clickingUser Accounts and Family Safety (or clicking User Accounts, if you are connected to a network domain), and then clicking User Accounts.
Click Manage another account.
 If you are prompted for an administrator password or confirmation, type the password or provide confirmation.
Click Create a new account.
Type the name you want to give the user account, click an account type, and then click Create Account.
To copy files to the new user profile
After you create the profile, you can copy the files from the existing profile. You must have at least three user accounts on the computer to complete these steps, including the new account you just created.
Log on as a user other than the new user you just created or the user that you want to copy files from.
Open Documents by clicking the Start button
, and then clicking Documents.Click the Tools menu, and then click Folder Options.
If you don't see the Tools menu, press ALT.
Click the View tab, click Show hidden files and folders, clear the Hide protected operating system files check box, and then click OK.
Locate the C:\Users\Old_Username folder, where C is the drive that Windows is installed, and Old_Username is the name of the profile you want to copy files from.
Select all of the files and folders in this folder, except the following files:
Ntuser.dat
Ntuser.dat.log
Ntuser.ini
Click the Edit menu, and then click Copy.
If you don't see the Edit menu, press ALT.
Locate the C:\Users\New_Username folder, where C is the drive that Windows is installed, and New_Username is the name of the new user profile you created.
Click the Edit menu, and then click Paste.
If you don't see the Edit menu, press ALT.
Log off, and then log back on as the new user.
If you have e-mail messages in an e-mail program, such as Windows Mail, you must import your e-mail messages and addresses to the new user profile before you delete the old profile. If everything is working properly, you can delete the old profile.
If the steps above do not fix the problem, you should contact your customer support provider for assistance. To find additional information about customer support options that apply to this computer, click the Start button , click Help and Support, and thenclick the Ask someone or expand your search link at the bottom of the Help window.
Saturday, November 28, 2009
Diagnosing Bad RAM
Signs of bad memory:
1. Starts Smoking
2. Becomes Moody

The common indicators of faulty memory:
- Blue Screens during the install procedure of Windows 2000 or XP.
- Random crashes or blue screens during the running of 2000 or XP.
- Crashes during memory intensive operations. 3D games, benchmarks, compiling, Photoshop, etc.
- Distorted graphics on screen. This can also be related to the video card.
- Failure to boot. This can be accompanied by repeated long beeps, which is the accepted BIOS beep code for a memory problem.
Testing Bad Memory Software: Click this to download Memtest86+
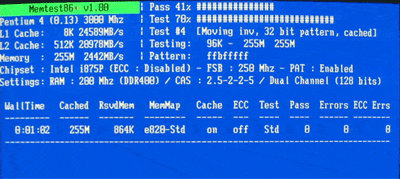
Memtest86+ has basic and advanced testing modes, differing in the time they take and the thoroughness of the testing. The basic mode should be sufficient to indicate any major problems with your memory.
To use Memtest86+ first download either the pre-compiled floppy disk image or the bootable ISO CD image.
Unzip the downloaded file and create your bootable disk by either running the 'install' program (for the floppy disk image) or creating a CD from the ISO image by using a program like Nero or Easy CD Creator.
Reboot your computer with the floppy or CD in the drive to start the Memtest86+ program. It will automatically begin the basic test. Note the system information displayed to the left of the screen.
The 'c' key will open a menu that allows you to choose between the various test modes. Any errors in your memory will be listed at the bottom of the screen.
Friday, November 27, 2009
Using Safe Mode at startup
To use Safe Mode with Command Prompt to return the computer to a previous restore point, follow the steps below.
NOTE: Using System Restore in Safe Mode to return the computer to a previous restore point cannot be undone.
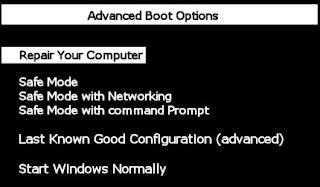
3. Press the down arrow key until Safe Mode with Command Prompt is selected, and then press enter . Wait while Windows loads system files. The Windows log on screen appears.
4. At the command prompt, enter rstrui.exe , and then press enter . Wait a few moments for the System Restore window to open.
5. Follow the on-screen instructions to perform a system restore.
You have now returned the computer to a previous restore point using Safe Mode with Command Prompt.
- Press the power button to turn on the computer.
- At the first screen, press the f8 key repeatedly every half of a second until the Windows Advanced Boot Options screen displays.

3. Press the down arrow key until Safe Mode with Command Prompt is selected, and then press enter . Wait while Windows loads system files. The Windows log on screen appears.
4. At the command prompt, enter rstrui.exe , and then press enter . Wait a few moments for the System Restore window to open.
5. Follow the on-screen instructions to perform a system restore.
You have now returned the computer to a previous restore point using Safe Mode with Command Prompt.
Wednesday, November 25, 2009
Can't open Control Panel in Vista/XP
I can't open Control Panel, it would open in a flash then gone. I can't change the printer settings.
Solution:
Click Start then at Start search or Run type services.msc. Then look for Software Licensing service, double click then click stop then start button.
Fix for Error “Windows Resource Protection Could Not Start the Repair Service” When Running SFC in XP/Vista
When you run the System File Checker using the /Scannow parameter from an elevated Command Prompt, the following error may occur. Additionally, you may experience problems running Windows Installer Setup files and installing fixes from Windows Update.
Windows Resource Protection could not start the repair service

This happens if the TrustedInstaller (Windows Modules Installer) service is disabled. Use these steps to reset the service startup type.
1. Click Start, type Services.msc
2. Double-click Windows Modules Installer
3. Set its Startup type to Manual
4. Click OK.

The TrustedInstaller service has full access to Windows Resource Protection (WRP) files and registry keys, and this services needs to be running in order to restore missing or corrupted WRP resources. The TrustedInstaller service starts on-demand when running the System File Checker.
Install SATA Hard Drive
How To Install and Troubleshoot Serial ATA (SATA) Hard Drives
Hard drives using SATA connectors are the next generation in hard drive technology and should replace hard drives using EIDE connectors within the next few years. SATA hard drives are the same size and shape as EIDE hard drives and are installed in exactly the same way with one big difference: one SATA port connects to one SATA hard drive, so there's no need to deal with the messy master and slave configuration scheme. It is not necessary to set any jumpers, terminators, or other settings on this drive for proper operation. The jumper block adjacent to the SATA interface connector is for factory use only.
With a Serial ATA interface, each disc drive has its own cable that connects directly to a Serial ATA host adapter or a Serial ATA port on your motherboard. Unlike Parallel ATA, there is no master-slave relationship between drives that use a Serial ATA interface.
You can use a Serial ATA drive in the same system with Parallel ATA drives as long as both interfaces are supported on the motherboard or with a host adapter. This makes it easy to add Serial ATA compatibility to your existing system without removing existing Parallel ATA disc drives.
What You Need
- A Phillips screwdriver and four 6-32 UNC drive mounting screws.
- A Serial ATA interface cable (sold separately). Maximum length is 39 inches (1 meter).
- A Serial ATA-compatible power cable or adapter (sold separately).
- A version of Windows with FAT32 or NTFS file system.
- A system with a motherboard that has a Serial ATA connector on it, or a Serial ATA host adapter and available PCI slot in which to install the adapter.
Refer to your computer system documentation to see if your system supports Serial ATA on the motherboard and to locate the Serial ATA connector. If your system does not have a Serial ATA connector on the motherboard, you must purchase a Serial ATA host adapter that is compatible with your computer and operating system and install it with the appropriate device driver according to the host adapter manufacturer's installation instructions.
Handling Precautions
- Disc drives are fragile. Do not drop or jar the drive. Handle the drive only by the edges or frame. Keep the drive in the protective anti-static container until you are ready to install it to minimize handling damage.
- Drive electronics are extremely sensitive to static electricity. While installing the drive, wear a wrist strap and cable connected to ground.
- Turn off the power to the host system during installation.
- Do not disassemble the drive. Doing so voids the warranty.
- Do not apply pressure or attach labels to the circuit board or to the top of the drive.
Attaching Cables and Mounting the Drive
1. Attach one end of the drive interface cable to the Serial ATA interface connector on your computer's motherboard or Serial ATA host adapter (see your computer manual for connector locations). Host adapter configuration is shown below.
Note: Serial ATA connectors are keyed to ensure correct orientation.


2. Attach the interface and power cables to the drive.
3. Secure the drive using four 6-32 UNC mounting screws in either the side-mounting or bottom-mounting holes. Insert the screws no more than 0.20 inches (5.08 mm) into the bottom-mounting holes and no more than 0.14 inches (3.55 mm) into the side-mounting holes.
Configuring the BIOS
Close your computer case and restart your computer. Your computer may automatically detect your new drive. If your computer does not automatically detect your new drive, follow the steps below.
1. Restart your computer. While the computer restarts, run the system setup program (sometimes called BIOS or CMOS setup). This is usually done by pressing a special key, such as DELETE, ESC, or F1 during the startup process.
2. Within the system setup program, instruct the system to auto detect your new drive.
3. Save the settings and exit the setup program. When your computer restarts, it should recognize your new drive. If your system still doesn't recognize your new drive, see the troubleshooting section on the back of this sheet.
Note: Serial ATA is a new interface type. Some older systems may see the drive and classify it as a SCSI device if you are using a Serial ATA host adapter. This is normal even though this is not a SCSI disc drive. This does not affect drive performance or capacity.
Partition SATA Hard Disk under Windows 2000/XP/Vista/Windows 7 and Windows server 2000/2003/2008
As we know, if you install a new drive and want to use it in Windows, you must partition the hard drive first! So how can you partition the SATA hard disk?
Most computer users know that Windows Disk Management itself or the install disk can partition the hard disk directly, while an easier or safer third party partition manager tool like EASEUS Partition Master may be much expected and welcome.
EASEUS Partition Master, comprehensive hard disk partition tool and system optimization software for Windows-based administration, enables you to easily partition the hard disk or change/extend partition without data loss under Windows 2000/XP/Vista/Windows 7 and Windows server 2000/2003/2008. It also offers some basic and advanced features like create, delete, resize/move, format, copy partition for better Windows hard disk management. More features…
Troubleshooting
If your drive is not working properly, these troubleshooting tips may help solve the problem.
1. Does the drive spin up? A spinning drive produces a faint whine and clicking noise. If your drive does not spin, check that the power connector and interface cable are securely attached.
2. Does the computer recognize the drive? Verify that the drive is enabled in the system CMOS or setup program. If not, select the autodetect option and enable it. If your drive has a problem, it may not be recognized by the system. If the operating system does not recognize the drive, you need to load your host adapter drivers.
3. Does FDISK detect the drive? Run the FDISK program located on your Windows startup diskette. Type fdisk/status to verify that your hard drive is present and recognized by the system.
4. I'm running Windows 98 and FDISK is not reporting the full capacity of my drive. Why? You need to upgrade your version of FDISK if you are using the diskettes or CD that came with your original Windows 95 or 98 operating system. Microsoft provides a free downloadable FDISK upgrade. See Microsoft Knowledgebase article number 263044 located at http://support.microsoft.com.
5. Does Scandisk find the drive defect-free? Scandisk is a utility located on your Windows startup diskette that scans the drive for defects. If defects are detected, this may be an indication of a problem.
6. Why does my computer hang on startup? Verify that your system is Serial ATA compatible. You need either a Serial ATA 1.0 - compatible motherboard connector or Serial ATA host adapter to use this drive.
Monday, November 23, 2009
Windows XP Task Manager
The Windows XP Task Manager is a very handy system utility that lists the applications and processes that are running. It shows system resource usage, various performance statistics and network information. With it, you can close hung programs and manage CPU and memory hogs.
Those who have previously used Windows 98/Me are probably familiar with the "3-finger salute". This is the keyboard combinationCtrl+Alt+Delete that was used to bring up the "Close Program" dialog box. As the name implies, its only function was to close programs that got hung up, or sometimes to close Windows itself when a program crash locked up the system. In Windows XP, a much more versatile utility called the Task Manager is available.
Opening Windows XP Task Manager
Task Manager can be opened with the old "3-finger salute" on XP systems that are not joined to a domain and that use the Welcome Screen for logging on. Otherwise, Ctrl+Alt+Delete opens the Windows Security dialog box, which contains a Task Manager button. A different shortcut, Ctrl+Shift+Esc can be used in all cases. Task Manager can also be opened by going to Start-Run and type taskmgr . Yet another route is to right-click on an empty spot in the Taskbar and then choose "Task Manager" from the context menu.
How to create a shortcut to Task manager
Note that Task manager is not normally available from the programs list in the Start menu although you can create a shortcut there if you wish. One way to create a shortcut is to use Windows Explorer to find the file
\Windows\system32\taskmgr.exe
Right-click on the file and choose "Send To- Desktop (Create Shortcut)". (Figure below)
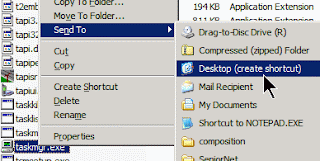
If you like shortcuts on the Desktop, you can leave it there. Otherwise, move it to the folder of your choice in \Documents and Settings\{User Name}\Start Menu. If it is to be available to all users, move it to a folder in \Documents and Settings\All Users\Start Menu\ . Note that Administrator rights are required to use some functions of Program Manager.
Using Task Manager
When Task Manager is first opened the dialog box shown below appears. It has four tabs. (There is also a Users tab if you are using Fast User Switching but I prefer to turn this off.) The default tab "Applications" is a list of the applications that are running in the foreground. These are programs that you can see on the desktop or on the taskbar and that are not running hidden in the background.
All the tab windows have information at the bottom showing the number of processes that are running, how much the CPU is being used, and how much memory resources are committed. The Applications window also has a button "New Task" in the lower right corner that is discussed below
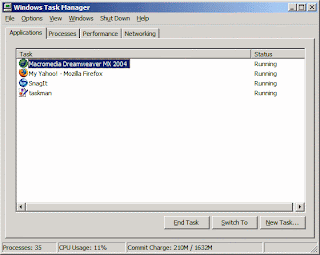
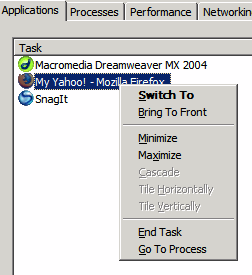
A common use for Task Manager is to end a program that has become frozen or hung. Select an application and click the button "End Task". Another way is to right-click on a program entry, which brings up the context menu shown below. It includes an entry "End Task". There is also an entry "Go to Process" that will take you to the actual process that is running a selected program. A new window will open listing all the processes.
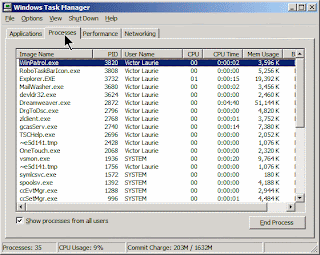
The dialog box for processes will also open when the tab "Processes" is selected as is shown in the next figure. A much larger group appears that includes many background services. Here you can see how much memory and CPU time each process is taking. This information can be enlightening and can help you decide if something is causing your computer to slow down. Processes can be ended either by a right-click menu or the button "End Process" that is in the lower right corner of the dialog box.
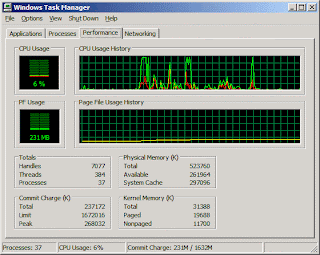
CPU and memory usage can vary over a substantial range. The "Performance" tab allows graphs of usage to be seen. An example is shown in the next figure. This can be useful in tracking down resource hogs.
How to Unfreeze a Hung Computer
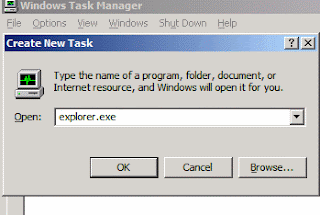
Task Manager has the very useful capability to open a new program. It is the equivalent of having Start-Run available and is obtained by clicking the button "New Task..." on the Applications tab window that is mentioned above. The resulting interface is shown in the figure below.This feature may seem redundant but it can come in very handy if a crash or badly written program freezes Windows Explorer, thus making the Desktop inoperable. Usually, Task Manager will still be functional and, even with no Desktop, programs can still be opened. In particular, the Desktop can be restored. First go to the "Processes" tab and find the entry for "Explorer.exe". Highlight the entry and click the "End Process" button. It may not respond immediately since there is usually a 20-second wait for hung processes to clean themselves up. Close any other hung processes. (They will show a status "Not responding".) Once Explorer.exe has been unloaded, the Desktop will disappear but, never fear, it is easily restored. Click the "Applications" tab and then the "New Task" button. As shown below, enter "explorer.exe" (no quotes) click "OK". The Desktop will reappear.
Opening Windows XP Task Manager
Task Manager can be opened with the old "3-finger salute" on XP systems that are not joined to a domain and that use the Welcome Screen for logging on. Otherwise, Ctrl+Alt+Delete opens the Windows Security dialog box, which contains a Task Manager button. A different shortcut, Ctrl+Shift+Esc can be used in all cases. Task Manager can also be opened by going to Start-Run and type taskmgr . Yet another route is to right-click on an empty spot in the Taskbar and then choose "Task Manager" from the context menu.
How to create a shortcut to Task manager
Note that Task manager is not normally available from the programs list in the Start menu although you can create a shortcut there if you wish. One way to create a shortcut is to use Windows Explorer to find the file
\Windows\system32\taskmgr.exe
Right-click on the file and choose "Send To- Desktop (Create Shortcut)". (Figure below)

If you like shortcuts on the Desktop, you can leave it there. Otherwise, move it to the folder of your choice in \Documents and Settings\{User Name}\Start Menu. If it is to be available to all users, move it to a folder in \Documents and Settings\All Users\Start Menu\ . Note that Administrator rights are required to use some functions of Program Manager.
Using Task Manager
When Task Manager is first opened the dialog box shown below appears. It has four tabs. (There is also a Users tab if you are using Fast User Switching but I prefer to turn this off.) The default tab "Applications" is a list of the applications that are running in the foreground. These are programs that you can see on the desktop or on the taskbar and that are not running hidden in the background.
All the tab windows have information at the bottom showing the number of processes that are running, how much the CPU is being used, and how much memory resources are committed. The Applications window also has a button "New Task" in the lower right corner that is discussed below

A common use for Task Manager is to end a program that has become frozen or hung. Select an application and click the button "End Task". Another way is to right-click on a program entry, which brings up the context menu shown below. It includes an entry "End Task". There is also an entry "Go to Process" that will take you to the actual process that is running a selected program. A new window will open listing all the processes.

The dialog box for processes will also open when the tab "Processes" is selected as is shown in the next figure. A much larger group appears that includes many background services. Here you can see how much memory and CPU time each process is taking. This information can be enlightening and can help you decide if something is causing your computer to slow down. Processes can be ended either by a right-click menu or the button "End Process" that is in the lower right corner of the dialog box.

CPU and memory usage can vary over a substantial range. The "Performance" tab allows graphs of usage to be seen. An example is shown in the next figure. This can be useful in tracking down resource hogs.

How to Unfreeze a Hung Computer
Task Manager has the very useful capability to open a new program. It is the equivalent of having Start-Run available and is obtained by clicking the button "New Task..." on the Applications tab window that is mentioned above. The resulting interface is shown in the figure below.This feature may seem redundant but it can come in very handy if a crash or badly written program freezes Windows Explorer, thus making the Desktop inoperable. Usually, Task Manager will still be functional and, even with no Desktop, programs can still be opened. In particular, the Desktop can be restored. First go to the "Processes" tab and find the entry for "Explorer.exe". Highlight the entry and click the "End Process" button. It may not respond immediately since there is usually a 20-second wait for hung processes to clean themselves up. Close any other hung processes. (They will show a status "Not responding".) Once Explorer.exe has been unloaded, the Desktop will disappear but, never fear, it is easily restored. Click the "Applications" tab and then the "New Task" button. As shown below, enter "explorer.exe" (no quotes) click "OK". The Desktop will reappear.

Subscribe to:
Posts (Atom)