Tuesday, May 26, 2020
Thursday, May 21, 2020
Wednesday, May 20, 2020
Tuesday, May 19, 2020
Monday, May 18, 2020
Sunday, May 17, 2020
Where is my Microsoft Teams Meeting Add-in for Outlook?
You’ve installed the Teams desktop app and you’re ready to start
scheduling Teams meetings in Outlook. One problem…there is no option to
make it a Teams Meeting. Well you’re not alone, because
apparently this has been an issue among many Teams users. As luck would
have it, there are quick fixes if you run into this issue.
Here are some of the steps you should take to troubleshoot:
Option 1: Install the Teams desktop application as an Administrator of the Windows computer.
Here are some of the steps you should take to troubleshoot:
Option 1: Install the Teams desktop application as an Administrator of the Windows computer.
- One of the requirements to successfully install the Teams add-in is that you have administrator permissions on that computer. This is due to the COM Add-ins (seen below) in Outlook write to a specific Windows registry. If you’re not an administrator of that computer you must have someone with the correct permissions install the Teams application. Once that is complete you should be able to open Outlook and see the add-in.
- When starting Outlook, do not run it with elevated permissions. This can often interfere with identifying the COM Add-ins that were mentioned above.
Option 3: 1) Download Teams –> 2) Install Teams –> 3) Sign into Teams –> 4) Restart Teams –> Restart Outlook – IN THAT ORDER


- In order to ensure that the add-in was installed successfully, this may require you to restart your Teams application as well as Outlook. Follow the steps above to see if this does the trick.
- In Outlook, click FILE and then OPTIONS
- Select the ADD-INS tab of the Outlook Options box.
- Confirm that “MICROSOFT TEAMS MEETING ADD-IN FOR MICROSOFT OFFICE” is listed in the “ACTIVE APPLICATION ADD-INS”
- If not, look in the “DISABLED APPLICATION ADD-INS” list. If it is in this list, select the “COM ADD-INS” in the MANAGE drop down and select GO.
- Make sure “Microsoft Teams Meeting Add-in for Microsoft Office” is checked and select OK.
- Restart Outlook and you should see the Teams Meeting option available when you go to schedule a meeting in Outlook.
BEFORE
AFTER
Get an Office Add-in for Outlook
Microsoft
has partnered with leading companies to build programs that help you
get things done right from your inbox. These programs are called Office Add-ins in Outlook 2016 and Outlook 2019, and Apps for Office in Outlook 2013, and help you speed up the way you access information on the web.
For
example, the Bing Maps add-in becomes available in an email that
contains an address, and you can use it to check the online map for that
location right from your email.
Some add-ins are installed by your email administrator, but you can install other ones from the Office Store.
Select a tab below for instructions for your version of Outlook.
Install an add-in from the Office Store
-
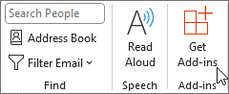
In Outlook, click Home > Get Add-ins on the ribbon.
-
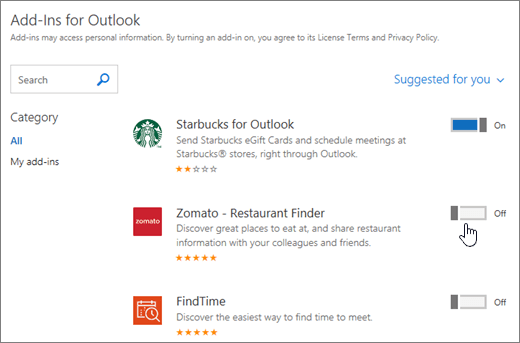
On the Add-Ins for Outlook page, browse for the add-in you want by selecting All and scrolling through the list, or search for an add-in by using the Search box. When you find an add-in you want, review its privacy policy.For free add-ins, use the toggle controls to turn them on or off. For paid add-ins and free trials, select Get it to finish your purchase.
-
-
When the add-in is installed, go to File > Manage Add-ins or Manage Apps to make sure it's turned on. When you’re prompted to sign in, type the email address and password you use to sign in to Office programs.Note: If you don’t see the Manage add-ins (or Manage Apps) button, you won’t be able to get add-ins for Outlook. To get them, you’ll need Office 2013 or Office 2016 and Exchange 2013 or Exchange 2016, and your administrator needs to activate add-ins for Outlook.
Use an add-in for Outlook
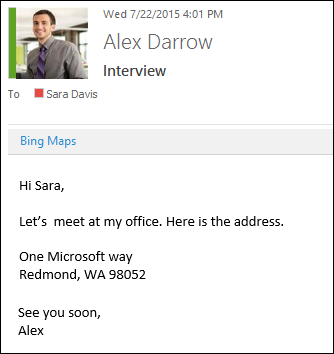
The add-ins that you have installed automatically appear in the gray add-in bar near the top of the message when there is data in the email that is related to the add-in.For example, when you open an email message that has a street address, you'll see that the add-in's name, Bing Maps, is displayed in the add-in bar.
Choose the add-in to access the data it offers.
When you're writing a new email message (Home > New Email), you can access other installed add-ins from the Message ribbon.

When you're in the main Outlook window (without a new message open), you can access your installed add-ins from the ribbon.
Note: If the Reading Pane (View > Reading Pane) is set to Off, all add-ins will appear disabled.
Manage your add-ins
In Outlook, go to File > Manage Add-ins or Manage Apps. When you’re prompted to sign in, type the email address and password you use to sign in to Office programs.
On the Manage add-ins page, you can do the following:
-
Select Find more add-ins for Outlook at the Office Store to go to the Office Store.
-
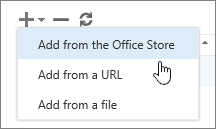
Use the options on the toolbar to add more add-ins,
uninstall an add-in, or refresh the page to see a list of the latest
add-ins.
-
Turn on or turn off an add-in by checking or clearing its check box in the Turned on column.
-
Select an add-in to see more information about it on the right side of the page.
Tip: You can also use Outlook Web App to manage your add-ins. On the top right corner of the page, choose Settings
 > Manage integrations.
> Manage integrations.Monday, May 11, 2020
How to find and remove stale users and computers in Active Directory
Using Command-Line-Interface
Finding inactive accounts, and disabling or deleting them can be performed using the command prompt, by using the following command line tools:
• Dsquery
The dsquery command line tool searches for AD objects according to the specified criteria. One can use this to find out inactive users and computers in the active directory. The search results can be given as input to dsmod and dsrm command lines for disabling and deleting.
The general syntax of dsquery command line is :
dsquery computer [-inactive
or
dsquery user [-inactive
• ‘Dsmod’ and ‘dsrm’
The dsmod command line modifies the attributes of the specified AD objects. It can be used to disable the queried AD computers and users. The dsrm command line deletes the specified AD objects. It can be used to delete the queried AD computers and users.
Note: One must have installed Active Directory Domain Services (AD DS) server role.
5 Steps total
Step 1: Open Command Prompt

Open Start menu, right-click the Command Prompt, and click Run as administrator.
Step 2: Find computers/users that are inactive

To find the computers/users that are inactive for seven weeks, run:
dsquery computer -inactive 7 -limit 200
or
dsquery user -inactive 1 -limit 200
dsquery computer -inactive 7 -limit 200
or
dsquery user -inactive 1 -limit 200
Step 3: Disable inactive computers/users

To disable the inactive computers/users, run:
dsquery computer -inactive 7 | dsmod computer –disabled yes
or
dsquery user -inactive 7 | dsmod user –disabled yes
dsquery computer -inactive 7 | dsmod computer –disabled yes
or
dsquery user -inactive 7 | dsmod user –disabled yes
Step 4: Find disabled computers/users and delete them

To find the disabled computers/users and to delete them, run:
dsquery computer –disabled | dsrm -noprompt
or
dsquery user -disabled | dsrm -noprompt
Note: while using -noprompt, no confirmation will be requested before deletion.
dsquery computer –disabled | dsrm -noprompt
or
dsquery user -disabled | dsrm -noprompt
Note: while using -noprompt, no confirmation will be requested before deletion.
Step 5: Delete Inactive Users/Computer account

Instead of disabling the inactive computers/users first, one can directly delete them by running :
dsquery computer -inactive 7 | dsrm -noprompt
or
dsquery user -inactive 7 | dsrm -noprompt
dsquery computer -inactive 7 | dsrm -noprompt
or
dsquery user -inactive 7 | dsrm -noprompt
With a few simple command line tools, administrators can find inactive computer as well as user accounts of the Active Directory. Such accounts can be disabled and deleted as per the organizational policy; they can be deleted directly too.
--------------------------------------------------------------------------------------------
Using Powershell
PowerShell is one of the many tools that can help you find inactive computers in your Active Directory. Using PowerShell, you can get inactive computers and export them to a CSV file; you can even schedule a script to run regularly to report on stale computers.
5 Steps
Step 1: Open the PowerShell ISE
Open the PowerShell ISE → Run the following script, adjusting the value of the $DaysInactive variable to suit your needs:
Step 2: Script Code
$DaysInactive = 90
$time = (Get-Date).Adddays(-($DaysInactive))
Get-ADComputer -Filter {LastLogonTimeStamp -lt $time} -ResultPageSize 2000 -resultSetSize $null -Properties Name, OperatingSystem, SamAccountName, DistinguishedName
$time = (Get-Date).Adddays(-($DaysInactive))
Get-ADComputer -Filter {LastLogonTimeStamp -lt $time} -ResultPageSize 2000 -resultSetSize $null -Properties Name, OperatingSystem, SamAccountName, DistinguishedName
Step 3: Export to CSV
To export the output to a CSV file, add the Export-CSV PowerShell cmdlet, as shown below:
Step 4: Script Code
Get-ADComputer -Filter {LastLogonTimeStamp -lt $time}
-ResultPageSize 2000 -resultSetSize $null -Properties Name,
OperatingSystem, SamAccountName, DistinguishedName | Export-CSV
“C:\Temp\StaleComps.CSV” –NoTypeInformation
Step 5: Review the results

Open the file produced by the script in MS Excel.
Sunday, May 10, 2020
Thursday, May 7, 2020
Wednesday, May 6, 2020
Monday, May 4, 2020
Sunday, May 3, 2020
How to Increase the Number of Jump List Items in Windows 10
By default, Windows 10 shows around 12 recent items in the jump list. To increase that number, you just need to make an adjustment to one setting in the Windows Registry.
In previous versions of Windows, you could change the number of recent items shown in jump lists with a simple option in taskbar properties. For whatever reason, Microsoft removed this ability in Windows 10. With a minor Registry hack, though, you can still bump that number up.
Increase the Jump List Limit by Editing the Registry Manually
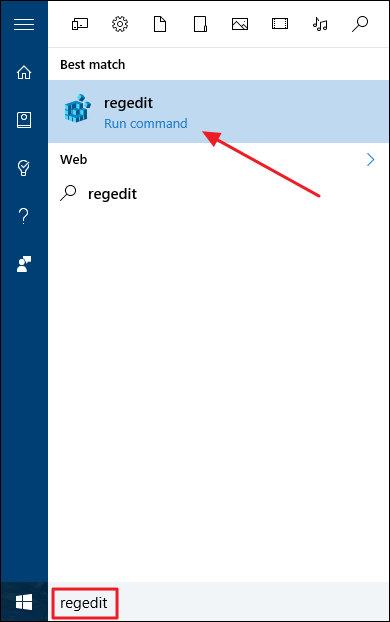
Open the Registry Editor by hitting Start and typing “regedit.” Press Enter to open Registry Editor and give it permission to make changes to your PC.
In the Registry Editor, use the left sidebar to navigate to the following key:
HKEY_CURRENT_USER\SOFTWARE\Microsoft\Windows\CurrentVersion\Explorer\Advanced

Next, you’re going to create and name a new value inside the
Advanced key. Right-click the Advanced folder and choose New > DWORD (32-bit) Value. Name the new value JumpListItems_Maximum and then double-click the value to open its properties window.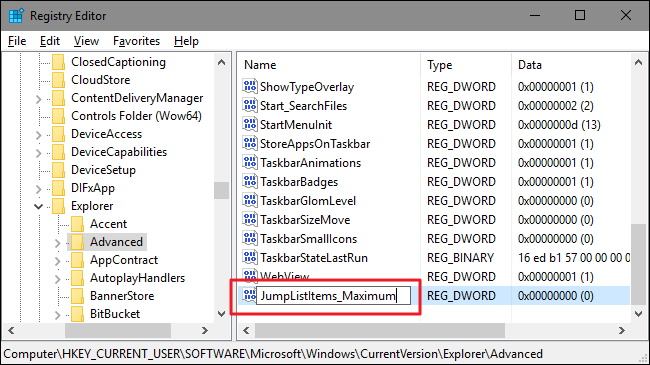
In the value’s properties window, select “Decimal” under Base and then enter the number of recent items you want your jumplists to show in the “Value data” box. We’ve found that 15-20 is a pretty good number that still lets the whole jump list show on most displays. You can go higher if you want; you just might end up needing to scroll your jump lists a bit. When you’re done, click OK.

You can now exit Registry Editor. You don’t need to restart Windows or anything. The change takes place immediately, so just open a jump list to make sure it worked. In our example, we boosted the number to 20 and you can see that many more entries are now shown.

If you ever want to reset the default number of items shown, just return to the
Advanced key and set the JumpListItems_Maximum value to 0.Friday, May 1, 2020
PEiD
Description
- PEiD detects most common packers, cryptors and compilers for PE files.
- It can currently detect more than 470 different signatures in PE files.
- It seems that the official website (www.peid.info) has been discontinued. Hence, the tool is no longer available from the official website but it still hosted on other sites.
Installation
PEiD
- Go to http://www.softpedia.com/get/Programming/Packers-Crypters-Protectors/PEiD-updated.shtml
- Download PEiD-0.95-20081103.zip.
- Uncompress the archive. You should have a similar tree:
.
├── external.txt
├── PEiD.exe
├── plugins
│   ├── GenOEP.dll
│   ├── ImpREC.dll
│   ├── kanal.dll
│   ├── kanal.htm
│   └── ZDRx.dll
├── pluginsdk
│   ├── C++
│   │   ├── defs.h
│   │   └── null.c
│   ├── Delphi
│   │   └── Sample.dpr
│   ├── MASM
│   │   ├── compile.bat
│   │   ├── masm_plugin.asm
│   │   └── masm_plugin.def
│   ├── PowerBASIC
│   │   └── PEiD_Plugin.bas
│   └── readme.txt
├── readme.txt
└── userdb.txt
Signatures
Update your signatures (initial file is empty). Replace the initial userdb.txt file with one of these files:- http://handlers.sans.org/jclausing/userdb.txt
- http://reverse-engineering-scripts.googlecode.com/files/UserDB.TXT
- http://research.pandasecurity.com/blogs/images/userdb.txt
Interface
Main interface

Section Viewer

PE disassembler

PE details

Extra information

Menu
Screenshot

Generic OEP Finder
In some cases, PEiD can find the Original Entry Point (OEP) of a packed executable:
Krypto Analyzer

InstallRite lets you install software on one PC, generate an application
image file, and clone the application to additional PCs. InstallRite
speeds up the process of installing new or upgraded software on multiple
machines. InstallRite recreates the installation, along with any
configuration changes, system settings, user settings, and preferences.
The cloned image files (or 'InstallKits') can be installed from any
media, such as a hard drive, network server, CD-ROM, or the Web.
InstallRite also includes all of the features of InstallWatch, a utility
that accurately documents changes made to your PC when you
install/remove software or hardware, or make configuration changes.
BinText is a tiny and portable piece of software
developed for programmers who want to extract text from various file
types and locate ASCII code, Unicode and Resource strings.
Since installation is not required, you can simply drop the executable file anywhere on the hard drive and run it.
Stud_PE The Portable Executables Viewer/Editor can view/edit PE basic Header information (DOS also).
Subscribe to:
Posts (Atom)