Wednesday, February 17, 2021

Recovery options in Windows 10

 If you're having problems with your PC, the following table can help you decide which recovery option to use.  

Problem

See this section

Your PC isn't working well and you recently installed an update.

Remove an installed Windows update

Your PC isn’t working well and it’s been a while since you installed an app, driver, or update.

Reset your PC

Your PC won't start, you haven't created a recovery drive, and resetting your PC didn't work.

Use installation media to reinstall Windows 10

Your PC won't start and you haven't created a recovery drive.

Use installation media to restore your PC

Your PC won't start and you've created a recovery drive.

Use a recovery drive to restore or recover your PC

You want to reinstall your previous operating system.

Go back to your previous version of Windows

Your PC isn't working well and you recently installed an app.

Restore from a system restore point


Click one of the recovery options below and follow the steps to try to get things working again.

Remove an installed Windows update

If you've recently installed a Windows update, uninstall the update to try to resolve the issue.

  1. Select the Start  button, then select Settings  Update & Security   Windows Update  > View your update history > Uninstall updates.
    View update history settings

  2. Right-click the update you want to remove, and then select Uninstall.

Reset your PC

Important: If you’ve encrypted your device, you’ll need your BitLocker key to reset your PC If you don’t know your BitLocker key, see Find my BitLocker recovery key.

Resetting reinstalls Windows 10, but lets you choose whether to keep your files or remove them, and then reinstalls Windows. You can reset your PC from Settings, the sign-in screen, or by using a recovery drive or installation media.

Reset your PC from Settings

  1. Select the Start  button, then select Settings  > Update & Security   > Recovery .
    Open Recovery settings

  2. Under Reset this PC, select Get started and then choose from the options and/or settings in the table below.

Option

What it does

Keep my files > Change settings > Preinstalled apps On

  • Reinstalls Windows 10 and keeps your personal files.

  • Removes apps and drivers you installed.

  • Removes changes you made to settings.

  • Restores any apps your PC manufacturer installed if your PC came with Windows 10.

Keep my files > Change settings > Preinstalled apps Off

  • Reinstalls Windows 10 and keeps your personal files.

  • Removes apps and drivers you installed.

  • Removes changes you made to settings.

  • Removes any apps your PC manufacturer installed.

Remove everything

  • Reinstalls Windows 10 and removes your personal files.

  • Removes apps and drivers you installed.

  • Removes changes you made to settings.

  • Removes any apps your PC manufacturer installed. (If your PC came with Windows 10, apps from your PC manufacturer will be reinstalled.)

Note: Remove everything > Change settings gives you two options.

Data erasure On removes files and cleans the drive. If you're planning to donate, recycle, or sell your PC, use this option. This might take an hour or two, but it makes it harder for other people to recover files you've removed.

Data erasure Off just removes files. It takes less time, but is less secure.

Reset your PC from the sign-in screen

If you can't open Settings, you can reset your PC from the sign-in screen. Here’s how:

  1. Press Windows logo key + L to get to the sign-in screen, and then restart your PC by pressing the Shift key while you select the Power  button > Restart in the lower-right corner of the screen.

  2. Your PC will restart in the Windows Recovery Environment (WinRE) environment.

  3. On the Choose an option screen, select Troubleshoot > Reset this PC, and then choose one of the options in the previous table.
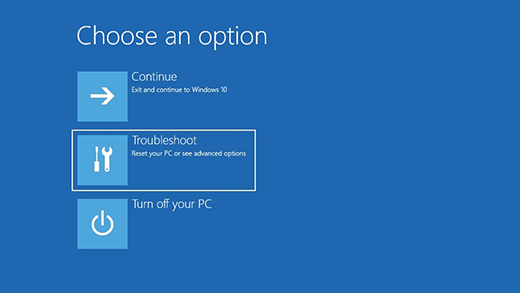
    Choose an option screen in the Windows Recovery Environment.

Use installation media to reinstall Windows 10

Connect the installation media you created to your PC and reinstall Windows 10. 

  1. Open File Explorer  and select the drive with the installation media.

  2. From the root directory of the drive, double-click setup.exe, and then select Yes when asked if you’d like to allow the app to make changes to your device.

  3. Select Change what to keep.

  4. Select one of the following options, and then select Next:

    • Keep personal files and apps – This will preserve your personal data, apps, and settings.

    • Keep personal files only – This will preserve your personal data and settings, but all your apps will be removed.

    • Keep nothing – This will remove all personal data, settings, and apps.

    Warning: You cannot undo a reinstallation of Windows 10. Be sure to back up your files first if you choose the Keep nothing option. 

  5. To finish, select Install to start reinstalling Windows 10 on your PC.

Your PC will restart several times during the resinstallation.

Use installation media to restore your PC

Important: If you’ve encrypted your device, you’ll need your BitLocker key to use a recovery drive to restore or reset your PC If you don’t know your BitLocker key, see Find my BitLocker recovery key.

If your PC won't start and you haven't created a recovery drive, download installation media and use it to restore from a system restore point or reset your PC.

  1. On a working PC, go to the Microsoft software download website.

  2. Download the Windows 10 media creation tool and then run it.

  3. Select Create installation media for another PC.

  4. Choose a language, edition, and architecture (64-bit or 32-bit).

  5. Follow the steps to create installation media, and then select Finish.

  6. Connect the installation media you created to your nonfunctional PC, and then turn it on.

  7. On the initial setup screen, enter your language and other preferences, and then select Next. If you don't see the setup screen, your PC might not be set up to boot from a drive. Check your PC manufacturer's website for info on how to change your PC's boot order, and then try again.

  8. Select Repair your computer.

  9. On the Choose an option screen, select Troubleshoot. From there, you can:

    • Restore from a system restore point by selecting Advanced options > System Restore. This will remove recently installed apps, drivers, and updates that might be causing your PC problems. Restoring from a restore point won’t affect your personal files.

Use a recovery drive to restore or recover your PC

Important: If you’ve encrypted your device, you’ll need your BitLocker key to use a recovery drive to restore or reset your PC If you don’t know your BitLocker key, see Find my BitLocker recovery key.

If your PC won’t start, you can use a recovery drive to restore from a system restore point or recover your PC. For info on how to create a recovery drive on a working PC, see Create a recovery drive.

Note: If you are using a Surface, see Creating and using a USB recovery drive for Surface to download and create a USB recovery image specifically for your Surface device.

To restore or recover using the recovery drive: 

  1. Connect the recovery drive and turn on your PC.

  2. Press Windows logo key + L to get to the sign-in screen, and then restart your PC by pressing the Shift key while you select the Power  button> Restart in the lower-right corner of the screen.

  3. Your PC will restart in the Windows Recovery Environment (WinRE) environment.

  4. On the Choose an option screen, select Troubleshoot, and then select one of the following two options. (If you don’t see the Choose your option screen, your PC might not be set up to boot from a drive. Check your PC manufacturer’s website for info on how to change your PC’s boot order.)

Choose an option screen in the Windows Recovery Environment.

  • To restore from a system restore point, select Advanced Options > System Restore. This won't affect your personal files, but it will remove recently installed apps, drivers, and updates that might be causing your PC problems.

  • To reinstall Windows 10, select Advanced OptionsRecover from a drive. This will remove your personal files, apps and drivers you installed, and changes you made to settings.

Go back to your previous version of Windows

For a limited time after upgrading to Windows 10, you’ll be able to go back to your previous version of Windows by selecting the Start  button, then select Settings  > Update & Security  > Recovery and then selecting Get started under Go back to the previous version of Windows 10. This will keep your personal files, but it'll remove apps and drivers installed after the upgrade, as well as any changes you made to settings. In most cases, you'll have 10 days to go back. 
Open Recovery settings

To go back, you'll need to:

  • Keep everything in the windows.old and $windows.~bt folders after the upgrade.

  • Remove any user accounts you added after the upgrade.

  • Know the password you used to sign in to Windows 7 or Windows 8.1 (if you used one).

  • Have the USB drive you used to upgrade to Windows 10 (if you used one).

Note: If you go back to Windows 8.1, some apps that came with Windows, like Mail and People, might not work anymore. To fix the apps, reinstall them from the Microsoft Store.

Note: The option in Settings to go back to your previous version of Windows is only available for a limited time after upgrading.

Info for Windows Insiders

If you’re an Insider and the current preview build isn’t working for you, select the Start  button, then select Settings  > Update & Security  > Recovery . Under Go back to the previous version of Windows 10, select Get Started. This won’t remove your personal files, but it’ll remove recently installed apps and drivers, and change settings back to their defaults.

Going back to an earlier build won’t remove you from the Insider Program. When the next preview build is ready, it'll be installed on your PC.

Restore from a system restore point

This option takes your PC back to an earlier point in time, called a system restore point. Restore points are generated when you install a new app or driver, and when you create a restore point manually. Restoring won’t affect your personal files, but it will remove apps, drivers, and updates installed after the restore point was made.

  1. In the search box on the taskbar, type control panel,andthen choose it from the list of results

  2. In the Control Panel search box, type recovery.

  3. Select Recovery > Open System Restore.

  4. In the Restore system files and setting box, select Next.

  5. Select the restore point that you want to use in the list of results, and then select Scan for affected programs.

    Notes: 

    • If you don’t see the restore point that you want to use, select the Show more restore points check box to see more restore points.

    • If you’re not seeing any restore points, it might be because system protection isn’t turned on. Here’s how to check:

      1. In the search box on the taskbar, type control panel,andthen choose it from the list of results.

      2. In the Control Panel search box, type recovery.

      3. Select Recovery > Configure System Restore > Configure and see if the Turn on system protection option is selected.

        • If the Turn on system protection option is not selected, system protection isn’t turned on and there aren't any restore points. In this scenario, you won't be able to recovery your PC using a system restore point and will need to use one of the other recovery options listed on this page.

        • If the Turn on system protection option is selected, continue with step 6.

  6. You'll see a list of items that will be deleted if you remove this restore point. If you're OK with the deletions, select Close> Next > Finish.

HP PCs - Performing an HP System Recovery (Windows 7)


Types of system recovery

Your computer might have three types of System Recovery available, or it might have only two. Use the recovery type that resolves your issue without making more changes than necessary.
  • System Recovery: This option reformats the system drive (usually C:), reinstalls the original operating system, and reinstalls all the original hardware drivers and software. System Recovery does not impact user created partitions. If there are two hard drives, System Recovery modifies only the drive with the operating system.
      caution:
    If the size of the operating system partition (usually C:) was reduced below a minimum size requirement, other user created partitions are removed and stored data is destroyed.
  • Factory Reset: Factory Reset removes all partitions, reformats the entire hard drive, reinstalls the original operating system, and reinstalls all the original hardware drivers and software. This option also recreates the required Recovery partition (usually D:) and UEFI partition (usually E:) and reinstalls the required software.
    The Factory Reset option returns all of the notebook's software to the condition it was in at the time of purchase. All user changes or additions are removed.
  • Minimized Image Recovery: Available on many of HP's notebook computers, the Minimized Image Recovery removes all partitions, reformats the entire hard drive, reinstalls the original operating system and hardware drivers, and reinstalls HP essential software (such as HP Support Assistant and HP Recovery Manager). Minimized Image Recovery does not reinstall the trial applications and games.

Recovery from the Windows 7 desktop screen

If Windows 7 opens correctly, perform the following steps to start a system recovery from the Windows 7 start menu.
note:
  1. Turn off the computer.
  2. Disconnect all peripheral devices, except for the monitor, keyboard, mouse, and power cord. Remove media from internal drives, and remove any recently added internal hardware.
  3. Turn on the computer.
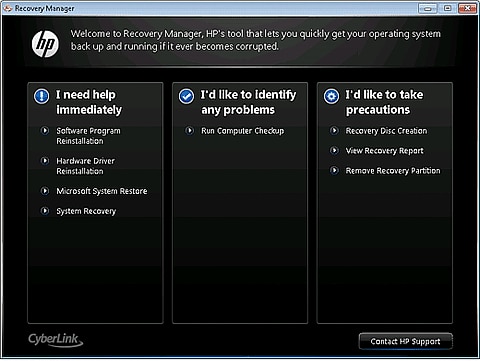
  4. Click Start , click All Programs, click Recovery Manager, and then click Recovery Manager again.
    If you are prompted for an Administrator password or confirmation, type the password or provide confirmation. If a User Account Control window asks if you want to allow the program to make changes to the computer, click Yes.
    Recovery Manager
  5. Under I need help immediately, click System Recovery.
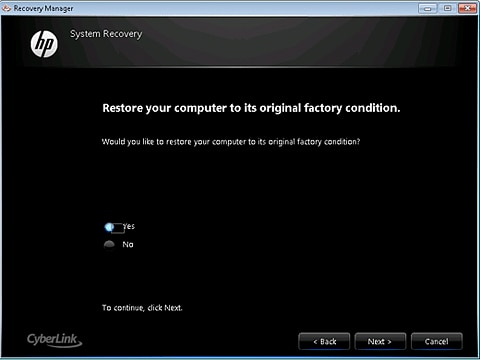
  6. The Recovery Manager asks if you want to restore the computer to its original factory shipped condition. Click Yes, and then click Next.
    Recovery Manager confirmation screen
  7. The computer restarts. If the recovery partition on the hard disk drive is functioning correctly, the Recovery Manager window displays.
    note:
    If the recovery partition on the hard disk drive is not functioning correctly, a set of recovery discs is needed to run a system recovery. Follow the instructions listed in the section Recovery from recovery discs.
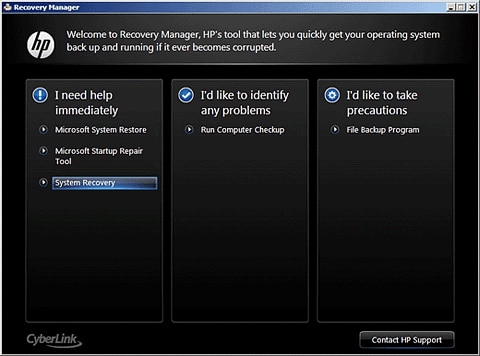
    Recovery Manager after restart
  8. Click System Recovery.
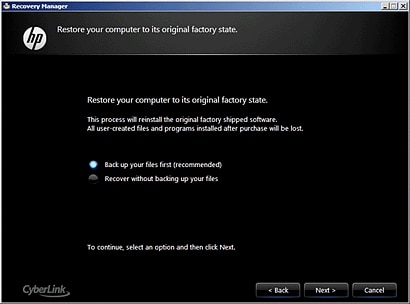
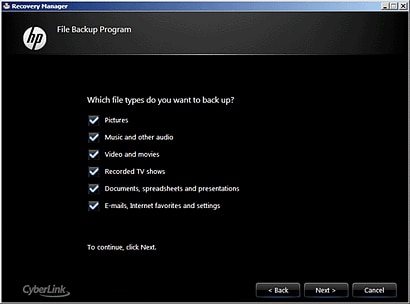
  9. When System Recovery prompts you to back up your files, select a backup option:
    • If you have already backed up personal files or you do not want to back up personal files, select Recover without backing up your files, and then click Next. Continue to the next step.
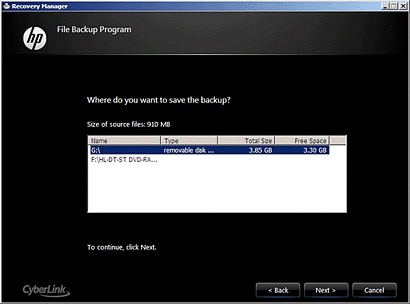
    • If you want to back up your personal files, follow these steps to create a backup.
  1. Click OK in the warning that displays.
  2. After the system recovery is complete, click Finish to restart the computer. Complete the setup screens and wait until the computer finishes the setup.
  3. Once the setup is complete, turn off the computer, reconnect all devices and cables, and then turn on the computer.
  4. Before using the computer, update and protect your computer. Reinstall any virus and security software that was installed before the system recovery.
  5. Reinstall any software programs that were added after purchasing the computer, as well as any files that were backed up.

Recovery from the startup screen (during system boot) OR when unable to boot to login in screen

If Windows 7 does not open correctly, perform the following steps to recover the computer:
note:
If the recovery partition on the hard disk drive is not functioning correctly, this method does not work and an error message displays. If an error message indicates that System Recovery cannot be run from the startup screen, a set of recovery discs is needed to perform a system recovery. Follow the instructions listed in the section Recovery from recovery discs.
  1. Turn off the computer.
  2. Disconnect all peripheral devices, except for the monitor, keyboard, mouse, and power cord. Remove media from internal drives, and remove any recently added internal hardware.
  3. Turn on the computer and repeatedly press the F11 key, about once every second, until Recovery Manager opens.
    Recovery Manager
  4. Under I need help immediately, click System Recovery.
  5. When System Recovery prompts you to back up your files, select a backup option:
    • If you have already backed up personal files or you do not want to back up personal files, select Recover without backing up your files, and then click Next. Continue to the next step.
    • If you want to back up your personal files, follow these steps to create a backup.
  1. Click OK in the warning that displays.
  2. After the system recovery is complete, click Finish to restart the computer. Complete the setup screens and wait until the computer finishes the setup.
  3. Once the setup is complete, turn off the computer, reconnect all devices and cables, and then turn on the computer.
  4. Before using the computer, update and protect your computer. Reinstall any virus and security software that was installed before the system recovery.
  5. Reinstall any software programs that were added after purchasing the computer, as well as any files that were backed up.

Recovery from recovery discs

Perform the following steps to recover the computer using a set of recovery discs (either CDs or DVDs). These discs can be a set that was received from HP Support or discs that you created.
note:
HP does not include recovery discs in the box its personal computers as the recovery software comes on the hard drive. You can obtain recovery discs from HP Support, or use Recovery Manager software to create a set of recovery discs yourself. HP recommends creating a set of recovery discs when you receive your computer and storing them in a safe place. Support Sent Recovery Discs can take as long as 4 to 6 hours to complete system recovery, but recovery discs that you create often take less time to complete system recovery. For more information about creating a set of recovery discs, see Creating Recovery Discs or Saving a Recovery Image to a USB Flash Drive in Windows 7.
  1. Turn on the computer, and then insert the first recovery disc into the drive.
  2. Press and hold the power button to turn off the computer.
  3. Disconnect all peripheral devices, except for the monitor, keyboard, mouse, and power cord. Remove media from internal drives, and then remove any recently added internal hardware.
  4. Turn on the computer.
  5. Immediately press the Escape key repeatedly, about once every second, until a Startup Menu or Select boot device menu opens.
  6. The selections you need to make vary slightly depending on the type of menu that displays on your screen:
    • If a Select Boot Device menu displays, use the up or down arrow key to select the CD/DVD drive, and then press Enter to continue.
    • If a Startup Menu opens, press F9 to open "Boot Menu" or "Boot Device Options". Use the up or down arrow key to select the CD/DVD drive. Then press Enter.
      note:
      More than one CD/DVD drive selection might be available from the list of bootable devices. If so, select one of the CD/DVD selections from the list to see if HP Recovery starts. If recovery does not start or a non-system disk error displays, restart the computer by pressing the power button and then repeat these steps to select another CD/DVD drive. When recovery starts, continue using the steps to complete recovery.
  7. A window might display and prompt you to choose whether to run Recovery Manager from the hard disk or from the disc inserted. If this window displays, select the Run program from disc, and then click Next.
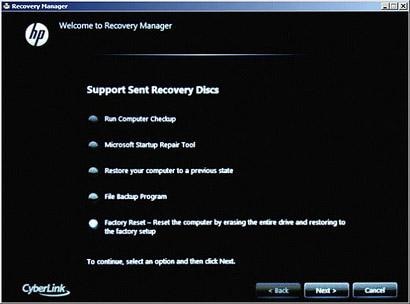
  8. Select an option based on the type of recovery discs you have:
    • Recovery discs created from your computer:
    • Recovery discs received from HP support:
    • Select one of the following selections, depending on which selection is shown on your screen, and then click Next.
      • Factory Reset - Reset the computer by erasing the entire drive and restoring to the factory setup
      • Reset the computer by erasing the entire drive and restoring to the factory setup
      Recovery Manager with HP-sent recovery discs
  • When System Recovery prompts you to back up your files, select a backup option:
    • If you have already backed up personal files or you do not want to back up personal files, select Recover without backing up your files, and then click Next. Continue to the next step.
    • If you want to back up your personal files, follow these steps to create a backup.
    1. Click OK in the warning that displays.
    2. Read and respond to the screens as they display. If a screen prompts for a disc, insert the next disc. In some cases, you might have to repeatedly insert the same disc several times before the screen allows you to continue.
    3. After system recovery is complete, remove the disc. If the tray does not eject the disc, press the eject button on the PC case to eject the disc.
    4. If you are presented with a “Restoration complete” screen, click Finish.
      If you are presented with a “File copy is complete” screen, click Next.
    5. Depending on which model of computer you have, the computer either turns off or restarts. If the computer shuts off, wait 5 seconds and turn on the computer.
      note:
      If you are using Support Sent Recovery discs sent from HP, it can take more than an hour to complete the recovery process. Do not interrupt the recovery process. The recovery process is complete when the Windows Setup screens appear.
    6. Complete Windows setup when the screens appear.
    7. Once Windows setup has been completed, turn off the computer, reconnect all devices and cables, and then turn on the computer.
    8. Before using the computer, update and protect your computer. Reinstall any virus and security software that was installed before the system recovery.
    9. Reinstall any software programs that were added after purchasing the computer, as well as any files that were backed up.

    Boot from USB recovery drive

    Perform the following steps to recover the computer using a USB flash drive.
    note:
    For more information about saving a recovery image to a USB flash drive, see Creating Recovery Discs or Saving a Recovery Image to a USB Flash Drive in Windows 7.
    1. Turn on the computer, and insert the USB flash drive into a USB port.
    2. Turn off the computer by pressing and holding the power button.
    3. Disconnect all peripheral devices, except for the monitor, keyboard, mouse, and power cord. Remove media from internal drives, and remove any recently added internal hardware.
    4. Immediately press the Escape key repeatedly, about once every second, until a Startup or Select Boot Device Menu opens.
    5. The selections you need to make vary slightly depending on the type of menu that displays on your screen:
      • If a "Select Boot Device" menu displays, use the up or down arrow key to select your USB Storage Device, and press Enter to continue.
      • If a "Startup Menu" opens, press F9 to open the "Boot Menu" or "Boot Device Options". Use the up or down arrow key to select the name of your USB Storage Device (the volume label of the drive). Then press Enter to continue.
      Recovery Manager welcome
    6. A window might display and prompt you to choose whether to run Recovery Manager from the hard disk or from the media inserted. If this window displays, select the USB flash drive option, and then click Next.
    7. Click System Recovery under I need help immediately. On the next screen, select Yes to confirm that you want to restore your computer to its original factory condition, and then click Next to continue.
      Restore computer verification
    8. When System Recovery prompts you to back up your files, select a backup option:
      • If you have already backed up personal files or you do not want to back up personal files, select Recover without backing up your files, and then click Next. Continue to the next step.If you want to back up your personal files, follow these steps to create a backup.
      • Do you want to back up your files first?
  • Click Next. A message displays warning you that all devices should be disconnected from the PC. Be sure all devices, except the recovery flash drive, are disconnected, and then click OK.
  • Read and respond to the screens as they appear. After system recovery is complete, a “Restoration complete” screen displays.
  • Remove the USB flash drive from the USB port.
  • Click Finish to restart your computer.
  • Depending on the model of your computer, the computer either turns off or restarts. If the computer turns off, wait 5 seconds, and then turn on the computer.
  • Complete Windows setup when the screens appear.
  • Once Windows setup has been completed, turn off the computer, reconnect all devices and cables, and then turn on the computer.
  • Before using the computer, update and protect your computer. Reinstall any virus and security software that was installed before the system recovery.
  • Reinstall any software programs that were added after purchasing the computer, as well as any files that were backed up.

    Tuesday, February 16, 2021

    Perform a Windows 10 system reset through Windows Recovery Environment in HP


    Perform a Windows 10 system reset through Windows Recovery Environment

    Use reset through Windows Recovery Environment if Windows 10 does not start correctly.

    1. Use one of the following methods to open Windows Recovery Environment:

      • Restart your computer and immediately press the F11 key repeatedly. The Choose an option screen opens.

      • Click Start . While holding down the Shift key, click Power, and then select Restart. Continue holding down the Shift key as the computer restarts, until the Choose an option screen opens.
    2. On the Choose an Option screen, click Troubleshoot.

      Clicking the Troubleshoot button

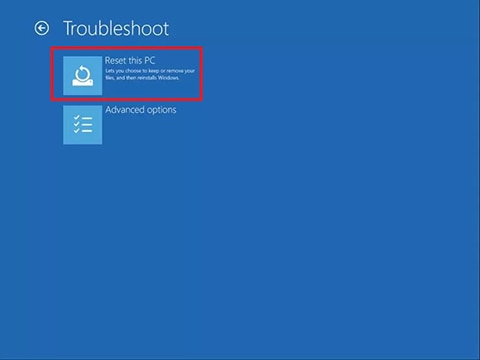
    3. Click Reset this PC.

      Clicking the Reset this PC button

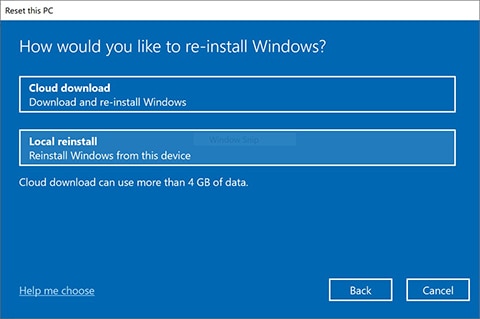
    4. When prompted, select your preferred method of reinstalling Windows.

      CAUTION: HP recommends selecting Local install. If your computer has a virus, select Cloud download to use the latest Windows files released from Microsoft instead of the Windows files on the computer.

      NOTE:

      • A cloud download cannot be performed on computers with storage capacities of 32 GB or less.

      • The cloud download might require more than 4 GB of storage space to download.

      • Installation of the downloaded image might exceed 45 minutes on a premium computer with an NVMe solid-state drive.

      Choosing cloud donwload or local reinstall.

    5. Windows prompts you to select an option for your personal files. Review the following options before you make a selection.

      Keep my files and Remove everything options

      • Keep my files: When you select this option, the computer:

        • Keeps your personal files intact when reinstalling Windows 10.

        • Deletes all apps and drivers you installed.

        • Removes all changes to settings.

        • Deletes all HP apps that came preinstalled on your computer. HP apps are reinstalled if your PC came with Windows 10.

      • Remove everything: When you select this option, the computer:

        • Removes all personal files when reinstalling Windows 10.

        • Deletes all apps and drivers you installed.

        • Removes all changes to settings.

        • Deletes all HP apps that came preinstalled on your computer. HP apps are reinstalled if your PC came with Windows 10.

        NOTE: Select this option if you plan to donate, sell, or recycle your PC.

    6. Choose an option for your personal files.

      • If you want to keep your personal files: Select Keep my files, and then click Reset. Your computer reinstalls the operating system and your computer restarts. You are done.

      • If you want to remove all your personal files, apps, and settings: Select Remove everything, and then continue with these steps.

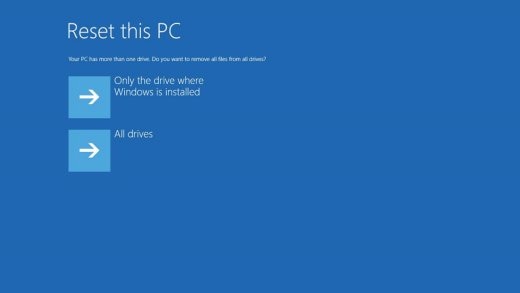
    7. If you only want to remove everything from the drive where Windows is installed, click Only the drive where Windows is installed. If you want to remove all files from the computer, click All drives.

      Remove all files from the drive where Windows is installed or from all drives

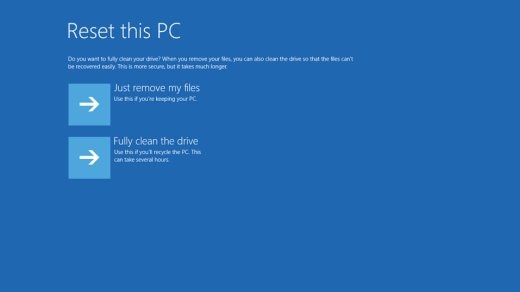
    8. You can fully clean the drive, so that no files are recoverable, or you can delete your files.

      • If you want to delete your files, click Just remove my files.

      • If you want to clean the drive, click Fully clean the drive.

      NOTE: If you plan to donate, sell, or recycle your PC, select the option to fully clean the drive. This can take several hours but makes it harder for another person to recover files you have removed.

      Just remove my files or fully clean the drive options

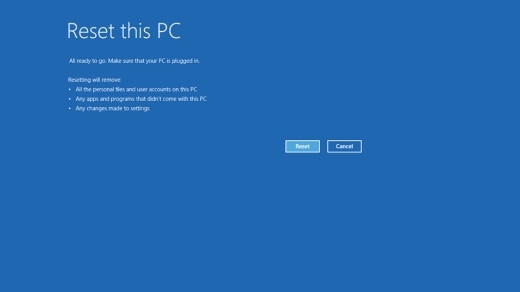
    9. Click Reset.

      Windows reinstalls the operating system and the computer restarts.

      Clicking the Reset button

    Tuesday, February 9, 2021

    How to Share My Outlook Folders (Inbox, Contacts, Calendar etc.)?

     You may want to allow other users on your Exchange hosting account to be able to view or manage your Outlook folders. You can grant access to your Calendar, Contacts, Inbox, and any other folder or subfolder.

    Important: Folder sharing is only available for people within your organization. You can make a calendar available to people outside the organization using "Publish a calendar" feature. 

    Choose what type of access you would like to grant:

    • Partial/selective access to share:
      • Calendar, Contacts, Journal, Notes or Tasks folders with Sharing invitation.
        Known Issues: Option Share may be missing in Outlook 2016 builds after 9330.2078. Microsoft introduced this as a feature so the behavior is treated as expected: https://docs.microsoft.com/en-us/officeupdates/monthly-channel-2018#version-1805-may-23
        Sharing Permissions
        As a workaround you need to go to Calendar > on Home Screen right click Ribbon > choose Customize the Ribbon. The option Share My Calendar is under the Commands Not in the Ribbon list of commands. 
      • Inbox, subfolders and custom top-level folders without Sharing invitation.
    • Complete/full access to share the entire mailbox.
    • Sharing in Outlook Web App.
    • Delegate Permissions in Outlook

    Note: for Exchange 2013/2016 accounts:

    • shared Contacts and Tasks are not visible or usable in OWA;
    • The calendar and mail folders can be shared via OWA;

    Partial/selective access with Sharing invitation

    This procedure allows other users to have limited access to selected folders in your Exchange Mailbox. If you want to grant full access to your mailbox, refer to the Complete/full access section of this article.

    Note: Autodiscover record is required to use this method. If no Autodiscover is set up, refer to the next section. To find out whether Autodiscover it is set up for your domain or not, contact your account administrator. 

    To share to your Calendar, Contacts, Journal, Notes or Tasks folders with Sharing invitation:

    1. In Outlook, highlight the folder you want to share > right-click this folder > Share > Share Calendar/Contacts/Journal/Notes/Tasks. This action will create a sharing invitation with Reviewer level of permissions. Level of permission can be changed later on step 3.
      1
    2. Click To button and choose user from the address book to whom you want to send invitation > click Send. Note: in Calendar invitation you can also choose level of details that will be shared.
      2
    3. If you wish to update permissions to a higher level, highlight the folder > right-click this folder > Share > Calendar/Folder Permissions
      3
    4. In Permissions tab, highlight the user > set the permissions > click OK.
      4

    Once you grant this access, the other party will be able to open your shared resource in their Outlook using Sharing invitation. 

    Important: Outlook 2011 and 2016 Mac users must be granted "Reviewer" access to another person's calendar to be able open that calendar and view details.

    If a user sets permission levels only to allow free/busy or free/busy limited details, an Outlook Mac user will not be able to see any details of the shared calendar.  PC users must grant "full details" to the Outlook Mac user.  Mac users must grant the "Reviewer" role to Outlook Mac users. 

    Basic free/busy time viewing is only viewable via the Outlook Mac Scheduling Assistant feature, or via OWA. (Note: Outlook Mac users who have a "Reviewer" role may also be able to select another users name within the Send As / From drop down menu. Unless you have explicit permissions to Create Items within the selected users mailbox, Exchange will not allow you to send on the behalf of that person).

    Partial/selective access without Sharing invitation

    This procedure allows other users to have limited access to selected folders in your Exchange Mailbox. 

    To grant access to Inbox, subfolders and custom top-level folders without Sharing invitation:

    1. In Outlook, highlight the folder you want to share > right-click this folder > choose Properties.
      5
    2. In the Properties window switch to the Permissions tab > click Add. Check the name of the folder you are going to update (top left corner has the folder name).
    3. In the Add Users window choose Address Book > select user (use search to find) > click Add > click OK.
    4. In Permissions, highlight user > set permissions (choose the level of permissions from the menu or set manually) > click OK
      6
    5. Now make all parent folders visible, otherwise, the other party will not be able to open your shared folder or subfolder. As shown in the screenshot, we will make Inbox and top container visible.
      Note: if you are going to share Inbox or custom top-level folder, remember to make the top container visible. If you are going to share a subfolder in sections other than Inbox (e.g. a subfolder in Calendar, Contacts etc.) then you need to the top level folder (Calendar, Contacts etc.) visible.
      7 Top Containers
    6. To make the top container visible right-click your email address > Folder Permissions > add a user to the list > check the box Folder visible > click OK.
      8
    7. To make a parent folder visible right-click this folder > Properties > Permissions > add user to the list > check the box Folder visible > click OK. Note: a user will not see the content of you Inbox or another folder, however, this permission is necessary for Outlook to expand this parent folder and show the subfolder.
      9

    Once you grant this access, the other party will need to open your shared resource in their Outlook. 

    Grant complete/full access

    This feature availability depends on your plan. This procedure allows almost complete access to a mailbox.
    Note: user with full access will be able to send messages from your mailbox.

    You may complete the steps in either My Services or HostPilot® Control Panel:

    From My Services:

    1. Go to Mailbox Access.
      Note: it may be unavailable in My Services; the account administrator would have to grant access to this feature from the administrative HostPilot. In this case, you need to use HostPilot or contact your account administrator.
    2. Click Select users to delegate access.
      10
    3. In the Address Book window, check the box(es) next to user(s) you wish to grant access to the your mailbox > click Select.
      11
    4. In the Mailbox Access window choose Full Access > click Save Changes.
      12

    From HostPilot Control Panel:

    1. Navigate to Services > Exchange Mailboxes.
    2. Click Action next to the Display Name for the mailbox that is granting permissions to another user or mailbox.
    3. Click Set Access to Mailbox. If the option is not in the list, click the small arrow on the bottom to open full menu.
    4. Type in the email addresses or display names of the users who need to have access to this mailbox and click Check Names. Alternatively, select users from the Address Book.
    5. Choose Full Access option and click Save Changes button.

    Once you grant this access, the other party will need to restart their Outlook. 

    Calendar sharing in Outlook Web App

    OWA 2010:

    1. Right-click the calendar you would like to share.
    2. Choose Share > Share This Calendar...
      13
    3. Specify permission level and choose people to share with.
    4. Click Send.
      14

    OWA 2013/2016/2019:

    1. Right-click the calendar you would like to share.
    2. Choose Share > Sharing permissions
      Sharing permissions
    3. Type in email address to share with.
    4. Specify permission level.
    5. Click Send.
      Share

      Important: for accounts hosted on Exchange 2013/2016 plans, it is possible to share the mail folders via OWA.

      To share the mail folder in OWA:

      1. Right-click the mail folder you would like to share
      2. Chose Permissions... option
      3. Specify permission level and choose people to share with
      4. Click OK

      Delegate Permissions in Outlook

      You may share various types of items via Outlook Delegate Permissions. 

      1. In Outlook 2010/2013/2016/2019 go to File > Account Settings > Delegate Access. In Outlook 2007 go to Tools > Options > Delegates.
        15
      2. Click Add and select user whom you would like to grant access to your mailbox items.
        16
      3. Select Delegate Permissions for each type of mailbox items (Inbox, Calendars, Contacts, Tasks, Notes) > Ok.
        17

      Note: if you share calendar and check the box Delegate receives copies of meeting-related messages sent to me, you delegate would get all your meeting invites in his Inbox.

      Once user is granted access, he would need to open delegated mailbox in is Outlook.