This guide provides a basic overview of the steps to configure the Web Deployment handler on your hosted server and test that a user can deploy applications to a Web site. This setup will be using the information in this document to install the Web Deployment Tool onto a new server and configure recommended settings.
PREREQUISITES
This guide requires the following prerequisites:
- .NET Framework 2.0 SP1 or greater
- Web Deployment Tool 1.0 or 1.1
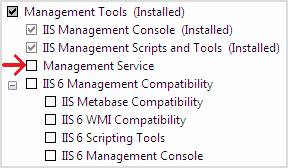
- IIS 7 or above with the Web Management Service (WMSvc) installed
UNDERSTANDING THE WEB DEPLOYMENT HANDLER
The handler is integrated with the Web Management Service (WMSVC) that ships with IIS 7.0 on Windows Server 2008 and IIS 7.5 on Windows 2008 R2.
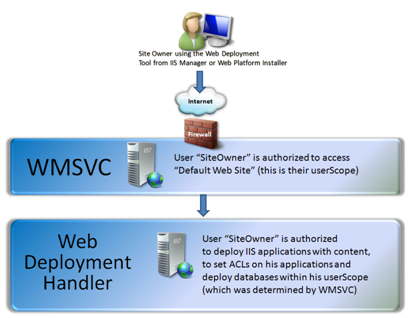
Second, the user must be authorized to connect to his or her Web site by using WMSVC. You can use the IIS Manager Permissions feature in IIS Manager to grant users the right to connect remotely to their Web sites.
Third, a user must also be authorized to perform deployments using the Web Deployment Tool. You can use the theManagement Service Delegation feature in IIS Manager to create delegation rules that allow users to perform deployments to their Web sites and to no others.
The following diagram illustrates how a user is first connected to and authorized by WMSVC, before the deployment request is routed to the handler and authorized against the handler’s own rules. This quick guide will help you setup the necessary rules to allow a user to deploy IIS applications with content, set file permissions and deploy databases.
PART 1 - CONFIGURE WMSVC AND IIS MANAGER PERMISSIONS
- Install IIS and the Web Management Service on your Windows Server 2008 server.
- Configure WMSVC so that remote connections are allowed.
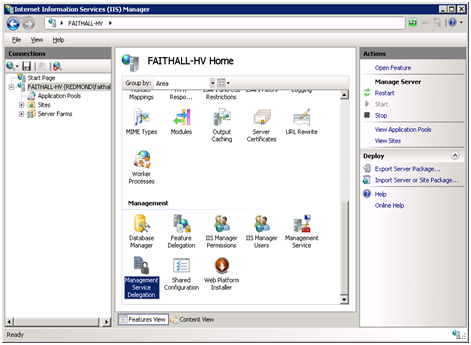
a. Open IIS Manager.
b. Select the Server node.
c. In Features View of the Server, double-click the Management Service icon.
d. Ensure that the Enable remote connections checkbox is selected. If the checkbox is not selected and grayed out, use theActions pane to stop the WMSvc Service. This will let you select the checkbox.
e. On the right-hand Actions pane, click Start. The Enable remote connections checkbox will be selected and grayed out.
- Give the account under which WMSvc is running (for example, Local Service) Full Control permissions to the customer's directory.
- After creating a Web site for the user, allow the user access to his or her Web site.
a. Open IIS Manager.
b. Select the Web site that the user will manage remotely.
c. In Features View, double-click the IIS Manager Permissions icon.
d. On the IIS Manager Permissions page, in the Actions pane, click Allow User.
e. In the Allow User dialog box, select the type of user (Windows or IIS Manager), then click Select to choose the user's account.
f. Click OK to dismiss the Allow User dialog box.
PART 2 – CREATE DELEGATION RULES FOR WEB DEPLOY USERS
- If you have not yet done so, download the Web Deployment tool and install it on the Web server.
- Create delegation rules for the Web Deploy functionality (providers) that you want to allow users to have. To allow a user to deploy applications and content to his or her Web site:
a. Open IIS Manager.
b. Select the Server node.
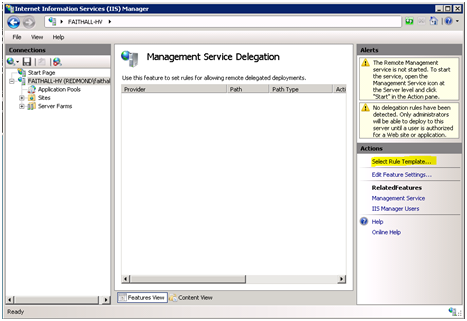
c. In Features View of the Server, double-click the Management Service Delegation icon.
d. In the right-hand Actions pane, click Add Rule…
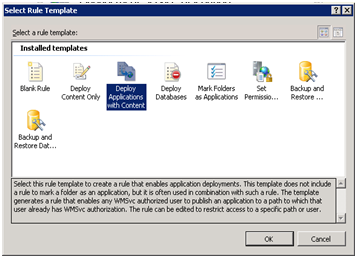
e. Select the Deploy Applications with Content rule template. This template creates a rule that allows any WMSVC authorized user to use the Web Deploy contentPath and iisApp providers to deploy applications to his or her user scope.
f. Click OK to open the template.
g. Click OK to create the rule.
h. In the Add User to Rule dialog box, type an asterisk ( * ). This will allow each user to deploy applications to his or her user scope.
NOTE: If you want to perform admin-only synchronization, go to the Management Service Delegation page. In the Actionspane, click Edit Feature Settings, and then select Allow administrators to bypass rules.
Mark Folders as Applications Rule
- To allow each user to create an application within his or her Web site:
a. Click Add Rule…
b. Select the Mark Folders as Applications rule template. This template allows all WMSVC authorized users to use the Web Deploy createApp provider to create applications within their user scope. The applications will inherit all settings from the parent, including the application pool.
c. Click OK to open the template.
d. In the RunAs section, select SpecificUser for the Identity Type, and the click the Set… button to specify a user account that will perform this operation. In order for this rule to work, the rule must run as a user that has access to write to the applicationHost.config file. It is recommended that you create an account (for example, "CreateAppUser") that is not in the Administrators group and only grant it the minimum required permissions. To do this:
- Create a user account.
- Grant read permission to %windir%\system32\inetsrv\config.
- Grant modify permission to %windir%\system32\inetsrv\config\applicationHost.config.
- In the Add User to Rule dialog box, type an asterisk ( * ). This will allow each user to create applications within his or her Web site.
Deploy Databases Rule
- To allow users to deploy databases to their Web sites:
a. Click Add Rule …
b. Select the Deploy Databases rule template. This template allows any WMSVC authorized users (as set in Part 1) to deploy databases to SQL database servers.
c. Click OK to open the template.
d. Add a path to authorize, such as Server=Server1 to allow anyone to deploy to this server using their SQL credentials, or Server=Server1;Database={userName}_db1 to restrict to specific databases that match their username.
e. Click OK to create the rule.
- In the Add User to Rule dialog box, type an asterisk ( * ). This will allow each user to deploy databases to his or her Web site.
Set Permissions Rule
- To allow each user to deploy applications and content to his or her Web site:
a. Click Select Rule Template… b. Select the Set Permissions rule template. This template allows any WMSVC authorized user to set ACLs on the file system.
c. Click OK to open the template.
d. Click OK to create the rule.
- In the Add User to Rule dialog box, type an asterisk ( * ). This will allow each user to deploy applications and content within his or her Web site.
Optionally, Enable Tracing for WMSvc
PART 3 - TEST THE USER'S CONNECTION TO THE WEB SITE
- Download and install the Web Deployment Tool on a client machine that has IIS Remote Manager installed, or use the local server. It is recommended that you test the local server first to isolate any issues that may be caused by networking, firewall or proxy settings.
- Test connect to the user's Web site by using the credentials you created for the user:
a. Open IIS Manager.
b. Right-click on the Start Page node.
c. Select Connect to a Site… (Note: do not select Connect to a Server)
d. In the Server name text box, enter localhost.
e. In the Site name text box, enter the name of the user's Web site that you enabled for remote management.
f. Click Next.
g. In the User name text box, enter the user you authorized for the Web site.
h. In the Password text box, enter the user's password.
i. Click Next to complete the connection. You may be prompted to trust the certificate if you’re using an untrusted or self-signed certificate. The lower right-hand corner of IIS Manager will show the new connection status (for example, localhost 8172 as SampleUser).
- Create a quick application package to verify that the authorization rules are working:
a. In the Actions pane on the right, click Export Application…
b. This will launch the Export Application wizard, click Next through all of the screens to accept the defaults and create a package.
- Now that you have created a package, verify that you can install it:
a. In the Actions pane, click Import Application…
b. Click Next.
c. On the Parameters page, change the application name to something that doesn’t already exist in the Web site to verify that the user can create applications.
d. Complete the wizard.
- Finally, you should download an application package or using the Web Platform Installer to install an application to this Web site to verify that the database and other options are working.
TROUBLESHOOTING
There are some common issues that can occur during deployments:
User receives 401 unauthorized error while trying to connect to a Web site.o Cause(s): This error comes from WMSVC and is usually an error with username/password, or because the user does not have access to the Web site.
o Resolution(s): Verify the username/password and that the user has access to the Web site.
User receives a server error while trying to import or export an application.o Cause(s): This error comes from the Web Deployment Handler and is usually a problem with the deployment rules. Since the user has connected successfully, it is not an issue with WMSVC. A deployment rule may have a typo, the user performing deployment may not be authorized or the runAs identity may not have access.
o Resolution(s): Open the tracing logs at %systemdrive%\inetpub\logs\wmsvc\tracinglogfiles\w3svc1 and see what rule is failing to authorize.
Look for logs that contain failures, such as “Details: No rule was found that could authorize user 'server1\siteowner', provider 'appPoolConfig', operation 'Read', path 'DefaultAppPool'”. In this case, the provider appPoolConfig is not authorized and the user tried to add a provider they are not allowed to add.
Another common error is if the RunAs user that is being used to create apps does not have proper access to configuration. In this case, Procmon is a useful tool for determining where an access denied error may be coming from.
SUMMARY
This guide shows how to configure the WMSVC and the deployment handler to allow users to manage their Web applications and describes steps to use IIS Manager to create and install a package to verify that the delegation rules are working.