Saturday, September 30, 2017

ADFS 3.0 Cannot start service MSSQL$MICROSOFT##WID


Error:

ADFS 3.0 Cannot start service MSSQL$MICROSOFT##WID 1
Cannot start service MSSQL$MICROSOFT##WID on computer ‘.’.
ADFS 3.0 Cannot start service MSSQL$MICROSOFT##WID 2
Clicking on ‘Show more’ reveals no understandable error .
ADFS 3.0 Cannot start service MSSQL$MICROSOFT##WID 3
Go into the services, and look for the Windows Internal Database.
ADFS 3.0 Cannot start service MSSQL$MICROSOFT##WID 4
Tried starting the service manual
ADFS 3.0 Cannot start service MSSQL$MICROSOFT##WID 5
Then I received an error which showed the real problem.

I tried several settings for giving ‘logon as a service’ rights to several account, but nothing worked.
To work around the issue, use one of the following methods:

Solution 1:

Assign the Log on as a service user right to NT SERVICE\ALL SERVICES in the GPO that defines the user right.
Exclude the computer from the GPO that defines the user right.

Solution 2:

This flow did the trick for me, and can be used as a work around :
  • Reboot the server
  • Open the services (services.msc)
  • Scroll down until you see services named Windows
  • Start the Post deployment process all over, in the Server manager dashboard.
  • Switch over to services
  • Continue hitting F5 until the Windows Internal Database service shows up.
  • Double click the Windows Internal Database service
  • Go to the Log On tab
  • Select local system account
  • Start the service
  • Wait until the ADFS installation is finished.

Saturday, September 23, 2017

How to configure HP SAN storage MSA 2040


Default IP range for HP SAN storage MSA 2040 is 10.0.0.1/2

You need to connect your laptop to the storage with CAT6 cable.

1-: Now in your system browser type


Enter User Name: manage
Enter password: !manage
(These ID and password is default for these series of storage)


Now click on Home to check your Fibber cable connection,  which port is active.

HOW to Configure RAID 5 ON storage-:

1-: Click on Home button > Action>select Configuration


3-:  Assign Time & Date manually or define through NTP server.


4-: Enter here New password for Manage user or leave it default to avoid any password remember issue.


5-: Assign IP address manually or take it through DHCP.
You can use this IP address for access your storage through web link any you can manage it from any system.


6-:  Select from here Web browser settings.


7-: Configure from here Mail notification if you want to receive any auto generated mail but for this you should have SMTP service.

Click next


8-: Define from here your controller speed better to leave it at default settings.

Now Click next


9-: Click on finish


Click Yes

10-: Now you can see all HDD that you have connect in storage, In my storage I have installed 6 HDD that is showing here.


11-:  Configuration Settings
A-      In type select Virtual
B-      In Name  Assign your storage name
C-      In RAID level assign RAID (In my case I have select RAID 5)
D-     And select the all Six HDD and click on ADD


   Click OK

12-: Click on Host and you will see here all 4 unassigned drive


13-: Now click on pool and see the all HDD space, storage Name and Drive space


13-: MAP Volume with Host Name

First you need to select on Group name and after that you need to follow below step

A  Click on Host
B  Click on Action> Add Host


14-: Assign Host name and click ok


Click OK
15-: How to Remove Host Name
First you need to select a Group Name

A  Select Host and click on Action
B  Select Remove Host


16-: Click on Action > select Create Virtual Volume


17-: Assign the Volume Name and drive space


18-: Click on Add row for add multiple Volume at a same time


19-: How to delete Volume

A  First you need to select Volume Name that you want to delete.
B  Click on Action select Delete Volume


20-: How to MAP Volume
A:  Select Mapping
B:  Click on Action> MAP
Select Volume and Host Name on which you want to MAP
Click on MAP


Now Please check in your system Mapped volume will display in your system Disk management
Initially it will Display in Offline Mode but you need to bring it Online for this you need to just right click on Device and select Online.

Tuesday, September 19, 2017

Step-By-Step: Setting Up Active Directory Sites, Subnets & Site-Links

Two topologies are found in a successful network, Physical Topology and Logical Topology. Physical Topology represents the structure of the network which includes network topologies, hardware placements, IP address allocations. Logical Topology represents the security boundaries of said network, network services etc. In  an Active Directory infrastructure setup, the Domain represents the logical topology while Sites and Subnets represent the physical topology.

Active_Directory_Sites_Subnets_001 
A site can simply be defined as a physical location or network. It can be separate building, separate city or even in separate country. This Step-By-Step will provide example of this by detailing steps on setup and configuration of sites and subnets. Two sites, Site A and Site B will be created then assigned to the relevant servers along with the subnets.
The environment to be created is as follows:
 
Server Name
Roles
Operating System
Site
Subnets
DC1.contoso.com
Primary Domain Controller
Windows server standard 2012 R2
Site A (HQ)
192.168.148.0/24
SRV1.contoso.com
Additional Domain Controller
Windows server standard 2012 R2
Site B (Branch Office)
10.10.10.0/24
In this demo, SRV1 server is located in Branch office which is located in different geographical location. It is connected to primary domain via 256kb link. It is currently setup under the default AD site.
Step 1: Creating a new site
  1. Navigate to Server Manager > Tools > Active Directory Sites and Services 
  2. In the Active Directory Sites and Service window, right-click Sites and select New Site
     
    Active_Directory_Sites_Subnets_002
     
  3. Enter SiteA in the Name: box
     
  4. Select the DEFAULTIPSITELINK and click OK 
     
    Active_Directory_Sites_Subnets_003
     
  5.  Click OK to complete the site creation
     
  6. Repeat steps 1 to 5 and create SiteB. Once completed, you should see the following:
     
    Active_Directory_Sites_Subnets_004 
     
Step 2: Creating Subnets
  1. In the Active Directory Sites and Services MMC, right-click Subnets and select New Subnet… 
     
    Active_Directory_Sites_Subnets_005
     
  2. In the New Object – subnet windowtype 192.168.148.0/24
     
  3. In the Select a site object for this prefix option select SiteA and click OK 
     
    Active_Directory_Sites_Subnets_006
     
  4. Repeat steps 1 to 3 and use prefex 10.10.10.0/24 assigned to SiteB
Step 3: Creating Site Links
  1. In the Active Directory Sites and Services MMC,  right-click Inter-Site Transports > IP and then click New Site Link 
     
    Active_Directory_Sites_Subnets_007
     
  2. In the New Object – subnet window, enter a desired name for the link, select both SiteA and SiteB, and click add
     
    Active_Directory_Sites_Subnets_008
     
  3. Click OK to continue 
     
  4. The link is then created link with the default values however it can be optimized. Right-click on the link and select properties 
     
    Active_Directory_Sites_Subnets_009
     
  5. In the SiteA-SiteB Dedicated Link Properties window, the cost defines the links assigned bandwidth. Further details in regards to cost can be found here 
     
    Active_Directory_Sites_Subnets_010
     
  6. Replication changes can also be defined between sites. To accomplish this, click on Change Schedule 
     
  7. Define a custom schedule and click OK 
     
    Active_Directory_Sites_Subnets_011
     
  8.  Click OK to apply the changes

Step 4: Moving the Domain controllers to the newly created sites
  1. In the Active Directory Sites and Services MMC, navigate to Default-First-Site-Name > Servers 
     
  2. Right-click on the Domain controller required to move and select Move… 
     
    Active_Directory_Sites_Subnets_012
     
  3. In the Move Server window, select SiteA which will be site the Domain Controller will be moving to and click OK 
     
    Active_Directory_Sites_Subnets_013
     
  4. Repeat steps 1 to 3 to move SRV1 to SiteB
     
    Active_Directory_Sites_Subnets_014 
     
This completes the configuration of sites, subnets and site links.

Friday, September 15, 2017

SQL Server – Uninstall /Remove SQL Server 2012 Failover Cluster Instance

Procedure to uninstall a SQL Server failover clustered instance

To update or remove a SQL Server failover cluster, you must be a local administrator with permission to login as a service on all nodes of the failover cluster.

To remove a node from an existing SQL Server failover cluster

  1. Insert the SQL Server installation media. From the root folder, double-click setup.exe. To install from a network share, navigate to the root folder on the share, and then double-click Setup.exe.
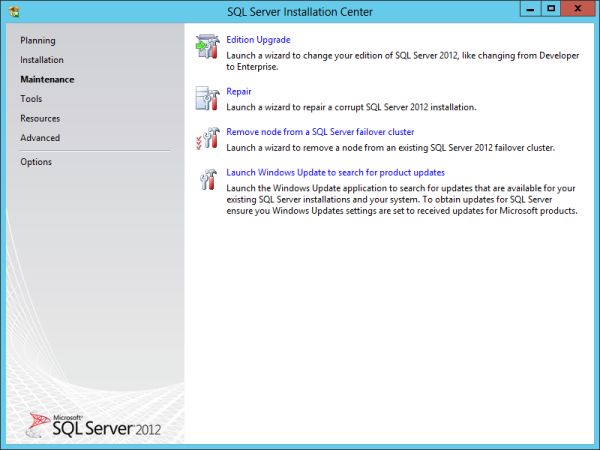
  2. The Installation Wizard launches the SQL Server Installation Center. To remove a node to an existing failover cluster instance, click Maintenance in the left-hand pane, and then select Remove node from a SQL Server failover cluster.
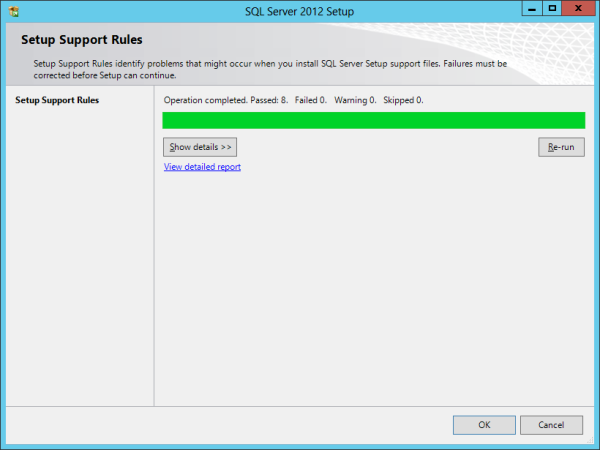
  3. The System Configuration Checker will run a discovery operation on your computer. To continue, Click OK. .
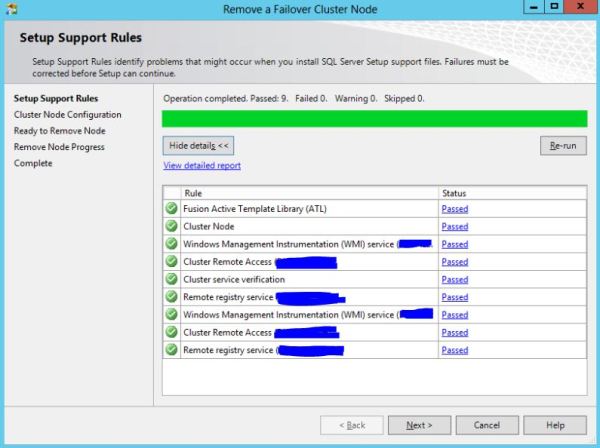
  4. After you click install on the Setup Support Files page, the System Configuration Checker verifies the system state of your computer before Setup continues. After the check is complete, click Next to continue.
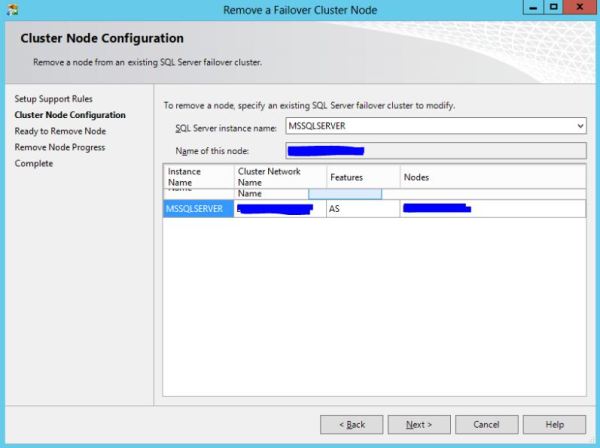
  5. On the Cluster Node Configuration page, use the drop-down box to specify the name of the SQL Server failover cluster instance to be modified during this Setup operation. The node to be removed is listed in the Name of this node field.
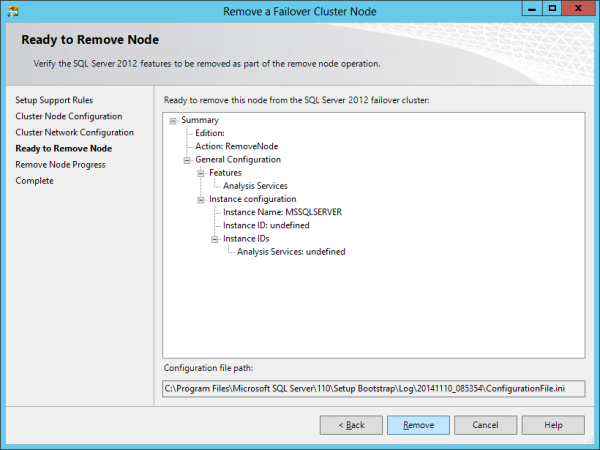
  6. The Ready to Remove Node page displays a tree view of options that were specified during Setup. To continue, click Remove.
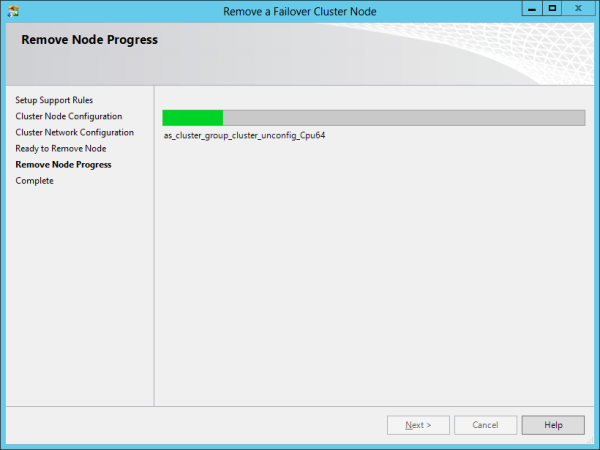
  7. During the remove operation, the Remove Node Progress page provides status.
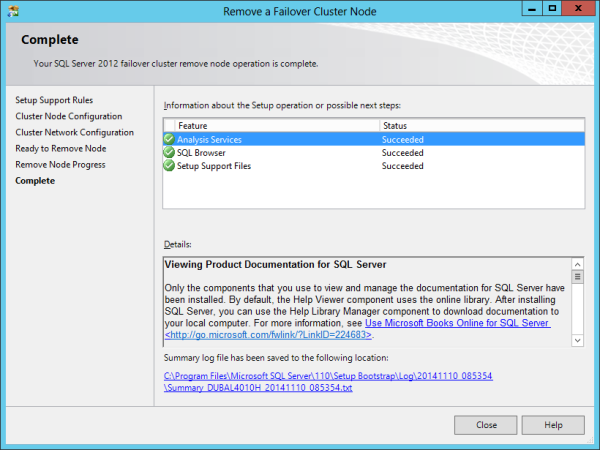
  8. The Complete page provides a link to the summary log file for the remove node operation and other important notes. To complete the SQL Server remove node, click Close.

Screenshots: 
1 2 3 4 5 6 7


Repeat above steps on all nodes used for the SQL Server clustered instance. Make sure you uninstall the active node last.

Note:    Remove Passive Nodes First and Active node Last.