I solved it by disabling the
Allow this precompiled site to be updatable feature in the publishing options of their websiteAllow this precompiled site to be updatable feature in the publishing options of their website| Value | Forest functional level |
|---|---|
| 0 | Microsoft Windows® 2000 Server mixed |
| 1 | Microsoft Windows Server™ 2003 interim |
| 2 | Microsoft Windows Server 2003 native |
 Caution: Caution: |
|---|
| If you incorrectly modify the attributes of Active Directory objects when you use ADSI Edit, the LDP tool, or another Lightweight Directory Access Protocol (LDAP) version 3 client, you may cause serious problems. These problems may require that you reinstall Windows Server 2003, Exchange Server 2003, or both. Modify Active Directory object attributes at your own risk. |
| The filter shown in Step 6 has been wrapped for readability. Make sure that you enter the filter without any spaces or returns. |
| Version | Notes |
|---|---|
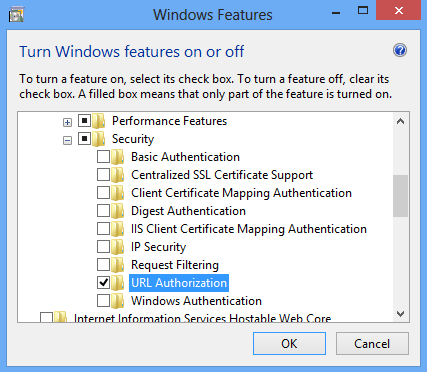
| IIS 8.5 | The |
| IIS 8.0 | The |
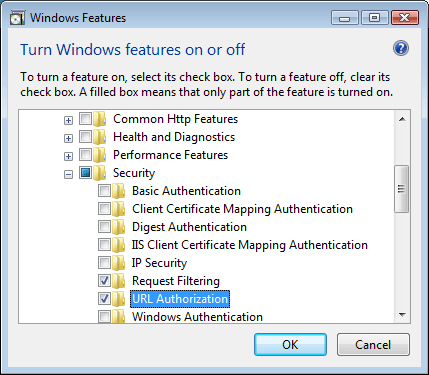
| IIS 7.5 | The |
| IIS 7.0 | The |
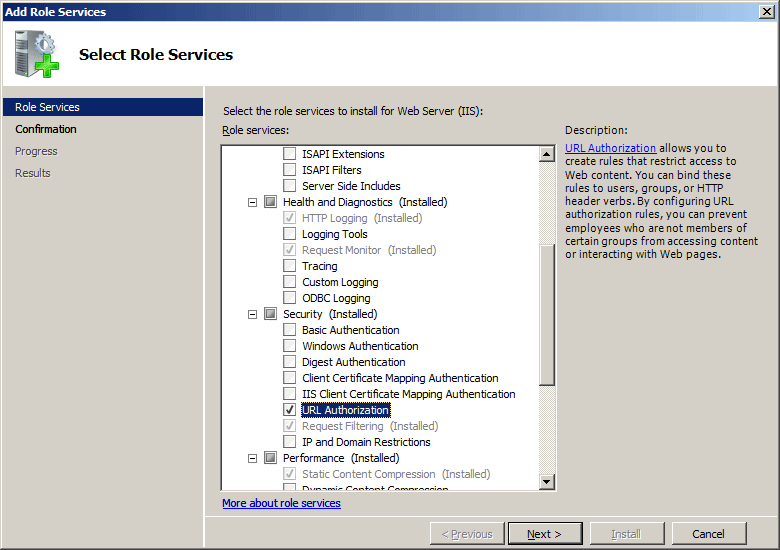
| IIS 6.0 | The |
 .
.

| Attribute | Description |
|---|---|
bypassLoginPages |
Optional Boolean attribute. Specifies whether to skip authorization check for the page specified as the login page for Forms authentication. This enables unauthenticated users to access the login page to log on. The default value is true. |
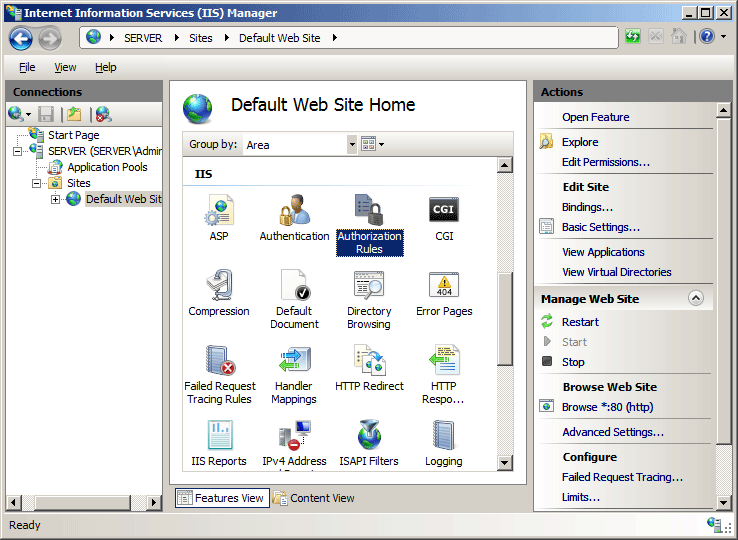
| Element | Description |
|---|---|
add |
Optional element. Adds an authorization rule to the collection of authorization rules. |
remove |
Optional element. Removes a reference to an authorization rule to the collection of authorization rules. |
clear |
Optional element. Removes all references to authorization rules from the collection of authorization rules. |
             users="*" roles="" verbs="" />
             accessType="Allow" users="" roles="Administrators" />
appcmd.exe set config "Contoso" -section:system.webServer/security/authorization /+"[accessType='Allow',roles='administrators']"Note: You can optionally set the commit parameter to
apphost
when using AppCmd.exe to configure these settings. This commits the
configuration settings to the appropriate location section in the
ApplicationHost.config file instead of a Web.config file.using System; using System.Text; using Microsoft.Web.Administration; internal static class Sample { private static void Main() { using (ServerManager serverManager = new ServerManager()) { Configuration config = serverManager.GetWebConfiguration("Contoso"); ConfigurationSection authorizationSection = config.GetSection("system.webServer/security/authorization"); ConfigurationElementCollection authorizationCollection = authorizationSection.GetCollection(); ConfigurationElement addElement = authorizationCollection.CreateElement("add"); addElement["accessType"] = @"Allow"; addElement["roles"] = @"administrators"; authorizationCollection.Add(addElement); serverManager.CommitChanges(); } } }
Imports System
Imports System.Text
Imports Microsoft.Web.Administration

Module Sample
   Sub Main()
      Dim serverManager As ServerManager = New ServerManager
      Dim config As Configuration = serverManager.GetWebConfiguration("Contoso")
      Dim authorizationSection As ConfigurationSection = config.GetSection("system.webServer/security/authorization")
      Dim authorizationCollection As ConfigurationElementCollection = authorizationSection.GetCollection
      Dim addElement As ConfigurationElement = authorizationCollection.CreateElement("add")
      addElement("accessType") = "Allow"
      addElement("roles") = "administrators"
      authorizationCollection.Add(addElement)
      serverManager.CommitChanges()
   End Sub
End Module
var adminManager = new ActiveXObject('Microsoft.ApplicationHost.WritableAdminManager');
adminManager.CommitPath = "MACHINE/WEBROOT/APPHOST/Contoso";
var authorizationSection = adminManager.GetAdminSection("system.webServer/security/authorization", "MACHINE/WEBROOT/APPHOST/Contoso");
var authorizationCollection = authorizationSection.Collection;

var addElement = authorizationCollection.CreateNewElement("add");
addElement.Properties.Item("accessType").Value = "Allow";
addElement.Properties.Item("roles").Value = "administrators";
authorizationCollection.AddElement(addElement);

adminManager.CommitChanges();
Set adminManager = CreateObject("Microsoft.ApplicationHost.WritableAdminManager")
adminManager.CommitPath = "MACHINE/WEBROOT/APPHOST/Contoso"
Set authorizationSection = adminManager.GetAdminSection("system.webServer/security/authorization", "MACHINE/WEBROOT/APPHOST/Contoso")
Set authorizationCollection = authorizationSection.Collection

Set addElement = authorizationCollection.CreateNewElement("add")
addElement.Properties.Item("accessType").Value = "Allow"
addElement.Properties.Item("roles").Value = "administrators"
authorizationCollection.AddElement(addElement)

adminManager.CommitChanges()