Friday, March 26, 2021

How to Check Your BIOS Version

 When troubleshooting, you might need to check your BIOS version to see if an update is available. While there are a few tools that can check your BIOS version for you, it's easiest to use Windows System Information Tool, the Windows Management Instrumentation command line (typically referred to as WMI or WMIC), DirectX Diagnostic Tool (DXDiag), or even the Registry.

1: Windows System Information Tool

Those who don't like the command prompt or the registry will be glad to know that the System Information Tool is also the easiest way to check your BIOS version.

Press the Windows Key + R, type in msinfo32 and press Enter. You can see your BIOS version on the right hand side next to BIOS version/Date.
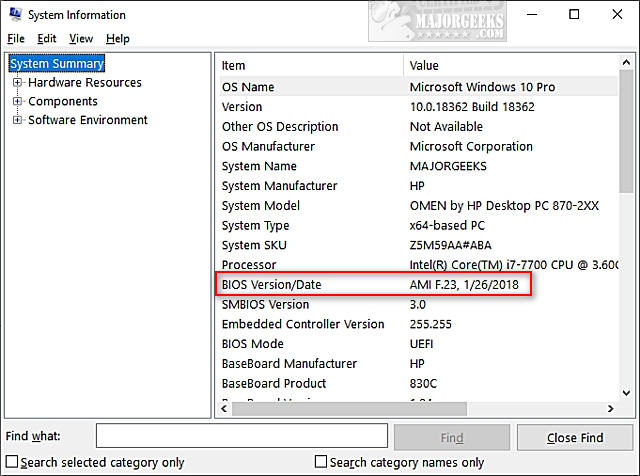


Another handy feature of using the System Information Tool is you can see your motherboard or computer brand and model number so you can effortlessly search for your manufacturer to see if there's a BIOS update. For example, with my PC, I typed in hp omen pc 870-2xx software updates in Google, and the first link was to software updates for my PC.

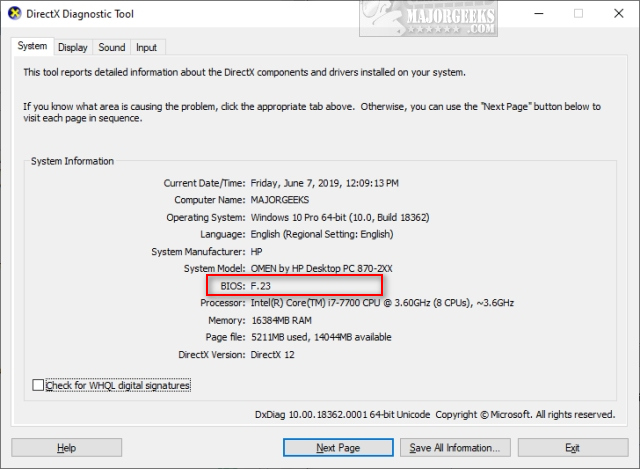
2: DirectX Diagnostic Tool

The DirectX Diagnostic Tool provides detailed information about DirectX and drivers on your computer. But, it also can show you additional information, including your BIOS version.

Press the Windows Key + R, type in dxdiag and press Enter.

System Information is displayed by default, including your BIOS information.


3: Command Prompt

Open the Command Prompt or PowerShell and type in wmic bios get biosversion.
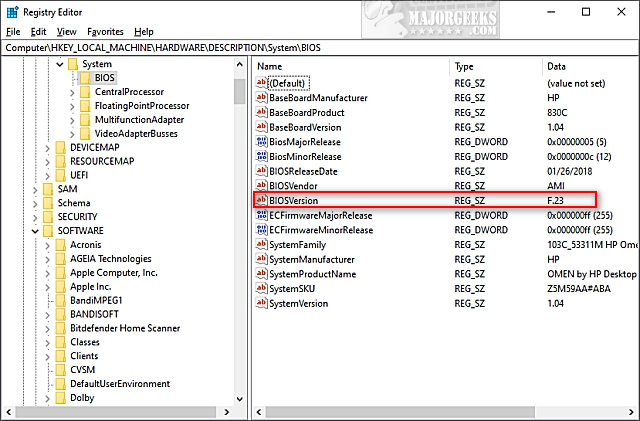


4: Registry

We only mention the Windows Registry because this is where all the information you've seen so far is stored.

Open the Registry Editor and type Computer\HKEY_LOCAL_MACHINE\HARDWARE\DESCRIPTION\System\BIOS into the search bar at the top and press Enter. Click on BIOS and look for BIOSVersion.

How to Check If Your Hard Drive Is SSD or HDD

 If you recently bought a new computer or hard drive, you might be wondering if your hard drive is an SSD drive or a standard HDD.

Before we begin, let's look at the differences between the two drives.

HDD is short for Hard Disk Drive. You could almost call them old school nowadays. They contain platters and a moving actuator arm that can read and write data to the platter surface. This is why you can hear an HDD making noise. They tend to be slow and require defragmentation regularly to optimize where data is placed. All hard drives fail sooner or later because they have moving parts.

SSD is short for Solid State Drive. They use integrated circuit assemblies as memory to store data persistently and are much faster than the traditional HDD. Computer boot times of 10 seconds or less is not uncommon. When SanDisk released their 20Mb SSD drive in 1991, the cost was $1,000. SSD drives used to be so expensive in modern times that many people would purchase a smaller (128MB for example) SSD just to run their operating system and favorite programs. SSD drives became larger and more affordable in 2018 with 1TB drives costing only $100. SSD drives do not need defragmentation but instead use TRIM which tells the SSD drive which data blocks it can erase because they are no longer in use. TRIM can prolong the SSD lifespan and performance. The jury is still out on how long SSD drives last, but we've had the same drives in use for a few years.

Here's how to tell what type of hard drive you have.

1: Using Disk Defragmentor

Press the Windows Key + S and type in defrag, then click on Defragment & Optimize Drives.

As mentioned, we don't need to defrag SSD drives, but we're just looking for Solid State Drive or Hard Disk Drive.


2: Using PowerShell

Open PowerShell or the Command Prompt and type in PowerShell "Get-PhysicalDisk | Format-Table -AutoSize".


3: Using Freeware Apps

There are so many freeware system information apps available; it can be hard to pick one.

We've always liked Belarc Advisor, but you might also consider HWiNFO, HiBit System Information, and SIV (System Information Viewer).

Wednesday, March 17, 2021

Setting up Remote Desktop Connection via Router Port Forwarding


           Step 1: Enable Remote Desktop on your computer

Right-click 'My Computer' and then click 'Properties'. Click the 'Remote' tab and then choose 'Allow remote connections to this computer'. Then click the 'OK' button.

Remote Desktop

Step 2: Open Remote Desktop port (port 3389) in Windows firewall

Go into the control panel in your computer and then into 'System and security' and then into 'Windows Firewall'. Click 'Advanced settings' on the left side. Ensure that 'Inbound Rules' for Remote Desktop is 'Enabled'. Please note that if you are using a firewall other than Windows Firewall on your computer, you must open port 3389 in the firewall.

Open Windows Firewall for Remote Desktop

Open Windows Firewall for Remote Desktop

Open Windows Firewall for Remote Desktop

Step 3: Set up Port Forwarding (Port Translation) in the router

Please log into the router website (generally at http://192.168.1.1 or http://192.168.0.1) and go into the 'Port Forwarding' section. Add a new 'Port Forwarding' rule for TCP port 3389 to be forwarded to the internal IP of your computer. To get the internal IP address of the device, you may type ipconfig in "cmd.exe". It is usually in the form of "192.168.1.**".

Port Forwarding for Remote Desktop

NOTE: If you need to connect to several machines behind the same router, you should set up port forwarding for all these machines. Let's suppose machine 1 has an internal IP 192.168.1.41, machine 2 has an internal IP 192.168.1.42, and machine 3 has an internal IP 192.168.1.43. We can setup different external ports for different machines as shown in the picture below.

Port Forwarding for Remote Desktop

To see if the port forwarding has been setup correctly, you can use our Port Check network tool to see if the corresponding port is open. If you get a "Success" response from the port check, then your network has been correctly set up.

STEP 4: Map your dynamic IP to a hostname

Internet service providers change your IP address on a regular basis, but with dynamic DNS you can keep your domain pointing at the current IP of your home server or other devices.

You may register a domain name of your own (yourdomain.com) and sign up for Dynu Dynamic DNS Service for it or use a free Dynu domain name (yourdomain.dynu.com). You may refer to this Getting started tutorial for more information.

STEP 5: Use Dynu DDNS service to access your computer remotely

Download the appropriate client software and run it in the computer to keep the hostname mapped to your dynamic IP. You may also set up the DDNS service in your router if your router supports it.

You should now be able to access your computer using yourhostname.dynu.com from the internet via Remote Desktop using any compatible Remote Desktop client and your domain name.

Port Forwarding for Remote Desktop

NOTE: In the case of connecting several machines, for machine 1, you can use "yourhostname.dynu.com:3389", for machine 2, you may use "yourhostname.dynu.com:3390", and for machine 3, you may use "yourhostname.dynu.com:3391".               

Tuesday, March 16, 2021

Enable RDP through CMD Line

 Quick and simple way to enable Remote Desktop (RDP) via psexec

    4 Steps total

    Step 1: Install PSEXEC

    PSEXEC is a standalone executable file that allows you to run commands on remote machines.

    You can download the tool from here:

    http://technet.microsoft.com/en-us/sysinternals/bb897553.aspx

    Step 2: Run psexec

    You can add the location of psexec to your %PATH% variable or simple copy the psexec to C:\WINDOWS\System32\ folder.

    After that simply open a command line and type psexec /? to test its functioning accordingly

    Step 3: Enable RDP

    Open a command line and type the follwoing:

    psexec \machinename reg add hklm\system\currentcontrolset\control\terminal server /f /v fDenyTSConnections /t REG_DWORD /d 0

    This adds a registry entry enabling RDP connections.

    Step 4: Configure Machine Firewall to allow RDP

    Open a command line and type the following

    psexec \remotecomputername netsh firewall set service remoteadmin enable psexec \remotecomputername netsh firewall set service remotedesktop enable:

    With this you have successfully configured a remote machine to enable RDP sessions and configured the firewall to allow the connections on the correct ports.


    Other Examples

    The following command launches an interactive command prompt on \\marklap computer name:

    cmd
    psexec -i \\marklap cmd
    

    This command executes IpConfig on the remote system with the /all switch, and displays the resulting output locally:

    cmd
    psexec -i \\marklap ipconfig /all
    

    This command copies the program test.exe to the remote system and executes it interactively:

    cmd
    psexec -i \\marklap -c test.exe
    

    Specify the full path to a program that is already installed on a remote system if its not on the system's path:

    cmd
    psexec -i \\marklap c:\bin\test.exe
    

    Run Regedit interactively in the System account to view the contents of the SAM and SECURITY keys::

    cmd
    psexec -i -d -s c:\windows\regedit.exe
    

    To run Internet Explorer as with limited-user privileges use this command:

    cmd

    psexec -l -d "c:\program files\internet explorer\iexplore.exe"