Friday, August 20, 2021
Tuesday, August 17, 2021
Resetting root password in vCenter Server Appliance 6.5 / 6.7 / 7.x (2147144)
Symptoms
- The root account password of VMware vCenter Server Appliance fails
- The root account of the vCenter Server Appliance 6.5 and above is locked or account is expired
- The root account password has been lost or forgotten
For previous versions, see: Resetting root account password of vCenter Server Appliance 6.0
Process to Reset the Root Password in VCSA:
Note: 6.7U1 and later has a simpler method to reset the password, see How to reset the lost or forgotten root password in vCenter Server Appliance 6.7 U1 and laterTo reset the root password for the vCenter Server Appliance:
- Take a snapshot or backup of the vCenter Server Appliance before proceeding.
Note: If the vCenter Appliance is on the same ESXi hosts it manages. Connect directly to the ESXi host that it is located on to perform these steps.
- Reboot the vCenter Server Appliance.
- After the VCSA Photon OS starts, press the e key to enter the GNU GRUB Edit Menu.
- Locate the line that begins with the word Linux.
- Append these entries to the end of the line:
rw init=/bin/bash
The line should look like the following screenshot:
- Press F10 to continue booting.
- Run the command
- In the Command prompt, enter the command passwd and provide a new root password (twice for confirmation):
- Unmount the filesystem by running this command (yes, the unmount command is umount - it's not a spelling error):
- Reboot the vCenter Server Appliance by running this command:
- Confirm that you can access the vCenter Server Appliance using the new root password.
- Remove the snapshot taken in Step 1 if applicable.
- You could set the Root password to never expire in order to prevent this issue by running command: # chage -I -1 -m 0 -M 99999 -E -1 root or at the VAMI ( https://<vcenter_fqdn>:5480)
Note: If you continue to have issues, see Unable to log in to the vCenter Server Appliance shell using root account even after password reset
How to install the Backup Exec 15 and above Agent for Windows (a.k.a. Remote Agent, AWS. RAWS)
Problem
This article provides instructions for installing the Backup Exec 15 and above Agent for Windows on a remote machine.
The Remote Agent for Windows Servers (RAWS) has been renamed to Agent for Windows (AWS) in Backup Exec 15 and above.
Error Message
UMI Code: V-225-285
Solution
Click on the desired method to see the installation instructions for the Agent for Windows Systems (AWS):
Automated (Push) Installation (to be performed from the Backup Exec 15 or above media server).
Local (manual) installation (to be performed on each remote machine).
In Backup Exec 15 and above, it is possible to install the Agent for Windows locally with a Graphical User Interface (GUI).
Silent (command line) installation (to be performed on each remote machine).
Command line scripts setupaa.cmd (OS 32-bit) and setupaax64.cmd (OS 64-bit) for a command line installation.
Automated (Push) Installation of Backup Exec 15 and above Agent for Windows
There are two methods to perform an Automated (Push) installation of the Agent for Windows:
From the Backup and Restore tab (recommended):
- Open the Backup Exec 15 or above console - go to the Backup and Restore tab.
- Select Add (from the ribbon menu) - select Microsoft Windows computer - click Next.
- Select 'Allow Backup Exec to establish a trust with the servers.' - click Next.
- Browse / Add a server name(s) - then click Next.
- Select/Add a System logon account - click Next.
- Select "Upgrade the Veritas Backup Exec Agent for windows to the current version automatically" (if Agent for Windows is not installed/up to date).
Note: 'Restart the remote computer automatically after installing the Veritas Backup Exec Agent for Windows when a restart is required' should only be selected if down time has been planned or is not problematic for the target server(s).
- Click Install to begin setup.
- Click Finish to complete the installation..
By clicking on the Backup Exec button:
- Open the Backup Exec 15 or above console on the media server.
- Click on the round Backup Exec button which is located to the left of the Home tab.
- Go to Installation and Licensing - select Install Agents and Backup Exec Servers on Other Servers.
- On the Remote Computers section - select Add
- Choose Add a Single Computer (if remote agent needs to be installed on only one machine).
OR
- Choose Add Multiple Computers with the Same Settings (to select multiple servers for remote agent installation).
Note: The box Save the server list for future remote install sessions enables the names of all of the remote computers and their credentials to be added automatically the next time Backup Exec or any of its options need to be installed to these remote computers.
- Choose Add a Single Computer (if remote agent needs to be installed on only one machine).
- On the Select the Remote Product screen - select Agent for Windows and click Next.
- On the Add Single Computer / Choose Remote Computers screen:
- When selecting Add a Single Computer:
- Enter the Remote Computer name / select Browse Remote Computers to select a remote machine.
- Enter the Remote computer credentials (type the user name and password of an account that has administrative rights on the server).
- Click Next.
OR
- Enter the Remote Computer name / select Browse Remote Computers to select a remote machine.
- When Selecting Add Multiple Computers with the Same Settings
- Enter the Remote computer name / Browse to select a remote computer - click on Add to List
NOTE: Repeat the above steps to select multiple servers for remote agent installation.
- Enter the Remote Install Credentials (type the user name and password of the account that has administrative rights on the servers).
- Click Next.
- Enter the Remote computer name / Browse to select a remote computer - click on Add to List
- When selecting Add a Single Computer:
- The destination location for Remote Agent install files can be changed under the Destination Folder section if required.
- On the Remote Agent Publishing screen:
- Check the box which says 'Enable remote agent to publish the
IP address and name of the remote computer and the version of the Remote
Agent to media server'.
- Click Add and enter the Media Server name or IP address (or both) and press OK.
- Click Next.
- Check the box which says 'Enable remote agent to publish the
IP address and name of the remote computer and the version of the Remote
Agent to media server'.
- Click Next when the screen shows Ready to install the Agent for Windows beside the server name(s).
- Click Install to begin the installation.
- Wait for the installation to complete and click Finish.
- An SSL trust relationship will need to be established after a
manual installation of the Agent for Windows. This is explained in the
following article:
How to establish trust for remote servers in Backup Exec 15 and above
Local (manual) installation using the GUI method
When automated (push) installation of the AWS fails it may be necessary to perform a local installation.
Listed below are two methods to perform a Local (manual) installation of Agent for Windows:
Using the RAWS32/RAWSX64 folder located on Backup Exec 15 and above media server (recommended):
- Copy the Agents folder which includes the "RAWS32 or RAWSX64", DotNetFx, VCRedist, and MSXML (if it exists) folders, from the Media Server to a drive on a remote computer.
NOTE: The default path for the above mentioned folder is 'X:\Program Files\Symantec\Backup Exec\Agents' or 'X:\Program Files\Veritas\Backup Exec\Agents" ('X' is the drive letter where Backup Exec is installed.)
For Remote Agent installation on:- 32-bit system: Use the RAWS32 folder.
- 64-bit system: Use the RAWSX64 folder.
- Go to the remote computer and open the RAWS32 or RAWSX64 directory which was copied from the media server.
- Double-click on Setup.exe.
Note: Turn off User Access Control (UAC) for Windows 2008, Vista or 7.
It is also recommended to right-click on the Setup.exe file and select 'Run as Administrator' to avoid any access issues during the installation process.
- Click Next on the Welcome screen.
- Select Local Install and click Next.
- Select 'Agent for Windows' - click Next.
Note: The destination location for the Remote Agent install files can be changed if desired by clicking on the 'Change' button.
- On the Remote Agent publishing screen:
- Check the box which says 'Enable remote agent to publish the
IP address and name of the remote computer and the version of the Remote
Agent to media server'.
- Click Add and enter the Media Server name or IP address (or both) and press OK.
- Click Next.
- Check the box which says 'Enable remote agent to publish the
IP address and name of the remote computer and the version of the Remote
Agent to media server'.
- Click Install to begin the installation.
- Wait for the Installation to complete and click Finish.
- An SSL trust will need to be established after a manual
installation of Agent for Windows. This is explained in the article
below:
How to establish trust for remote servers in Backup Exec 15 and above
Silent (command line) Installation
- Copy the Agents folder from the Backup Exec media server's installation folder (by
default located in C:\Program Files\Symantec\Backup Exec\Agents on the
media server or C:/Program Files/Veritas/Backup Exec/Agents) to the root of the C: drive on the remote server. Verify it contains the folders "RAWS32 or RAWSX64", DotNetFx, VCRedist, and MSXML (if it exists). To perform the steps below, you will be using these following folders:
- RAWS32: For a 32-bit (x86) Windows System.
- RAWSX64: For a 64-bit Windows System.
- On the remote server, go to the command prompt (click Start - Run - cmd):
- Browse to the RAWS folder which was copied on the local drive using DOS commands.
- In the command prompt window type setupaa.cmd (for 32-bit OS) or setupaax64.cmd (for 64-bit OS) and press enter to install Agent for Windows.
Note: Installation of AOFO is no longer required. If the operating system is Windows Server 2003 or above, it will use the Microsoft VSS provider for the Advanced Open File Option.
- Browse to the RAWS folder which was copied on the local drive using DOS commands.
- On the remote server, open the RAWS folder which was copied on the local drive:
- Double-click on setupaa.cmd (for 32-bit OS) or setupaax64.cmd (for 64-bit OS) to install Agent for Windows.
Note: On Windows Server 2008, Windows Vista or Windows 7, right-click on Setupaa.cmd and select Run as administrator.
Installation of AOFO is no longer required. If the operating system is Windows Server 2003 or above, it will use the Microsoft VSS provider for the Advanced Option File Option.
- The command prompt will appear blank for a period between a few seconds and a couple of minutes while the remote agent installs.
- Once completed, the command prompt cursor will appear awaiting further input.
- To check if the Agent for Windows was installed: Go to the Windows services console (Start - Run - Services.msc), and see if the Backup Exec Remote Agent for Windows service is present and started.
- An SSL trust will need to be established after a manual
installation of the Agent for Windows. This is explained in the article
below:
How to establish trust for remote servers in Backup Exec 15 and above
- To check if the Agent for Windows was installed: Go to the Windows services console (Start - Run - Services.msc), and see if the Backup Exec Remote Agent for Windows service is present and started.
- Double-click on setupaa.cmd (for 32-bit OS) or setupaax64.cmd (for 64-bit OS) to install Agent for Windows.
Friday, August 13, 2021
Install and configure Windows Server Update Services (WSUS)
WSUS can be used to automatically download Windows update files and store them locally. Other Windows servers in your network will then download the updates from the WSUS server rather than the Internet, saving you Internet bandwidth and speeding up the Windows update process.
With WSUS we can configure all of our servers to be automatically updated, ensuring that security updates are installed quickly from a central location. This will provide us with useful information such as reports advising which servers have or have not been patched with a specific update.
Install WSUS with PowerShell
Installing WSUS with PowerShell is the fastest and easiest way, simply run the command below in PowerShell.
Install-WindowsFeature -Name UpdateServices, UpdateServices-WidDB, UpdateServices-Services, UpdateServices-RSAT, UpdateServices-API, UpdateServices-UI
In this case we are using the Windows Internal Database (WID), if you’re going to be using an SQL database instead, include the UpdateServices-DB option rather than UpdateServices-WidDB.
1. From within Server Manager, select “Add roles and features”


5. On the Select server roles screen, scroll down and select “Windows Server Update Services”.


7. On the Windows Server Update Services screen, read the things to note and click next. It’s basically just advising you that at least one WSUS server in your network must be able to connect to the Internet in order to download the updates from Microsoft. It’s then possible for other downstream WSUS servers in your network to connect to your primary upstream WSUS server that connects to the Internet in order to get their updates.

9. On the Content location selection, we have the option of selecting where the WSUS updates will be stored. In my experience I suggest dedicating a secondary disk drive for the updates, this way you will not risk filling up the primary operating system drive. The amount of space that you will need will depend on the amount of Microsoft products that you select to store updates for.
Alternatively you can untick the store updates check box and update files will not be stored locally, they will be downloaded from Microsoft as needed. This is not recommended unless you are really pressed for disk space as the update process will take a lot longer.
Also keep in mind that update files will not be downloaded until they have been approved. We can manually or automatically approve individual updates, as we’ll see later.
 1
1

Configuring WSUS
Once you have installed WSUS through either PowerShell or the GUI we can proceed to configure WSUS. To start this process, simply open the WSUS console from within the Tools menu in Server Manager.

From the Complete WSUS Installation window, we will select that we wish to store our updates locally in the folder specified.

After you click Run, the WSUS Configuration Wizard will open which we will now run through.
- On the Windows Server Update Services Configuration Wizard before you begin page, read the information and click Next. Basically you should confirm that other Windows machines can connect to the WSUS server, and that the WSUS server can connect to the Internet to download updates.

2. Choose whether or not you want to join the Microsoft Update Improvement Program, as I am running a test instance I have select to not join and provide any false test data.

3. Next you will choose your upstream server. If this is your first WSUS server, you will likely want to leave the default setting to synchronize from Microsoft update over the Internet. This will download update files from Microsoft to your WSUS server. Alternatively if you already have another WSUS server that stores the update files, you can specify it here to synchronize with it as a downstream server.

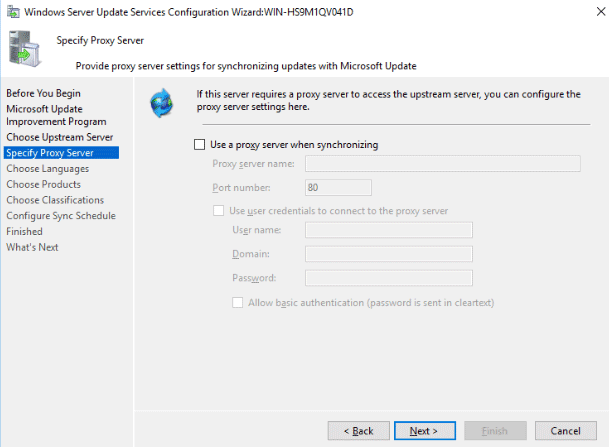
4. Next specify if your WSUS server needs to connect through a proxy server in order to connect to the Internet. In my test environment the WSUS server connects directly out to the Internet so I’ll just select next, however if you’re using a proxy server specify its details here.
5. Now we are asked to connect to an upstream server, click the start connecting button to save the information entered so far. You’ll need to wait a while while WSUS attempts to connect to an upstream server, either from the Internet or within your own network based on your selection in the last step. This took quite a long time (over 30 minutes) to complete for me even with a decent connection.

6. Choose the languages that you want to download updates for. Note that you should only select the languages that you actually support, if you select additional languages additional update files will be downloaded for each update to include your language selection which can quickly increase your disk space requirements.

7. On the Choose products screen simply select the Microsoft products in your network that you plan on updating with WSUS. Updates for the selected products will be stored on our WSUS server, so the more you pick the more disk space you will require.

8. We can now choose the types of updates to download, for example we can specify that we only want to download critical and security updates.

9. Finally we can set the synchronization schedule which will specify when WSUS will check for new updates to download. By default manual synchronization is set, however we will change this to happen a few times per day.

10. That’s it, on the finished screen you can optionally check to begin the initial synchronization which will start downloading updates from the Internet after you click finish.
