Sunday, March 26, 2017

Hard Reset CATERPILLAR S40

First method:

  1. The device must be turned off, so hold down the Power rocker for a while.
  2. Afterwards press and hold the Volume Up button for a few seconds.
  3. While still holding the Volume Up connect your device to PC or charger by using Micro USB cable.
  4. You can release held key as soon as the Recovery Mode appears on the screen.
  5. In the next step use Volume buttons to select "wipe data/factory reset" and tap the Power button to confirm.
  6. Afterwards choose "yes" from the menu, and accept it with Power button.
  7. After a while accept option "reboot system now" using Power rocker.
  8. That's all. The hard reset operation should be completed.

Second method:

  1. At the very beginning hold down the Power key for a short while in order to switch off the device.
  2. In the next step go to Settings and select Backup & Reset.
  3. Then tap Factory Data Reset and Reset Phone.
  4. After that, choose Erase Everything if you are sure you want to clear all your data. 
  5. Finally, select OK to confirm the whole operation.
  6. Congratulations! Your phone is ready to use.

How to Use an Epson Ceiling Mount Projector

A number of projectors in the Epson PowerLite and EX lines are designed to be ceiling-mountable, which can be an optimal location in a business conference room. When Epson projectors are mounted on the ceiling, they are mounted upside down. This means that the operator must select the ceiling projection option on the projector, and do it with the remote control, because the manual operation buttons will no longer be easily reachable.
1. Attach the video cable from the projector to the monitor output port on the computer.
2. Power on the computer and use the toggle key combination to send the video to the output port (usually "Fn-F9").
3. Press the power button on the remote control and wait for the power light to stop flashing and glow a steady green.
4. Press the Menu button on the remote control to display the projector menu. Unless the projector has already been set for ceiling-mounted operation, the menu screen will appear upside down.
5. Press the down arrow key on the remote until the "Extended" option is highlighted on the menu screen. Then press the Enter button on the remote.
6. Press the down arrow key on the remote until the blue cursor is next to "Projection" on the Extended menu and press Enter. Then press the right or left arrow keys until the option reads "Front/Ceiling" and press Enter again. The screen should now appear right-side up. Press the Menu button on the remote to exit the menu.
7. Operate your presentation from your computer as you would normally.

Wednesday, March 15, 2017

Wi-Fi Security: Should You Use WPA2-AES, WPA2-TKIP, or Both?

On our Comcast Xfinity router, WPA2-PSK (TKIP), WPA2-PSK (AES), and WPA2-PSK (TKIP/AES) are all different options. Choose the wrong option and you’ll have a slower, less-secure network.
The last option — both TKIP and AES — was the default on our router. That’s actually a bad choice, but just understanding the options requires some knowledge of Wi-Fi encryption standards.

AES vs. TKIP

encryption that can be used by a Wi-Fi network. TKIP stands for “Temporal Key Integrity Protocol.” It was a stopgap encryption protocol introduced with WPA to replace the very-insecure WEP encryption at the time. TKIP is actually quite similar to WEP encryption. TKIP is no longer considered secure, and is now deprecated. In other words, you shouldn’t be using it.
AES stands for “Advanced Encryption Standard.” This was a more secure encryption protocol introduced with WPA2, which replaced the interim WPA standard. AES isn’t some creaky standard developed specifically for Wi-Fi networks; it’s a serious worldwide encryption standard that’s even been adopted by the US government. For example, when you encrypt a hard drive with TrueCrypt, it can use AES encryption for that. AES is generally considered quite secure, and the main weaknesses would be brute-force attacks (prevented by using a strong passphrase) and security weaknesses in other aspects of WPA2.
The “PSK” in both names stands for “pre-shared key” — the pre-shared key is generally your encryption passphrase. This distinguishes it from WPA-Enterprise, which uses a RADIUS server to hand out unique keys on larger corporate or government Wi-Fi networks.

WPA Uses TKIP and WPA2 Uses AES, But…

In summary, TKIP is an older encryption standard used by the old WPA standard. AES is a newer Wi-Fi encryption solution used by the new-and-secure WPA2 standard. In theory, that’s the end of it. But, depending on your router, just choosing WPA2 may not be good enough.
While WPA2 is supposed to use AES for optimal security, it also has the option to use TKIP for backward compatibility with legacy devices. In such a state, devices that support WPA2 will connect with WPA2 and devices that support WPA will connect with WPA. So “WPA2” doesn’t always mean WPA2-AES. However, on devices without a visible “TKIP” or “AES” option, WPA2 is generally synonymous with WPA2-AES.

Wi-Fi Security Modes Explained


Confused yet? We’re not surprised. But all you really need to do is hunt down the one, most secure option in the list. For example, here are the options our Comcast Xfinity router provides:
  • Open (risky): Open Wi-Fi networks have no passphrase. You shouldn’t set up an open Wi-Fi network — seriously, you could have your door busted down by police.
  • WEP 64 (risky): The old WEP encryption standard is vulnerable and shouldn’t be used. Its name, which stands for “Wired Equivalent Privacy,” now seems like a joke.
  • WEP 128 (risky): WEP with a larger encryption key size isn’t really any better.
  • WPA-PSK (TKIP): This is basically the standard WPA, or WPA1, encryption. It’s been superseded and isn’t secure.
  • WPA-PSK (AES): This chooses the older WPA wireless protocol with the more modern AES encryption. Devices that support AES will almost always support WPA2, while devices that require WPA1 will almost never support AES encryption. This option makes very little sense.
  • WPA2-PSK (TKIP): This uses the modern WPA2 standard with older TKIP encryption. This isn’t secure, and is only a good idea if you have older devices that can’t connect to a WPA2-PSK (AES) network.
  • WPA2-PSK (AES): This is the most secure option. It uses WPA2, the latest Wi-Fi encryption standard, and the latest AES encryption protocol. You should be using this option. On devices with less confusing interfaces, the option marked “WPA2” or “WPA2-PSK” will probably just use AES, as that’s a common-sense choice.
  • WPAWPA2-PSK (TKIP/AES) (recommended): Our Comcast Xfinity router recommends this free-for-all option. This enables both WPA and WPA2 with both TKIP and AES. This provides maximum compatibility with any ancient devices you might have, but also ensures an attacker can breach your network by cracking the lowest-common-denominator encryption scheme. This TKIP+AES option may also be called WPA2-PSK “mixed” mode.

Devices Manufactured Since 2006 Must Support AES

WPA2 certification became available in 2004, ten years ago. In 2006, WPA2 certification became mandatory. Any device manufactured after 2006 with a “Wi-Fi” logo must support WPA2 enctyption. That’s now eight years ago!
Your Wi-Fi enabled devices are probably newer than 8-10 years old, so you should be fine just choosing WPA2-PSK (AES). Select that option and then you can see if anything doesn’t work. If a device does stop working, you can always change it back — although you may just want to buy a new device manufactured at any time in the last eight years.

WPA and TKIP Will Slow Your Wi-Fi Down


WPA and TKIP compatability options can also slow your Wi-Fi network down. Many modern Wi-Fi routers that support 802.11n and newer, faster standards will slow down to 54mbps if you enable WPA or TKIP in their options. They do this to ensure they’re compatible with these older devices.
In comaprison, even 802.11n supports up to 300mbps — but, generally, only if you’re using WPA2 with AES. Theoretically, 802.11ac offers theoretical maximum speeds of 3.46 Gbps under optimum (read: perfect) conditions.
In other words, WPA and TKIP will slow a modern Wi-Fi network down. It’s not all about security!
wifi logo

On most routers we’ve seen, the options are generally WEP, WPA (TKIP), and WPA2 (AES) — with perhaps a WPA (TKIP) + WPA2 (AES) compatibility mode thrown in for good measure.
If you do have an odd sort of router that offers WPA2 in either TKIP or AES flavors, choose AES. Almost all your devices will certainly work with it, and it’s faster and more secure. It’s an easy choice, as long as you can remember AES is the good one.

Wednesday, March 8, 2017

How to backup SQL logs and truncate them in BE 2012

If your SQL database is set to Full Recovery Mode, it maintains transaction logs.  If these logs are not truncated from time to time, they will grow and eventually fill up your disk.  BE will warn you that you need to truncate your log.
V-79-40960-37914 - Database database_name is configured to maintain transaction logs.  Transaction log backups are not being performed.  This will result in the log growing to fill all available disk space.  Regular log backups should be scheduled or the database should be changed to the simple recovery mode.
Before you change the recovery mode to Simple, you should check with the database owner because some applications require a Full Recovery Mode database.
To truncate SQL transaction logs on a regular basis, you need to set up a SQL log backup job which will backup the log and truncate it.  This is not so apparent in BE 2012 because BE 2012 requires you to do a full SQL database backup before you can backup SQL logs.

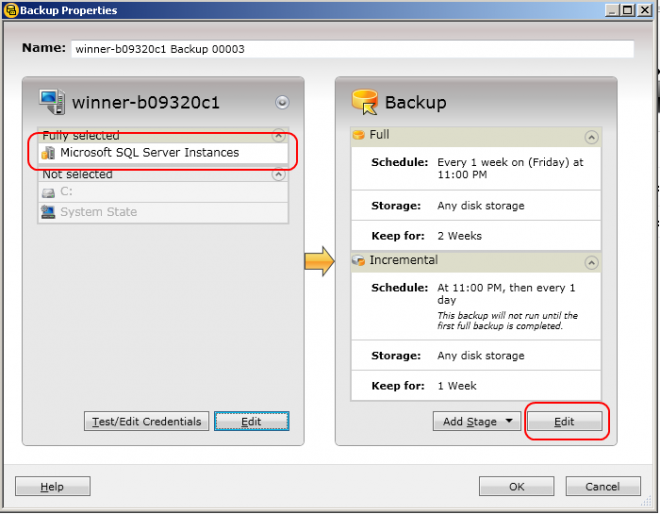
1) Create your SQL backup job.

Make sure you only select the Microsoft SQL Instances.  Do not include files in the backup because you would need to turn off AOF.

2) Edit your SQL backup job
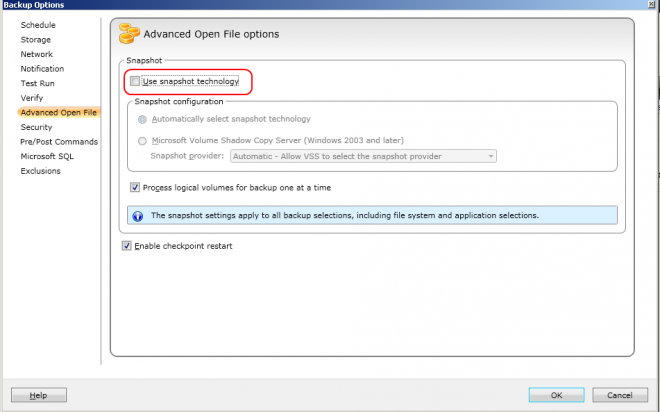
BE 2012 - Edit SQL backup job.png

3) Turn off AOF

You would need to turn off AOF by unchecking Use snapshot technologs.  Otherwise, you may encounter problems when you try to re-direct your SQL database restore later.
BE 2012 - Turn off AOF.png
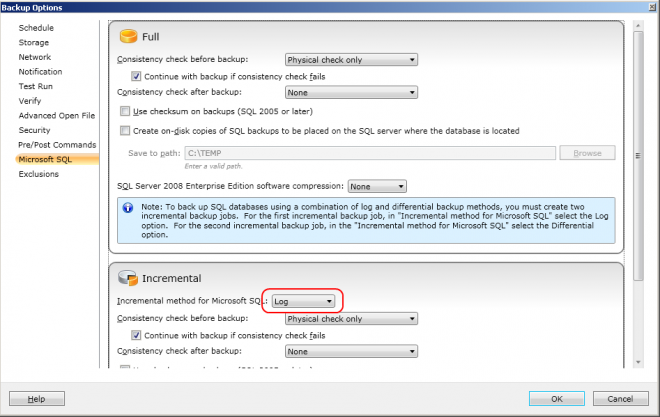
3) Check that the incremental job is backing up the transaction log
BE 2012 - Log backup job.png
If you do not want to do differential backups of your SQL databases, then this is all for the SQL part.  All you need to specify the schedule for the jobs, the media to use, etc.
You should schedule the log backup to be done AFTER the full database backup.  If you run the log backup before the full database backup and the database backup fails, then you might end up with nothing to recover your database.

4) Set up your differential SQL database backup

This step is optional.  Add another incremental job.
BE 2012 - add job.png
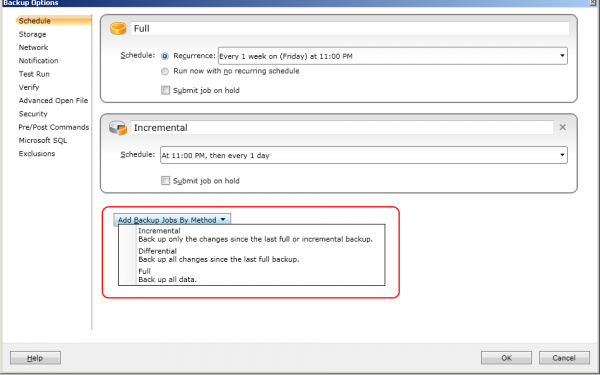
I know it is strange to add an incremental job to do a differential SQL backup, but you can only do differential backup on SQL databases, not incremental backup.

5) Change the method of the additional incremental job

BE 2012 - Differential SQL backup job.png
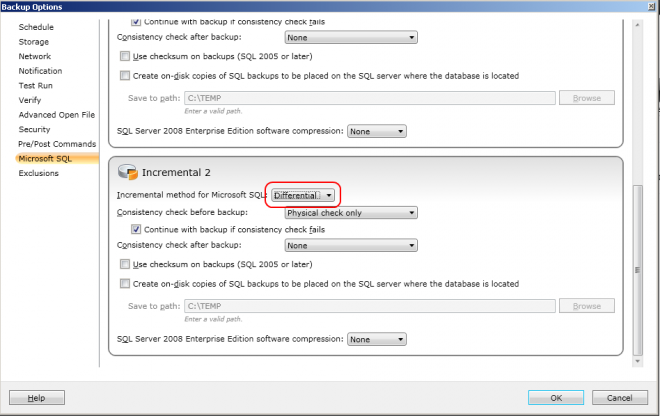
If you have differential database backups, you can either do your log backups after the full backup or after the full and differential backups.

Notes

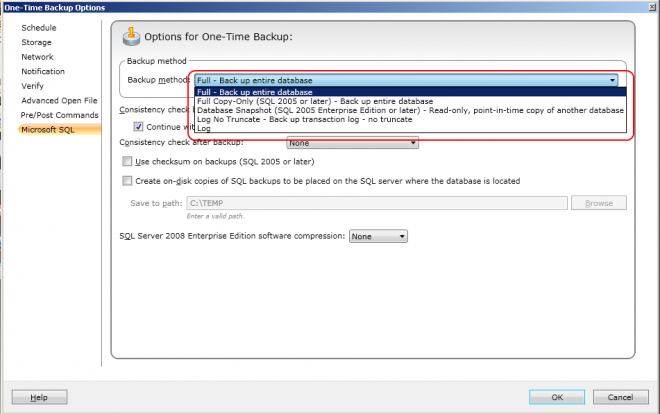
a) You can also truncate the SQL transaction logs on a one-off basis.  To do this, set up a one-time backup job, select only the SQL databases and then turn off AOF.  You then choose log for the backup option as in the screenshot below
BE 2012 - One-time SQL backup.png
b) Note that truncating the transaction logs does not recover the space occupied by the logs.  You would need to compact the logs to recover the space.  See these documents
http://www.symantec.com/docs/TECH33654
http://www.symantec.com/docs/TECH82950
c) If your database is set to Simple Recovery Mode and you attempt to do log backups on them, you will get this warning message
V-79-57344-33960 - A log backup was attempted on database discover that is not configured to support log backups. To change the configuration, use the SQL administration tools to set the recovery mode to Full.  A new full backup should be performed if this setting is changed before a log backup is run.
Note that some databases, like the Master database, cannot be set to Full Recovery Mode.
If you have a mixture of databases, i.e. some with Full Recovery Mode and some with Simple Recovery Mode, then you need to set up two backup jobs.
Job1 - with log backups, for databases with Full Recovery Mode
Job2 - without log backups, for databases with Simple Recovery Mode.  In Step 2 above, you would delete the incremental job.

Wednesday, March 1, 2017

How to Specify the Default Account in Mac OS X Mail

But what if you use one of the "different" accounts more often than the account suggested by Mac OS X Mail as the default? Make the account you use most often to send messages the default!

Specify the Default Account in Mac OS X Mail

To specify a default email account in Mac OS X Mail:
  • Select Mail | Preferences... from the menu.
  • Go to the Composing category.
  • Select the desired account under Send new messages from: (or Send new mail from:) (under Addressing:).
    • Select Account of selected mailbox to have OS X Mail choose the account based on the open folder; if you have your Gmail inbox open, for instance, if you start a new message, the Gmail address and account will be used as the default for sending.
  • Close the preferences window.

Specify the Default Account in Mac OS X Mail 1

To set the default account in Mac OS X Mail 1.x:
  • Select Mail | Preferences... from the menu.
  • Go to the Accounts tab.
  • Click on the account you want to make the default and
  • keep the mouse button pressed.
  • Drag the account to the top of the accounts list.
  • Release the mouse button.
Mac OS X Mail uses the topmost account in the account list as the default for outgoing messages. Of course, you can change the complete order of all accounts using this drag-and-drop method.
The individual account's folders under Inbox, for example, are also sorted in this order.

Very big/small letters when composing an email

Every time I compose a new email, the new message window shows very big letters.
For example, I can only see 6 English words on my 22″ monitor. The font I use is Arial size 10. This is very annoying as I just cannot see my message clearly. I have tried to turn off everything in Accessibility and it didn’t help. When I read email, then all is normal.
How do I get back to a normal size font again?
Zoom buttonIf your font looks smaller or bigger than the actually configured font size, your zooming factor has been set above or below 100%.
You can change it back in the following way;
Outlook 2016
When composing, go to the Format Text tab and click on the Zoom button.
When you are replying “inline” (within the Reading Pane), click on the “Pop Out” button at the top of the Reading Pane first to see the Format Text tab.
Outlook 2010 and Outlook 2013When composing, click on the Zoom button on the Home tab.
When you are replying “inline” (within the Reading Pane), click on the “Pop Out” button at the top of the Reading Pane first to see the Zoom button on the Home tab.
Outlook 2007
When composing go to the Format Text tab and click on the Zoom button.
Previous versions of Outlook You can only zoom when you have Word set as the email editor. The Zoom function can be found in the View menu.
Note:
The change in the zoom factor probably was caused by holding the CTRL button while scrolling. This is an alternative method to change the zoom factor.
Zoom options dialog
Set the zoom factor back to 100% in the Zoom options dialog.