Wednesday, January 28, 2015

Deploy a System Recovery Image

This walkthrough describes how to deploy a recovery solution to reinstall the factory image in the event of a system failure. Windows® Recovery Environment (Windows RE) supports several recovery scenarios. This topic describes two sample recovery solutions: using Windows RE with Windows Setup as the primary recovery tool, and using Windows RE with a custom recovery solution.
In Windows® 7, you can install a Windows RE image on any primary NTFS partition that is on the same disk as your Windows installation, provided the partitions is one of the following types:
  • MBR disks Type 0x7 or type 0x27. If type 0x27, it must be at the beginning of the disk.
  • GPT disks   Contains the PARTITION_MSFT_RECOVERY_GUID attribute.
For more information about partition requirements, see Understanding Disk Partitions.

In This Topic

Setup-based Recovery Solution

The setup-based solutions provide the end user an option to use Windows RE to reinstall the factory image in the event of a system failure.

Prerequisites

To complete this walkthrough, you need the following hardware and software:

Step 1: Configure the recovery partition

In this step, you configure a setup-based recovery solution by using the same Windows 7 image you deployed and the default Windows Recovery image that is contained in the Windows partition.
  1. Start the destination computer by using a Windows PE bootable media.
  2. Connect the computer to the device or network location containing the Windows 7 image:

    net use n: \\server\share\
    
  3. Move the default Windows Recovery image (Winre.wim) from the Operating System partition to the System partition (S:).

    mkdir S:\Recovery\WindowsRE
    move C:\Windows\System32\Recovery\winre.wim S:\Recovery\WindowsRE
    
    noteNote
    You can store the Winre.wim file on any drive, but you must place it in the following directory structure: \Recovery\WindowsRE.
  4. Configure Windows to recognize the default Windows Recovery image (Winre.wim):

    C:\Windows\System32\Reagentc.exe /setreimage /path S:\Recovery\WindowsRE /target C:\Windows
    
  5. Copy your Windows 7 image (.wim) file to the recovery partition (R:).

    copy N:\images\my-windows-partition.wim R:\
    
  6. Rename the image file to Install.wim.

    rename R:\my-windows-partition.wim R:\install.wim
    
    noteNote
    You can store the Windows recovery image in any folder, but the file must be named install.wim.
  7. Configure Windows RE to recognize your Windows 7 image (.wim) file.

    C:\Windows\System32\Reagentc.exe /setosimage /path R:\ /target C:\Windows
    

Step 2: Test your recovery solution

In this step, you start the destination computer to verify that the recovery tool can be started.
  1. Remove the CD-ROM and any USB drives.
  2. Start the destination computer and complete Windows Welcome.
  3. Click Start, click Control Panel, click System and Security, click Backup and Restore, and then click Recover system settings or your computer.
  4. Click Advanced recovery methods and then click Reinstall Windows
  5. Follow the on-screen instructions. The computer restarts.
  6. Verify that the computer starts in Windows RE. The system reinstalls Windows by using the image that you placed in the recovery partition. When the installation is complete, you have the option to restore other files you have backed up.

Custom Recovery Solution

By using a custom recovery solution, you can integrate a non-Microsoft recovery solution with Windows RE. In the event of a failure, an end user can restore their computer to a factory image by using a non-Microsoft solution.

Prerequisites

To complete this walkthrough, you need the following software and hardware:
  • Customized Windows RE image, as described in step 4 of Walkthrough: Create a Windows RE Image.
  • Technician computer. For more information, see Building a Technician Computer.
  • Bootable Windows PE media with the ImageX tool. This can be a CD-ROM, a USB flash drive, or another bootable media. For more information, see Windows PE Walkthroughs.
  • A reference Windows 7 image stored on an external location, such as a network share or an external USB hard drive.
  • A destination computer with the Windows and system partitions applied, and an empty recovery partition. For more information, see Apply Images by Using ImageX.

Step 1: Configure the Recovery Partition

In this step, you configure your custom recovery solution and the default Windows recovery image that is contained in the Windows partition.
  1. Start the destination computer by using your Windows PE bootable media.
  2. Connect the computer to the device or network location containing the Windows 7 image:

    net use n: \\server\share\
    
  3. Move your custom Windows RE image (Winre.wim) to the recovery partition (R:).

    Mkdir R:\Recovery\WindowsRE
    Move N:\images\winre.wim R:\Recovery\WindowsRE\
    
    noteNote
    You can store the Winre.wim file on any drive, but you must place it in the following directory structure: \Recovery\WindowsRE.
  4. Configure your custom Windows RE image and specify that when the F1 key (scan code = 0x3b00) is pressed during startup, Windows RE and the custom recovery application launch:

    C:\Windows\System32\Reagentc.exe /setreimage /path R:\Recovery\WindowsRE /target C:\Windows /bootkey 3b00
    
    For other examples of keyboard scan codes, see REAgentC Command-Line Options. For more about customizing the bootstrapping process, see Custom Bootstrap Actions.
  5. Configure the operating system to recognize the custom recovery tool you included in your Windows RE image:

    C:\Windows\System32\Reagentc.exe /setosimage /customtool /target C:\Windows
    

Step 2: Test your recovery solution


In this step, you start the destination computer to verify that the recovery tool can be started. In addition, you verify that the custom factory recovery application can be launched from the Windows RE menu.
  1. Remove the CD-ROM and any USB drives.
  2. Restart the computer.
  3. Start the destination computer and complete Windows Welcome.
  4. Restart the computer. Immediately after POST, hold down the F8 key. The Advanced Boot Options menu appears.
  5. Select Repair your computer and then press Enter. Windows RE starts.
  6. Follow the on-screen instructions to select a keyboard layout and provide credentials.
  7. Verify that a link to your custom recovery application appears on the Windows RE menu.
  8. Restart the computer.
  9. Immediately after POST, hold down the F1 key. Windows RE starts.
  10. Verify that your custom recovery application launches automatically.

Monday, January 26, 2015

Windows 10 Release Date, Free Upgrade News: New Features Revealed By Microsoft

Windows 10


Microsoft Corp. has announced that Windows 10 will be available for free to certain Windows users as it released more information on its latest operating system.
Joe Belfiore, corporate vice president of Microsoft's operating systems group, said Windows 10 would be free for those who currently use Windows 7, Windows 8.1 and Windows Phone 8.1.
After the new operating system is released, those who want to upgrade free of cost will have one year to take advantage of the offer. However, some editions will be excluded, Belfiore said during a demo of the operating system on Wednesday.
The demo was attended by a select audience and members of the Insiders testing program, who will be the first to get Windows 10 in the coming week. At the demo, the consumer portion of the operation system was previewed.
Meanwhile, the much anticipated preview of Windows 10 for mobile devices, earlier scheduled to take place on Wednesday, was pushed to February.
It was also announced that a number of features previewed during Wednesday's demo will not make it to a build that will be released soon. Instead, the new features will be incorporated into the build gradually over four to five months.
Among the new features pointed out by Belfiore was Cortana, the digital assistant which is already available on Windows phones and will now come to the desktop version of the software. Cortana will be featured adjacent to the start button on the desktop's taskbar and can be given commands via text or voice input. The assistant can answer basic questions about the weather, search the web for specific answers, and find files on the local machine, OneDrive account and even on a business network, all based on natural language questions.
Cortana also works along with the new web browser codenamed Spartan which will allow users to highlight and note details on a web page and then share the full page including comments with other users. Spartan will also feature a reading mode, which will remove all ads from a webpage and only leave the text.
In addition to the new features of Windows 10, Microsoft also unveiled the Windows HoloLens headset, Windows Holographic for 3D imaging in the operating system and the HoloStudio application which can be used to create holograms.
While an exact date for Windows 10's release has not yet been confirmed, many reports are touting that the new OS will be available from October 22, 2015.

Dynamics GP Smartlist is empty on one client computer

MS Dynamics GP Smartlist is empty on one client computer only. However, when I log on to another computer with the same user. It is working fine. The problem is on the on the local computer. I already uninstall and reinstall GP 10 still it didn't work.

Solution:

1. Compare the Dynamics.set file of the system that works and not working.

2. Check the language for Unicode under Region and Language and compare the same with the working one. Please refer the following window where the unicode language is selected.


It solved the issue when I changed the language to English.

Creating Window RE Using Windows AIK

Create Windows RE using the Windows Automated Installation Kit (AIK).

These instructions are also included in the Windows AIK. Please note that the ReadMe file that accompanies the Windows AIK contains an important update to the instructions.

Note: If you install Windows RE using the Windows OPK, please continue to follow the instructions in the Windows OPK. Those instructions remain unchanged. Use these instructions only if you do not have access to the Windows OPK.

Step 1: Copy Windows PE from the Installation Media
The version of Windows PE that ships with the Windows AIK does not contain the components required to support Windows RE. However every Windows installation disk contains Windows RE that can be used for recovery of Windows Vista. Therefore, we will use the Windows RE from the Windows installation media.
  1. On your technician computer, click Start, point to All Programs, then Windows AIK, and then click Windows PE Tools Command Prompt.
    The menu shortcut opens a command prompt window and automatically sets environment variables to point to all the necessary tools.
  2. Create a directory for the Windows PE image and a mount point
            mkdir c:\winre_image
            mkdir c:\winre_mount
  1. Copy the Windows PE image from the installation media using ImageX
            imagex.exe /export /boot e:\sources\boot.wim 2 c:\winre_image\winre.wim “Windows Recovery Environment”
  1. Mount the image using ImageX
            imagex /mountrw c:\winre_image\winre.wim 1 c:\winre_mount
Step 2: Add Windows RE shell script
The Windows PE we copied in step 1, does not launch Windows RE automatically. In this step, we will create a script called winpeshl.ini that will launch the Windows RE shell at startup.
  1. By using a text editor, create a file called winpeshl.ini that contains the following text:
    [LaunchApp]
    AppPath=x:\sources\recovery\recenv.exe
  1. Copy this file to \Windows\System32 directory in your mounted Windows RE directory. For example,
              copy winpeshl.ini c:\winre_mount\Windows\System32
Step 3: Add mass-storage drivers (optional)
If necessary, you can include third-party drivers (.inf) in your Windows RE image by using the peimg.exe /inf command. For example,
    peimg.exe /inf= C:\winre_x86\mount\Windows
        Where  is the location of the. inf file.
Step 4: Add custom tools to Windows RE (optional)
You can customize Windows RE shell by creating an .xml file called WinREConfig.xml. WinREConfig.xml enables you to define custom support and diagnostic tools within Windows RE. This step is optional. For more information, refer to the Windows RE documentation in the Windows AIK.
Step 5: Save changes to the image
Unmount the image by using ImageX. For example,
    imagex.exe /unmount /commit c:\winre_mount


The WinRE.wim file is now ready to be deployed on the harddisk or a WDS server. 

Sunday, January 25, 2015

Dell: How to restore your Windows 7 computer to factory settings

  You may need to restore your computer to factory settings to fix some computer problems or crashes or to clear your personal information from the system.

Follow these instructions to reset your computer using the Dell Factory Image Restore that come from the factory on your computer.


Notes:
  • This process only sets the C: drive back to factory settings and leaves the other partitions alone.

  • If you have deleted the Dell Factory Image Restore partition, then the option to use the Dell Factory Image Restore will not appear and you will have to reinstall the Operating System manually or from a backup. For more information refer to Dell Knowledge Base articles, How to manually reinstall Windows 7 on a Dell computer? (when you have installation disks) or My Dell Computer Did Not Come With Disks.

Warning: Restoring your computer to the factory settings will remove all files and programs except those it came with. You will lose all personal files, including photos, emails and programs, if you do not back up your files and data

To restore your Windows 7 computer to factory settings


  1. Back up important files and data. If you do not back up your files, you will lose them.
  2. Turn off your computer.
  3. Disconnect everything but the monitor, keyboard and mouse. This includes your:
    • scanner
    • printer
    • modem or network cables
    • mobile phone and tablet
    • USB flash drive or other external hard drive
  4. If your laptop is docked, remove it from the docking station.
  5. When the Dell logo appears on the screen, press F8 several times to open the Advanced Boot Options menu.
    Note: If the Advanced Boot Options menu doesn't open, wait for the Windows login prompt. Then restart the computer and try again.
  6. Use the Arrow keys to select Repair Your Computer and then press Enter.
  7. On the System Recovery Options menu, select a keyboard layout and click Next.
  8. On the next screen you can log in as a local user or the Administrator.
    Note: Use the drop down menu to the right of User name: to select the local user or the Administrator account and enter the password for that account. If you have not set up a password on the local user account leave the password space empty and click OK.
  9. Depending on your configuration, you may need to select Dell Factory Tools and then Dell Factory Image Restore.
  10. Click Next to open the Confirm Data Deletion menu.
  11. Select the Yes, reformat hard drive and restore system software to factory condition check box and click Next.
    Note: The restore process begins and may take five or more minutes to complete. A message appears when the operating system and factory-installed applications have been restored to factory condition.
  12. After the restore operation is complete, click Finish to restart the computer.
  13. Restore any data or programs you want from back up files.

Create a maintenance backup plan in SQL Server 2008 R2 using the wizard

Check SQL Server Agent service

Verify that the SQL Server Agent service is running and set to automatic. The maintenance plan depends on this service to run.
  1. On the server, open the Run dialog box, type in services.msc and press Enter.
  2. Find the SQL Server Agent service in the list and double-click it.
  3. Cick the Recovery tab, and set the failure value to Restart the Service.
  4. On the General tab, select Automatic as the startup type, and then start the service.

Create the maintenance plan

  1. Launch the SQL Management Studio and log in.
  2. In the Object Explorer pane, go to Management > Maintenance Plans, right-click Maintenance Plans, and select Maintenance Plan Wizard.
  3. On the welcome page of the wizard, click  Next.
  4. On the Select Plan Properties page, specify a name for the plan, select  Separate schedules for each task, and then click Next.
  5. On the Select Maintenance Tasks page, select the Back Up Database (Full)Back Up Database (Differential), and Back Up Database (Transaction Log) check boxes, and then click Next.
  6. On the Select Maintenance Task Order page, leave the order as shown, and then click Next.

Define full backup settings

On the Define Back Up Database (Full) Task page, set up the full backup  according to the following instructions.
  1. Select the databases that you want to back up (typically All user databases).
  2. Specify when you want the backups to expire. In the following example, 14 days is specified.
    Note: This setting overwrites the oldest backup file for rotation.
  3. Select your backup media (typically Disk).
  4. Specify a location (either Default or as assigned by you) for your backup files.
  5. Select the Verify backup integrity check box.
  6. To configure the scheduling options for this task, click Change near the bottom of the page.
  7. In the Job Schedule Properties dialog box, select Recurring for the Schedule type.
  8. Specify the frequency of the backup. The following example shows full backups running on Monday, Wednesday, and Friday. Alter this to fit your backup plan.
  9. Adjust the daily frequency according to when your backup needs to run.
  10. Under Duration, adjust the Start and End dates. In the example No end date is selected.
  11. Click OK.
  12. On the Define Back Up Database (Full) Task page of the Maintenance Plan Wizard, click Next.

Define differential Backup Settings

On the Define Back Up Database (Differential) Task page, set up the differential backup according to the following instructions. The settings are similar to the settings for the full backup.
  1. Select the databases that you want to back up (typically All user databases).
  2. Specify when you want the backups to expire.
  3. Select your backup media (typically Disk).
  4. Specify a location (either Default or as assigned by you) for your backup files.
  5. Select the Verify backup integrity check box.
  6. To configure the scheduling options for this task, click Change near the bottom of the page.
  7. In the Job Schedule Properties dialog box, select Recurring for the schedule type.
  8. Specify the frequency of the backup. For example, you could choose to run differential backups on Tuesday, Thursday, Saturday, and Sunday.
  9. Under Duration, adjust the daily frequency according to when your backup needs to run.
  10. Adjust the Start and End dates.
  11. Click OK.
  12. On the Define Back Up Database (Differential) Task page of the Maintenance Plan Wizard, click Next.

Define transaction log backup settings

On the Define Back Up Database (Transaction Log) Task page, set up the transaction log backup according to the following instructions.
  1. Select the databases that you want to back up (typically All user databases).
  2. Do not select the Backup set will expire check box.
    Expiration of transaction log backups is configured in the next section, “Set up the transaction log cleanup task."
  3. Select your backup media (typically Disk).
  4. Specify a location (either Default or as assigned by you) for your backup files.
  5. Copy the path for the backup file and paste it to Notepad. You will need to refer to this path in later steps.
  6. Select the Verify backup integrity check box.
  7. To configure the scheduling options for this task, click Change near the bottom of the page.
    Note : You need to determine transaction log backup intervals based on transaction log growth. It might be necessary to run the transaction log backups at  shorter intervals to prevent transaction logs from growing.
  8. In the Job Schedule Properties dialog box, select  Recurring for the Schedule type.
  9. Specify the frequency of the backup. In the following example, the transaction log backups are running daily.
  10. Adjust the daily frequency. In the following example, this is set to run every hour.
  11. Under Duration, adjust the Start date and End date fields.
  12. Click OK.
  13. On the Define Back Up Database (Transaction Log) Task page of the Maintenance Plan Wizard, click Next.
  14. On the Select Report Options page, specify how you want to save the details of the maintenance plan, and then click Next.
  15. On the Complete the Wizard page, click Finish.
  16. On the Maintenance Plan Wizard Progress page, click Close.
  17. When you are returned to the SQL Server Management Studio main window, press F5 to refresh the maintenance plan with the new settings.
    The new maintenance plan is listed under Maintenance Plans in the Object Explorer pane.

Set up the transaction Log Cleanup Task

This section demonstrates how to set up a maintenance cleanup task. This task is set to clean up the transaction logs after three days. This setting keeps the one-hour transaction logs for three days, until the maintenance cleanup task deletes the old data. The transaction log cleanup must include a series of three days, which ensures that if you need to revert back to the second differential backup, you can apply the transaction logs from that time period. The goal is to have enough transaction log backups between the full and differential backups.
  1. Click the maintenance plan name.
  2. In the Design pane, select the Subplan_3.
  3. In the Toolbox pane, select Maintenance Cleanup Task and drag it into the transaction log backup area under the Design pane.
  4. Right-click on the Maintenance Cleanup Task and choose Edit.
  5. In the Maintenance Cleanup Task dialog box, select Backup files.
  6. Select Search folder and delete files based on an extension.
  7. In the Folder text box, enter the path that you pasted into Notepad in the previous task. Ensure that you include the same path that your transaction logs are backing up to.
  8. Enter the file extension type, trn.  Do not precede the extension with a period.
  9. Select the Include the first-level sub-folders check box.
  10. Select the Delete files based on the age of the file at task run time check box, and set the file age to 3 Days.
  11. Click OK to return to the Management Studio main window.
  12. Drag the green arrow from the differential backup task to the maintenance cleanup task.
  13. Double-click the connected green line.
  14. In the Precedence Constraint Editor, set Value to Completion.
    This setting allows the task to become conditional, meaning that if the differential backup did not run, then the transaction cleanup task is not run, or if the backup did run, the cleanup task is run.
  15. Click OK to return to the Management Studio main window.
    The line should now appear blue.
  16. Save your work by selecting Save All from the File menu.
    You have finished setting up your maintenance backup plan. You can adjust your backup plan to your needs, but you should first test it.

Test your setup

After you are done setting up your maintenance plan, verify that it works. You can wait a few days to see if the job completes, or you can force the job to run by performing the following steps.
  1. In the Object Explorer pane of SQL Server Management Studio, browse to SQL Server Agent > Jobs.
  2. Right-click the maintenance plan and select Start Job at Step.
    This command runs the first section of the maintenance plan.
  3. If the job completes without error, run the next step of the maintenance plan and test-run the setup. Repeat this step for all subplans that you created in the maintenance plan.
If all of your steps run without error, your maintenance plan works and you are finished.

Troubleshoot errors by viewing the job history

If any of the jobs fail when testing the maintenance plan, view the job history to see what failed.
  1. In the Object Explorer pane, right-click the failed subplan and select View History.
    The Log File Viewer window, which shows the job history, is displayed.
    If the job failed  a red X icon is displayed next to the time that you ran the job.
  2. Click the row for the failed job.
    Details about the error appear below the table. Scroll or expand the pane to see more information.
  3. Troubleshoot the error and repeat the test-job.

When your maintenance plan is reliable, check it in a few days to see if it is running as expected. Verify that the .bak files are being removed after the expiration and that the transaction logs are being cleaned up after three days.

Thursday, January 22, 2015

Microsoft office cannot verify the license for the application. A repair attempt failed or was cancelled by the user. The application will shut down

Error message, "Microsoft office cannot verify the license for the application. A repair attempt failed or was cancelled by the user. The application will shut down". I get this error message when opening Office.


Method: 1
Make sure the system service "Office Software Protection Platform Service" is automatic and started.
1. Click on Start, type 'services.msc' (without quotes) in search programs and files box above Start and press enter
2. Locate ‘Office Software Protection Platform Service’list right click on it and click on properties.
3. Under General tab, Startup type, Automatically
4. Click Apply and OK.

Method: 2
You may repair Office 2010 using the link below and check if licensing works fine:
http://office.microsoft.com/en-us/excel-help/repair-or-remove-office-2010-HA010357402.aspx

Method: 3
If the above steps fail, run the 'Fix It' tool available for Office suite from the link mentioned below this will remove all the installed components of Office
Note: Before running the ‘fix it’ tool make sure that you have the Office 2010 installation source file and its product key to reinstall it back.
https://support.microsoft.com/kb/290301
Note: If you are using Windows 64 bit operating system, save the ‘Fix it’ on desktop before running it.
Once you have uninstalled Office you may use the installation source file and the product key to reinstall Office 2010 and verify the status.

Wednesday, January 21, 2015

Printer Paper Usage Logger


PaperCut Print Logger Screenshot

The free print logging program

PaperCut™ Print Logger is a free print logging application for Windows systems designed to provide real-time activity logs detailing all printer use. Information tracked includes:
  • the time of print,
  • the name of the user who printed,
  • the total number of pages,
  • document names and titles,
  • other print job attributes such as paper size, color mode and more.
Print audit logs are available in a viewer friendly HTML format, or in CSV or Excel format for advanced users needing the data for further analysis.

Highlights...

  • 100% free!
  • Easy to use HTML interface.
  • Now available in English, French, German, Japanese, Chinese (Traditional), Chinese (Simplified), Italian and Spanish.
  • Monitor printing on all major printer makes and models.
  • Real-time print logs ensure data is always current and live.
  • Printer usage logs are available in Microsoft Excel format allowing for detailed print analysis and charting.
  • Compatible with both desktop and server versions of Microsoft Windows print queues.
  • Unobtrusive - no need to modify the printing process or configure printers differently.

Download PaperCut Print Logger

Windows download for all languages.
Download Now
999 KB

FAQ

Why is PaperCut Print Logger free?
PaperCut Print Logger provides a way to get a "taste" of some of the benefits our other applications. Our main development focus is our print management software applications like PaperCut NG and PaperCut MF. If you need more than just basic print auditing, please check our other applications.
Can I install PaperCut Print Logger on my server and monitor all network printing?
If your server is set up to host print queues and workstations print to these shared queues, then installing PaperCut Print Logger on the server will monitor all printing. Computers with individually attached desktop printers will need Print Logger installed locally if monitoring these printers is desired. Consider PaperCut NG if you require centralized logging from multiple systems.
Do you provide support for PaperCut Print Logger?
Because Print Logger is a free application, we're not able to provide official support. If however you have a quick question, please feel free to contact support and our developers will do their best to help you out.
I have a virtual PDF printer or FAX printer installed. How do I stop PaperCut Print Logger from monitoring this printer/device?
By default, Print Logger will ignore and not monitor printing on most popular virtual printers. Printers can be ignored by defining the printer's name in the IgnoredPrinters setting in the configuration file located at:
C:\Program Files\PaperCut Print Logger\papercut-logger.conf
Remember to restart the PaperCut Print Logger Service in Control Panel -> Services to apply this change.
I notice you offer solutions for Apple Mac and Linux. Why is Print Logger only available for Windows?
We may look at developing a version for Mac or Linux in the future. We first need to gauge popularity. If you're interested in a version for this platform, please email support and put your vote in!
Are you planning any new features?
The goal of Print Logger is to do one job (print logging) and do it well. We may make minor tweaks and will continue to support new hardware. The main development goal is to provide a basic print audit log and we may add more features around this soon. If you're looking for advanced print management features please take a look at PaperCut NG.
Does Print Logger support Microsoft Cluster/Failover Server?
Not officially, but you may be able to set it up using a similar procedure to the cluster setup notes for PaperCut NG. For official support in a cluster environment, please consider our other applications.
Can I use the data for reporting?
The raw print log data recorded is available in a Microsoft Excel format. You may be able to use many of the features of Excel or a similar program to summarize and construct reports. If you're after pre-built reporting features, please consider PaperCut NG.
Where can I find the download?
The latest version of PaperCut Print Logger can always be downloaded from the "Download Now" link at the top of this page on www.papercut.com .
What are the different platforms supported by PaperCut Print Logger?
PaperCut Print Logger supports the print spooler service running on the following platforms:
  • Microsoft Windows Server 2008 (any edition)
  • Microsoft Windows Server 2003 (any edition)
  • Microsoft Windows 7 (any edition)
  • Microsoft Windows Vista (any edition)
  • Microsoft Windows XP (any edition)
What languages is PaperCut Print Logger available in?
PaperCut Print Logger is available in:
I’ve just unboxed a new printer, how do I add it to Print Logger?
Print Logger draws its information regarding the printers from the Windows spooler, and will automatically detect when a new printer is added. When a new printer is added, Print logger will begin monitoring the new queue and logging usage.
I have a virtual PDF printer or other virtual printer installed. How do I enable PaperCut Print Logger to monitor this print queue?
By default, Print Logger will ignore and not monitor printing on most popular virtual printers. This setting can be overridden by setting the Ignorevirtualprinters setting in the configuration file located at:
C:\Program Files\PaperCut Print Logger\papercut-logger.conf
Under the line 'IgnorePrinters=' add:
Ignorevirtualprinters=off
Remember to restart the PaperCut Print Logger Service in Control Panel -> Services to apply this change.   

Crash when leaving browser page | Flash Player

                                         Issue

Adobe Flash Player crashes when exiting a page that has SWF file content and the RealPlayer "browser download button" feature is enabled.

Solution:
Remove RealPlayer or disable the RealPlayer browser download button in your browser's add-on preferences. To disable the download button:
Internet Explorer
  1. Choose Tools > Manage Add-ons.
  2. Choose Enable or Disable Add-ons.
  3. In the Add-ons window, select "Real Player Download and Record Plugin for Internet Explorer"
  4. Click Disable in the settings area at the bottom of the window.
  5. Close and reopen the browser.
Firefox

  1. Choose Tools > Add-ons.
  2. In the Add-ons window, select "Real Player Browser Record Plugin."
  3. Select either Disable or Uninstall.
  4. Close and reopen the browser for the change to take effect.         

Tuesday, January 20, 2015

Migrating SQL Reporting Services to a new server by moving the Reporting Services databases

Backup Files and Data

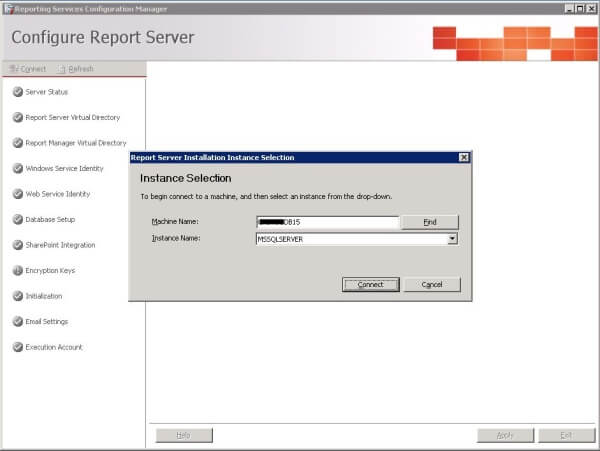
Backup the encryption key for the report server database. The report server encryption key is backed up using the Reporting Services Configuration Manager. For SQL 2005 navigate to Start/All Programs/Microsoft SQL Server 2005/Configuration Tools/ and click Reporting Services Configuration. On the Instance Selection dialog enter Machine Name and Instance Name and click Connect.
Reporting Services Configuration Manager
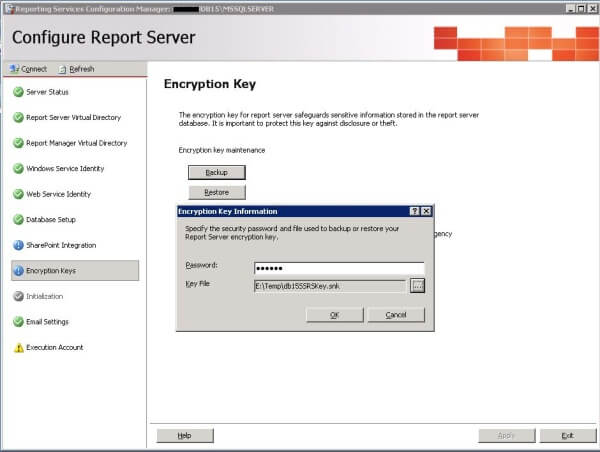
In the navigation panel on the left select Encryption Keys, then click Backup. Enter a Password in the Encryption Key Information dialog and click the button next to Key File to specify a location and name for the key backup file.
Reporting Services Configuration Manager
Click Exit to exit the Reporting Services Configuration Manager. Microsoft recommends backing up the report server configuration files. As I went through the process I did not need these files later in the process, but backed them up anyway. Here is a list of the files and their locations in a SQL 2008 installation on the E: drive.
  • Rsreportserver.config - E:\Program Files\Microsoft SQL Server\MSRS10_50.MSSQLSERVER\Reporting Services\ReportServer
  • Rssvrpolicy.config - E:\Program Files\Microsoft SQL Server\MSRS10_50.MSSQLSERVER\Reporting Services\ReportServer
  • Report Server web.config - E:\Program Files\Microsoft SQL Server\MSRS10_50.MSSQLSERVER\Reporting Services\ReportServer
  • Rswebapplication.config - E:\Program Files\Microsoft SQL Server\MSRS10_50.MSSQLSERVER\Reporting Services\ReportServer
  • RsmgrPolicy.config - E:\Program Files\Microsoft SQL Server\MSRS10_50.MSSQLSERVER\Reporting Services\ReportServer
  • Report Manger web.config - E:\Program Files\Microsoft SQL Server\MSRS10_50.MSSQLSERVER\Reporting Services\ReportServer
  • ReportingServicesservice.exe.config - E:\Program Files\Microsoft SQL Server\MSRS10_50.MSSQLSERVER\Reporting Services\ReportServer\bin
  • Machine.config for ASP.NET if you modified it
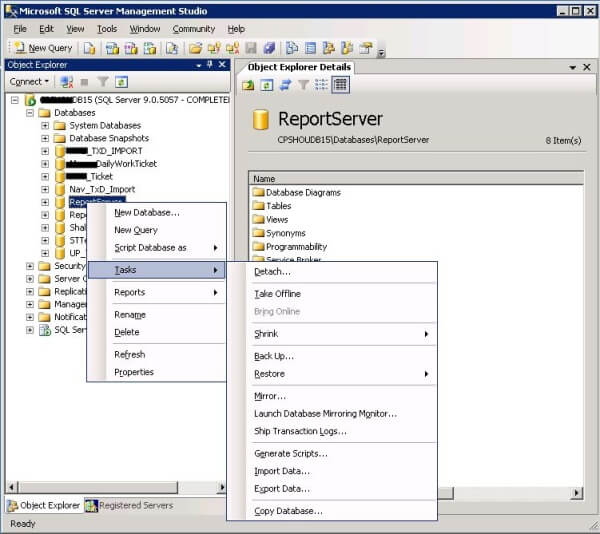
Backup the report server database using any supported method for backing up SQL Server databases. I choose to backup the databases using SQL Management Studio. Microsoft states that both the ReportServer and ReportServerTempDB databases should be backed up and restored to the new server. In SQL Management Studio expand Databases and right click the ReportServer database, select Tasks and select Back Up....
SQL Management Studio
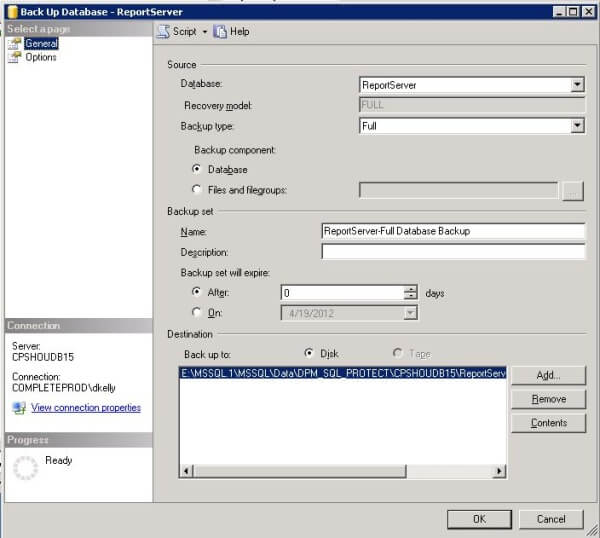
Make sure the Backup Type is set to Full and specify a location and filename for the backup.
SQL Management Studio
Do the same tasks for the ReportServerTempDB database.
Note: If the database is using the Full recovery model, use the following script to back it up to avoid breaking the log chain, 'With Copy_only' will make a copy only backup and will not break the log chain:
Backup Database ReportServer To Disk='E:\Temp\ReportServer_04192012.bak' With Copy_only

Move Report Server Database and Configure Report Server

If you are moving the databases to a server that has never hosted SQL Reporting services you will need to create the RSExecRole, click this link for instructions.
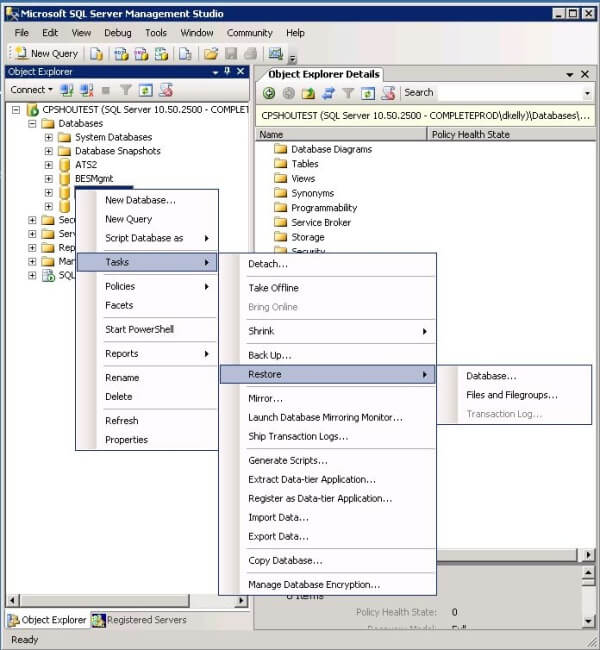
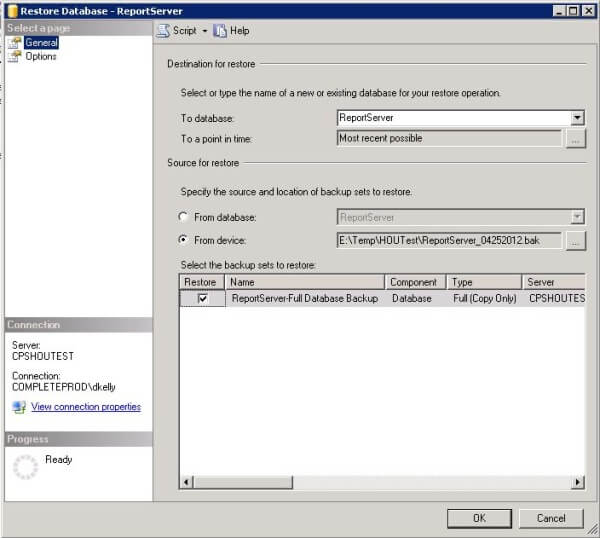
When ready, restore the ReportServer and ReportServerTempDB databases to the new server. In my case I am replacing the existing Report server databases. In SQL Management Studio expand databases and right click the ReportServer database, from the pop up menu select Tasks/Restore/Database.
SQL Management Studio
Make the entries in the Restore Database dialog appropriate for the backup you took. In my case it is a file stored on the local disk. Note: To gain exclusive access to the database for the restore I had to stop the SQL Server Reporting Services (MSSQLSERVER) service.
SQL Management Studio
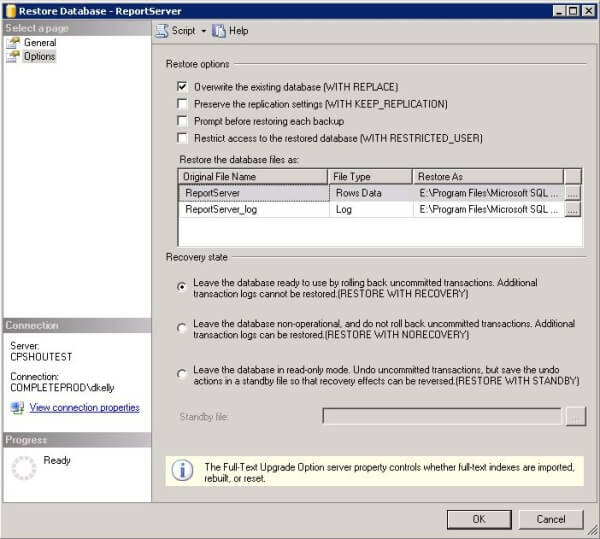
In the Options page of the Restore Database dialog check 'Overwrite the existing database (WITH REPLACE)', leave the database ready for use and use the buttons under 'Restore As' to locate the physical database files (existing .mdf and .ldf files).
SQL Management Studio
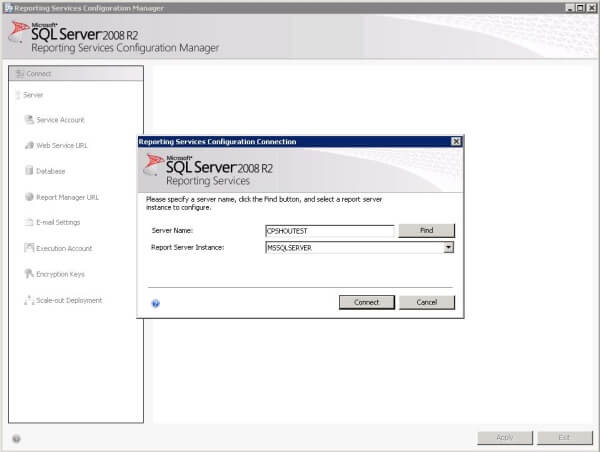
Once the ReportServer database has been restored repeat the process for the ReportServerTempDB database. If your reporting installation includes custom items you must re-deploy those items, refer to the 'Move Custom Assemblies or Extensions' section of the migration document. My installation does not include custom items so I will not cover this section. Now that the databases and custom items (if any) have been moved you must use the Report Services Configuration tool to configure Reporting Services. Navigate to Start/All Programs/Microsoft SQL Server 2008 R2/Configuration Tools and click Reporting Services Configuration Manager. Enter the Server Name and Report Server Instance in the Reporting Services Configuration Connection dialog and click Connect.
Reporting Services Configuration Manager
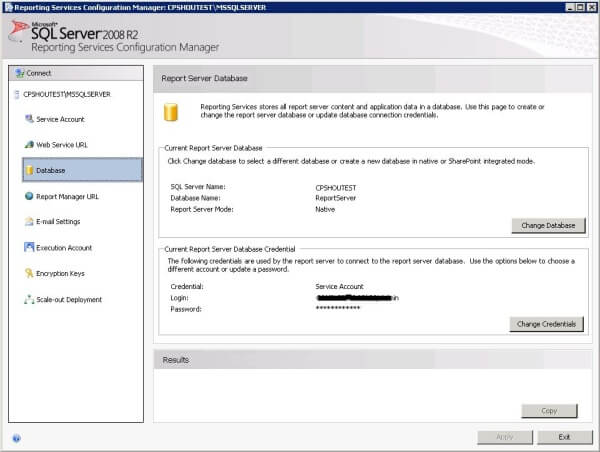
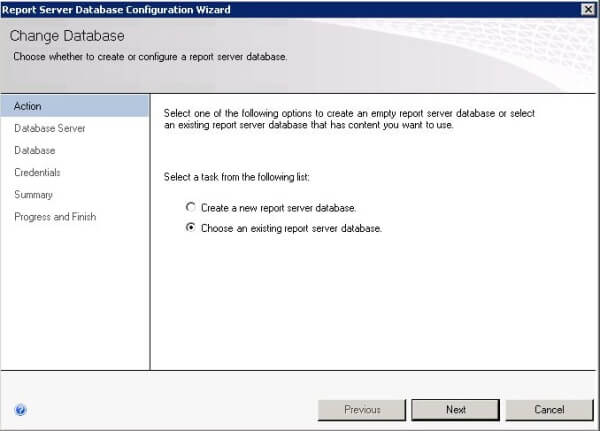
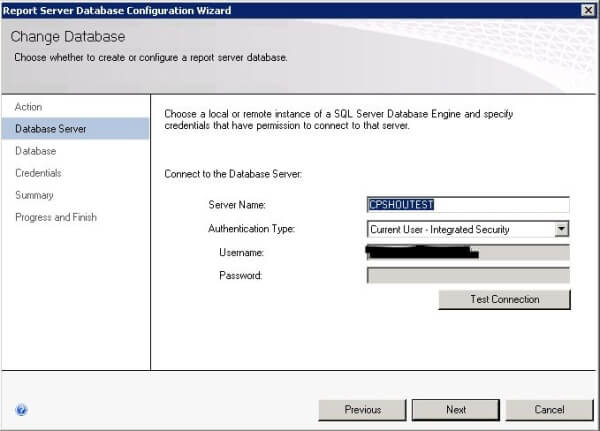
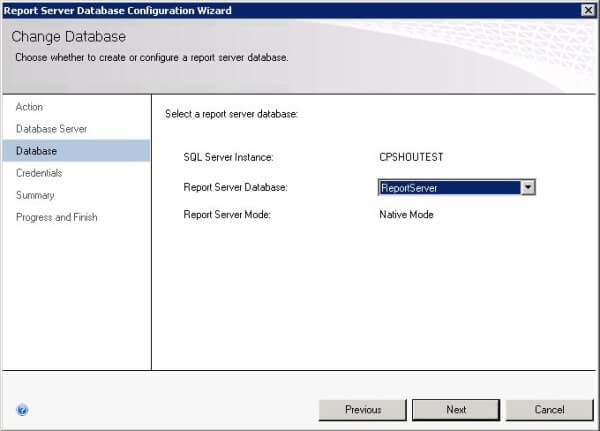
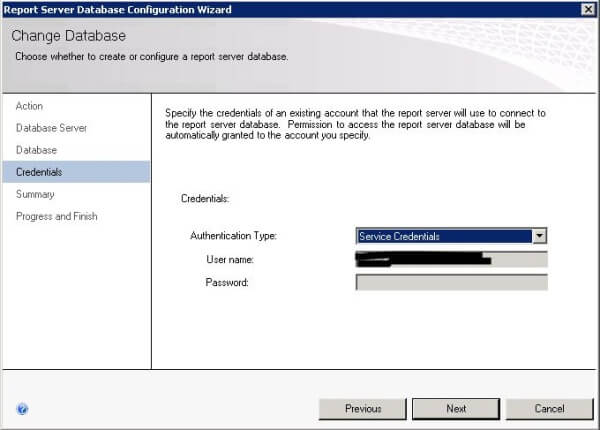
If you stopped the Reporting Services service during the restore process click the Start button to start the service. If needed configure the URLs for the Report Server and Report Manager, instructions can be found in the Migration document under the Configure the Report Server section, I did not need to do this. For Reporting Services to recognize there is a different database you must go through the Configure Database process. In the Navigation panel click Database then click the Change Database button.
Reporting Services Configuration Manager
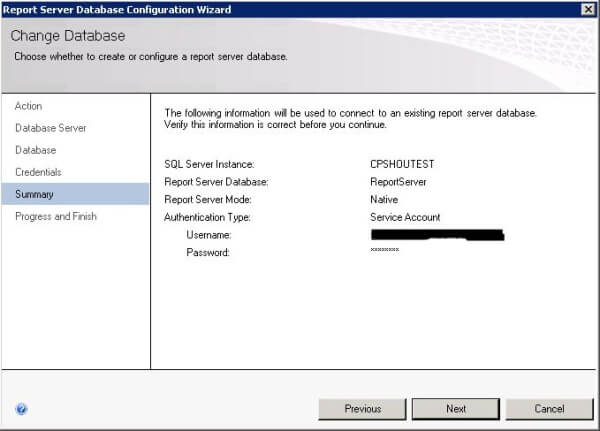
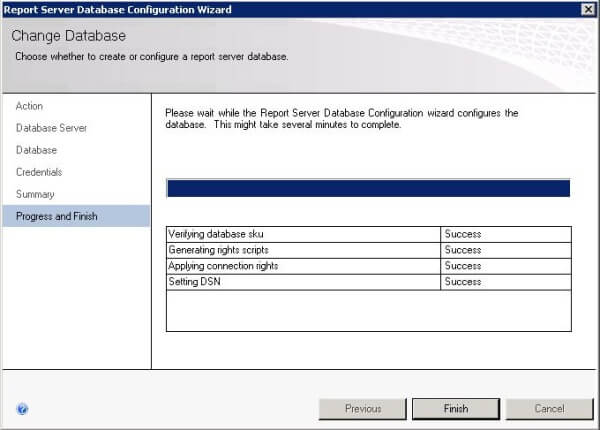
The following images show the screens and settings when configuring the database.
Reporting Services Configuration Manager
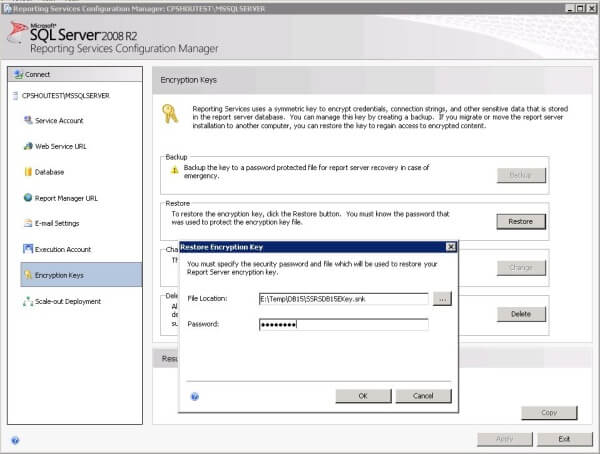
Now restore the Encryption Key from the database you restored. In the Navigation panel of the Reporting Services Configuration Manager select Encryption Keys and click the Restore Button. In the Restore Encryption Key dialog click the ... button to locate the file you created when backing up the Encryption Key from the server you are migrating, enter the password you used and click the OK button.
Reporting Services Configuration Manager
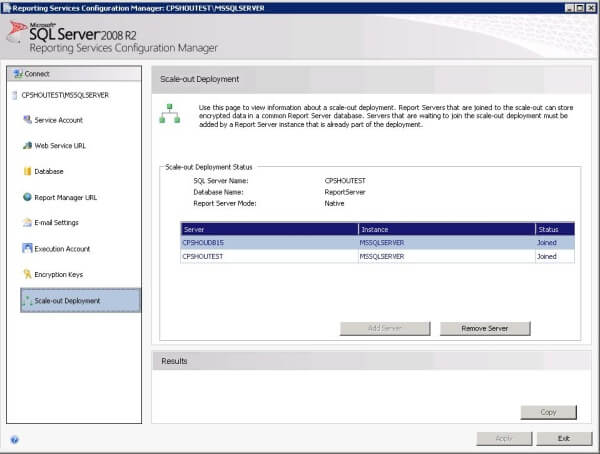
Now this is where I had trouble. According to the Migration document, once the Encryption Key has been restored things should be working. When I tried to access my Report Server I got an error stating 'The feature: "Scale-out deployment" is not supported in this edition of Reporting Services. (rsOperationNotSupported)'. I opened Reporting Services configuration Manager and clicked Scale-out Deployment in the navigation panel and saw that there were two servers listed, the old one and the new one.
Reporting Services Configuration Manager

I did not find any mention of this in the migration document. After searching the internet I found some articles describing this issue and the fix. There are a couple of ways to fix this but the simplest is to delete the record corresponding to the old server in the Keys table of the ReportServer database. Once I deleted the record for the old server Reporting Services started working as expected.


Next Steps

Migrating SQL Reporting Services to a new server

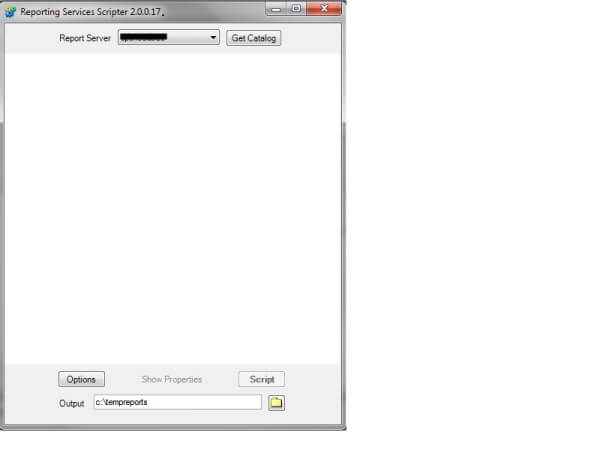
To use the tool simply double click the RSSCripter.exe file. If presented with an 'Open File - Security Warning' acknowledge the warning by clicking Run and the tool will open.
Reporting Serivces Scripting Tool
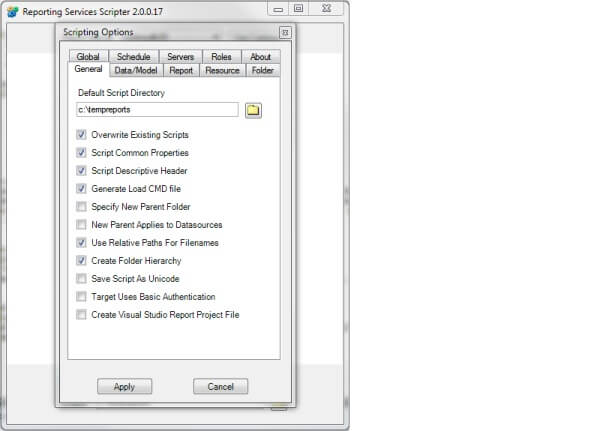
Once the tool is open click the Options button to configure the tool for your environment.
Scripting tool Options
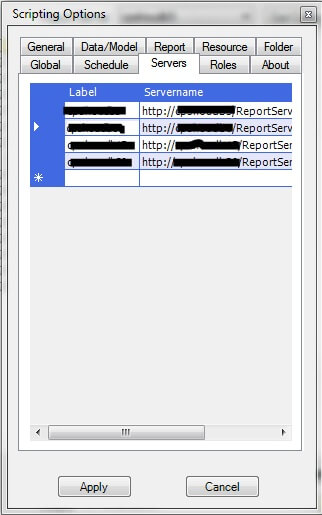
Be sure to set the Default Script Directory, this is the location the tool will put the generated script files in. Next click the Servers tab to add your reporting servers to the grid. The first column is just a label and can be anything you like, but it must be unique. The second column is the actual link to the reporting server and should be of the form http://servername/Reportserver/ReportService.asmx for SQL 2000 servers and http://servername/Reportserver/ReportService2005.asmx for SQL 2005 and 2008.
Scripting tool Servers grid
I am not going to go through each tab; the tool includes a very good readme that describes all the available options. There are a few things to note. To include report subscriptions click the Report tab and check the Include Subscriptions check box. The Global tab is used to define the location of the RS.EXE file, the database authentication and the scripting mode. Once all options have been set you are ready to run the tool.
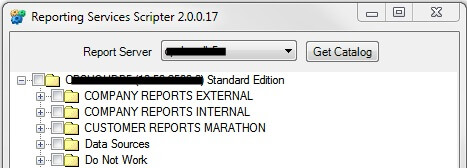
First select a server from your server list by clicking the drop down labeled Report Server. Once a server is selected click the Get Catalog button. This will list all the catalog items on the reporting server.
Scripting tool Report server catalog
You can select individual reports by expanding the report folder and selecting the report or select the entire folder. Once you have selected the objects click the Script button and the script files will be generated in the folder selected as the Default Script Directory. The tool will create script files for all objects selected and it will create a command (.cmd) file for loading those objects on a server. In the command file there is a line that sets the URL of the server to script the report objects to, change this line to the server you want to transfer your reports to:

 SET REPORTSERVER=http://servername/ReportServer

Also be sure the line for the location to the RS.EXE file is correct.

 SET RS="C:\Program Files\Microsoft SQL Server\90\Tools\Binn\RS.EXE"

Once the command file has been edited copy all the files to the new reporting server and execute the command file by double clicking the file in Windows 2003 and right clicking and selecting Run As Administrator in Windows 2008. When I used this tool to migrate to the new server 136 items were migrated and it took just a few minutes. When I inspected the new reporting server and compared it to the old all items I ask for were on the new server, intact and functioned the same as on the old server.

Next Steps