Tuesday, November 17, 2020

We couldn’t update system reserved partition” error installing Windows 10


 Symptoms


When upgrading to, or updating, Windows 10, you might encounter the error “We couldn’t update system reserved partition”, error code 0xc1900104, or error code 0x800f0922. 

Cause


The System Reserved Partition (SRP) may be full. The System Reserve Partition (SRP) is a small partition on your hard drive that stores boot information for Windows. Some third-party anti-virus and security apps write to the SRP, and can fill it up.

Resolution


Caution: these steps are complicated, and carry some risk. This is best done by advanced users with experience using the command line. If you make an error in entering these commands, you could put your device in a no-boot situation, and possibly lose data you have stored on the device.

To upgrade your device, you'll need to free up 15MB of space on the SRP using the appropriate method below, and then try the upgrade again. If you're updating Windows 10, you need to free up 13MB.

First, determine whether the SRP is GPT or MBR partition style:
 
  1. Press the Windows key + R. In the Run window that comes up, type diskmgmt.msc and press Enter.
  2. Press-and-hold or right-click on the Disk (such as Disk 0) that contains the SRP, and select Properties.
    Properties
  3. Choose the Volumes tab.
  4. The Partition Style: line will say either GUID Partition Table (GPT) or Master Boot Record (MBR).

Thursday, October 29, 2020

How to Rebuild SQL Indexes Via A Maintenance Plan


  1. Open up SQL Server Management Studio.
  2. Expand out "Management".
  3. Right Click on "Maintenance Plans".
  4. Choose "Maintenance Plan Wizard".
  5. Give your maintenance plan a name. Suggestion: Name your plan something that describes what it does. For example, you could give it the name "Rebuild Indexes on the fly".
  6. Click Next
  7. Check "Rebuild Index" and "Update Statistics"
  8. Click Next
  9. "Rebuild" should be at the top
  10. Click Next
  11. Choose under Databases: All user databases
  12. Click Next
  13. Choose under Databases: All user databases
  14. Click Next
  15. Note or Change the location of the report of this task
  16. Click Next
  17. Click Finish
  18. Final screen upon successful creation 
  19. Now you will have your task created under Maintenance Plans
  20. Right click on your maintenance plan, it will show the name you gave it in step 6
  21. Click Execute

Note: If it fails immediately check your SQL Agent, it should be green as you see below with a little play button. If it is not started do so then try 22 and 23 above again. 


If you have any trouble with getting this to run we will need to engage our services group as a paid engagement.

Overview

The purpose of this article is to provide the basic steps of creating a maintenance task within SQL Server which is crucial to the success of heavily coded or large databases. It is recommended to run this in accordance with your maintenance plan. A maintenance plan is suggested in our specifications guide. For a custom maintenance plan please contact our services department.

Wednesday, September 9, 2020

Wi-Fi standards and speeds explained

 802.11: Wi-Fi standards and speeds explained

In the world of wireless, the term Wi-Fi is synonymous with wireless access in general, despite the fact that it is a specific trademark owned by the Wi-Fi Alliance, a group dedicated to certifying that Wi-Fi products meet the IEEE’s set of 802.11 wireless standards.

These standards, with names such as 802.11b (pronounced “Eight-O-Two-Eleven-Bee”, ignore the “dot”) and 802.11ac, comprise a family of specifications that started in the 1990s and continues to grow today. The 802.11 standards codify improvements that boost wireless throughput and range as well as the use of new frequencies as they  become available. They also address new technologies that reduce power consumption.

What is Wi-Fi 6? Wi-Fi 5? Wi-Fi 4?


The IEEE naming scheme for the standard is a little tough to get used to, and in an effort to make it easier to understand, the Wi-Fi Alliance has come up with some simpler names.

Under its naming convention, the alliance calls 802.11ax Wi-Fi 6. 802.11ac is now Wi-Fi 5, and 802.11n is Wi-Fi 4. The idea, according to the Wi-Fi Alliance, is to make matching endpoint and router capabilities a simpler matter for the rank-and-file user of Wi-Fi technology.

There is a subcategory of Wi-Fi 6 called Wi-Fi 6E, which was written into the 802.11ax specification to accommodate additional spectrum that might be added down the road. That happened in April 2020, vastly expanding the potential capacity of Wi-Fi 6E access points vs. the original Wi-Fi 6 APs.

Meanwhile it's important to know that the Wi-Fi Alliance has not made up simpler names for all the 802.11 standars, so it's important to be familiar with the traditional designations. Also, the IEEE, which continues to work on newer versions of 802.11, has not adopted these new names, so trying to track down details about them using the new names will make the task more complicated.

The traditional names of these standards create quite an alphabet soup, made all-the-more confusing because they are not arranged alphabetically. To help clarify the situation, here’s an update on these physical-layer standards within 802.11, listed in reverse chronological order, with the newest standards at the top, and the oldest toward the bottom. After that is a description of standards that are still in the works.

Thursday, July 9, 2020

BitLocker cannot encrypt a drive: known issues

Error 0x80310059: BitLocker Drive Encryption is already performing an operation on this drive

When you turn on BitLocker Drive Encryption on a computer that is running Windows 10 Professional, you receive a message that resembles the following:
ERROR: An error occurred (code 0x80310059):BitLocker Drive Encryption is already performing an operation on this drive. Please complete all operations before continuing.NOTE: If the -on switch has failed to add key protectors or start encryption,you may need to call manage-bde -off before attempting -on again.

Cause

This issue may be caused by settings that are controlled by Group Policy Objects (GPOs).

Resolution

Important
Follow the steps in this section carefully. Serious problems might occur if you modify the registry incorrectly. Before you modify it, back up the registry for restoration in case problems occur.
To resolve this issue, follow these steps:
  1. Start Registry Editor, and navigate to the following subkey: HKEY_LOCAL_MACHINE\SOFTWARE\Policies\Microsoft\FVE
  2. Delete the following entries:
    • OSPlatformValidation_BIOS
    • OSPlatformValidation_UEFI
    • PlatformValidation
  3. Exit Registry Editor, and turn on BitLocker Drive Encryption again.

"Access is denied" message when you try to encrypt removable drives

You have a computer that is running Windows 10, version 1709 or version 1607. You try to encrypt a USB drive by following these steps:
  1. In Windows Explorer, right-click the USB drive and select Turn on BitLocker.
  2. On the Choose how you want to unlock this drive page, select Use a password to unlock the drive.
  3. Follow the instructions on the page to enter your password.
  4. On the Are you ready to encrypt this drive? page, select Start encrypting.
  5. The Starting encryption page displays the message "Access is denied."
You receive this message on any computer that runs Windows 10 version 1709 or version 1607, when you use any USB drive.

Cause

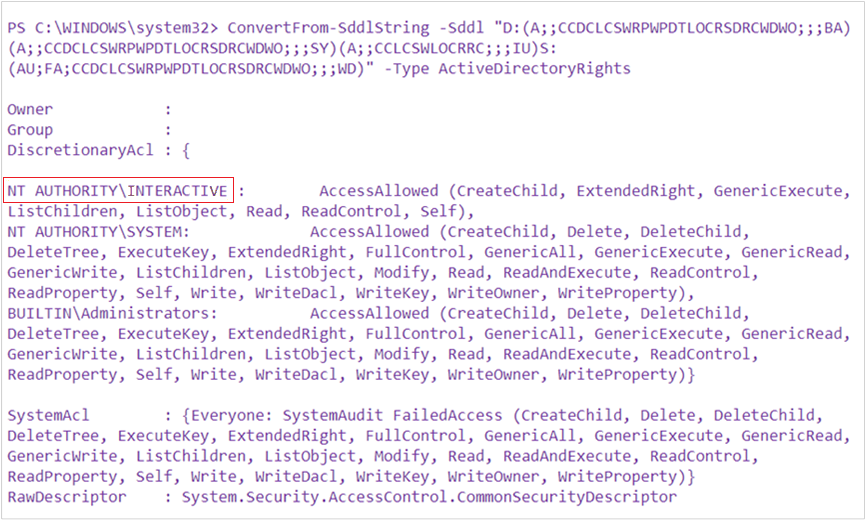
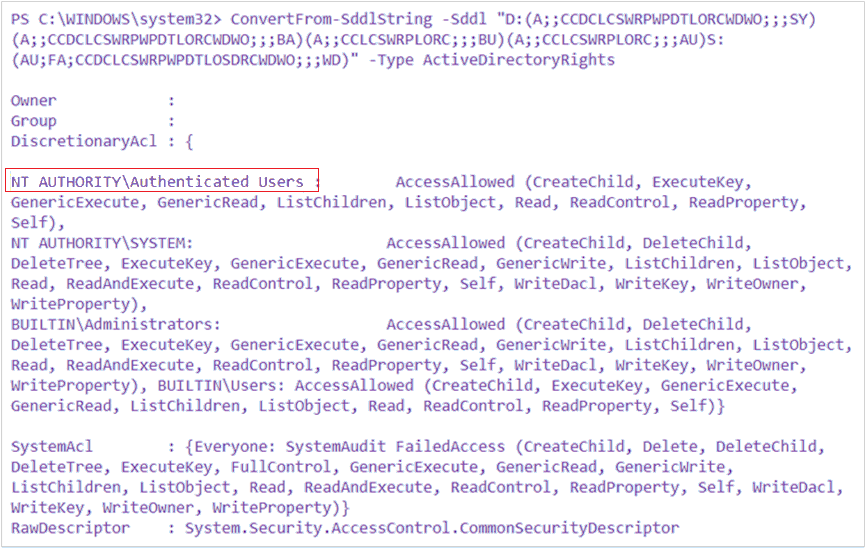
The security descriptor of the BitLocker Drive Encryption service (BDESvc) has an incorrect entry. Instead of NT AUTHORITY\Authenticated Users, the security descriptor uses NT AUTHORITY\INTERACTIVE.
To verify that this issue has occurred, follow these steps:
  1. On an affected computer, open an elevated Command Prompt window and an elevated PowerShell window.
  2. At the command prompt, enter the following command:
    cmd
  1. C:\>sc sdshow bdesvc
    
    The output of this command resembles the following:
    D:(A;;CCDCLCSWRPWPDTLORCWDWO;;;SY)(A;;CCDCLCSWRPWPDTLORCWDWO;;;BA)(A;;CCLCSWRPLORC;;;BU)(A;;CCLCSWRPLORC;;;AU)S:(AU;FA;CCDCLCSWRPWPDTLOSDRCWDWO;;;WD)
  2. Copy this output, and use it as part of the ConvertFrom-SddlString command in the PowerShell window, as follows.
    Output of the ConvertFrom-SddlString command, showing NT AUTHORITY\INTERACTIVE
    If you see NT AUTHORITY\INTERACTIVE (as highlighted), in the output of this command, this is the cause of the issue. Under typical conditions, the output should resemble the following:
    Output of the ConvertFrom-SddlString command, showing NT AUTHORITY\Authenticated Users
Note
GPOs that change the security descriptors of services have been known to cause this issue.

Resolution

  1. To repair the security descriptor of BDESvc, open an elevated PowerShell window and enter the following command:
    ps
  1. sc sdset bdesvc D:(A;;CCDCLCSWRPWPDTLORCWDWO;;;SY)(A;;CCDCLCSWRPWPDTLORCWDWO;;;BA)(A;;CCLCSWRPLORC;;;BU)(A;;CCLCSWRPLORC;;;AU)S:(AU;FA;CCDCLCSWRPWPDTLOSDRCWDWO;;;WD)
    
  2. Restart the computer.

The issue should now be resolved.

Wednesday, July 8, 2020

I'm getting this error - this workbook contains links to one or more external sources that could be unsafe

As far as I know, this message is a Security Warning that Automatic update of links has been disabled.
To suppress the message and to automatically update the links when you open a workbook, follow these steps:   
  1. Click Microsoft Office File, and then click Options.
  2. Click Advanced.
  3. Under General, click to clear the Ask to update automatic links check box.
https://support.microsoft.com/en-us/kb/826921 (It also applies to Excel 2013)

Common Powershell Commands

Restart-Computer


Syntax

PowerShell
Restart-Computer
       [-WsmanAuthentication ]
       [[-ComputerName] ]
       [[-Credential]]
       [-Force]
       [-Wait]
       [-Timeout ]
       [-For ]
       [-Delay ]
       [-WhatIf]
       [-Confirm]
       []

Description

The Restart-Computer cmdlet restarts the operating system on the local and remote computers.
You can use the parameters of Restart-Computer to run the restart operations, to specify the authentication levels and alternate credentials, to limit the operations that run at the same time, and to force an immediate restart.
Starting in Windows PowerShell 3.0, you can wait for the restart to complete before you run the next command. Specify a waiting time-out and query interval, and wait for particular services to be available on the restarted computer. This feature makes it practical to use Restart-Computer in scripts and functions.

Examples

Example 1: Restart the local computer
Restart-Computer restarts the local computer.
PowerShell
Restart-Computer
Example 2: Restart multiple computers
Restart-Computer can restart remote and local computers. The ComputerName parameter accepts an array of computer names.
PowerShell
Restart-Computer -ComputerName Server01, Server02, localhost
Example 3: Get computer names from a text file
Restart-Computer gets a list of computer names from a text file and restarts the computers. The ComputerName parameter isn't specified. But because it's the first position parameter, it accepts the computer names from the text file that are sent down the pipeline.
PowerShell
Get-Content -Path C:\Domain01.txt | Restart-Computer
Get-Content uses the Path parameter to get a list of computer names from a text file, Domain01.txt. The computer names are sent down the pipeline. Restart-Computer restarts each computer.
Example 4: Force restart of computers listed in a text file
This example forces an immediate restart of the computers listed in the Domain01.txt file.
The computer names from the text file are stored in a variable. The Force parameter forces an immediate restart.
PowerShell
$Names = Get-Content -Path C:\Domain01.txt
$Creds = Get-Credential
Restart-Computer -ComputerName $Names -Credential $Creds -Force
Get-Content uses the Path parameter to get a list of computer names from a text file, Domain01.txt. The computer names are stored in the variable $Names. Get-Credential prompts you for a username and password and stores the values in the variable $Creds.
Restart-Computer uses the ComputerName and Credential parameters with their variables. The Force parameter causes an immediate restart of each computer.
Example 6: Restart a remote computer and wait for PowerShell
Restart-Computer restarts the remote computer and then waits up to 5 minutes (300 seconds)
for PowerShell to become available on the restarted computer before it continues.
PowerShell
Restart-Computer -ComputerName Server01 -Wait -For PowerShell -Timeout 300 -Delay 2
Restart-Computer uses the ComputerName parameter to specify Server01. The Wait parameter waits for the restart to finish. The For specifies that PowerShell can run commands on the remote computer. The Timeout parameter specifies a five-minute wait. The Delay parameter queries the remote computer every two seconds to determine whether it's restarted.


-------------------------------------------------------------------------------------------

Stop-Computer

Syntax

PowerShell
Stop-Computer
    [-WsmanAuthentication ]
    [[-ComputerName] ]
    [[-Credential] ]
    [-Force]
    [-WhatIf]
    [-Confirm]
    []

Description

The Stop-Computer cmdlet shuts down the local computer and remote computers.
You can use the parameters of Stop-Computer to specify the authentication levels and alternate credentials, and to force an immediate shut down.

Examples

Example 1: Shut down the local computer
This example shuts down the local computer.
PowerShell
Stop-Computer -ComputerName localhost
Example 2: Shut down two remote computers and the local computer
This example stops two remote computers and the local computer.
PowerShell
Stop-Computer -ComputerName "Server01", "Server02", "localhost"
Stop-Computer uses the ComputerName parameter to specify two remote computers and the local computer. Each computer is shut down.
Example 3: Shut down remote computers as a background job
In this example, Stop-Computer runs as a background job on two remote computers.
The background operator & runs the Stop-Computer command as a background job. For more information, see about_Operators.
PowerShell
$j = Stop-Computer -ComputerName "Server01", "Server02" &
$results = $j | Receive-Job
$results
Stop-Computer uses the ComputerName parameter to specify two remote computers. The & background operator runs the command as a background job. The job objects are stored in the $j variable.
The job objects in the $j variable are sent down the pipeline to Receive-Job, which gets the job results. The objects are stored in the $results variable. The $results variable displays the job information in the PowerShell console.
Example 4: Shut down a remote computer
This example shuts down a remote computer using specified authentication.
PowerShell
Stop-Computer -ComputerName "Server01" -WsmanAuthentication Kerberos
Stop-Computer uses the ComputerName parameter to specify the remote computer. The WsmanAuthentication parameter specifies to use Kerberos to establish a remote connection.
Example 5: Shut down computers in a domain
In this example, the commands force an immediate shut down of all computers in a specified domain.
PowerShell
$s = Get-Content -Path ./Domain01.txt
$c = Get-Credential -Credential Domain01\Admin01
Stop-Computer -ComputerName $s -Force -Credential $c
Get-Content uses the Path parameter to get a file in the current directory with the list of domain computers. The objects are stored in the $s variable.
Get-Credential uses the Credential parameter to specify the credentials of a domain administrator. The credentials are stored in the $c variable.
Stop-Computer shuts down the computers specified with the ComputerName parameter's list of computers in the $s variable. The Force parameter forces an immediate shutdown. The Credential parameter submits the credentials saved in the $c variable.

-------------------------------------------------------------------------------------------

Start-Service

Syntax

PowerShell
Start-Service
     [-InputObject] 
     [-PassThru]
     [-Include ]
     [-Exclude ]
     [-WhatIf]
     [-Confirm]
     []
PowerShell
Start-Service
     [-Name] 
     [-PassThru]
     [-Include ]
     [-Exclude ]
     [-WhatIf]
     [-Confirm]
     []
PowerShell
Start-Service
     [-PassThru]
     -DisplayName 
     [-Include ]
     [-Exclude ]
     [-WhatIf]
     [-Confirm]
     []

Description

The Start-Service cmdlet sends a start message to the Windows Service Controller for each of the specified services. If a service is already running, the message is ignored without error. You can specify the services by their service names or display names, or you can use the InputObject parameter to supply a service object that represents the services that you want to start.

Examples

Example 1: Start a service by using its name
This example starts the EventLog service on the local computer. The Name parameter identifies the service by its service name.
PowerShell
Start-Service -Name "eventlog"
Example 2: Display information without starting a service
This example shows what would occur if you started the services that have a display name that includes "remote".
PowerShell
Start-Service -DisplayName *remote* -WhatIf
The DisplayName parameter identifies the services by their display name instead of their service name. The WhatIf parameter causes the cmdlet to display what would happen when you run the command but does not make changes.
Example 3: Start a service and record the action in a text file
This example starts the Windows Management Instrumentation (WMI) service on the computer and adds a record of the action to the services.txt file.
PowerShell
$s = Get-Service wmi
Start-Service -InputObject $s -PassThru | Format-List >> services.txt
First we use Get-Service to get an object that represent the WMI service and store it in the $s variable. Next, we start the service. Without the PassThru parameter, Start-Service does not create any output. The pipeline operator (|) passes the object output by Start-Service to the Format-List cmdlet to format the object as a list of its properties. The append redirection operator (>>) redirects the output to the services.txt file. The output is added to the end of the existing file.
Example 4: Start a disabled service
This example shows how to start a service when the start type of the service is Disabled.
PowerShell
PS> Start-Service tlntsvr
Start-Service : Service 'Telnet (TlntSvr)' cannot be started due to the following error: Cannot start service TlntSvr on computer '.'.
At line:1 char:14
+ Start-Service  <<<< tlntsvr

PS> Get-CimInstance win32_service | Where-Object Name -eq "tlntsvr"
ExitCode  : 0
Name      : TlntSvr
ProcessId : 0
StartMode : Disabled
State     : Stopped
Status    : OK

PS> Set-Service tlntsvr -StartupType manual
PS> Start-Service tlntsvr
The first attempt to start the Telnet service (tlntsvr) fails. The Get-CimInstance command shows that the StartMode property of the Tlntsvr service is Disabled. The Set-Service cmdlet changes the start type to Manual. Now, we can resubmit the Start-Service command. This time, the command succeeds. To verify that the command succeeded, run Get-Service.

------------------------------------------------------------------------------------------

Start-Process

Starts one or more processes on the local computer.

Syntax

PowerShell
Start-Process
     [-FilePath] 
     [[-ArgumentList] ]
     [-Credential ]
     [-WorkingDirectory ]
     [-LoadUserProfile]
     [-NoNewWindow]
     [-PassThru]
     [-RedirectStandardError ]
     [-RedirectStandardInput ]
     [-RedirectStandardOutput ]
     [-WindowStyle ]
     [-Wait]
     [-UseNewEnvironment]
     [-WhatIf]
     [-Confirm]
     []
PowerShell
Start-Process
     [-FilePath] 
     [[-ArgumentList] ]
     [-WorkingDirectory ]
     [-PassThru]
     [-Verb ]
     [-WindowStyle ]
     [-Wait]
     [-WhatIf]
     [-Confirm]
     []

Description

The Start-Process cmdlet starts one or more processes on the local computer. By default, Start-Process creates a new process that inherits all the environment variables that are defined in the current process.
To specify the program that runs in the process, enter an executable file or script file, or a file that can be opened by using a program on the computer. If you specify a non-executable file, Start-Process starts the program that is associated with the file, similar to the Invoke-Item cmdlet.
You can use the parameters of Start-Process to specify options, such as loading a user profile, starting the process in a new window, or using alternate credentials.

Examples

Example 1: Start a process that uses default values
This example starts a process that uses the Sort.exe file in the current folder. The command uses all of the default values, including the default window style, working folder, and credentials.
PowerShell
Start-Process -FilePath "sort.exe"
Example 2: Print a text file
This example starts a process that prints the C:\PS-Test\MyFile.txt file.
PowerShell
Start-Process -FilePath "myfile.txt" -WorkingDirectory "C:\PS-Test" -Verb Print
Example 3: Start a process to sort items to a new file
This example starts a process that sorts items in the Testsort.txt file and returns the sorted items in the Sorted.txt files. Any errors are written to the SortError.txt file.
PowerShell
Start-Process -FilePath "Sort.exe" -RedirectStandardInput "Testsort.txt" -RedirectStandardOutput "Sorted.txt" -RedirectStandardError "SortError.txt" -UseNewEnvironment
The UseNewEnvironment parameter specifies that the process runs with its own environment variables.
Example 4: Start a process in a maximized window
This example starts the Notepad.exe process. It maximizes the window and retains the window until the process completes.
PowerShell
Start-Process -FilePath "notepad" -Wait -WindowStyle Maximized
Example 5: Start PowerShell as an administrator
This example starts PowerShell by using the Run as administrator option.
PowerShell
Start-Process -FilePath "powershell" -Verb RunAs
Example 6: Using different verbs to start a process
This example shows how to find the verbs that can be used when starting a process. The available verbs are determined by the filename extension of the file that runs in the process.
PowerShell
$startExe = New-Object System.Diagnostics.ProcessStartInfo -Args PowerShell.exe
$startExe.verbs

open
runas
runasuser
The example uses New-Object to create a System.Diagnostics.ProcessStartInfo object for PowerShell.exe, the file that runs in the PowerShell process. The Verbs property of the ProcessStartInfo object shows that you can use the Open and RunAs verbs with PowerShell.exe, or with any process that runs a .exe file.
Example 7: Specifying arguments to the process
Both commands start the Windows command interpreter, issuing a dir command on the Program Files folder. Because this foldername contains a space, the value needs surrounded with escaped quotes. Note that the first command specifies a string as ArgumentList. The second command a string array.
PowerShell
Start-Process -FilePath "$env:comspec" -ArgumentList "/c dir `"%systemdrive%\program files`""
Start-Process -FilePath "$env:comspec" -ArgumentList "/c","dir","`"%systemdrive%\program files`""
--------------------------------------------------------------------------------------------

Rename-Computer

Syntax

PowerShell
Rename-Computer
      [-ComputerName ]
      [-PassThru]
      [-DomainCredential ]
      [-LocalCredential ]
      [-NewName] 
      [-Force]
      [-Restart]
      [-WsmanAuthentication ]
      [-WhatIf]
      [-Confirm]
      []

Description

The Rename-Computer cmdlet renames the local computer or a remote computer. It renames one computer in each command.
This cmdlet was introduced in Windows PowerShell 3.0.

Examples

Example 1: Rename the local computer
This command renames the local computer to Server044 and then restarts it to make the change effective.
PowerShell
Rename-Computer -NewName "Server044" -DomainCredential Domain01\Admin01 -Restart
Example 2: Rename a remote computer
This command renames the Srv01 computer to Server001. The computer is not restarted.
The DomainCredential parameter specifies the credentials of a user who has permission to rename computers in the domain.
The Force parameter suppresses the confirmation prompt.
PowerShell
Rename-Computer -ComputerName "Srv01" -NewName "Server001" -DomainCredential Domain01\Admin01 -Force
------------------------------------------------------------------------------------------


Sunday, May 17, 2020

Where is my Microsoft Teams Meeting Add-in for Outlook?

You’ve installed the Teams desktop app and you’re ready to start scheduling Teams meetings in Outlook. One problem…there is no option to make it a Teams Meeting. Well you’re not alone, because apparently this has been an issue among many Teams users. As luck would have it, there are quick fixes if you run into this issue.

Here are some of the steps you should take to troubleshoot:
Option 1: Install the Teams desktop application as an Administrator of the Windows computer.
  • One of the requirements to successfully install the Teams add-in is that you have administrator permissions on that computer. This is due to the COM Add-ins (seen below) in Outlook write to a specific Windows registry. If you’re not an administrator of that computer you must have someone with the correct permissions install the Teams application. Once that is complete you should be able to open Outlook and see the add-in.
Option 2: Run Outlook in normal user mode, not as an administrator.

  • When starting Outlook, do not run it with elevated permissions. This can often interfere with identifying the COM Add-ins that were mentioned above.
Option 3: 1) Download Teams –> 2) Install Teams –> 3) Sign into Teams –> 4) Restart Teams –> Restart Outlook – IN THAT ORDER
  • In order to ensure that the add-in was installed successfully, this may require you to restart your Teams application as well as Outlook. Follow the steps above to see if this does the trick.
Option 4: Make sure that you have the Teams Meeting add-in enabled. If the first 3 options haven’t worked for you try taking a look at your Outlook Options.
  • In Outlook, click FILE and then OPTIONS
  • Select the ADD-INS tab of the Outlook Options box.

  • Confirm that “MICROSOFT TEAMS MEETING ADD-IN FOR MICROSOFT OFFICE” is listed in the “ACTIVE APPLICATION ADD-INS”
  • If not, look in the “DISABLED APPLICATION ADD-INS” list. If it is in this list, select the “COM ADD-INS” in the MANAGE drop down and select GO.

  • Make sure “Microsoft Teams Meeting Add-in for Microsoft Office” is checked and select OK. 
  • Restart Outlook and you should see the Teams Meeting option available when you go to schedule a meeting in Outlook.

BEFORE


AFTER

Get an Office Add-in for Outlook

Microsoft has partnered with leading companies to build programs that help you get things done right from your inbox. These programs are called Office Add-ins in Outlook 2016 and Outlook 2019, and Apps for Office in Outlook 2013, and help you speed up the way you access information on the web.
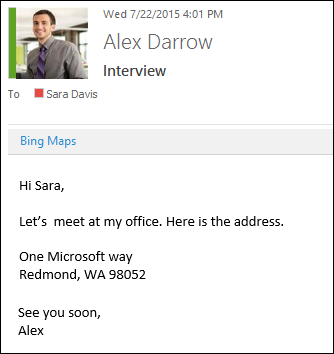
For example, the Bing Maps add-in becomes available in an email that contains an address, and you can use it to check the online map for that location right from your email.

Some add-ins are installed by your email administrator, but you can install other ones from the Office Store.


Select a tab below for instructions for your version of Outlook.

Install an add-in from the Office Store

  1. In Outlook, click Home > Get Add-ins on the ribbon.
    Select Get Add-ins from the ribbon.
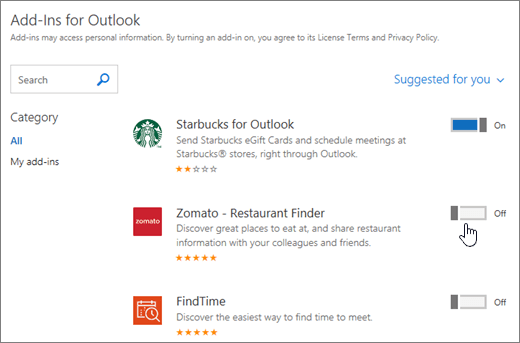
    1. On the Add-Ins for Outlook page, browse for the add-in you want by selecting All and scrolling through the list, or search for an add-in by using the Search box. When you find an add-in you want, review its privacy policy.
      For free add-ins, use the toggle controls to turn them on or off. For paid add-ins and free trials, select Get it to finish your purchase.
      Screenshot of the Add-ins for Outlook page where you can see installed add-ins and search for and select more add-ins.
  2. When the add-in is installed, go to File > Manage Add-ins or Manage Apps to make sure it's turned on. When you’re prompted to sign in, type the email address and password you use to sign in to Office programs.
    Note: If you don’t see the Manage add-ins (or Manage Apps) button, you won’t be able to get add-ins for Outlook. To get them, you’ll need Office 2013 or Office 2016 and Exchange 2013 or Exchange 2016, and your administrator needs to activate add-ins for Outlook.

Use an add-in for Outlook

The add-ins that you have installed automatically appear in the gray add-in bar near the top of the message when there is data in the email that is related to the add-in.
For example, when you open an email message that has a street address, you'll see that the add-in's name, Bing Maps, is displayed in the add-in bar.
Choose the add-in to access the data it offers.
Bing Maps add-in

When you're writing a new email message (Home > New Email), you can access other installed add-ins from the Message ribbon.

Screenshot of  the Outlook ribbon with the focus on the Message tab where the cursor points to add-ins at the far left side. In this example, the add-ins are Office Add-ins, PayPal, Evernote, Yelp, and Starbucks.
When you're in the main Outlook window (without a new message open), you can access your installed add-ins from the ribbon.
Note: If the Reading Pane (View > Reading Pane) is set to Off, all add-ins will appear disabled.

Manage your add-ins

In Outlook, go to File > Manage Add-ins or Manage Apps. When you’re prompted to sign in, type the email address and password you use to sign in to Office programs.
Manage add-ins in Outlook
On the Manage add-ins page, you can do the following:
  • Select Find more add-ins for Outlook at the Office Store to go to the Office Store.
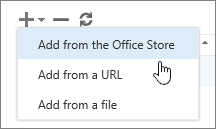
  • Use the options on the toolbar to add more add-ins, uninstall an add-in, or refresh the page to see a list of the latest add-ins.
    Screenshot of the available options on the Manage add-ins toolbar, which include add, delete, and refresh. The selections in Add are shown, which include Add from the Office Store, Add from a URL, and Add from a file.
  • Turn on or turn off an add-in by checking or clearing its check box in the Turned on column.
  • Select an add-in to see more information about it on the right side of the page.
Tip: You can also use Outlook Web App to manage your add-ins. On the top right corner of the page, choose Settings Settings > Manage integrations.

PowerShell Desired State Configuration

Monday, May 11, 2020

How to find and remove stale users and computers in Active Directory

Using Command-Line-Interface


Finding inactive accounts, and disabling or deleting them can be performed using the command prompt, by using the following command line tools:

• Dsquery
The dsquery command line tool searches for AD objects according to the specified criteria. One can use this to find out inactive users and computers in the active directory. The search results can be given as input to dsmod and dsrm command lines for disabling and deleting.
The general syntax of dsquery command line is :
dsquery computer [-inactive ] [-limit ]
or
dsquery user [-inactive ] [-limit ]

• ‘Dsmod’ and ‘dsrm’
The dsmod command line modifies the attributes of the specified AD objects. It can be used to disable the queried AD computers and users. The dsrm command line deletes the specified AD objects. It can be used to delete the queried AD computers and users.
Note: One must have installed Active Directory Domain Services (AD DS) server role.

5 Steps total

Step 1: Open Command Prompt


Open Start menu, right-click the Command Prompt, and click Run as administrator.

Step 2: Find computers/users that are inactive

To find the computers/users that are inactive for seven weeks, run:

dsquery computer -inactive 7 -limit 200
or
dsquery user -inactive 1 -limit 200

Step 3: Disable inactive computers/users

To disable the inactive computers/users, run:

dsquery computer -inactive 7 | dsmod computer –disabled yes
or
dsquery user -inactive 7 | dsmod user –disabled yes

Step 4: Find disabled computers/users and delete them

To find the disabled computers/users and to delete them, run:
dsquery computer –disabled | dsrm -noprompt
or
dsquery user -disabled | dsrm -noprompt
Note: while using -noprompt, no confirmation will be requested before deletion.

Step 5: Delete Inactive Users/Computer account

Instead of disabling the inactive computers/users first, one can directly delete them by running :

dsquery computer -inactive 7 | dsrm -noprompt
or
dsquery user -inactive 7 | dsrm -noprompt  


With a few simple command line tools, administrators can find inactive computer as well as user accounts of the Active Directory. Such accounts can be disabled and deleted as per the organizational policy; they can be deleted directly too.

--------------------------------------------------------------------------------------------

Using Powershell


PowerShell is one of the many tools that can help you find inactive computers in your Active Directory. Using PowerShell, you can get inactive computers and export them to a CSV file; you can even schedule a script to run regularly to report on stale computers.

         5 Steps

Step 1: Open the PowerShell ISE

Open the PowerShell ISE → Run the following script, adjusting the value of the $DaysInactive variable to suit your needs:

Step 2: Script Code

$DaysInactive = 90
$time = (Get-Date).Adddays(-($DaysInactive))
Get-ADComputer -Filter {LastLogonTimeStamp -lt $time} -ResultPageSize 2000 -resultSetSize $null -Properties Name, OperatingSystem, SamAccountName, DistinguishedName

Step 3: Export to CSV

To export the output to a CSV file, add the Export-CSV PowerShell cmdlet, as shown below:

Step 4: Script Code

Get-ADComputer -Filter {LastLogonTimeStamp -lt $time} -ResultPageSize 2000 -resultSetSize $null -Properties Name, OperatingSystem, SamAccountName, DistinguishedName | Export-CSV “C:\Temp\StaleComps.CSV” –NoTypeInformation

Step 5: Review the results


Open the file produced by the script in MS Excel.

Sunday, May 3, 2020

How to Increase the Number of Jump List Items in Windows 10


By default, Windows 10 shows around 12 recent items in the jump list. To increase that number, you just need to make an adjustment to one setting in the Windows Registry.

In previous versions of Windows, you could change the number of recent items shown in jump lists with a simple option in taskbar properties. For whatever reason, Microsoft removed this ability in Windows 10. With a minor Registry hack, though, you can still bump that number up.

Increase the Jump List Limit by Editing the Registry Manually

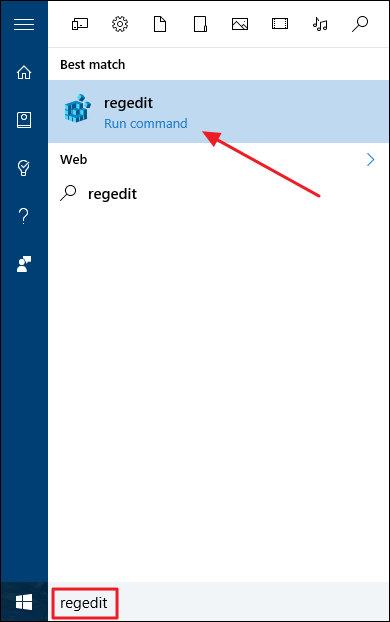
Open the Registry Editor by hitting Start and typing “regedit.” Press Enter to open Registry Editor and give it permission to make changes to your PC.

ijn_1

In the Registry Editor, use the left sidebar to navigate to the following key:
HKEY_CURRENT_USER\SOFTWARE\Microsoft\Windows\CurrentVersion\Explorer\Advanced

ijn_2

Next, you’re going to create and name a new value inside the Advanced key. Right-click the Advanced folder and choose New > DWORD (32-bit) Value. Name the new value JumpListItems_Maximum and then double-click the value to open its properties window.

ijn_3

In the value’s properties window, select “Decimal” under Base and then enter the number of recent items you want your jumplists to show in the “Value data” box. We’ve found that 15-20 is a pretty good number that still lets the whole jump list show on most displays. You can go higher if you want; you just might end up needing to scroll your jump lists a bit. When you’re done, click OK.


You can now exit Registry Editor. You don’t need to restart Windows or anything. The change takes place immediately, so just open a jump list to make sure it worked. In our example, we boosted the number to 20 and you can see that many more entries are now shown.
ijn_7


If you ever want to reset the default number of items shown, just return to the Advanced key and set the JumpListItems_Maximum value to 0.

How to Troubleshoot the Dell Computers Using Support Assist Tool

Friday, May 1, 2020

PEiD

Description

  • PEiD detects most common packers, cryptors and compilers for PE files.
  • It can currently detect more than 470 different signatures in PE files.
  • It seems that the official website (www.peid.info) has been discontinued. Hence, the tool is no longer available from the official website but it still hosted on other sites.

Installation

PEiD

.
├── external.txt
├── PEiD.exe
├── plugins
│   ├── GenOEP.dll
│   ├── ImpREC.dll
│   ├── kanal.dll
│   ├── kanal.htm
│   └── ZDRx.dll
├── pluginsdk
│   ├── C++
│   │   ├── defs.h
│   │   └── null.c
│   ├── Delphi
│   │   └── Sample.dpr
│   ├── MASM
│   │   ├── compile.bat
│   │   ├── masm_plugin.asm
│   │   └── masm_plugin.def
│   ├── PowerBASIC
│   │   └── PEiD_Plugin.bas
│   └── readme.txt
├── readme.txt
└── userdb.txt

Signatures

Update your signatures (initial file is empty). Replace the initial userdb.txt file with one of these files:

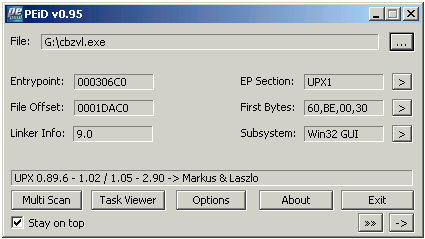
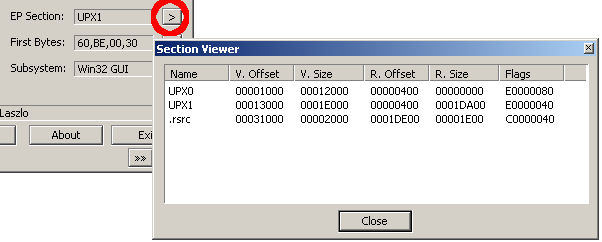
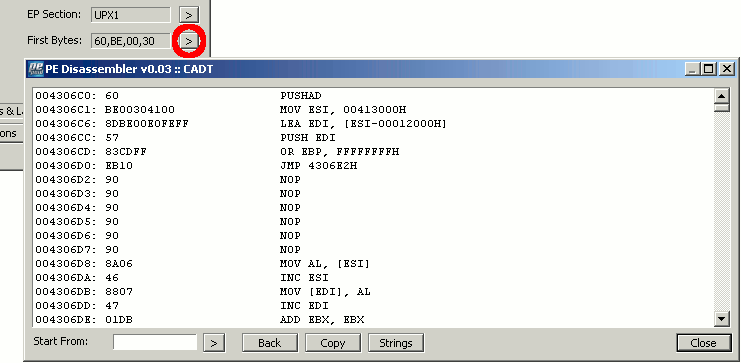
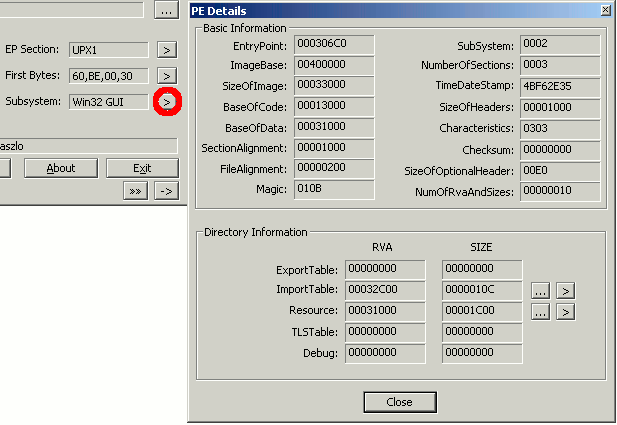
Interface

Main interface

Peid.png

Section Viewer

Peid-ep-section.png

PE disassembler

Peid-1st-bytes.png

PE details

Peid-subsytem.png

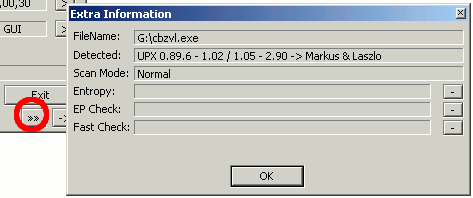
Extra information

Peid-menu-1.png

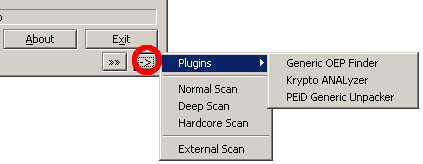
Menu

Screenshot

Peid-menu-2.png

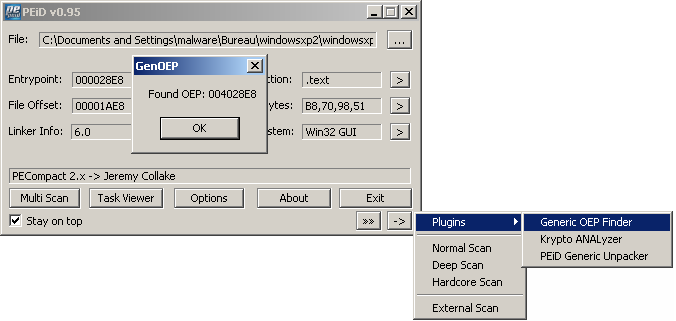
Generic OEP Finder

In some cases, PEiD can find the Original Entry Point (OEP) of a packed executable:
PEiD-generic-oep-finder.png

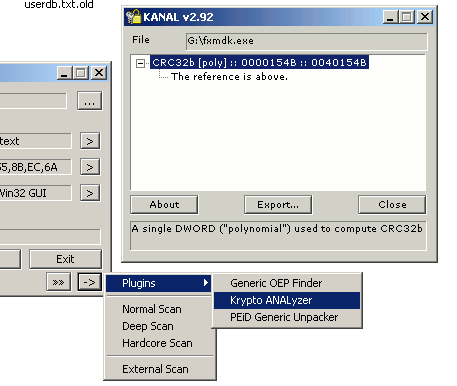
Krypto Analyzer


Peid-kanal.png


InstallRite lets you install software on one PC, generate an application image file, and clone the application to additional PCs. InstallRite speeds up the process of installing new or upgraded software on multiple machines. InstallRite recreates the installation, along with any configuration changes, system settings, user settings, and preferences. The cloned image files (or 'InstallKits') can be installed from any media, such as a hard drive, network server, CD-ROM, or the Web. InstallRite also includes all of the features of InstallWatch, a utility that accurately documents changes made to your PC when you install/remove software or hardware, or make configuration changes.


BinText is a tiny and portable piece of software developed for programmers who want to extract text from various file types and locate ASCII code, Unicode and Resource strings.
Since installation is not required, you can simply drop the executable file anywhere on the hard drive and run it.

Stud_PE The Portable Executables Viewer/Editor can view/edit PE basic Header information (DOS also).                 

Tuesday, April 28, 2020

Abu Dhabi Police GHQ Virus Removal Guide

If your computer is locked, and you are seeing a “ATTENTION! Your PC is blocked!” notification from Abu Dhabi Police GHQ , then your computer is infected with a piece of malware known as Trojan Reveton.

This threat is distributed through several means. Malicious websites, or legitimate websites that have been compromised, may drop this trojan onto a compromised computer. This drive-by-download often happens surreptitiously. Another method used to propagate this type of malware is spam email containing infected attachments or links to malicious websites. The threat may also be downloaded manually by tricking the user into thinking they are installing a useful piece of software.

The Abu Dhabi Police GHQ virus is also prevalent on peer-to-peer file sharing websites and is often packaged with pirated or illegally acquired software.
Once installed on your computer, the Abu Dhabi Police GHQ virus will display a bogus notification that pretends to be from the Abu Dhabi Police, and states that your computer has been blocked due to it being involved with the distribution of pornographic material, SPAM and copyrighted content.
The Abu Dhabi Police GHQ virus will lock you out of your computer and applications, so whenever you’ll try to log on into your Windows operating system or Safe Mode with Networking, it will display instead a lock screen asking you to pay a non-existing fine of 100$ or 100 Euro in the form of a CashU code.
Furthermore, to make this alert seem more authentic, this virus also has the ability to access your installed webcam, so that the bogus Abu Dhabi Police GHQ notification shows what is happening in the room.

The Abu Dhabi Police GHQ virus locks the computer and, depending on the user’s current location, displays a localized webpage that covers the entire desktop of the infected computer and demands payment for the supposed possession of illicit material.

[Image: Abu Dhabi Police GHQ lock screen virus]
Cyber criminals often updated the design of this lock screen, however you should always keep in mind that the Abu Dhabi Police will never lock down your computer or monitor your online activities.
The message displayed by the threat can be localized depending on the user’s location, with text written in the appropriate language.
The Abu Dhabi Police GHQ lock screen is a scam, and you should ignore any alerts that this malicious software might generate.
Under no circumstance should you send any  Ukash or Paysafecard code to these cyber criminals, and if you have, you can  should request a refund, stating that you are the victim of a computer virus and scam.

Abu Dhabi Police GHQ lock screen – Virus Removal Guide

STEP 1: Remove Abu Dhabi Police GHQ lock screen from your computer

Abu Dhabi Police GHQ Paysafecard Ransom has modified your Windows registry and added its malicious files to run at start-up, so whenever you’re trying to boot your computer it will launch instead its bogus notification.To remove these malicious changes, we can use any of the below methods :

Method 1: Start your computer in Safe Mode with Networking and scan for malware

Some variants of Abu Dhabi Police GHQ virus will allow the users to start the infected computer in Safe Mode with Networking without displaying the bogus lock screen. In this first method, we will try to start the computer in Safe Mode with Networking and then scan for malware to remove the malicious files.
  1. Remove all floppy disks, CDs, and DVDs from your computer, and then restart your computer.
  2. Press and hold the F8 key as your computer restarts.Please keep in mind that you need to press the F8 key before the Windows start-up logo appears.
    Note: With some computers, if you press and hold a key as the computer is booting you will get a stuck key message. If this occurs, instead of pressing and holding the “F8 key”, tap the “F8 key” continuously until you get the Advanced Boot Options screen.
  3. On the Advanced Boot Options screen, use the arrow keys to highlight Safe Mode with Networking , and then press ENTER.
    [Image: Safe Mode with Networking]
  4. If your computer has started in Safe Mode with Networking, you’ll need to perform a system scan (as seen on STEP 2) with Malwarebytes Anti-Malware and HitmanPro to remove the malicious files from your machine.
IF the Abu Dhabi Police GHQ virus didn’t allow you to start the computer in Safe Mode with Networking,you’ll need to follow Method 2 to get rid of its lock screen.

Method 2: Restore Windows to a previous state using System Restore

System Restore can return your computer system files and programs to a time when everything was working fine, so we will try to use this Windows feature to get rid of Abu Dhabi Police GHQ  lock screen.
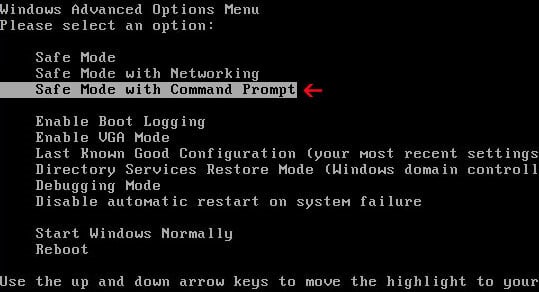
  1. Restart your computer, and then press and hold F8 during the initial startup to start your computer in safe mode with a Command prompt.
    Note: With some computers, if you press and hold a key as the computer is booting you will get a stuck key message. If this occurs, instead of pressing and holding the “F8 key”, tap the “F8 key” continuously until you get the Advanced Boot Options screen.
  2. Use the arrow keys to select the Safe mode with a Command prompt option.
    Enter Safe Mode with Command Prompt
  3. At the command prompt, type cd restore, and then press ENTER.
    Next,we will type rstrui.exe , and then press ENTER.Alternatively, if you are using Windows Vista, 7 and 8, you can just type : C:\windows\system32\rstrui.exe , and press ENTER.
    If you are using Windows XP, you will need to type C:\windows\system32\restore\rstrui.exe, and then press ENTER.
    System Restore commands
  4. The System Restore utility will start, and you’ll need to select a restore point previous to this infection.
    Restore points in Windows 7
  5. After System Restore has completed its task, you should be able to boot in Windows normal mode, and perform a system scan (as seen on STEP 2) with Malwarebytes Anti-Malware and HitmanPro to remove the malicious files from your machine.
IF the Abu Dhabi Police GHQ  virus didn’t allow you to restore your computer to a previous point, you’ll need to follow Method 3 to get rid of its screen lock.

Method 3: Remove Abu Dhabi Police GHQ  lock screen with msconfig utility

When your computer was infected with the Abu Dhabi Police GHQ virus, this trojan has set a its malicious files to start whenever your computer is booting. IF you didn’t have a restore point, we can use msconfig to remove it’s malicious start-up entry.
  1. While your computer is in Safe Mode with Command Prompt, type msconfig to start the Windows System Configuration utility.
    [Image: Type msconfig in the Command prompt]
  2. Click on the Startup tab, then search for any suspicious or unknonw entries (random numbers or letters, ctfmon.exe, and other suspicious or unknown entries), and unckech them from startup, then click on OK.
    This will stop the Abu Dhabi Police GHQ virus from starting with Windows, however it won’t remove the malicous files from your computer.
    [Image: Uncheck any suspicious entries from start-up]
  3. Type shutdown /r in the command prompt to restart your computer, then  perform a scan with Malwarebytes Anti-Malware and HitmanPro as seen on STEP 2.
IF the Abu Dhabi Police GHQ virus didn’t allow you to start the computer in Safe Mode with Command Prompt you’ll need to follow Method 4 to get rid of its screen lock.

Method 4: Remove Abu Dhabi Police GHQ virus with HitmanPro Kickstart

IF you couldn’t boot into Safe Mode with Command Prompt or didn’t have a System Restore point on your machine, we can use HitmanPro Kickstart to bypass this infection, and access your computer to scan it for malware.
  1. We will need to create a HitmanPro Kickstart USB flash drive,so while you are using a “clean” (non-infected) computer, download HitmanPro from the below link.
    HITMANPRO DOWNLOAD LINK (This link will open a download page in a new window from where you can download HitmanPro)
  2. Insert your USB flash drive into your computer and follow the instructions from the below video:
  3. After you have create the HitmanPro Kickstart USB flash drive, you can insert this USB drive into the infected machine and start your computer.
  4. Once the computer starts, repeatedly tap the F11 key (on some machines its F10 or F2),which should bring up the Boot Menu, from there you can select to boot from your USB.
    Next,you’ll need to perform a system scan with HitmanPro as see in the below video:
  5. After HitmanPro Kickstart has completed its task,you should be able to boot in Windows normal mode,from there you’ll need to perform a system scan (as seen on STEP 2) with Malwarebytes Anti-Malware and HitmanPro to remove the malicious files from your machine.

STEP 2: Remove Abu Dhabi Police GHQ malicious files from your computer

Run a computer scan with Malwarebytes Anti-Malware Free

  1. You can download Malwarebytes Anti-Malware Free from the below link,then double click on it to install this program.
    MALWAREBYTES ANTI-MALWARE DOWNLOAD LINK(This link will open a download page in a new window from where you can download Malwarebytes Anti-Malware Free)
  2. When the installation begins, keep following the prompts in order to continue with the setup process.
    DO NOT make any changes to default settings and when the program has finished installing, make sure you leave both the Update Malwarebytes’ Anti-Malware and Launch Malwarebytes’ Anti-Malware checked,then click on the Finish button.
    [Image: Malwarebytes Anti-Malware final installation screen]
  3. On the Scanner tab,select Perform quick scan and then click on the Scan button to start scanning your computer.
    [Image: Malwarebytes Anti-Malware Quick Scan]
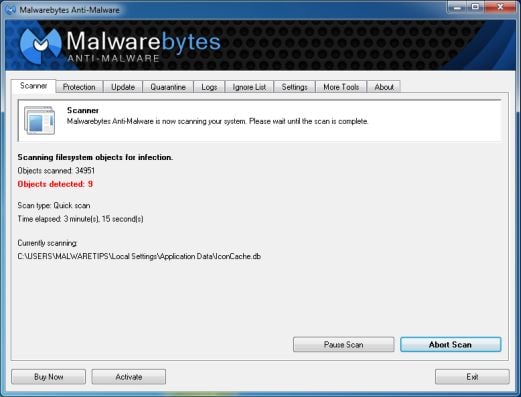
  4. Malwarebytes’ Anti-Malware will now start scanning your computer for Abu Dhabi Police GHQ virus as shown below.
    [Image: Malwarebytes Anti-Malware scanning for
  5. When the Malwarebytes scan will be completed,click on Show Result.
    [Image: Malwarebytes Anti-Malware scan results]
  6. You will now be presented with a screen showing you the malware infections that Malwarebytes’ Anti-Malware has detected.Please note that the infections found may be different than what is shown in the image.Make sure that everything is Checked (ticked) and click on the Remove Selected button.
    [Image:Malwarebytes removing virus]
  7. After your computer will restart in Normal mode, open Malwarebytes Anti-Malware and perform a Full System scan to verify that there are no remaining threats

Run a computer scan with HitmanPro

  1. Download HitmanPro from the below link,then double click on it to start this program.
    HITMANPRO DOWNLOAD LINK (This link will open a new web page from where you can download HitmanPro)
    IF you are experiencing problems while trying to start HitmanPro, you can use the Force Breach mode.To start HitmanPro in Force Breach mode, hold down the left CTRL-key when you start HitmanPro and all non-essential processes are terminated, including the malware process. (How to start HitmanPro in Force Breach mode – Video)
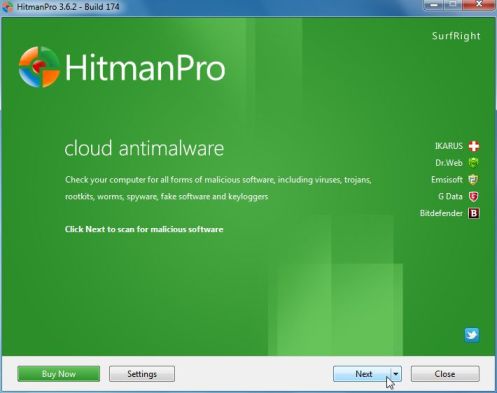
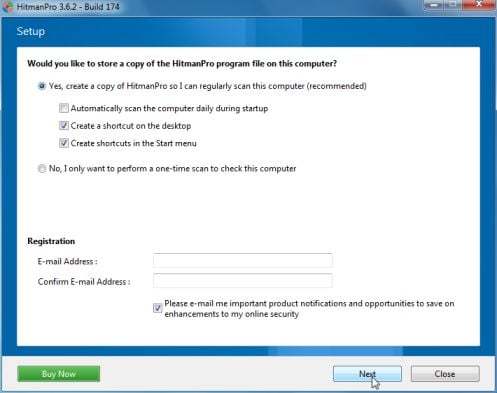
  2. HitmanPro will start and you’ll need to follow the prompts (by clicking on the Next button) to start a system scan with this program.
    HitmanPro scanner
    HitmanPro installation
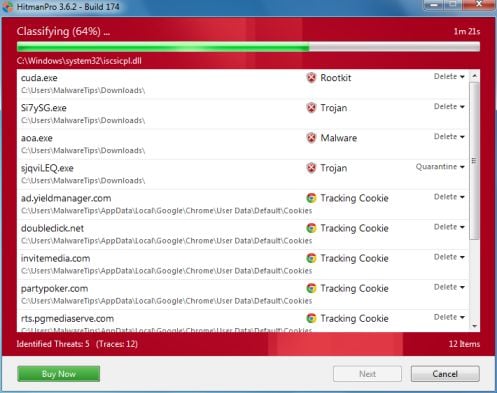
  3. HitmanPro will start scanning your computer for Abu Dhabi Police GHQ  malicious files as seen in the image below.
    HitmanPro scans after
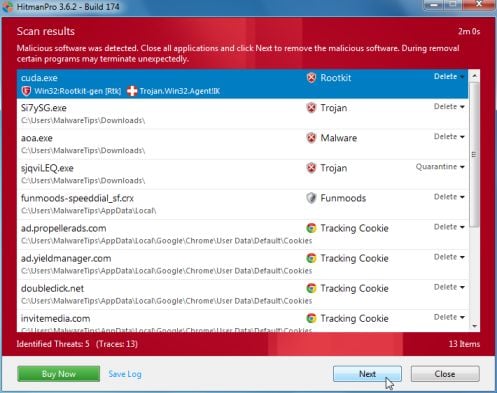
  4. Once the scan is complete,you’ll see a screen which will display all the infected files that this utility has detected, and you’ll need to click on Next to remove these malicious files.
    HitmanPro scan results
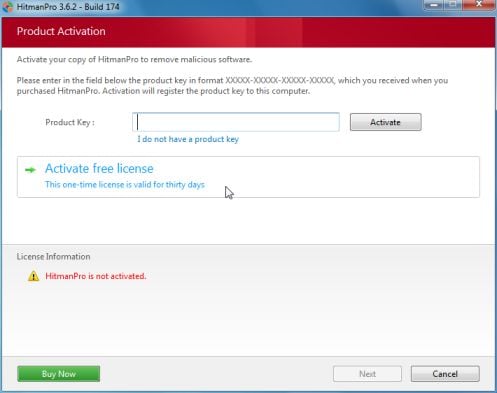
  5. Click Activate free license to start the free 30 days trial and remove all the malicious files from your computer.
    HitmanPro 30 days activation button