One of the main functions of a DBA is to maintain database indexes.
There have been several tips written about different commands to use for
both index rebuilds and index defrags as well as the differences
between index maintenance with SQL Server. In addition, other tips have
been written about using maintenance plans to maintain indexes on all
databases. One of the issues with maintenance plans is that they don't
always seem to be as reliable as you would hope and you also sometimes
get false feedback on whether the task actually was successful or not.
In this tip we look at a simple script that could be used to rebuild all
indexes for all databases.
Solution
The one nice thing about maintenance plans is that it works across
multiple databases and therefore you can push out one task to handle the
same activity across all of your databases. The problem that I have
seen with maintenance plans is that sometimes they do not work as
expected, therefore here is another approach.
The script below allows you to rebuild indexes for all databases and
all tables within a database. This could be further tweaked to handle
only indexes that need maintenance as well as doing either index defrags
or index rebuilds.
The script uses two cursors one for the databases and another for the
tables within the database. In addition, it uses the
INFORMATION_SCHEMA.TABLES view to list all of the tables within a
database.
Because we need to change from database to database we also need to
create dynamic SQL code for the queries. For the DBCC DBREINDEX option
we can just pass in the parameters, but for the ALTER INDEX statement we
need to build the query dynamically. Here is the script.
DECLARE DatabaseCursor CURSOR FOR SELECT name FROM master.dbo.sysdatabases WHERE name NOT IN ('master','msdb','tempdb','model','distribution') ORDER BY 1
OPEN DatabaseCursor
FETCH NEXT FROM DatabaseCursor INTO @Database WHILE @@FETCH_STATUS = 0 BEGIN
SET @cmd = 'DECLARE TableCursor CURSOR FOR SELECT ''['' + table_catalog + ''].['' + table_schema + ''].['' + table_name + '']'' as tableName FROM [' + @Database + '].INFORMATION_SCHEMA.TABLES WHERE table_type = ''BASE TABLE'''
-- create table cursor EXEC (@cmd) OPEN TableCursor
FETCH NEXT FROM TableCursor INTO @Table WHILE @@FETCH_STATUS = 0 BEGIN
IF (@@MICROSOFTVERSION / POWER(2, 24) >= 9) BEGIN -- SQL 2005 or higher command SET @cmd = 'ALTER INDEX ALL ON ' + @Table + ' REBUILD WITH (FILLFACTOR = ' + CONVERT(VARCHAR(3),@fillfactor) + ')' EXEC (@cmd) END ELSE BEGIN -- SQL 2000 command DBCC DBREINDEX(@Table,' ',@fillfactor) END
FETCH NEXT FROM TableCursor INTO @Table END
CLOSE TableCursor DEALLOCATE TableCursor
FETCH NEXT FROM DatabaseCursor INTO @Database END CLOSE DatabaseCursor DEALLOCATE DatabaseCursor
The script will work for both SQL 2000 and higher versions. For SQL
2000 it uses DBREINDEX and for SQL Server 2005 and higher it uses ALTER
INDEX. Thanks go out to LittlePanthers for providing the code snippet
to check the version of SQL Server.
While indexes can speed up execution of queries
several fold as they can make the querying process faster, there is
overhead associated with them. They consume additional disk space and
require additional time to update themselves whenever data is updated,
deleted or appended in a table. Also when you perform any data
modification operations (INSERT, UPDATE, or DELETE statements) index
fragmentation may occur and the information in the index can get
scattered in the database. Fragmented index data can cause SQL Server to
perform unnecessary data reads and switching across different pages, so
query performance against a heavily fragmented table can be very poor.
In this article I am going to write about fragmentation and different
queries to determine the level of fragmentation.
Solution
When indexes are first built, little or no
fragmentation should exist. Over time, as data is inserted, updated, and
deleted, fragmentation levels on the underlying indexes may begin to
rise. So let's see how it happens.
When a page of data fills to 100 percent and more data must be added
to it, a page split occurs. To make room for the new incoming data, SQL
Server moves half of the data from the full page to a new page. The new
page that is created is created after all the pages in the database.
Therefore, instead of going right from one page to the next when looking
for data, SQL Server has to go from one page to another page somewhere
else in the database looking for the next page it needs. This is called
index fragmentation.
There are basically two types of fragmentation:
External fragmentation - External, a.k.a logical,
fragmentation occurs when an index leaf page is not in logical order, in
other words it occurs when the logical ordering of the index does not
match the physical ordering of the index. This causes SQL Server to
perform extra work to return ordered results. For the most part,
external fragmentation isn't too big of a deal for specific searches
that return very few records or queries that return result sets that do
not need to be ordered.
Internal fragmentation - Internal fragmentation occurs when
there is too much free space in the index pages. Typically, some free
space is desirable, especially when the index is created or rebuilt. You
can specify the Fill Factor setting when the index is created or
rebuilt to indicate a percentage of how full the index pages are when
created. If the index pages are too fragmented, it will cause queries to
take longer (because of the extra reads required to find the dataset)
and cause your indexes to grow larger than necessary. If no space is
available in the index data pages, data changes (primarily inserts) will
cause page splits as discussed above, which also require additional
system resources to perform.
As we learned, heavily fragmented indexes can degrade query
performance significantly and cause the application accessing it to
respond slowly. So now the question is how to identify the
fragmentation. For that purpose SQL Server 2005 and 2008 provide a
dynamic management function (DMF) to determine index fragmentation
level. This new DMF (sys.dm_db_index_physical_stats)
function accepts parameters such as the database, database table, and
index for which you want to find fragmentation. There are several
options that allow you to specify the level of detail that you want to
see in regards to index fragmentation, we will see some of these options
in the examples below.
The sys.dm_db_index_physical_stats function returns tabular data regarding one particular table or index.
Input Parameter
Description
database_id
The default is 0 (NULL, 0,
and DEFAULT are equivalent values in this context) which specify to
return information for all databases in the instance of SQL Server else
specify the databaseID from sys.databases if you want information about a
specific database. If you specify NULL for database_id, you must also specify NULL for object_id, index_id, and partition_number.
object_id
The default is 0 (NULL, 0,
and DEFAULT are equivalent values in this context) which specify to
return information for all tables and views in the specified database or
else you can specify object_id for a particular object. If you specify
NULL for object_id, you must also specify NULL for index_id and partition_number.
index_id
The default is -1 (NULL,
-1, and DEFAULT are equivalent values in this context) which specify to
return information for all indexes for a base table or view. If you
specify NULL for index_id, you must also specify NULL for partition_number.
partition_number
The default is 0 (NULL, 0,
and DEFAULT are equivalent values in this context) which specify to
return information for all partitions of the owning object. partition_number is 1-based. A nonpartitioned index or heap has partition_number set to 1.
mode
mode specifies the
scan level that is used to obtain statistics. Valid inputs are DEFAULT,
NULL, LIMITED, SAMPLED, or DETAILED. The default (NULL) is LIMITED.
LIMITED - It is the fastest mode
and scans the smallest number of pages. For an index, only the
parent-level pages of the B-tree (that is, the pages above the leaf
level) are scanned. In SQL Server 2008, only the associated PFS and IAM
pages of a heap are examined; the data pages of the heap are not
scanned. In SQL Server 2005, all pages of a heap are scanned in LIMITED
mode.
SAMPLED - It returns
statistics based on a 1 percent sample of all the pages in the index or
heap. If the index or heap has fewer than 10,000 pages, DETAILED mode is
used instead of SAMPLED.
DETAILED - It scans all pages and returns all statistics.
Note
The sys.dm_db_index_physical_stats dynamic management function
replaces the DBCC SHOWCONTIG statement. It requires only an
Intent-Shared (IS) table lock in comparison to DBCC SHOWCONTIG which
required a Shared Lock, also the algorithm for calculating fragmentation
is more precise than DBCC SHOWCONTIG and hence it gives a more accurate
result.
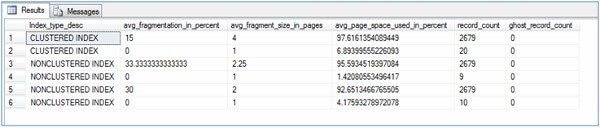
For an index, one row is returned for each level of the B-tree in each partition (this
is the reason, if you look at image below, for some indexes there are
two or more than two records for a single index; you can refer to the
Index_depth column which tells the number of index levels). For a
heap, one row is returned for the IN_ROW_DATA allocation unit of each
partition. For large object (LOB) data, one row is returned for the
LOB_DATA allocation unit of each partition. If row-overflow data exists
in the table, one row is returned for the ROW_OVERFLOW_DATA allocation
unit in each partition.
Example
Let's see an example. The first script provided below gives the
fragmentation level of a given database including all tables and views
in the database and all indexes on these objects. The second script
gives the fragmentation level of a particular object in the given
database. The details about the columns and its meaning returned by the sys.dm_db_index_physical_stats are given in the below table.
Script : Index Fragmentation Report Script
--To Find out fragmentation level of a given database
--This query will give DETAILED information
--CAUTION : It may take very long time, depending on the number of tables in the DB
USE AdventureWorks
GO
SELECT object_name(IPS.object_id) AS [TableName],
   SI.name AS [IndexName],
   IPS.Index_type_desc,
   IPS.avg_fragmentation_in_percent,
   IPS.avg_fragment_size_in_pages,
   IPS.avg_page_space_used_in_percent,
   IPS.record_count,
   IPS.ghost_record_count,
   IPS.fragment_count,
   IPS.avg_fragment_size_in_pages
FROM sys.dm_db_index_physical_stats(db_id(N'AdventureWorks'), NULL, NULL, NULL , 'DETAILED') IPS
   JOIN sys.tables ST WITH (nolock) ON IPS.object_id = ST.object_id
   JOIN sys.indexes SI WITH (nolock) ON IPS.object_id = SI.object_id AND IPS.index_id = SI.index_id
WHERE ST.is_ms_shipped = 0
ORDER BY 1,5
GO
--To Find out fragmentation level of a given database and table
--This query will give DETAILED information
DECLARE @db_id SMALLINT;
DECLARE @object_id INT;
SET @db_id = DB_ID(N'AdventureWorks');
SET @object_id = OBJECT_ID(N'Production.BillOfMaterials');
IF @object_id IS NULL
BEGIN
   PRINT N'Invalid object';
END
ELSE
BEGIN
   SELECT IPS.Index_type_desc,
      IPS.avg_fragmentation_in_percent,
      IPS.avg_fragment_size_in_pages,
      IPS.avg_page_space_used_in_percent,
      IPS.record_count,
      IPS.ghost_record_count,
      IPS.fragment_count,
      IPS.avg_fragment_size_in_pages
   FROM sys.dm_db_index_physical_stats(@db_id, @object_id, NULL, NULL , 'DETAILED') AS IPS;
END
GO
Returned Column
Description
avg_fragmentation_in_percent
It indicates the amount of external fragmentation you have for the given objects. The lower the number the better - as this number approaches 100% the more pages you have in the given index that are not properly ordered. For heaps, this value is actually the percentage of extent fragmentation and not external fragmentation.
avg_page_space_used_in_percent
It indicates how dense the pages in your index are, i.e. on average how full each page in the index is (internal fragmentation). The higher the number the better speaking in terms of fragmentation and read-performance. To achieve optimal disk space use, this value should be close to 100% for an index that will not have many random inserts. However, an index that has many random inserts and has very full pages will have an increased number of page splits. This causes more fragmentation. Therefore, in order to reduce page splits, the value should be less than 100 percent.
fragment_count
A fragment is made up of physically consecutive leaf pages in the same file for an allocation unit. An index has at least one fragment. The maximum fragments an index can have are equal to the number of pages in the leaf level of the index. So the less fragments the more data is stored consecutively.
avg_fragment_size_in_pages
Larger fragments mean that less disk I/O is required to read the same number of pages. Therefore, the larger the avg_fragment_size_in_pages value, the better the range scan performance.
SolutionFragmented indexes can be de-fragmented in
two ways depending on the level of fragmentation and size of the tables
in terms of rows.
Reorganize Index - The reorganize operation doesn't take a lot
of system resources and can be done while users are accessing the table
that the index exists on, that's the reason it is an "online"
operation. The reorganize process reorganizes the leaf nodes of the
index physically to match it with the logical order, this physical order
matching the logical order improves the performance of index scans. The
indexes can be reorganized using ALTER INDEX...REORGANIZE command (more
details on this command and its usage are given below). This command is
the same as DBCC INDEXDEFRAG of previous versions (though it still
available for backward compatibility), but there is one difference, it
has some additional features like large objects compaction
(LOB_COMPACTION) and it is an online operation. Also, reorganize does
NOT update statistics.
Script : Index Reorganize
ALTER INDEX { index_name | ALL }
ON
Rebuild Index - Rebuilding an index means dropping an existing
index and creating a new one altogether. Any fragmentation that was in
the older index is gone with the drop and in the new index the logical
order matches the physical order. Because the existing index is removed
and created afresh, users would not be able to access the table and
performance may degrade while the index is being built. (If the index
you are rebuilding is a cluster index, then your tables will be
unavailable to the user during the rebuild process though if it is
non-clustered index only a shared lock will be placed on the table so
users will be able to access the table, but would not be allowed to do
modifications on it). In other words, users will not be able to lock the
table during the time the index rebuild is occurring. This could be a
major performance bottleneck when rebuilding indexes. Though beginning
with SQL Server 2005 you can rebuild your indexes in an online fashion,
so that other users are able to access the table and index while the
rebuild is being performed. Since you can access the indexes during the
rebuild operation, you are not limited to only rebuilding indexes during
off-peak hours, though there is some trade-off needed as discussed in
the section below.
You might be wondering how SQL Server makes available the index while it is being rebuilt. Well, it uses Row versioning
behind the scenes. When you create an index online, it does not drop
the existing index and create a new one, but rather it keeps the
original index (source) to be used by the users and creates an index
(target) parallel to it. The target index resembles the source index
which is now a write-only index. Any modifications are applied to the
target as well as on the source index. But during the rebuild only the
source index will be available for use by the users. Once the index
rebuild operation is complete, the original (source) index will be
dropped and the meta-data will be updated to make the newly created
(target) available for read and write operations. Of course when you
plan to rebuild your indexes online, you need to consider its trade-off
of having almost double the storage size for indexes to maintain two
indexes (source and target) simultaneously (also additional temporary
disk might be required for sorting operations).
Indexes can be rebuilt using these two techniques:
CREATE INDEX Command - One way is to simply drop the index
using a DROP INDEX statement followed by a CREATE INDEX statement.
Though you can combine these two commands by using the DROP_EXISTING
clause of CREATE INDEX command as given below in the script table. You
can use the DROP_EXISTING clause to rebuild the index, add or drop
columns, modify options, modify column sort order, or change the
partition scheme or filegroup. DROP_EXISTING enhances performance when
you re-create a clustered index, with either the same or different set
of keys, on a table that also has non-clustered indexes. DROP_EXISTING
replaces the execution of a DROP INDEX statement on the old clustered
index followed by the execution of a CREATE INDEX statement for the new
clustered index. The benefit it gives, the non-clustered indexes are
rebuilt only once, and even then only if the index definition has
changed. With this command you can rebuild the index online.
Script : Index Rebuild using CREATE INDEX Command
ALTER INDEX { index_name | ALL }
CREATE [ UNIQUE ] [ CLUSTERED | NONCLUSTERED ] INDEX index_name
ON
Using ALTER INDEX command - This statement replaces the DBCC
DBREINDEX statement. The ALTER INDEX statement allows for the rebuilding
of the clustered and non-clustered indexes on the table. The drawback
with this statement is that you cannot change the index definition the
way you can do with the CREATE INDEX command. Though with this command
you can rebuild the index online. ALTER INDEX cannot be used to
repartition an index or move it to a different filegroup. This statement
cannot be used to modify the index definition at all, such as adding or
deleting columns or changing the column order. Use CREATE INDEX with
the DROP_EXISTING clause to perform these operations as stated above.
Script : Index Rebuild using ALTER INDEX Command
ALTER INDEX { index_name | ALL }
ON
Notes
Rebuilding the Clustered Index (CI) does not rebuild the
Non-Clustered Indexes (NCI) unless the keyword ALL is specified, you
will have do it separately.
If you rebuild your indexes online, you must ensure that you
have enough available disk space to hold the index that is being created
along with the pre-existing index (source and target indexes
simultaneously). After the rebuild operation, the old index will be
dropped though. Also, rebuilding indexes online takes a significant
amount more time and resources than just rebuilding the index. This is
usually a considerable tradeoff since the table will remain available
during the rebuild operation.
Also the underlying table cannot be altered, truncated, or dropped while an online index operation is in process.
For partitioned indexes built on a partition scheme, you can
use either of these methods (Reorganize and Rebuild) on a complete index
or on a single partition of an index.
In general, fragmentation on small indexes is often not
controllable, in other words rebuilding or reorganizing small indexes
often does not reduce fragmentation. That is because the pages of small
indexes are stored on mixed extents. Mixed extents are shared by up to
eight different objects, so the fragmentation in a small index might not
be reduced after reorganizing or rebuilding the index.
Index rebuilding can be either online or offline.
Index reorganizing is always executed online.
The create index operation can be minimally logged if the database recovery model is set to either bulk-logged or simple.
An index cannot be reorganized or rebuilt if the filegroup in which it resides is offline or set to read-only.
Example Script to Rebuild / Reorganize Fragmented Indexes
Let's see an example, the script
provided below reorganizes and rebuilds the indexes if the fragmentation
level is higher than the given threshold. You can define the threshold
for reorganizing as well as for rebuilding and the script will work
accordingly. Please note this script may take several minutes to several
hours depending on the level of fragmentation and size of the
tables in terms of rows. Kindly test it on your dev or test environment
before executing on your production environment.
--Description : This script reorganizes and rebuilds the index if the fragmentation level is higher the given threshold
-- You can define the threshold for reorganize as well as for rebuild and script will work accordingly
-- INPUTS : @fillfactor - While rebuilding index what would be FILLFACTOR for new index
-- @FragmentationThresholdForReorganizeTableLowerLimit - Fragmentation Level lower threshold to check for reorganizing the table, if the fragmentation is higher than this level, it will be considered for reorganize
-- @@FragmentationThresholdForRebuildTableLowerLimit - Fragmentation Level lower threshold to check for rebuilding the table, if the fragmentation is higher than this level, it will be considered for rebuild
-- NOTES : PRINT statements are all queued up and don't show up until the entire script is printed. However, there is an alternative to PRINTing messages.
-- You can raise an error that isn't really an error (code of 0) and you'll get the same effect--message will be printed immediately.
--You can specify your customized value for reorganize and rebuild indexes, the default values
--of 10 and 30 means index will be reorgnized if the fragmentation level is more than equal to 10
--and less than 30, if the fragmentation level is more than equal to 30 then index will be rebuilt
SET @fillfactor = 90
SET @FragmentationThresholdForReorganizeTableLowerLimit = '10.0' -- Percent
SET @FragmentationThresholdForRebuildTableLowerLimit = '30.0' -- Percent
BEGIN TRY
-- ensure the temporary table does not exist
IF (SELECT OBJECT_ID('tempdb..#FramentedTableList')) IS NOT NULL
DROP TABLE #FramentedTableList;
SET @Message = 'DATE : ' + CONVERT(VARCHAR, GETDATE()) + ' - Retrieving indexes with high fragmentation from ' + DB_NAME() + ' database.'
RAISERROR(@Message, 0, 1) WITH NOWAIT
SELECT OBJECT_NAME(IPS.OBJECT_ID) AS [TableName], avg_fragmentation_in_percent, SI.name [IndexName],
schema_name(ST.schema_id) AS [SchemaName], 0 AS IsProcessed INTO #FramentedTableList
FROM sys.dm_db_index_physical_stats(DB_ID(), NULL, NULL, NULL , NULL) IPS
JOIN sys.tables ST WITH (nolock) ON IPS.OBJECT_ID = ST.OBJECT_ID
JOIN sys.indexes SI WITH (nolock) ON IPS.OBJECT_ID = SI.OBJECT_ID AND IPS.index_id = SI.index_id
WHERE ST.is_ms_shipped = 0 AND SI.name IS NOT NULL
AND avg_fragmentation_in_percent >= CONVERT(DECIMAL, @FragmentationThresholdForReorganizeTableLowerLimit)
ORDER BY avg_fragmentation_in_percent DESC
SET @Message = 'DATE : ' + CONVERT(VARCHAR, GETDATE()) + ' - Retrieved indexes with high fragmentation from ' + DB_NAME() + ' database.'
RAISERROR(@Message, 0, 1) WITH NOWAIT
RAISERROR('', 0, 1) WITH NOWAIT
WHILE EXISTS ( SELECT 1 FROM #FramentedTableList WHERE IsProcessed = 0 )
BEGIN
SELECT TOP 1 @Table = TableName, @AvgFragmentationInPercent = avg_fragmentation_in_percent,
@SchemaName = SchemaName, @IndexName = IndexName
FROM #FramentedTableList
WHERE IsProcessed = 0
--Reorganizing the index
IF((@AvgFragmentationInPercent >= @FragmentationThresholdForReorganizeTableLowerLimit) AND (@AvgFragmentationInPercent < @FragmentationThresholdForRebuildTableLowerLimit))
BEGIN
SET @Message = 'DATE : ' + CONVERT(VARCHAR, GETDATE()) + ' - Reorganizing Index for [' + @Table + '] which has avg_fragmentation_in_percent = ' + CONVERT(VARCHAR, @AvgFragmentationInPercent) + '.'
RAISERROR(@Message, 0, 1) WITH NOWAIT
SET @cmd = 'ALTER INDEX ' + @IndexName + ' ON [' + RTRIM(LTRIM(@SchemaName)) + '].[' + RTRIM(LTRIM(@Table)) + '] REORGANIZE'
EXEC (@cmd)
--PRINT @cmd
SET @Message = 'DATE : ' + CONVERT(VARCHAR, GETDATE()) + ' - Reorganize Index completed successfully for [' + @Table + '].'
RAISERROR(@Message, 0, 1) WITH NOWAIT
RAISERROR('', 0, 1) WITH NOWAIT
END
--Rebuilding the index
ELSE IF (@AvgFragmentationInPercent >= @FragmentationThresholdForRebuildTableLowerLimit )
BEGIN
SET @Message = 'DATE : ' + CONVERT(VARCHAR, GETDATE()) + ' - Rebuilding Index for [' + @Table + '] which has avg_fragmentation_in_percent = ' + CONVERT(VARCHAR, @AvgFragmentationInPercent) + '.'
RAISERROR(@Message, 0, 1) WITH NOWAIT
SET @cmd = 'ALTER INDEX ' + @IndexName + ' ON [' + RTRIM(LTRIM(@SchemaName)) + '].[' + RTRIM(LTRIM(@Table)) + '] REBUILD WITH (FILLFACTOR = ' + CONVERT(VARCHAR(3),@fillfactor) + ', STATISTICS_NORECOMPUTE = OFF)'
EXEC (@cmd)
--PRINT @cmd
SET @Message = 'DATE : ' + CONVERT(VARCHAR, GETDATE()) + ' - Rebuild Index completed successfully for [' + @Table + '].'
RAISERROR(@Message, 0, 1) WITH NOWAIT
RAISERROR('', 0, 1) WITH NOWAIT
END
UPDATE #FramentedTableList
SET IsProcessed = 1
WHERE TableName = @Table
AND IndexName = @IndexName
END
DROP TABLE #FramentedTableList
END TRY
BEGIN CATCH
PRINT 'DATE : ' + CONVERT(VARCHAR, GETDATE()) + ' There is some run time exception.'
PRINT 'ERROR CODE : ' + CONVERT(VARCHAR, ERROR_NUMBER())
PRINT 'ERROR MESSAGE : ' + ERROR_MESSAGE()
END CATCH
After searching emails in Outlook. It did not show all the all the results.
There is link at the bottom, saying “More”, but clicking this one never yield much result.
The
solution is fortunately not far away. Just click “File > Options
> Search” and uncheck “Improve search speed by limiting the number of
results shown”, like this:
Now, if you go back and do the same result, you should get more results!
One
last thing: You may still get the “More” option, but now it refers the
messages not cached locally on your machine. Starting from Outlook 2013,
the client will by default only cache messages for the last 12 months,
but this is easily configurable, as well. See this support article for
details: http://support.microsoft.com/kb/2733062
In this article, I’ll show you a couple of different methods to fix
this problem so you can start opening links in Outlook again without a
problem.
Method 1 – Microsoft Fix it
Your easiest choice here is to simply download and run the Microsoft Fix it repair tool for this particular problem. http://support.microsoft.com/kb/310049
Go ahead and give it a shot and see if it fixes the issue for you. If
not, then you can keep reading and try some of the other solutions.
Method 2 – Registry Changes
The second way is to manually edit the registry. You have to open an
elevated command prompt (right-click on Run and choose Run as
Administrator) and type in the following commands:
REG ADD HKEY_CURRENT_USER\Software\Classes\.htm /ve /d htmlfile /fREG
ADD HKEY_CURRENT_USER\Software\Classes\.html /ve /d htmlfile /f
REG ADD HKEY_CURRENT_USER\Software\Classes\.shtml /ve /d htmlfile
/fREG ADD HKEY_CURRENT_USER\Software\Classes\.xht /ve /d htmlfile /f
REG ADD HKEY_CURRENT_USER\Software\Classes\.xhtml /ve /d htmlfile /f
Make Internet Explorer your default browser after doing this and then
restart once. You should be good to go. You can read this tutorial on
setting IE to be the default browser: http://windows.microsoft.com/en-GB/Windows7/Change-your-default-web-browser
Again, this is if you recently uninstalled Google Chrome and started having this issue in Outlook.
Method 3 – Set IE as Default Program
You can also set IE to be the default program for opening links by going to Control Panel, clicking on Default Programs, then click Set your default programs.
Click on Internet Explorer and click the Set this program as default link. This is for Windows 7. On Windows XP, you have to go to Control Panel, then Add and Remove Programs, then under Default Programs click on Set your default programs. Then the process is the same after that.
Method 4 – System Restore
The last thing you can try is to do a system restore to a previous
point when you know the issue was not occurring. Just click on Start and
type system restore and choose a restore point far enough in the past
to ensure you skip past whatever caused the issue with the hyperlinks in
the first place.
Method 5 – Reinstall Chrome
As a last resort, you can always reinstall Chrome, set it as your
default browser, then check if the links are working properly. If so,
then go ahead and change your default browser to Internet Explorer. Then
check to see if the links are working. If they are, then go ahead and
uninstall Chrome. Kind of a pain, but if nothing else worked for you,
then it’s worth a shot.
If you’re still having problems with this issue in Outlook 2003, 2007 or 2010, post a comment here and I’ll try to help. Enjoy!
Enterprise Mode is a new feature in Internet Explorer that allows
businesses to use old web applications in modern versions of IE. This
feature is designed to help businesses who still need Internet Explorer 8
for some reason to upgrade to a more modern, secure browser.
This feature is arriving in Internet Explorer 11 as part of Windows 8.1 Update 1,
and will also be available as an update to IE 11 on Windows 7, Windows
RT, Windows Server 2008 R2 SP1, and Windows Server 2012 R2.
Enable Enterprise Mode with Group Policy
If you need Enterprise Mode, there’s a good chance you’re using a
Professional or Enterprise version of Windows and will have access to
the group policy editor. You can’t enable Enterprise Mode on standard versions of Windows 8.1 or Home versions of Windows 7.
To launch the local group policy editor, press Windows Key + R, type gpedit.msc into the Run dialog, and press Enter.
Navigate to User Configuration > Administrative Templates > Windows Components > Internet Explorer.
Scroll down and locate the Let users turn on and use Enterprise Mode
from the Tools menu option. Double-click it, set it to Enabled, and
users will be able to enable Enterprise Mode manually.
System administrators can also enable the Use the Enterprise Mode IE
website list option. You’ll need to create a list of websites you want
rendered in Enterprise Mode and save it to a file — either on the local
computer or on a website — and enter the address of that file here.
Internet Explorer will load the list, read it, and render all the
websites on it in Enterprise Mode.
Some reports indicate that there are various registry entries that
you can modify to enable this feature on Home or standard versions of
Windows. However, it appears these options have been removed on the
final version of Windows 8.1 Update 1. When we monitored the Group Policy Editor to see what registry entry it was changing, it was changing a Group Policy-only entry and not a standard registry entry you could change by hand. Update: Microsoft’s Fred Pullen has informed us that
there are still registry keys you can change to enable this feature on
standard versions of Windows 8:
“The registry keys should still work, but may have
changed from the pilot. The ones that work are
{HKLM|HKCU}\Software\Policies\Microsoft\Internet
Explorer\Main\EnterpriseMode and consist of the strings “Enable” and
“SiteList”. Note that it’s in the “Policies” branch, and that some of
the keys (“Internet Explorer\Main\EnterpriseMode”) may need to be
created. I’ve tested this in Windows 7 VMs, and the regkeys work for me
on non-domain-joined machines.”
With Enterprise Mode enabled, using it is as simple as tapping the
Alt key in Internet Explorer, clicking the Tools menu, and selecting
Enterprise Mode to toggle Enterprise Mode for the current website. If
you’ve set up a list of websites that will be automatically opened in
Enterprise Mode, you don’t even need to do this — it will all happen
automatically.
If you just enabled the group policy setting, you’ll have to close
and re-open Internet Explorer before this option will appear in the
Tools menu.
It’s no surprise that this feature requires a Professional or
Enterprise version of Windows. It’s named Enterprise Mode and intended
for businesses with out-of-date websites, not typical home users.
By default, the Backup Exec catalogs are stored in the following directory:
C:\Program Files\Symantec\Backup Exec\Catalogs
It may be necessary to move the catalogs to a different location due
to disk space limitations or other issues. Backup Exec can be configured
to use a different directory for the catalog files.
Symantec recommends the Backup Exec Utility be used to change the
location where catalogs are stored. Backup Exec Utility provides the
most direct method for moving catalogs to a new directory. For more
information about using Backup Exec Utility to change the catalog
location, refer to the topic "Setting the location for the job log and
the catalogs" in the Backup Exec Utility User's Guide.
The directory in which catalogs are stored from the Backup Exec
server can also be chaned. When changing the catalog directory from the
Backup Exec server, all Backup Exec services must be stopped first and
manually copy any existing catalogs to the new catalog directory.
Solution
To change the directory in which Backup Exec catalogs are stored from the Backup Exec server, complete the following steps:
Click the Backup Exec button, select Configuration and Settings, and then click Backup Exec Settings.
In the left pane, click Catalog.
In the Catalog path field, browse to or type the new path in which to store catalogs.
Note: The directory must exist in Windows. Create the directory using Windows Explorer before you type it in the Catalog path field.
Click OK.
Click the Backup Exec button, select Configuration and Settings, and then click Backup Exec Services.
Click Stop all services.
Click OK.
After stopping all Backup Exec services, manually copy the catalog files from the old folder to the new one.
Using Windows Explorer, navigate to the directory in which the catalogs are currently stored.
Copy all of the items in the folder, including any subfolders and all files.
Using Windows Explorer, navigate to the directory to which you want to move the catalogs.
Paste all of the items in the folder.
After any catalog files have been copied to the new directory, restart all Backup Exec services.
Click the Backup Exec button, select Configuration and Settings, and then click Backup Exec Services.
Click Start all services.
Click OK.
Backup Exec will now use the new directory for any catalog
operations. After backup job has completed successfully, run a restore
job to verify that the catalogs are working as intended, then the
directory where the old catalogs were stored can be deleted.