Showing posts with label DNS. Show all posts

Thursday, August 11, 2022

Implementing DNS Security in Windows Server 2016

 A number of options are available for protecting the DNS server, including :

• DNS cache locking
• DNS socket pool
• DNSSEC

Before we start the step by step to implement the DNS Security, lets go through a theory behind this technology.

DNS Cache Locking

Cache locking is a Windows Server 2016 security feature that allows you to control when information in the DNS cache can be overwritten. When a recursive DNS server responds to a query, it caches the results so that it can respond quickly if it receives another query requesting the same information. The period of time the DNS server keeps information in its cache is determined by the Time to Live (TTL) value for a resource record.

DNS Socket Pool

The DNS socket pool enables a DNS server to use source port randomization when it issues DNS queries. When the DNS service starts, the server chooses a source port from a pool of sockets that are available for issuing queries. Instead of using a predicable source port, the DNS server uses a random port number that it selects from the DNS socket pool. The DNS socket pool makes cache-tampering attacks more difficult because a malicious user must correctly guess both the source port of a DNS query and a random transaction ID to successfully run the attack. The DNS socket pool is enabled by default in Windows Server 2016

DNSSEC

DNSSEC enables a DNS zone and all records in the zone to be signed cryptographically so that client computers can validate the DNS response. DNS is often subject to various attacks, such as spoofing and cache-tampering. DNSSEC helps protect against these threats and provides a more secure DNS infrastructure.

So now, lets go through a simple step how you as Server Administrator can implement DNS Security.

01 – Step to configure DNSSEC

1 – Open Server Manager,  click Tools and open DNS Manager.
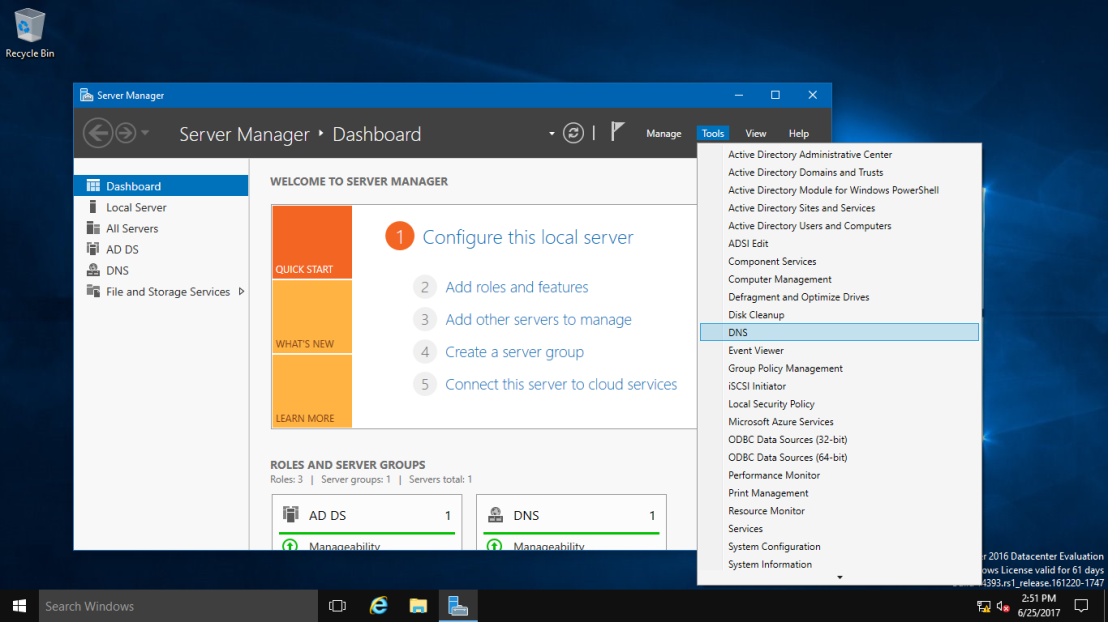
2

2 – In the DNS Manager, browse to your Domain name, then right click domain name, click DNSSEC and then click Sign the Zone.
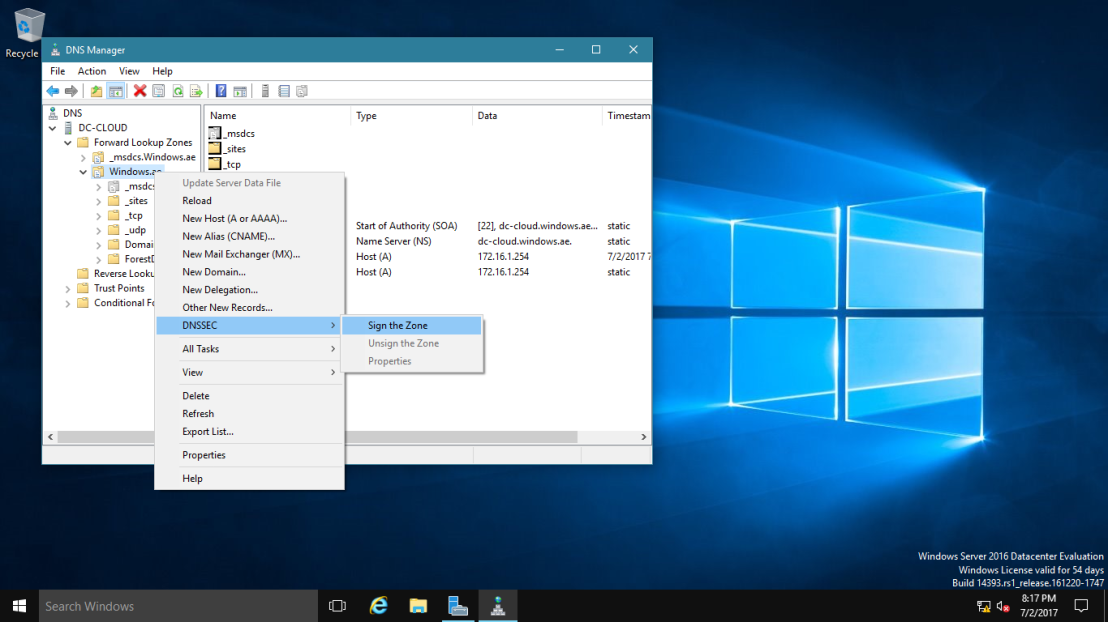
1.png


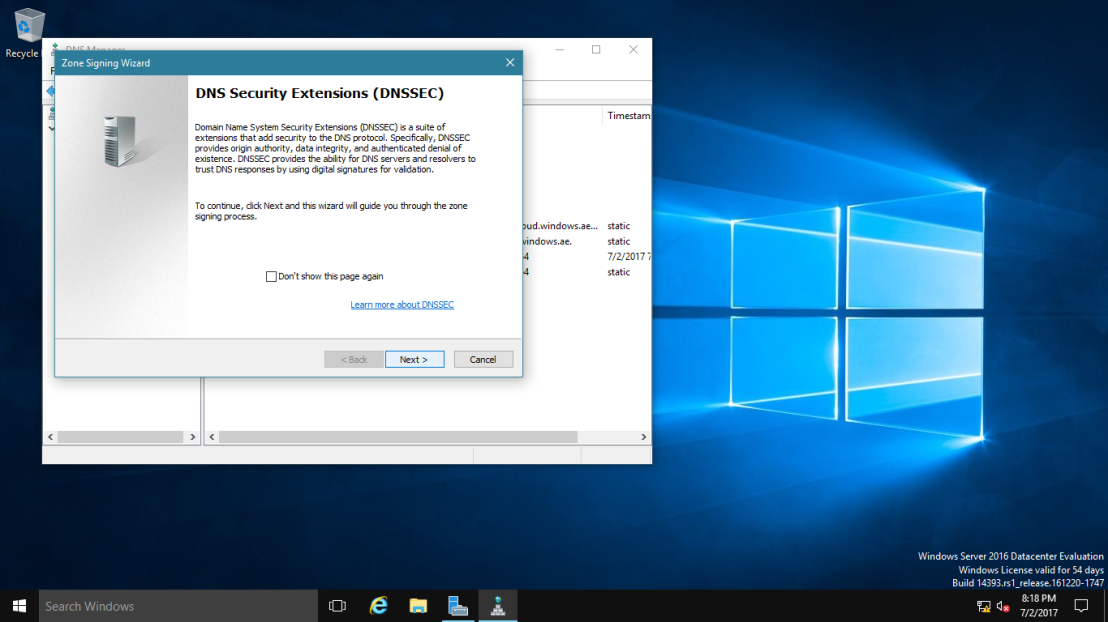
2 – In the Zone Signing Wizard interface, click Next.
2.png

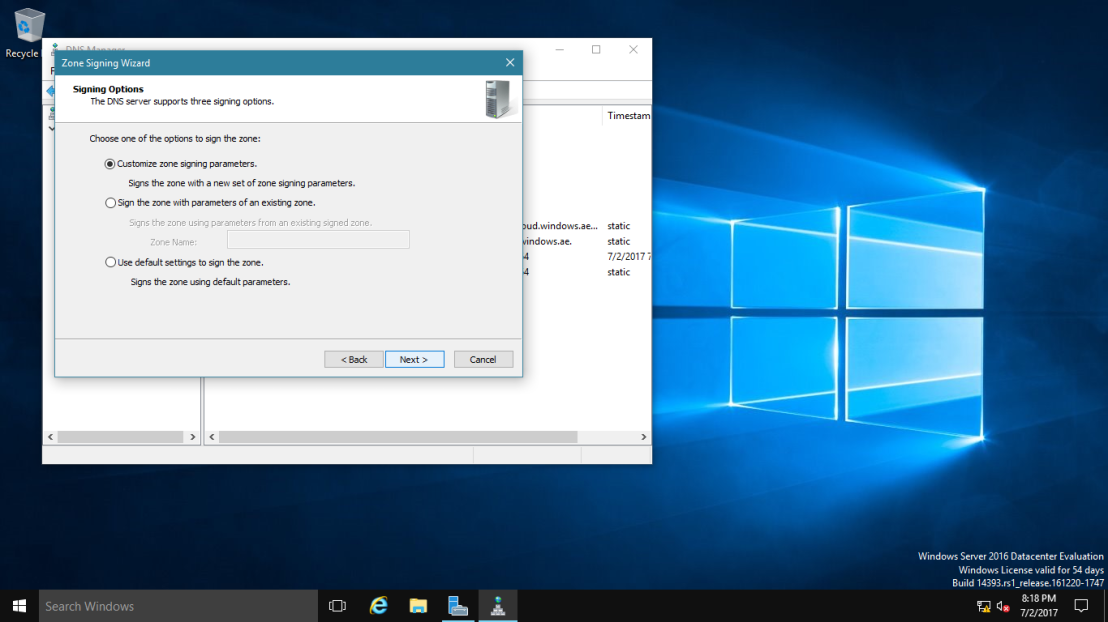
3 – On the Signing options interface, click Customize zone signing parameters, and then click Next.
3.png


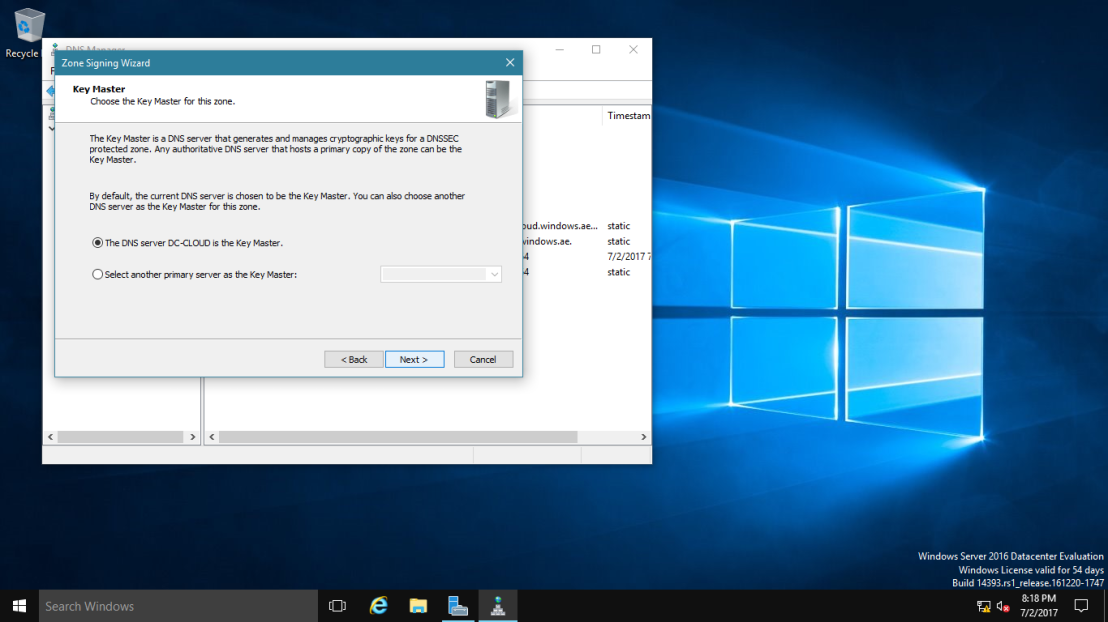
4 – On the Key Master interface, ensure that “The DNS server CLOUD-SERVER is selected as the Key Master“, and then click Next.
4.png

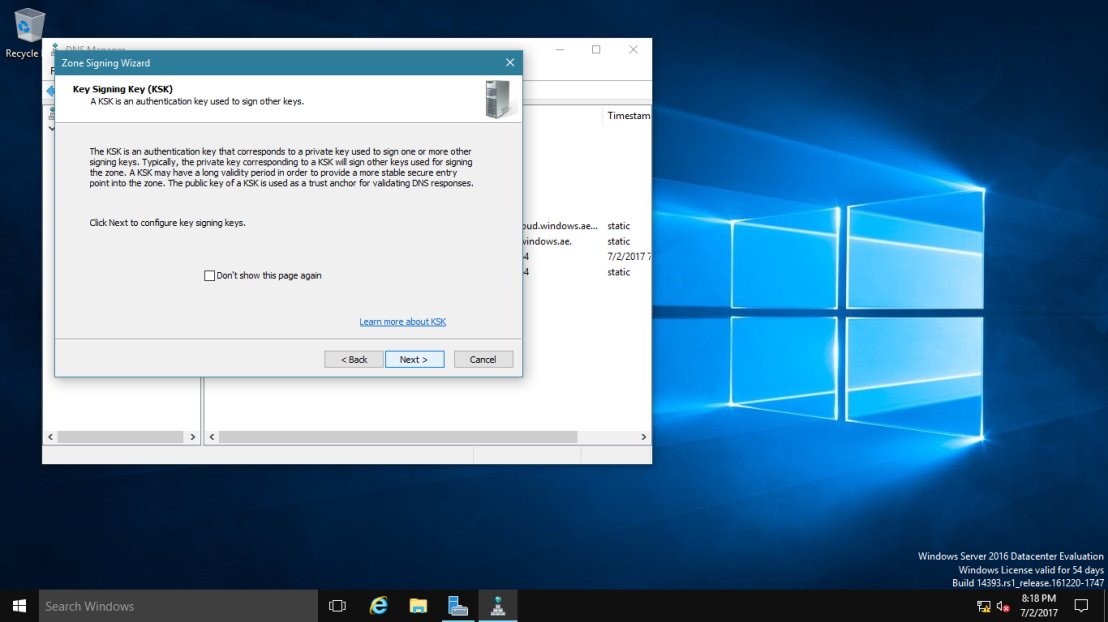
5 – On the Key Signing Key (KSK) interface, click Next.
5.png


6 – On the Key Signing Key (KSK) interface, click Add.
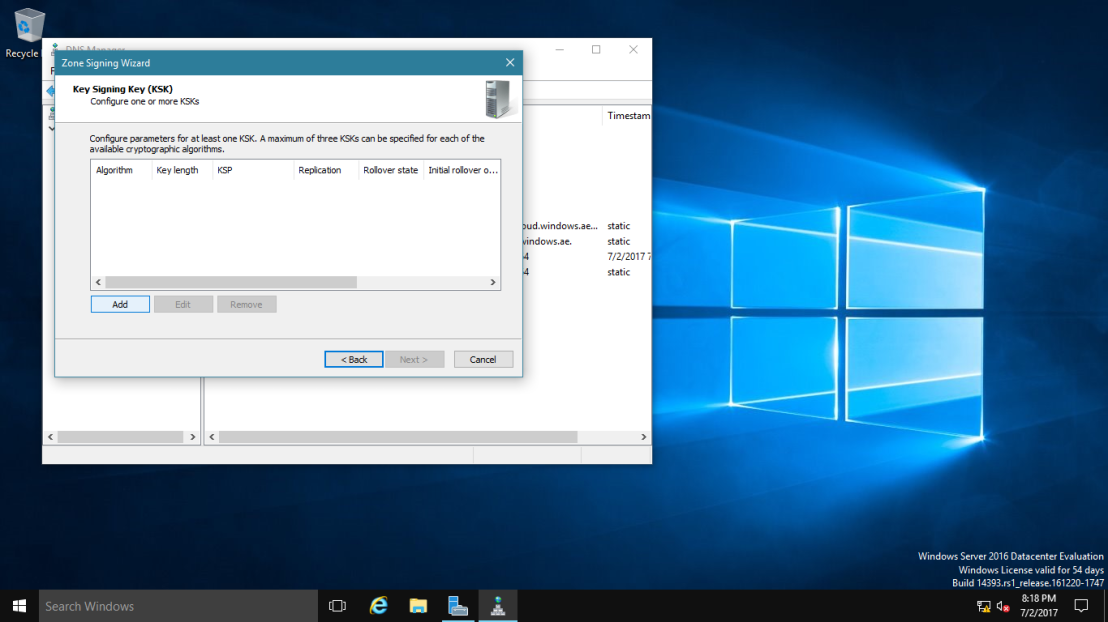
6.png

7 – On the New Key Signing Key (KSK) interface, click OK.

~*~ please spend some time to go through about key properties on the New Key Signing Key (KSK) interface.
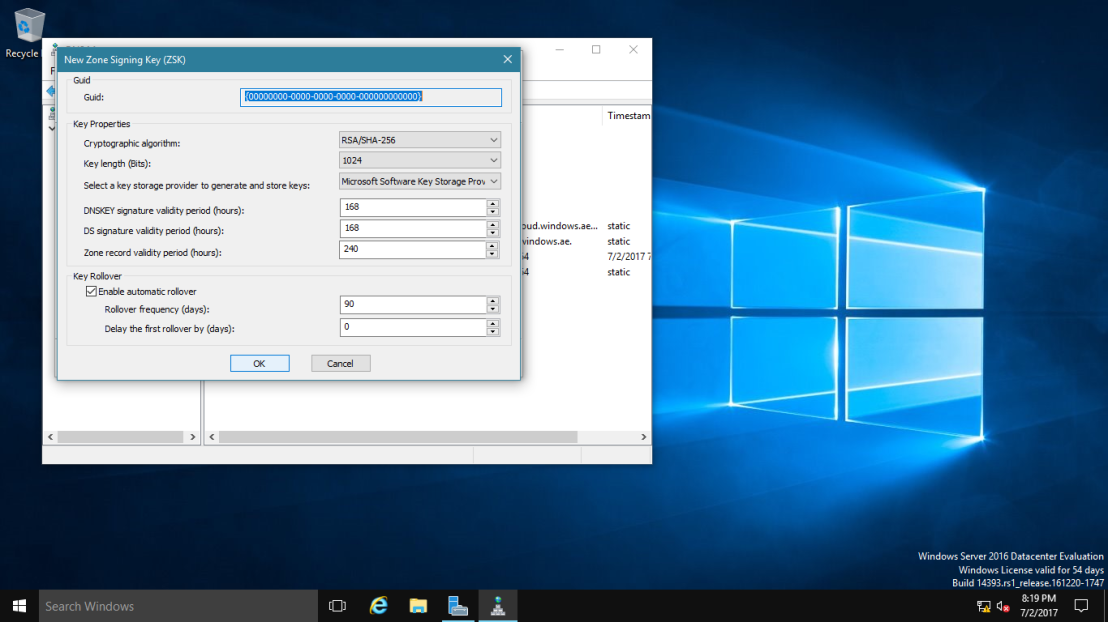
10.png

8 – On the Key Signing Key (KSK) interface, click Next.

11.png

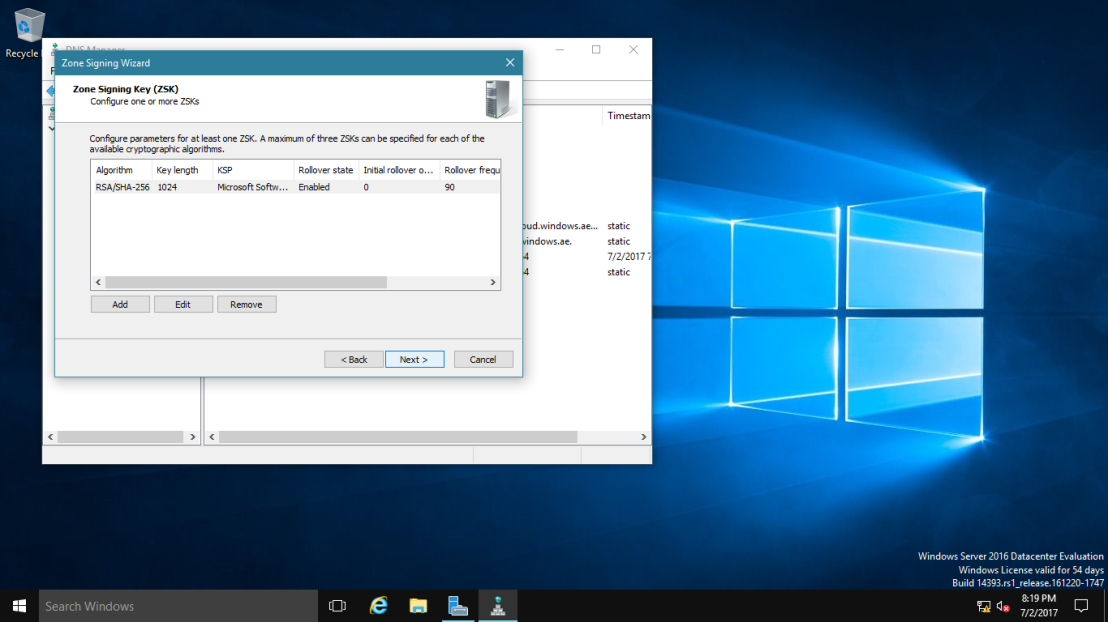
9 – On the Zone Signing Key (ZSK) interface, click Next.
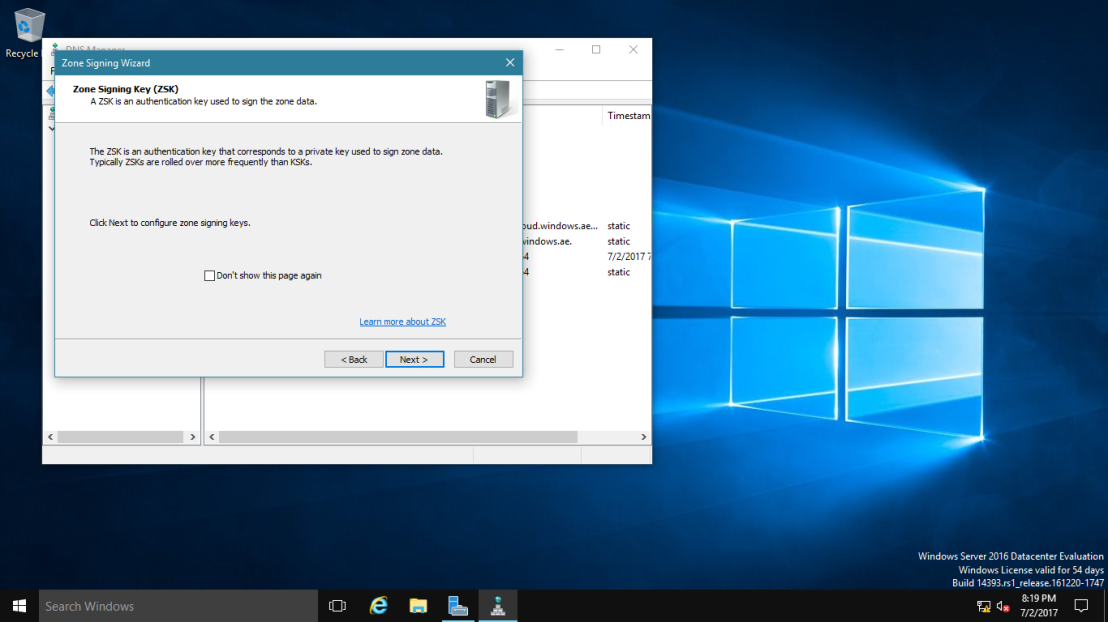
9.png


10 – On the Zone Signing Key (ZSK) interface, click Add.
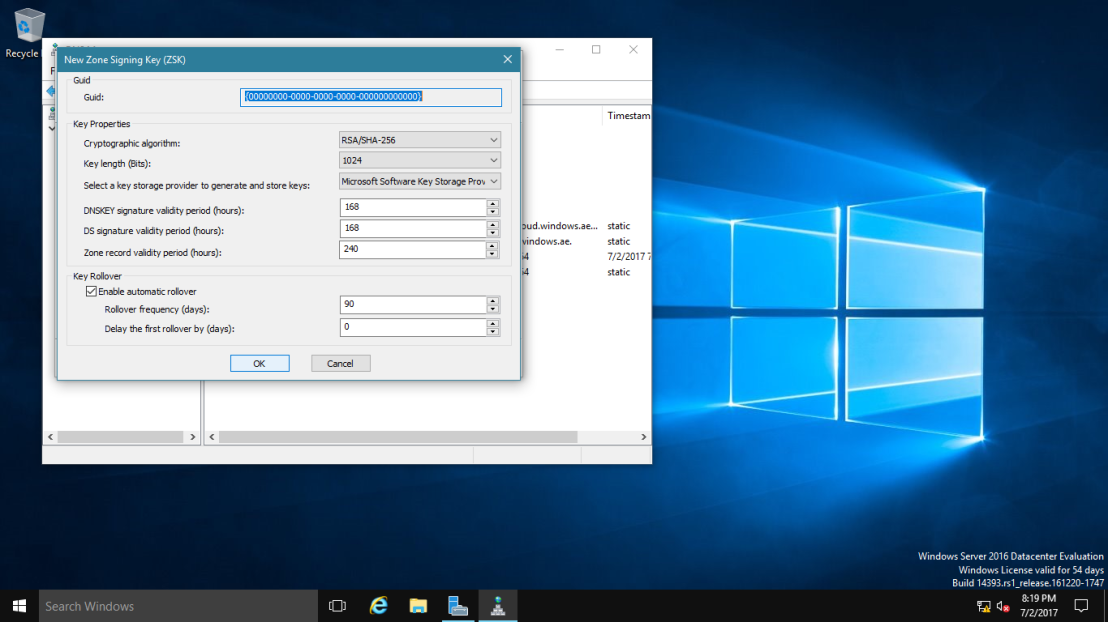
10.png

11 – On the New Zone Signing Key (ZSK) interface, click OK.
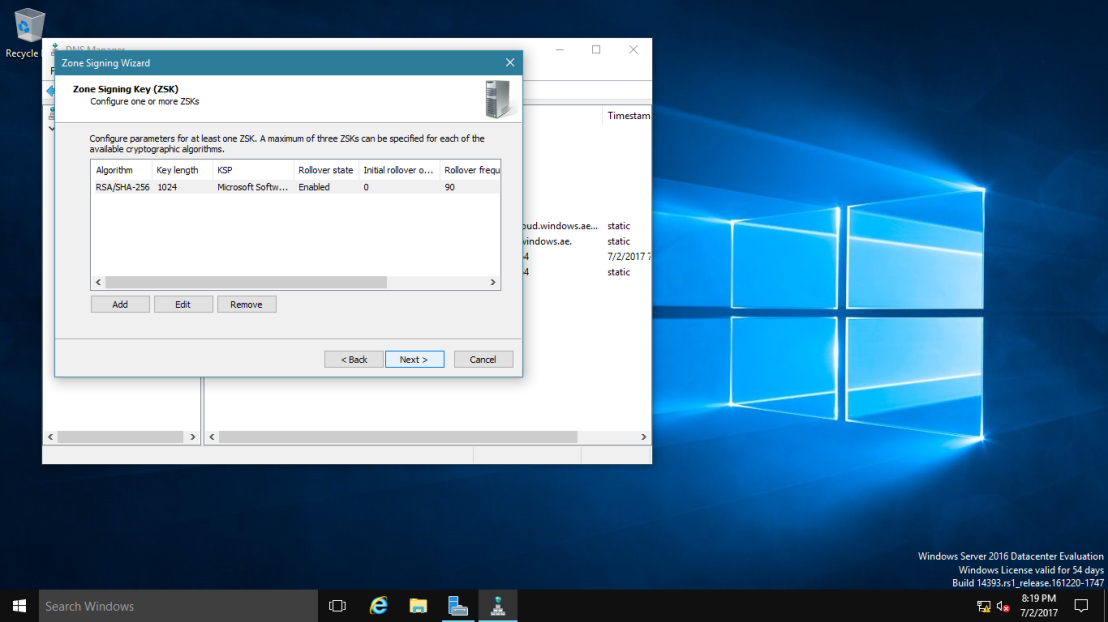
11.png

12 – On the Zone Signing Key (ZSK) interface, click Next.
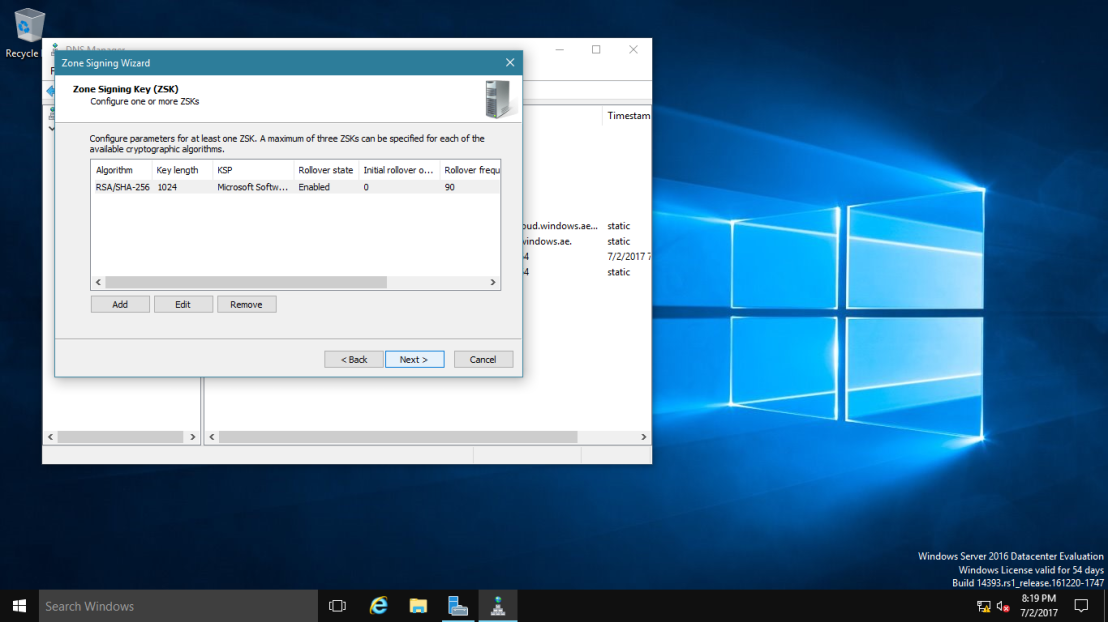
11.png

13 – On the Next Secure (NSEC) interface, click Next.

~*~ NSEC is when the DNS response has no data to provide to the client, this record authenticates that the host does not exist.
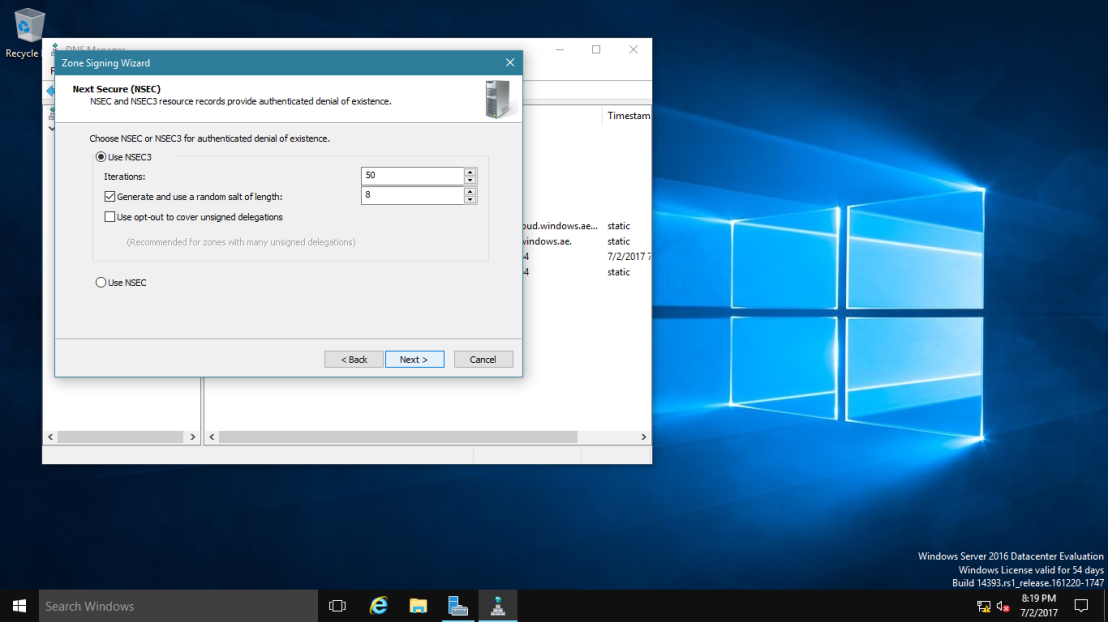
12.png

14 – On the Trust Anchors (TAs) interface, check the Enable the distribution of trust anchors for this zone check box, and then click Next.

~*~ A trust anchor is an authoritative entity that is represented by a public key. The TrustAnchors zone stores preconfigured public keys that are associated with a specific zone.
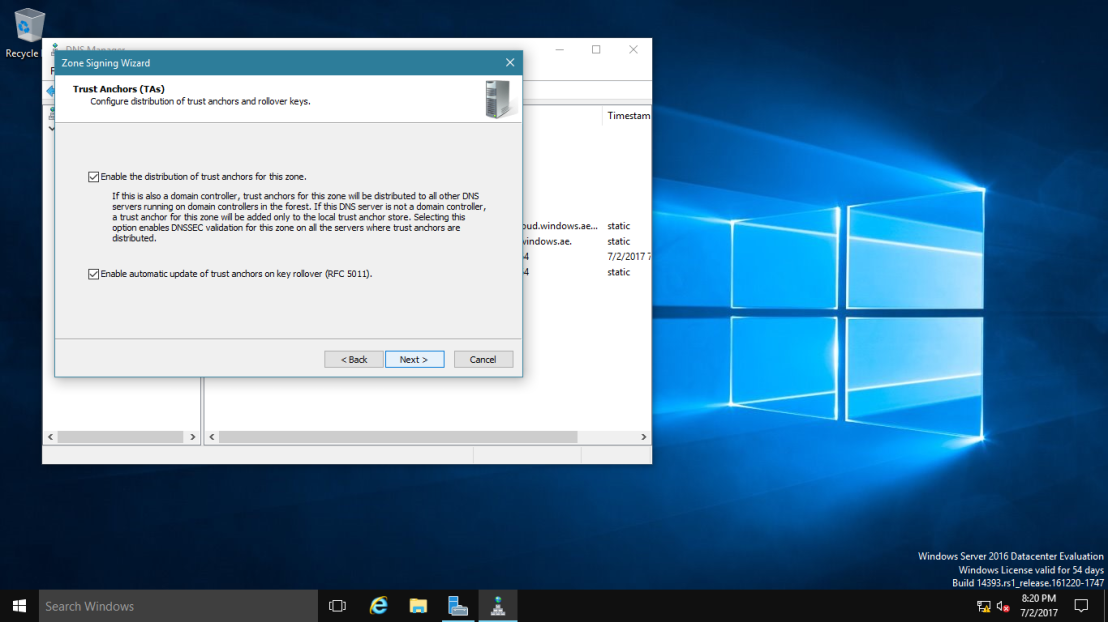
14.png

15 – On the Signing and Polling Parameters interface, click Next.
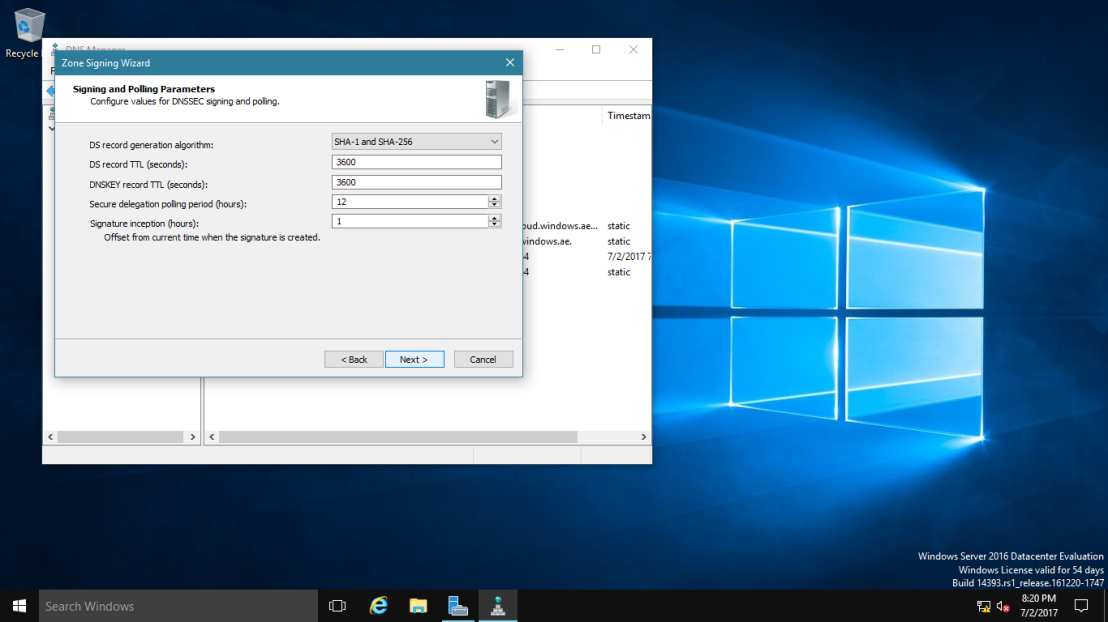
15.png

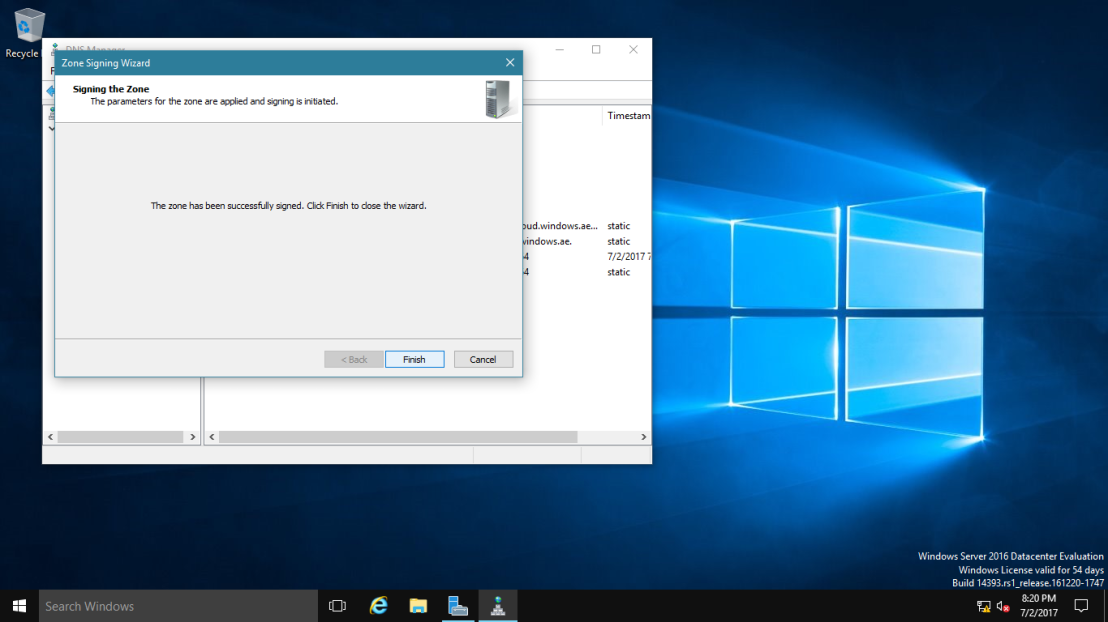
16 – On the DNS Security Extensions (DNSSEC) interface, click Next, and then click Finish.
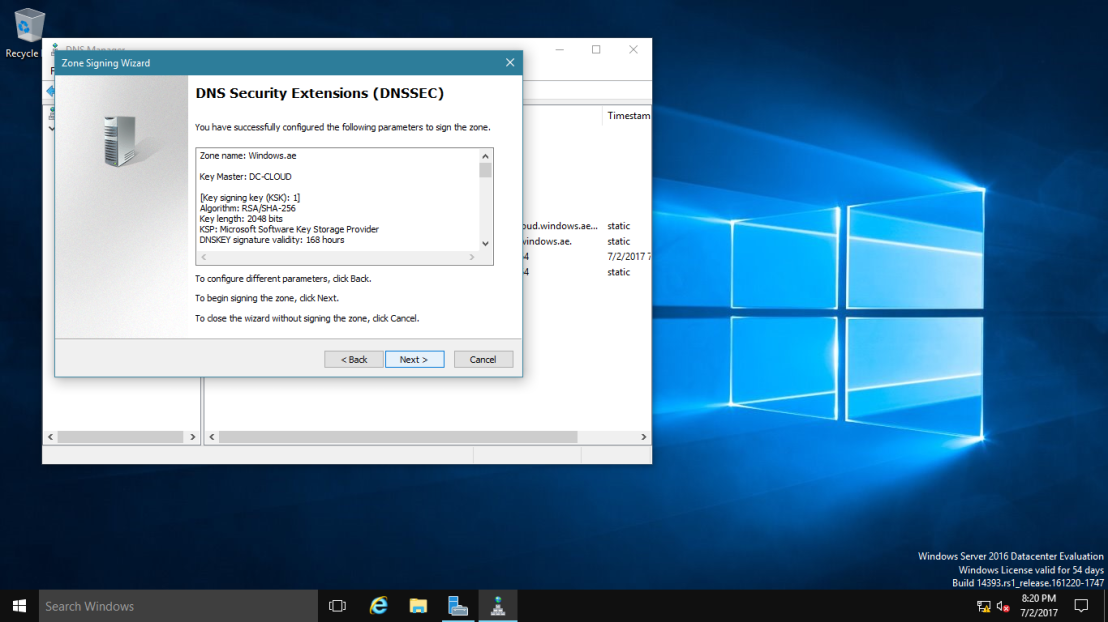
16.png17.png

17 – In the DNS console, expand Trust Points, expand ae, and then click your domain name.

Ensure that the DNSKEY resource records display, and that their status is valid.
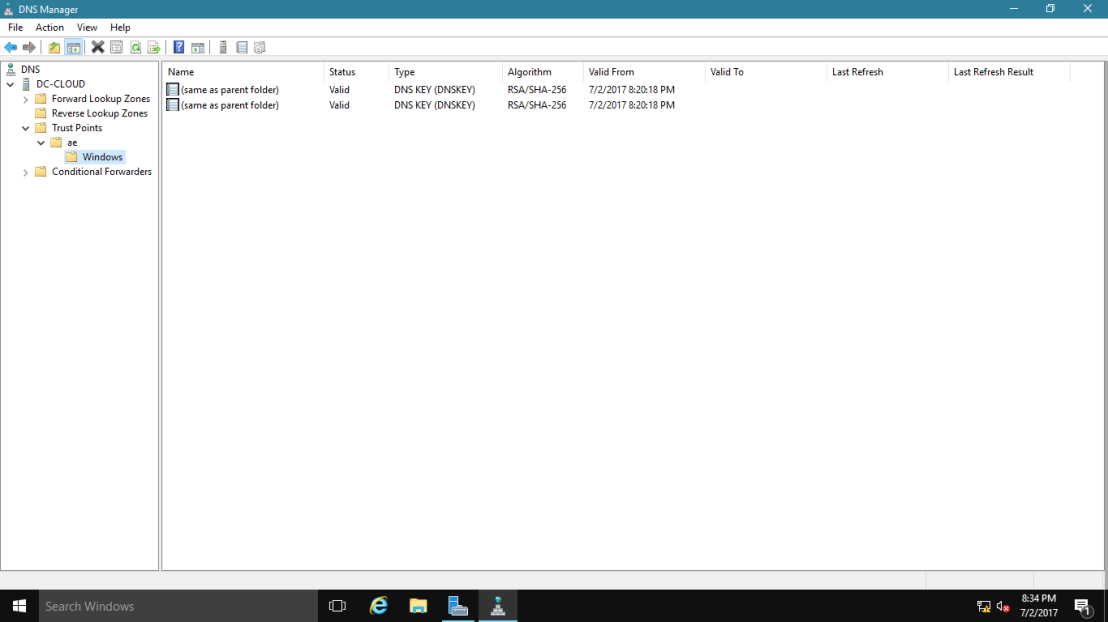
18.png

18 – Open Server Manager,  click Tools and open Group Policy Management.

19.png

19 – Next, open Group Policy Management, expand Forest: Windows.ae, expand Domains, expand Windows.ae, right-click Default Domain Policy, and then click Edit.
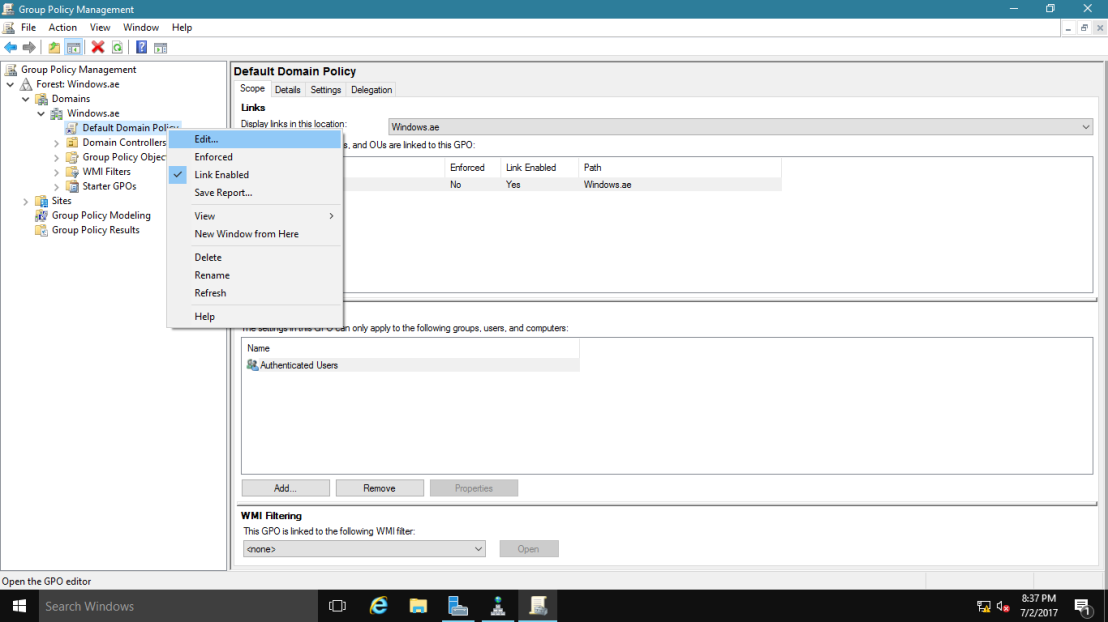
20.png

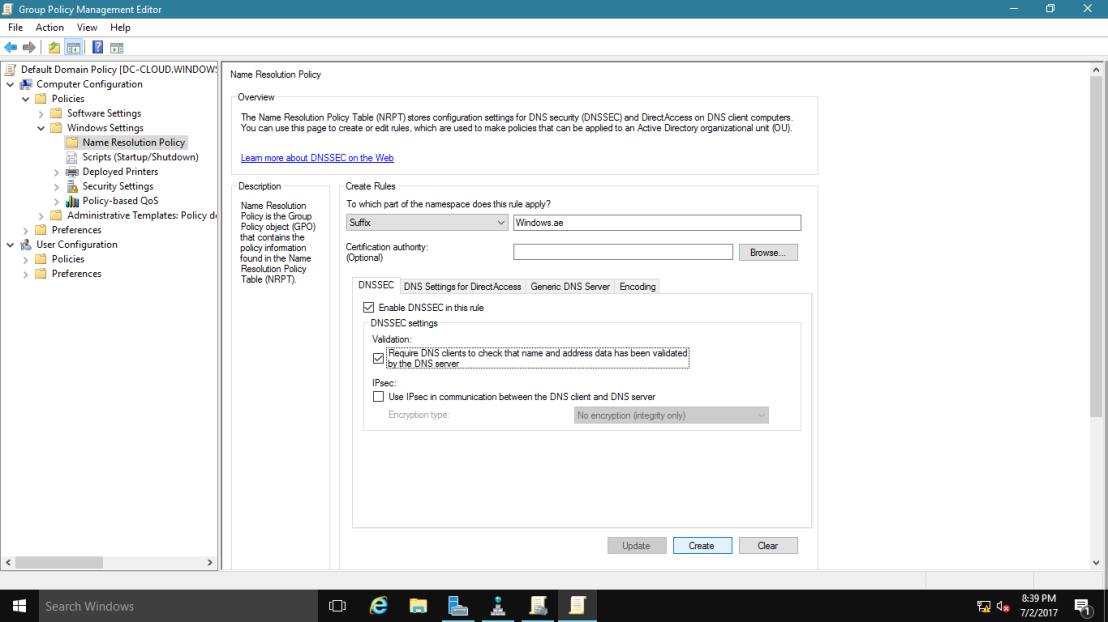
20 – In the Group Policy Management Editor interface, under Computer Configuration, expand Policies, expand Windows Settings, and then click Name Resolution Policy.

~*~ In the right pane, under Create Rules, in the Suffix box, type Windows.ae to apply the rule to the suffix of the namespace.

~*~ Select both the Enable DNSSEC in this rule check box and the Require DNS clients to check that the name and address data has been validated by the DNS server check box, and then click Create.
22.png

02 – Configure the DNS Socket Pool

1 – In domain Server, open Windows PowerShell and type : Get-DNSServer

~*~ This command displays the current size of the DNS socket pool (on the fourth line in the ServerSetting section). Note that the current size is 2,500.

~*~ Please take note that the default DNS socket pool size is 2,500. When you configure the DNS socket pool, you can choose a size value from 0 to 10,000. The larger the value, the greater the protection you will have against DNS spoofing attacks.

23.png

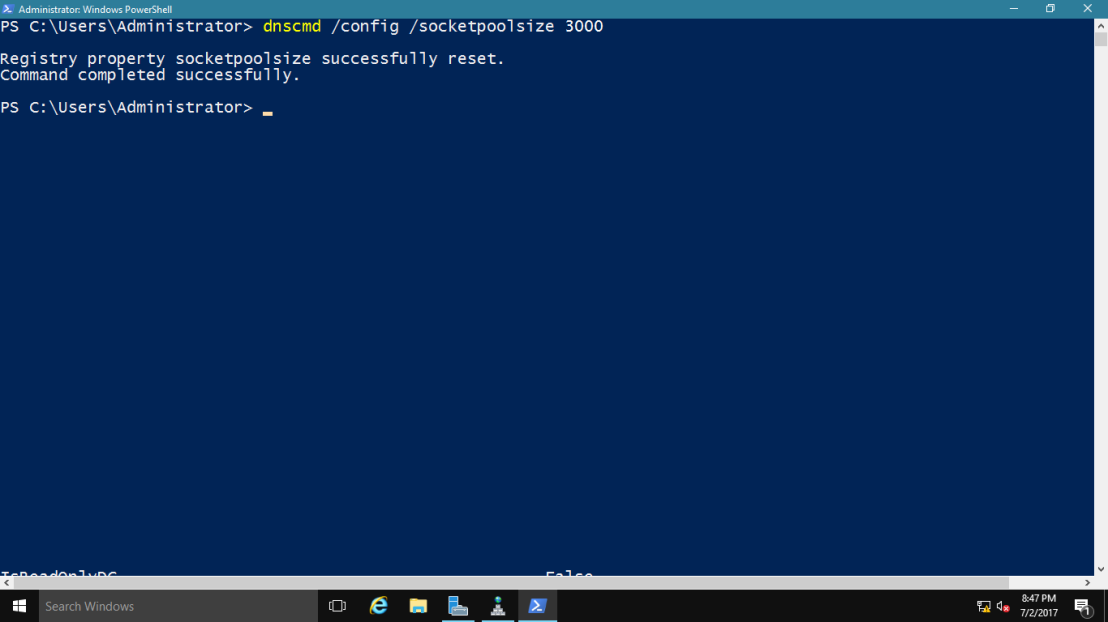
2 – Now lets change the socket pool size to 3,000.

type : dnscmd /config /socketpoolsize 3000
24.png

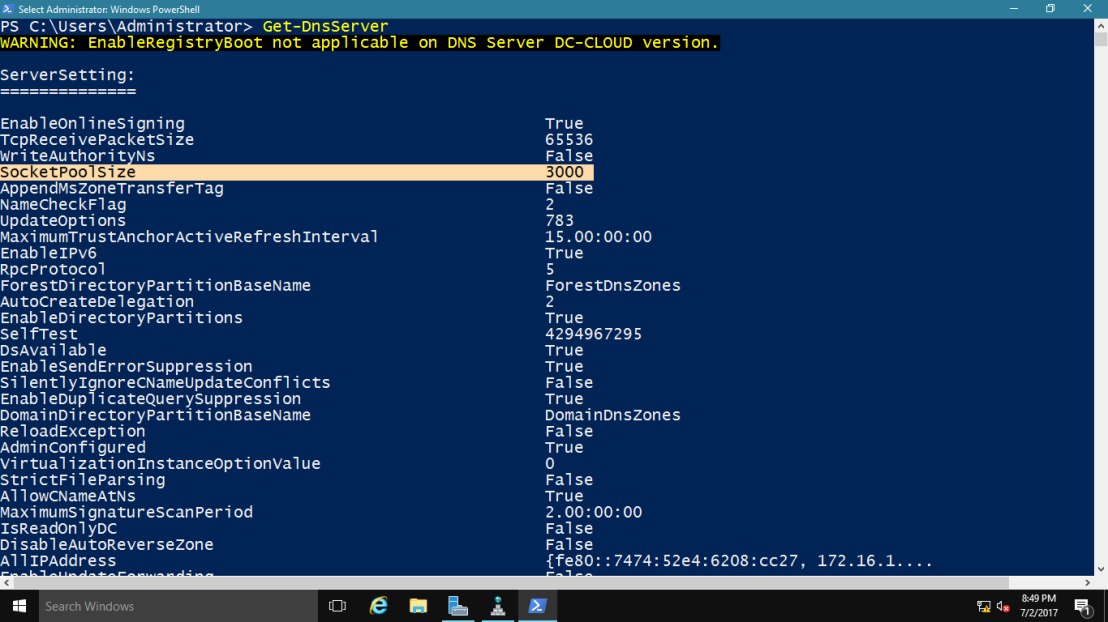
3 – Restart your DNS Server for the changes to take effect.

~*~ confirm that the new socket pool size now is 3000
25.png

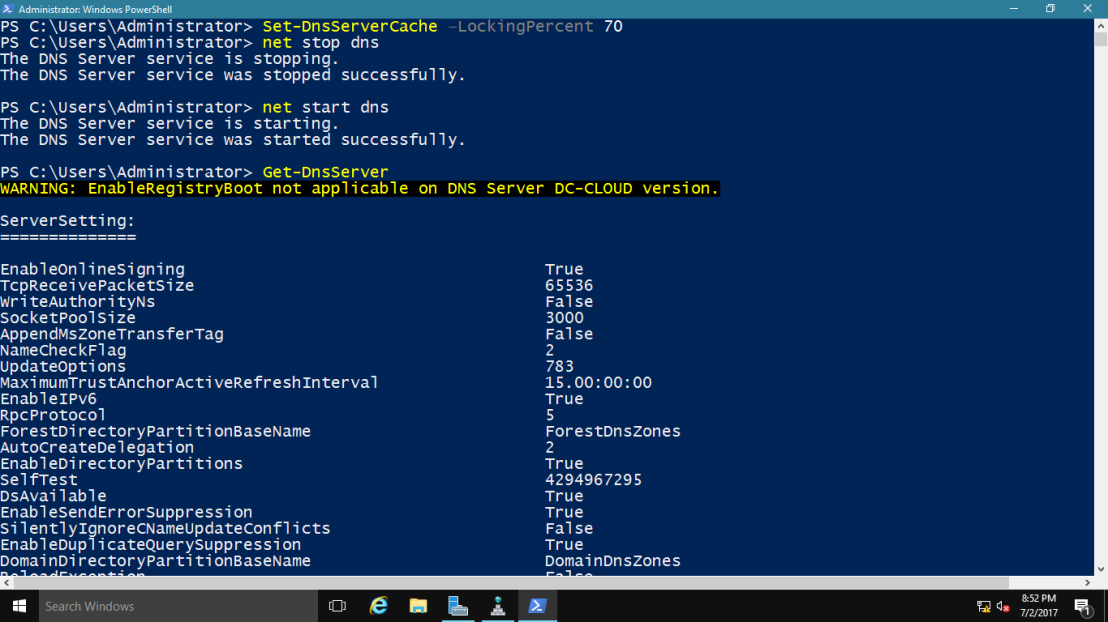
04 – Configure the DNS Cache Locking

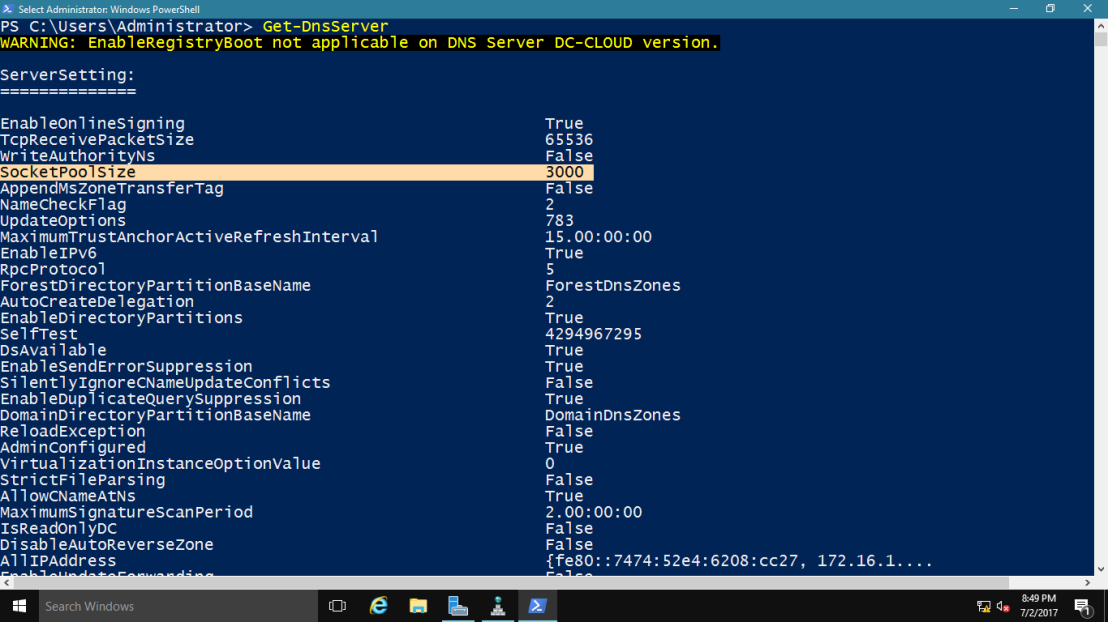
1 – In Windows PowerShell, type Get-Dnsserver

~*~ This command will displays the current percentage value of the DNS cache lock.

~*~ Note that the current value is 100 percent.
25.png

2 – type Set-DnsServerCache –LockingPercent 70

~*~ This changes the cache lock value to 70 percent
26.png

~*~ Please take note that you configure cache locking as a percentage value.

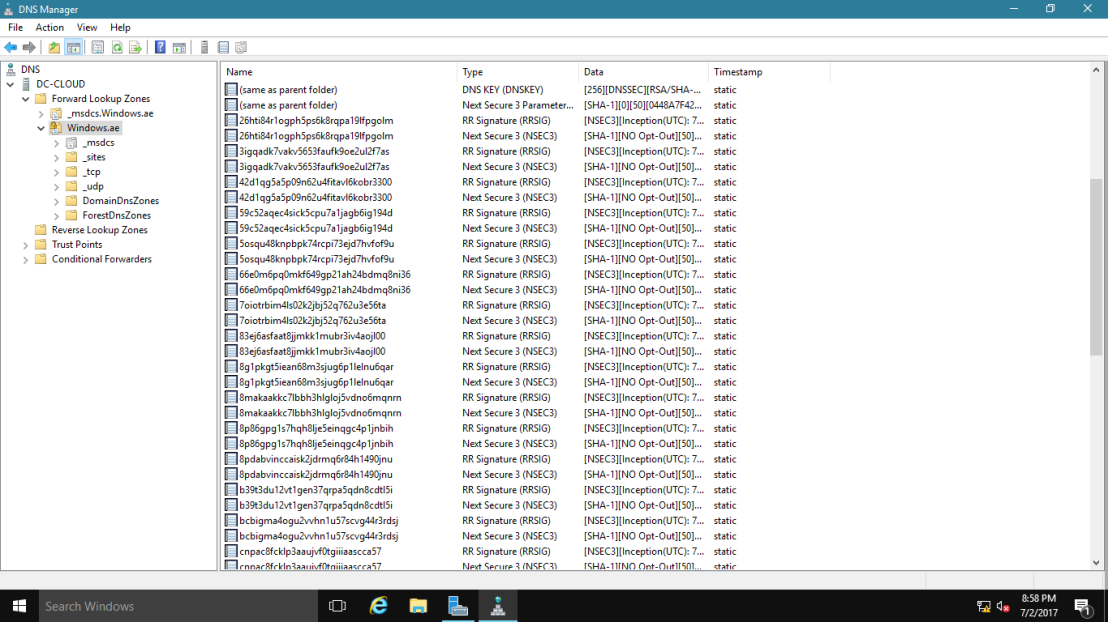
3 – Looking your DNS Manager Verify.
27.png

Wednesday, October 2, 2019

How to verify that SRV DNS records have been created for a domain controller

The SRV record is a Domain Name System (DNS) resource record that is used to identify computers that host specific services. SRV resource records are used to locate domain controllers for Active Directory. To verify SRV locator resource records for a domain controller, use one of the following methods.

DNS Manager

After you install Active Directory on a server running the Microsoft DNS service, you can use the DNS Management Console to verify that the appropriate zones and resource records are created for each DNS zone.


Active Directory creates its SRV records in the following folders, where Domain_Name is the name of your domain:
Forward Lookup Zones/Domain_Name/_msdcs/dc/_sites/Default-First-Site-Name/_tcp Forward Lookup Zones/Domain_Name/_msdcs/dc/_tcp

In these locations, an SRV record should appear for the following services:
_kerberos

_ldap

Netlogon.dns

If you are using non-Microsoft DNS servers to support Active Directory, you can verify SRV locator resource records by viewing Netlogon.dns. Netlogon.dns is located in the %systemroot%\System32\Config folder. You can use a text editor, such as Microsoft Notepad, to view this file.

The first record in the file is the domain controller's Lightweight Directory Access Protocol (LDAP) SRV record. This record should appear similar to the following:
_ldap._tcp.Domain_Name

Nslookup

Nslookup is a command-line tool that displays information you can use to diagnose Domain Name System (DNS) infrastructure.
To use Nslookup to verify the SRV records, follow these steps:
  1. On your DNS, click Start, and then click Run.
  2. In the Open box, type cmd.
  3. Type nslookup, and then press ENTER.
  4. Type set type=all, and then press ENTER.
  5. Type_ldap._tcp.dc._msdcs.Domain_Name, where Domain_Name is the name of your domain, and then press ENTER.
Nslookup returns one or more SRV service location records that appear in the following format, where Server_Name is the host name of a domain controller, and where
Domain_Name is the domain the domain controller belongs to, and Server_IP_Address is the domain controller's Internet Protocol (IP) address:
Server: localhost
Address:  127.0.0.1
_ldap._tcp.dc._msdcs. Domain_Name 
SRV service location:
priority= 0
weight= 100
port= 389
srv hostname=  Server_Name . Domain_Name Server_Name . Domain_Name internet address =  Server_IP_Address 


Tuesday, October 18, 2016

How to verify that SRV DNS records have been created for a domain controller

The SRV record is a Domain Name System (DNS) resource record that is used to identify computers that host specific services. SRV resource records are used to locate domain controllers for Active Directory. To verify SRV locator resource records for a domain controller, use one of the following methods.

DNS Manager

After you install Active Directory on a server running the Microsoft DNS service, you can use the DNS Management Console to verify that the appropriate zones and resource records are created for each DNS zone.

Active Directory creates its SRV records in the following folders, where Domain_Name is the name of your domain:
Forward Lookup Zones/Domain_Name/_msdcs/dc/_sites/Default-First-Site-Name/_tcp Forward Lookup Zones/Domain_Name/_msdcs/dc/_tcp

In these locations, an SRV record should appear for the following services:
_kerberos
_ldap

Netlogon.dns

If you are using non-Microsoft DNS servers to support Active Directory, you can verify SRV locator resource records by viewing Netlogon.dns. Netlogon.dns is located in the %systemroot%\System32\Config folder. You can use a text editor, such as Microsoft Notepad, to view this file.

The first record in the file is the domain controller's Lightweight Directory Access Protocol (LDAP) SRV record. This record should appear similar to the following:
_ldap._tcp.Domain_Name

Nslookup

Nslookup is a command-line tool that displays information you can use to diagnose Domain Name System (DNS) infrastructure.
To use Nslookup to verify the SRV records, follow these steps:
  1. On your DNS, click Start, and then click Run.
  2. In the Open box, type cmd.
  3. Type nslookup, and then press ENTER.
  4. Type set type=all, and then press ENTER.
  5. Type _ldap._tcp.dc._msdcs.Domain_Name, where Domain_Name is the name of your domain, and then press ENTER.
Nslookup returns one or more SRV service location records that appear in the following format, where Server_Name is the host name of a domain controller, and where Domain_Name is the domain the domain controller belongs to, and Server_IP_Address is the domain controller's Internet Protocol (IP) address:
Server: localhost
Address:  127.0.0.1
_ldap._tcp.dc._msdcs.Domain_Name
SRV service location:
 priority = 0
 weight  = 100
 port  = 389
 srv hostname = Server_Name.Domain_NameServer_Name.Domain_Name  internet address = Server_IP_Address

Monday, April 18, 2016

Reverse DNS Entries Are Not Being Added Automatically – Event ID:1056

Reverse DNS Entries Are Not Being Added Automatically – Event ID:1056
If you are working with, well almost anything network intensive these days, like Antivirus or management tools, your Reverse DNS (rDNS) lookups need to be in good shape.  If you find that you can not resolve IP’s back to a name on your network check your DNS REVERSE LOOKUP ZONE.  If there are missing entries, you likely have your DHCP missing one of two settings:

SET DHCP TO AUTOMATICALLY CREATE DNS ENTRIES

  1. Launch DHCP
  2. Right click on your SCOPE and select PROPERTIES
  3. Click the DNS tab
  4. Make sure that the following settings are on
    1. ENABLE DNS DYNAMIC UPDATES
      1. ALWAYS DYNAMICALLY UPDATE DNS A AND PTR RECORDS
    2. DISCARD A AND PTR RECORDS WHEN LEASE IS DELETED
    3. DYNAMICALLY IPDATE DNSA a AND PTR RECORDS FOR DHCP CLEINTS THAT DO NOT REQUEST UPDATES

SET CREDENTIALS TO ALLOW DHCP SET TO DYNAMICALLY UPDATED DNS ENTRIES

  1. Using Active Directory Users and Computers create a standard domain user and set the password to DOES NOT EXPIRE.
  2. Launch DHCP
  3. Right click on IPv4 and select PROPERTIES
  4. Select the ADVANCED tab
  5. Click the CREDENTIALS button
  6. Enter the user information you created in step one
This is required if you have DHCP installed on a Domain Controller.  It is an issue on Server 2000, 2003, 2008, 2008R2, Server 2012, Server 2012 R2 and will likely be an issue in the newer builds.  If you check your servers event viewer you will see EVENT ID 1056:
The DHCP service has detected that it is running on a DC and has no credentials configured for use with Dynamic DNS registrations initiated by the DHCP service.   This is not a recommended security configuration.  Credentials for Dynamic DNS registrations may be configured using the command line “netsh dhcp server set dnscredentials” or via the DHCP Administrative tool.
If you want more information you may find the following useful:
http://technet.microsoft.com/en-us/library/c0e87732-985c-4c9c-83b4-70c679cad748.aspx
http://support.microsoft.com/kb/282001
http://jackstromberg.com/tag/dhcp/

http://social.technet.microsoft.com/Forums/windowsserver/en-US/d97cf295-1345-4be7-bfcd-6d59436d93b2/ttl-times-on-a-records-dns-records-disappearing?forum=winserverNIS

Friday, December 11, 2015

How to reconfigure an _msdcs subdomain to a forest-wide DNS application directory partition when you upgrade from Windows 2000 to Windows Server 2003

SUMMARY
This step-by-step article describes how to make the forest-wide locator records under the _msdcs.ForestName DNS zone available on every DNS server in the forest when you upgrade domain controllers that are running the DNS Server service from Microsoft Windows 2000 to Microsoft Windows Server 2003.

Background information

Windows 2000 behavior

When a server that is running Microsoft Windows 2000 is promoted as the first domain controller in a new Active Directory directory service forest, the Windows 2000 Active Directory Installation Wizard (Dcpromo.exe) creates a DNS forward lookup zone that is named after the first domain in the forest (ForestName), and it creates a subdomain and names it _msdcs.ForestName. For example, if your Active Directory forest name is reskit.com, the Installation Wizard creates the reskit.com DNS zone and the _msdcs.reskit.com subdomain as a child of the forest root domain zone.

The forest domain zone hosts the DNS resource records for each Active Directory domain controller in the domain. The _msdcs.ForestName subdomain hosts the domain controller locator DNS resource records for all the domain controllers in an Active Directory forest. It is also used to locate domain controllers that have specific roles in the Active Directory domain or in the Active Directory forest, and to locate a domain controller by searching for its GUID when a domain has been renamed.

Windows Server 2003 behavior

When the DNS root domain of a new Active Directory forest is created on a Windows Server 2003-based domain controller, two DNS zones are automatically created. One zone is created for the forest root domain; this zone is replicated between all domain controllers in that domain. The other zone is created for the _msdcs.ForestName subdomain; this zone is stored in the forest-wide DNS application directory partition. This partition replicates to all Windows Server 2003-based domain controllers in the forest that are running the Windows Server 2003 DNS Server service.

Upgrading domain controllers from Windows 2000 to Windows Server 2003

If you upgrade from Windows 2000 to Windows Server 2003, your DNS zone configuration is not modified, and the _msdcs.ForestName zone is stored on your Windows Server 2003-based domain controller in one of the following ways:
  • Case 1: The _msdcs.ForestName zone is a subdomain of your Active Directory-integrated forest root DNS zone, and the secondary _msdcs.ForestName zones are stored in your child domains (if child domains are present).
  • Case 2: The _msdcs.ForestName is a subdomain of your Active Directory-integrated forest root DNS zone.
After all the DNS servers in the forest root domain are running the Windows Server 2003 DNS Server service, configure your ForestName zone to be stored in an Active Directory-integrated domain-wide application partition. Similarly, configure your DNS records for the _msdcs.ForestName domain name to be stored in a separate _msdcs.ForestName zone that you store in an Active Directory-integrated forest-wide application partition.

Case 1: Configure the domain-wide _msdcs.ForestName zone to the forest-wide DNS application directory partition

  1. In the DNS console, right-click the _msdcs.ForestName zone, and then click Properties.
  2. On the General tab, note the current zone replication type, and then do one of the following:
    • If the type is not the forest-wide replication scope, click Change, and then go to step 3.
    • If the type is the forest-wide replication scope, skip this step, and then go to step 4.
  3. Select the forest-wide replication scope for the zone.
  4. Delete any secondary _msdcs.ForestName zones that are stored in your child domains.
Notes
  • To perform this procedure, you must be a member of the DnsAdmins or the Domain Admins security group in Active Directory, or you must have been delegated the appropriate authority. As a security best practice, consider using the Secondary Logon service command to perform this procedure. You can access this command through the built-in Runas.exe command.
  • When you change the storage of a zone from the domain partition to an application directory partition (for example, after you promote a new Windows Server 2003-based domain controller in an existing Windows 2000 domain), the domain controller that holds the domain naming master role must be running Windows Server 2003 for the DNS application directory partitions to exist. If you receive an error when you change the storage of a zone from the domain partition to an application directory partition, transfer the domain naming master role to a domain controller that is running Windows Server 2003, create the default DNS application directory partitions, and then try again.
  • After the new forest-wide zone is propagated to the application partition of all the DNS servers in the forest, delete the previous secondary zone. To delete the zone, right-click the zone in the DNS console, and then click Delete.
  • The zone replication type change is made one time per forest; however, you must delete the secondary zones from each DNS server individually.

Case 2: Configure the Windows 2000 _msdcs subdomain to a Windows Server 2003 zone that is stored in the forest-wide DNS application directory partition

The following steps assume that the DNS zones for the Active Directory forest root domain were created during the promotion of a Windows 2000-based domain controller, and that all domain controllers in the forest root domain that host the DNS server have been upgraded to Windows Server 2003.

The following is a summary of the procedure that you use to configure the subdomain. This procedure is described in detail after the notes.
  1. Configure the primary DNS server setting in the network connections of all domain controllers in your forest with the IP address of a single root domain controller.
  2. Create the _msdcs zone for the Active Directory forest name, and then store the _msdcs.ForestName zone in the DNS forest-wide application directory partition.
  3. Force replication.
  4. Delete the old _msdcs subdomain.
  5. Return the primary DNS server setting in the network connections of all domain controllers in your forest to their previous settings.
Notes
  • By default, only members of the Enterprise Admins security group can create a DNS application directory partition.
  • When you change the storage of a zone from the domain partition to an application directory partition (for example, after you promote a new Windows Server 2003-based domain controller in an existing Windows 2000 domain), the domain controller that holds the domain naming master role must be running Windows Server 2003 for the DNS application directory partitions to exist. If you receive an error when you change the storage of a zone from the domain partition to an application directory partition, transfer the domain naming master role to a domain controller that is running Windows Server 2003, create the default DNS application directory partitions, and then try again.
To register the required records to the single root domain controller, restart the Net Logon service on all the domain controllers. The replication works correctly if the replication window is not less than the default DNS Time to Live (TTL) entry. To restart the Net Logon service, follow these steps:
  1. Click Start, click Run, type cmd in the Open box, and then press ENTER.
  2. At the command prompt, type the following command, and then press ENTER:
    net stop netlogon
  3. Type net start netlogon, and then press ENTER.
If your _msdcs subdomain is still not populated, or if the TTL is smaller than the replication window, follow these steps to configure the _msdcs subdomain to a zone that is stored in the forest-wide DNS application partition:
  1. On all the domain controllers in the forest, modify the network connection configuration on all domain controllers to point to a single DNS Server:
    1. Click Start, click Control Panel, click Network and Internet Connections, and then click Network Connections.
    2. Right-click the network connection that you want to configure, and then click Properties.
    3. On the General tab (for a local area connection), click Internet Protocol (TCP/IP), and then click Properties.
    4. Confirm that Use the following DNS server addresses is enabled.
    5. Make a note of the existing IP address that appears in the Preferred DNS server box. (You will need this address in a later step in this procedure.)
    6. In the Preferred DNS server box, type the IP address of a single root domain controller that is running the DNS Server service.
    7. Click OK.
    Note For large deployments, you may want to create a script to configure the IP address of a single root domain controller as the Preferred DNS server setting on all the domain controllers.

    Important You must use the same IP address of a single root domain controller for all domain controllers in the forest. The purpose of this configuration is to make sure that all domain controllers in the forest register their DNS resource records in copies of the same _msdcs.ForestName zone.
  2. Log on to the Windows Server 2003-based root domain controller by using an account that is a member of the Enterprise Admins security group.
  3. Verify that a Windows Server 2003-based domain controller holds the domain naming master role.
  4. Verify that all DNS servers that currently host the _msdcs.ForestName subdomain in primary zones are running Windows Server 2003.
  5. Start the DNS console. To do this, click Start, click Run, type dnsmgmt.msc, and then click OK.
  6. In the DNS console, right-click Forward Lookup Zones, and then click New Zone. Click Next
  7. On the Zone Type page in the New Zone Wizard, click Primary zone, and then click to select the Store the zone in Active Directory check box. Click Next
  8. On the Active Directory Zone Replication Scope page, click To all DNS servers in the Active Directory forest ForestName.
  9. On the Zone Name page, in the Zone Name box, type _msdcs.ForestName.
  10. Complete the wizard by accepting all the default options.

    The zone is created, and the Net Logon service populates the zone with the _msdcs.ForestName resource records for the local domain controller.
  11. The zone will now replicate to all other DNS servers in the replication scope by using the replication schedules and paths that are configured in the forest, or you can force replication. To force replication, use Active Directory Sites and Services, or use the Repadmin.exe tool:
    • To use Active Directory Sites and Services:
      1. Open Active Directory Sites and Services.
      2. In the console tree, click NTDS Settings for the server that you want to force replication from.
      3. In the details pane, right-click the connection that you want to replicate directory information over, and then click Replicate Now.
    • To use the Repadmin.exe tool:
      1. With the Support Tools installed, open a command prompt.
      2. At the command prompt, type the following, and then press ENTER:
        repadmin /syncall
        This will synchronize all the directory partitions.
  12. Delete the old _msdcs subdomain from the zone where it was created before you upgraded. To do this:
    1. Open the DNS console.
    2. In the console tree, expand the zone that contains the _msdcs subdomain.
    3. Right-click the _msdcs subdomain folder, and then click Delete.
    Note This step is not mandatory because the DNS Server service will use the new _msdcs zone to answer any queries for names that start with _msdcs. Microsoft recommends that you delete the old _msdcs subdomain to maintain a more orderly DNS database.
  13. After replication is confirmed for all the domain controllers in the forest, perform the following network connection configuration on all the domain controllers in the forest:
    1. Click Start, click Control Panel, click Network and Internet Connections, and then click Network Connections.
    2. Right-click the network connection that you want to configure, and then click Properties.
    3. On the General tab (for a local area connection), click Internet Protocol (TCP/IP), and then click Properties.
    4. Confirm that Use the following DNS server addresses is selected, and in the Preferred DNS server box, type the IP address that was used previously (that is, the one that you noted in step 1e).
    5. Click OK.
Note In Windows Server 2003 SP1, when you create a new forward lookup zone that is already under an existing zone, the wizard automatically creates a new delegation under the existing zone.

DNS: Domain subfolders missing from forward lookup zone

SYMPTOMS
When you open the forward lookup zone in the Domain Name System (DNS) Microsoft Management Console (MMC) snap-in, the following subdomains may be missing:
  • _msdcs
  • _sites
  • _tcp
  • _udp
This problem may occur if the zone is either Active Directory-Integrated or Standard Primary. Additionally, the forward lookup zone is being used to store SRV records for Active Directory.

When this problem occurs, the following event is logged:
Type: Warning
Event: 5782
Source: NETLOGON
Category: None
Computer: ComputerName
Event Msg: Dynamic registration or deregistration of one or more DNS records failed with the following error: No DNS servers configured for local system
Data: 7C 26 00 00
CAUSE
On a multi-homed server, DNS dynamic update protocol registration may have been turned off (disabled) on the internal network adapter. The same problem occurs on a server that has a single network adapter and DNS dynamic update protocol turned off.
RESOLUTION
To turn on DNS dynamic update protocol on the affected network adapter, follow these steps:
  1. On the desktop, right-click My Network Places, and then click Properties.
  2. Right-click the internal network adapter, and then click Properties.
  3. Click TCP/IP, and then click Properties.
  4. Click the Advanced button.
  5. Click the DNS tab, and then click to select the Register this connection's addresses in DNS check box at the bottom of the tab.
  6. Click OK until the Network Properties dialog box is closed.
  7. Click Start, click Run, type cmd, and then press ENTER.
  8. At a command prompt, stop and restart the Netlogon service and initiate the registration of the network adapter in DNS. To do this, use the following command-line statements:
    • net stop netlogon
    • net start netlogon
    • ipconfig /registerdns
If the previous steps do not resolve this problem, you may have to remove DNS and reinstall it. To remove DNS, follow these steps:
  1. Right-click My Network Places, and then click Properties.
  2. In the Network and Dial-Up Connections window on the Advanced menu, click Optional Networking Components.
  3. In the Windows Optional Networking Components Wizard, click to select Networking Services, and then click Details.
  4. In the Networking Services window, click to clear the box next to Domain Name System (DNS) check box, click OK, and then click Next. This removes DNS.
Before you reinstall DNS, delete the following files:
  • Cache.dns-which is located in %systemroot%\Winnt\System32\DNS
  • Netlogon.dns-which is located in %systemroot%\Winnt\System32\Config
  • Netlogon.dnb-which is located in %systemroot%\Winnt\System32\Config
To reinstall DNS, follow these steps:
  1. Right-click My Network Places, and then click Properties.
  2. In the Network and Dial-Up Connections window on the Advanced menu click Optional Networking Components.
  3. In the Windows Optional Networking Components Wizard, click to select the Networking Services check box, and then click Details.
  4. In the Networking Services dialog box, click to select the Domain Name System (DNS) check box, click OK, and then click Next.
  5. Insert the operating system installation disc when you are prompted, click OK, and DNS is reinstalled.
  6. Restart the computer.
To reconfigure the DNS server and re-create the Forward and Reverse Lookup Zones, see the articles listed in the "More Information" section.
STATUS
Microsoft has confirmed that this is a problem in the Microsoft products that are listed in the "Applies to" section.
MORE INFORMATION
Other possible causes of this problem are the following:
  • The value for Load zone data on startup on the Advanced tab in the DNS server properties is set to From registry instead of From Active Directory and registry. To resolve this problem, reset the value, and then restart the server.
  • The value of the following registry subkey is 0:
    HKEY_LOCAL_MACHINE\CurrentControlSet\Services\Netlogon\Parameters\UseDynamicUpdates
  • The filter display limit for the zone is smaller than the number of records in the zone. To resolve this problem, follow these steps:
    1. Click Start, click Run, type dnsmgmt.msc in the Open box, and then click OK.
    2. In the Dnsmgmt dialog box, expand ServerName, and then expand Forward Lookup Zones.
    3. Click the zone, click the View menu, and then click Filter.
    4. Click the Display Limit tab.
    5. Set the display limit to a number that is larger than the number of records in your zone.
  • The forward lookup zone was created by using the wrong name or was accidentally deleted. To re-create the zone, follow these steps:
    1. Make sure that the internal network adapter (and external network adapter if there is one) point to the server IP for DNS resolution in the TCP/IP Properties dialog box.
    2. In the DNS MMC, right-click the server object, and then click New Zone. The New Zone Wizard starts. Under Zone Type, click Active Directory Integrated. On the next page, click Forward Lookup Zone, and then type a domain name (for example, domain.com).
    3. Expand the Forward Lookup Zones folder, right-click the zone, and then click Properties.
    4. On the General tab, make sure that Only secure updates is selected in the Allow Updates? list (this is the default setting). Click OK, and then close the DNS MMC.
    5. At a command prompt, restart the Netlogon service by using the following command line:
      • net stop netlogon
      • net start netlogon
      • ipconfig /registerdns
    Verify that the zone file now has the following subdomains:
    • _msdcs
    • _sites
    • _tcp
    • _udp

Verifying Your Basic DNS Configuration

If you use a third-party DNS server to support Active Directory, you must perform configuration tasks manually, and doing so, you might cause common configuration errors that prevent DNS and Active Directory from working properly. The following sections describe tests that you can perform to verify that your DNS server is working properly, that the forward and reverse lookup zones are properly configured, and that DNS can support Active Directory.
If you use either the Configure DNS Server wizard or the Active Directory Installation wizard to install your Windows 2000 DNS server, most configuration tasks are performed automatically and you can avoid many common configuration errors, but you might still want to perform the tests in this section.
Before checking anything else, check the event log for errors. For more information about Event Viewer, see "Troubleshooting Tools" earlier in this chapter.

Verifying That Your DNS Server Can Answer Queries

Use the following process to verify that your DNS server is started and can answer queries.
  • Make sure that your server has basic network connectivity. For more information about verifying basic network connectivity, see "Checking the DNS Server for Problems" later in this chapter.
  • Make sure that the server can answer both simple and recursive queries from the Monitoring tab in the DNS console. For more information about the Monitoring tab, see "Troubleshooting Tools" earlier in this chapter.
  • From a client, use Nslookup to look up a domain name and the name of a host in the domain. For more information about using Nslookup, see "Troubleshooting Tools" earlier in this chapter.
  • On the server, run netdiag to make sure the server is working properly and that the resource records Netlogon needs are registered on a DNS server. For more information about Netdiag, see "Troubleshooting Tools" earlier in this chapter.
  • Make sure that the server can reach a root server by typing the following:
    nslookup
    server < IP address of server >
    set querytype=NS
    .
  • Make sure that there is an A and PTR resource record configured for the server. For information about PTR resource records, see "Testing for Reverse Lookup Zones and PTR Records" later in this chapter.
------------

Verifying That the Forward Lookup Zone Is Properly Configured

After you create a forward lookup zone, you can use Nslookup to make sure it is properly configured and to test its integrity to host Active Directory. To start Nslookup, type the following
Nslookup server < IP address of server on which you created zone > set querytype=any
Nslookup starts. If the resolver cannot locate a PTR resource record for the server, you see an error message, but you are still able to perform the tests in this section.
To verify the zone is responding correctly, simulate a zone transfer by typing the following:
ls -d < domain name >
If the server is configured to restrict zone transfers, you might see an error message in Event Viewer. (For more information about Event Viewer, see "Troubleshooting Tools" earlier in this chapter.) Otherwise, you see a list of all the records in the domain.
Next, query for the SOA record by typing the following and pressing ENTER:
< domain name >
If your server is configured correctly, you see an SOA record. The SOA record includes a "primary name server" field. To verify that the primary name server has registered an NS record, type the following:
set type=ns < domain name >
If your server is configured correctly, you see an NS record for the name server.
Make sure that the authoritative name server listed in the NS record can be contacted to request queries by typing the following:
server
Next, query the server for any name for which it is authoritative.
If these tests are successful, the NS record points to the correct hostname, and the hostname has the correct IP address associated with it.

-------------

Testing for Reverse Lookup Zones and PTR Resource Records

You do not need reverse lookup zones and PTR resource records for Active Directory to function. However, you need them if you want clients to be able to resolve FQDNs from IP addresses. Also, PTR resource records are commonly used by some applications for security purposes, to verify the identity of the client.
You do not need to have the reverse lookup zones and PTR resource records on your own servers; instead, another DNS server can contain these zones.
After you have configured your reverse lookup zones and PTR resource records, manually examine them in the DNS console. A reverse lookup zone must exist for each subnet, and the parent reverse lookup zone must have a delegation to your reverse lookup zone. For example, if you have a private root and the subnets 172.32.16.x and 172.32.17.x, the private root can host all reverse lookup zones, or it can contain the reverse lookup zone 172.32.x and delegate the reverse lookup zones 172.32.16.x and 172.32.17.x to other servers. Also, PTR resource records must exist for all the computers in your network. For more information about adding a reverse lookup zone, see "Adding a Reverse Lookup Zone" earlier in this chapter.
You can also use Nslookup to verify that the reverse lookup zones and PTR resource records are configured correctly.
To make sure your reverse lookup zones and PTR resource records are configured correctly
  1. Start Nslookup by typing Nslookup at the command prompt and then pressing ENTER.
  2. Switch to the server you want to query by typing the following:
    server < Server IP Address >
  3. Enter the IP address of the computer whose PTR resource record you want to verify, and then press ENTER.
    If the reverse lookup zone and PTR resource record are configured correctly, Nslookup returns the name of the computer.
  4. To quit Nslookup, type exit and then press ENTER.
-------------

Verifying Your DNS Configuration After Installing Active Directory

When you use third-party DNS servers to support Active Directory, you can verify the registration of domain controller locator resource records. If the server does not support dynamic update, you need to add these records manually.
The Netlogon service creates a log file that contains all the locator resource records and places the log file in the following location:
% SystemRoot %\System32\Config\Netlogon.dns
You can check this file to find out which locator resource records are created for the domain controller.
The locator resource records are stored in a text file, compliant with RFC specifications. If your server is configured correctly, you see the LDAP SRV record for the domain controller:
_ldap._tcp. IN SRV < priority > < weight > 389 < domain controller name >
For example:
_ldap._tcp.reskit.com. IN SRV 0 0 389 dc1.reskit.com
Next, use the Nslookup command-line tool to verify that the domain controller registered the SRV resource records that were listed in Netlogon.dns.
note-icon Note
During the following test, if you have not configured a reverse lookup zone and PTR resource record for the DNS server you are querying, you might see several time-outs. This is not a problem.
To verify that SRV resource records are registered for the domain controller
  1. At the command prompt, type nslookup and then press ENTER.
  2. To set the DNS query type to filter for SRV records only, type set type=SRV and then press ENTER.
  3. To send a query for the registered SRV record for a domain controller in your Active Directory domain, type _ ldap._tcp. < Active Directory domain name > and then press ENTER.
  4. You should see the SRV records listed in Netlogon.dns. If you do not, SRV resource records might not be registered for the domain controller.
The following example shows a full Nslookup session, used to verify SRV resource records that are registered for locating two domain controllers on a network. In this example, the two domain controllers (DC1 and DC2) are registered for the domain noam.reskit.com.

C:\>nslookup
Default Server: dc1.noam.reskit.com
Address: 10.0.0.14
> set type=SRV
> _ldap._tcp.noam.reskit.com
Server: dc1.noam.reskit.com
Address: 10.0.0.14
_ldap._tcp.noam.reskit.com SRV service location:
priority = 0
weight = 0
port = 389
svr hostname = dc1.noam.reskit.com
_ldap._tcp.noam.reskit.com SRV service location:
priority = 0
weight = 0
port = 389
svr hostname = dc2.noam.reskit.com
dc1.noam.reskit.com internet address = 10.0.0.14

dc2.noam.reskit.com internet address = 10.0.0.15