Showing posts with label SQL Server. Show all posts

Friday, July 19, 2019

SQL Server: Database stuck in “Restoring” state


I backed up a database:

BACKUP DATABASE MyDatabase
TO DISK = 'MyDatabase.bak'
WITH INIT --overwrite existing

And then tried to restore it:

RESTORE DATABASE MyDatabase
   FROM DISK = 'MyDatabase.bak'
   WITH REPLACE --force restore over specified database

And now the database is stuck in the restoring state.
Some people have theorized that it's because there was no log file in the backup, and it needed to be rolled forward using:

RESTORE DATABASE MyDatabase
WITH RECOVERY 

Except that, of course, fails:

Msg 4333, Level 16, State 1, Line 1
The database cannot be recovered because the log was not restored.
Msg 3013, Level 16, State 1, Line 1
RESTORE DATABASE is terminating abnormally.

And exactly what you want in a catastrophic situation is a restore that won't work.

The backup contains both a data and log file:

RESTORE FILELISTONLY 
FROM DISK = 'MyDatabase.bak'

Logical Name    PhysicalName
=============   ===============
MyDatabase    C:\Program Files\Microsoft SQL Server\MSSQL.1\MSSQL\DATA\MyDatabase.mdf
MyDatabase_log  C:\Program Files\Microsoft SQL Server\MSSQL.1\MSSQL\DATA\MyDatabase_log.LDF

Tuesday, September 11, 2018

Table Of Content 1- Download SQLServer 2014 2- Install 3- Configuring SQL Server 4- Using SQL Server Management Studio 5- SQL Tutorial for Beginners with SQL Server Installing and configuring SQL Server Express 2014


1- Download SQLServer 2014

You can download   SQLServer Express 2014, including visual tools, at:
You can see there are many packages for selection:
Package Include
SQLEXPR_x64_ENU.exe
SQLEXPR_x32_ENU.exe
This is SQLServer software.
SQLManagementStudio_x64_ENU.exe
SQLManagementStudio_x86_ENU.exe
Visual tools (SQL Management Studio)
SQLEXPRWT_x64_ENU.exe
SQLEXPRWT_x86_ENU.exe
WT = With Tools
SQLServer software + SQL Management Studio
SQLEXPRADV_x64_ENU.exe
SQLEXPRADV_x86_ENU.exe
ADV = Advanced
SQLServer software + SQL Management Studio + Advanced tools
In this document, I instruct you to install the fullest package:
  • SQLEXPRADV_x64_ENU.exe
  • SQLEXPRADV_x32_ENU.exe
You download one of two above files. It depends on whether your computer's operating system is 32 bit or 64 bit.
After successful download:

2- Install

Install:
Select all:
Select: Named Instance
Next you select  "Mix Mode" mode that allows you to log in SQL server in two ways:
  1. Using Username/password of windows.
  2. Using username/password of SQLServer
Wait until the installation is complete. And start your computer.

3- Configuring SQL Server


It is important that this configuration allows you to connect to this database from another computer on the LAN.
Access to function:
  • SQL Server Configuration Management
This function allows you to configure so that from another computer you can access to  SQL Server through IP or Server name.
You need to start service: SQL Server Browser. Right-click it and select Properties.
Switch service mode to Automatic start.
Then click Start to start the service.
Next, turn  TPC/IP on and allow other computers to connect with SQL through IP.
Similarly, Enabled: Named Pipes, allowing other computers to connect to SQL Server via the Server name.
Next, ensure that your  SQL Server is running under the  Network Service mode.
After configuration is complete, restart the SQL Server service.

4- Using SQL Server Management Studio


When you connect with  SQL Server on a local computer, you can use the dot to represent the computer name.
This is a picture after you log into SQL Server Management Studio.
We create a database named mytestdb.


Create table My_Table  (
  ID int primary key,
  Name Varchar(32)
);
Insert into My_Table(Id,Name)
values (1 , 'Tom Cat');


Wednesday, April 18, 2018

In OpManager, How to resolve SQL Cache Memory alerts

I am running SQL Server 2008 R2 Standard (x64) on a Windows 2008 R2 Enterprise x64 Virtual Machine (vmware ESX 4.1).  I have given the VM 8GB of RAM and 4 vCPUs.  I am constantly getting the SQL Cache Memory alerts saying that my threshold has been surpassed.  I've done researc on the Internet but could not find how to resolve this.

Solution:

OpManager itself has some predefined thresholds for few of the MSSQL monitors. This threshold value might not be applicable for all the environments. So in those cases, it will be better to get the average monitored value of this metric and then update it threshold value.

Go to the snapshot page of the device and you can find the MSSQL monitor which is violating the threshold. Find its average monitored value over a period of time and change its threshold settings.

Friday, September 15, 2017

SQL Server – Uninstall /Remove SQL Server 2012 Failover Cluster Instance

Procedure to uninstall a SQL Server failover clustered instance

To update or remove a SQL Server failover cluster, you must be a local administrator with permission to login as a service on all nodes of the failover cluster.

To remove a node from an existing SQL Server failover cluster

  1. Insert the SQL Server installation media. From the root folder, double-click setup.exe. To install from a network share, navigate to the root folder on the share, and then double-click Setup.exe.
  2. The Installation Wizard launches the SQL Server Installation Center. To remove a node to an existing failover cluster instance, click Maintenance in the left-hand pane, and then select Remove node from a SQL Server failover cluster.
  3. The System Configuration Checker will run a discovery operation on your computer. To continue, Click OK. .
  4. After you click install on the Setup Support Files page, the System Configuration Checker verifies the system state of your computer before Setup continues. After the check is complete, click Next to continue.
  5. On the Cluster Node Configuration page, use the drop-down box to specify the name of the SQL Server failover cluster instance to be modified during this Setup operation. The node to be removed is listed in the Name of this node field.
  6. The Ready to Remove Node page displays a tree view of options that were specified during Setup. To continue, click Remove.
  7. During the remove operation, the Remove Node Progress page provides status.
  8. The Complete page provides a link to the summary log file for the remove node operation and other important notes. To complete the SQL Server remove node, click Close.

Screenshots: 
1 2 3 4 5 6 7


Repeat above steps on all nodes used for the SQL Server clustered instance. Make sure you uninstall the active node last.

Note:    Remove Passive Nodes First and Active node Last.

Wednesday, March 8, 2017

How to backup SQL logs and truncate them in BE 2012

If your SQL database is set to Full Recovery Mode, it maintains transaction logs.  If these logs are not truncated from time to time, they will grow and eventually fill up your disk.  BE will warn you that you need to truncate your log.
V-79-40960-37914 - Database database_name is configured to maintain transaction logs.  Transaction log backups are not being performed.  This will result in the log growing to fill all available disk space.  Regular log backups should be scheduled or the database should be changed to the simple recovery mode.
Before you change the recovery mode to Simple, you should check with the database owner because some applications require a Full Recovery Mode database.
To truncate SQL transaction logs on a regular basis, you need to set up a SQL log backup job which will backup the log and truncate it.  This is not so apparent in BE 2012 because BE 2012 requires you to do a full SQL database backup before you can backup SQL logs.

1) Create your SQL backup job.

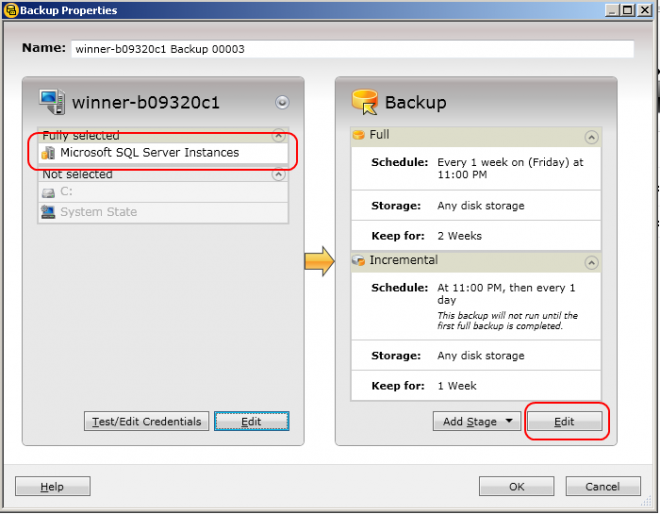
Make sure you only select the Microsoft SQL Instances.  Do not include files in the backup because you would need to turn off AOF.

2) Edit your SQL backup job

BE 2012 - Edit SQL backup job.png

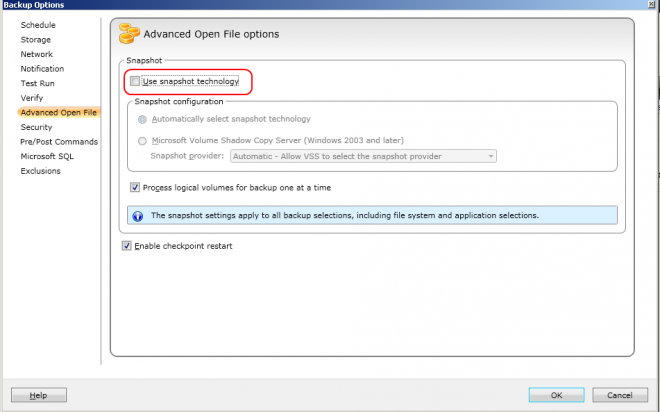
3) Turn off AOF

You would need to turn off AOF by unchecking Use snapshot technologs.  Otherwise, you may encounter problems when you try to re-direct your SQL database restore later.
BE 2012 - Turn off AOF.png
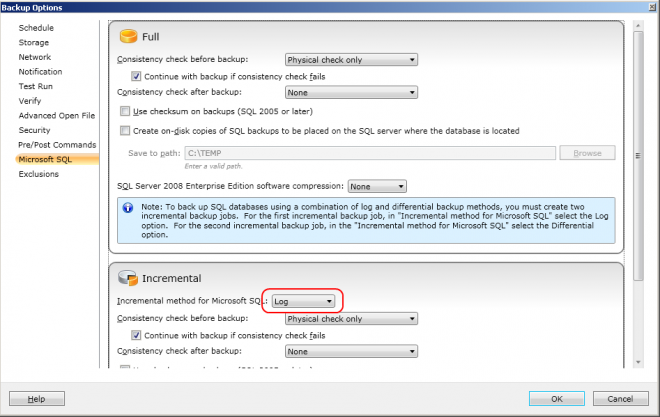
3) Check that the incremental job is backing up the transaction log
BE 2012 - Log backup job.png
If you do not want to do differential backups of your SQL databases, then this is all for the SQL part.  All you need to specify the schedule for the jobs, the media to use, etc.
You should schedule the log backup to be done AFTER the full database backup.  If you run the log backup before the full database backup and the database backup fails, then you might end up with nothing to recover your database.

4) Set up your differential SQL database backup

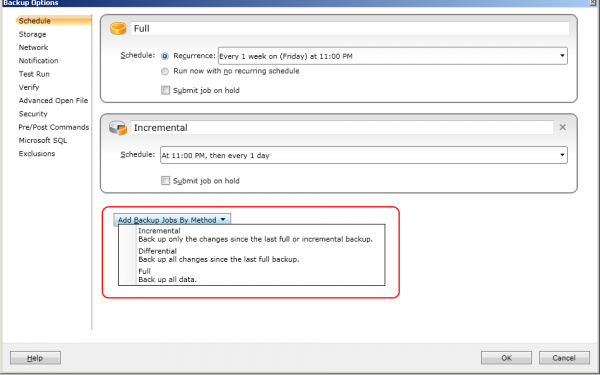
This step is optional.  Add another incremental job.
BE 2012 - add job.png
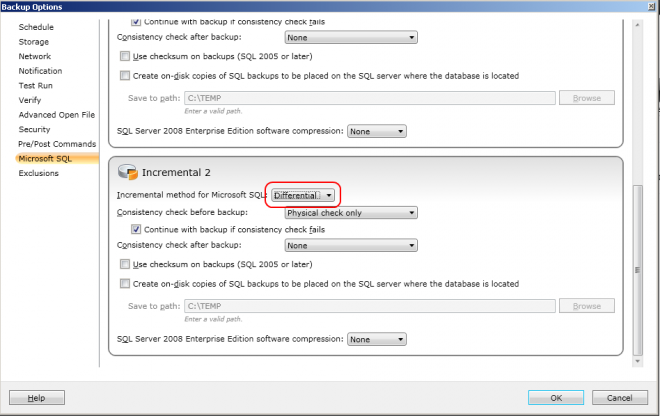
I know it is strange to add an incremental job to do a differential SQL backup, but you can only do differential backup on SQL databases, not incremental backup.

5) Change the method of the additional incremental job

BE 2012 - Differential SQL backup job.png
If you have differential database backups, you can either do your log backups after the full backup or after the full and differential backups.

Notes

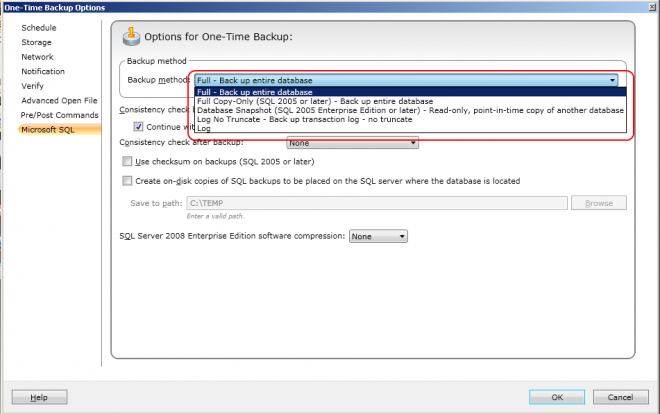
a) You can also truncate the SQL transaction logs on a one-off basis.  To do this, set up a one-time backup job, select only the SQL databases and then turn off AOF.  You then choose log for the backup option as in the screenshot below
BE 2012 - One-time SQL backup.png
b) Note that truncating the transaction logs does not recover the space occupied by the logs.  You would need to compact the logs to recover the space.  See these documents
http://www.symantec.com/docs/TECH33654
http://www.symantec.com/docs/TECH82950
c) If your database is set to Simple Recovery Mode and you attempt to do log backups on them, you will get this warning message
V-79-57344-33960 - A log backup was attempted on database discover that is not configured to support log backups. To change the configuration, use the SQL administration tools to set the recovery mode to Full.  A new full backup should be performed if this setting is changed before a log backup is run.
Note that some databases, like the Master database, cannot be set to Full Recovery Mode.
If you have a mixture of databases, i.e. some with Full Recovery Mode and some with Simple Recovery Mode, then you need to set up two backup jobs.
Job1 - with log backups, for databases with Full Recovery Mode
Job2 - without log backups, for databases with Simple Recovery Mode.  In Step 2 above, you would delete the incremental job.