These days, there are three types of drive you can find in the computer.
- Hard disk drive
(HDD) is a classic device with a magnetic spinning disk inside. These
drives were first introduced in 1956, and are widely used until now.
They perform read and write operations with a magnetic head, and can
also retrive data in random-access order.
- Solid-state drive
(SSD) is a modern type of drives which has no rotating parts. It is
like a huge flash drive with a controller that operates the data
transfer. The information will be written into special memory cells.
Obviously, SSD work much faster than HDDs and produce no noise. Classic
SSDs are often interchangable with HDDs.
- Non-Volatile Memory Express
(NVMe) is the latest version of solid state drives. They are different
from classic SSDs as they use a special interface. They are not
compatible with HDDs and Sata SSDs, yet they offer incredible data
transfer speeds. Also they are very compact in size.
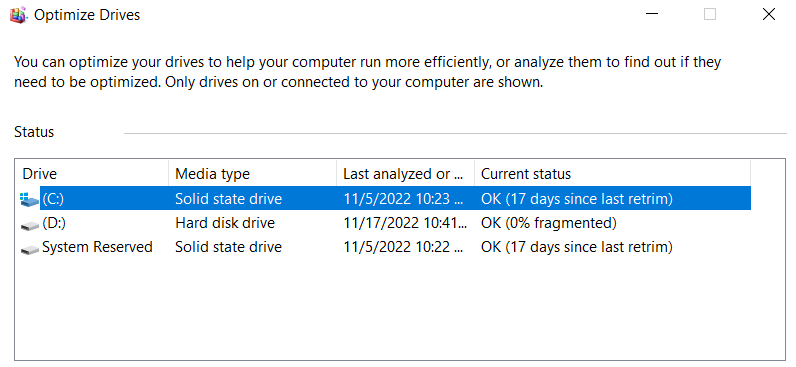
Detect SSD or HDD in the Optimize Disks tool
- Right-click the Start button and select Run, or press Win + R.
- Type dfrgui in the Run box and hit Enter to open the Optimize Drives tool.
In the drive list, look at the Media type column. For an SSD drive, it will say Solid state drive.
You
are done. While this method is the simplest one, it may be not that
accurate. Because Windows detects the drive type with its own tests,
including the drive speed. If it works slowly or is too new for your
Windows version, the OS may be detect it as HDD.
Another method is a PowerShell applet.
Find SSD or HDD in Windows 11 with PowerShell
- Press Win + X and select Terminal (Admin) from the menu.
- Ensure it opens with a PowerShell tab, and type the following command: Get-PhysicalDisk.
- In the output, check out the MediaType column. It will say SSD or HDD depending on the drive type.
Finally, you can use the Task Manager app to learn about your drives.
Using Task Manager
In
Windows 11, Microsoft has updated the Task Manager with advanced
capabilities. Besides the updated look, it is able to display extra
details about your hardware.
To find the drive type with Task Manager, do the following.
- Open the Task Manager app with the Ctrl + Shift + Esc shortcut.
- In the app, click on the hamburger icon to see the text labels, and then click on the Performance tab.
- Finally, on the Performance tab, select the disk. You will see if it is SSD or HDD in a note below the partition names.
Also,
you can try to look on the Internet for technical specification of your
drive. There, you will find a lot of information about it, including
its type. But first you have to learn its model.
Find drive type by its model
First
of all, you need to find the drive model. You can find it either in
Device Manager, Task Manager, or System Information tool.
Task Manager
- In Task Manager (Ctrl + Shift + Esc), the Disks tab on the Performance page shows the drive model.
Device Manager
- Right-click the Start button in the taskbar and select Device Manager from the menu.
- Expand the storage section.
- Write down the drive model.
Using System Information tool
- Press Win + R and enter msinfo32 in the Run dialog.
In the left pane, expand the tree to Components > Storage > Disks.- Look for the drive model in the right and select it.
- Press Ctrl + C to copy the drive model to the clipboard.
Now,
when you know the drive model, do a web search with Google or Bing
using the model words as a keyword. On the vendor's website or some
reputable hardware resource you will find all the information about the
drive, including its type. I.e. it will show if it is SSD, NVMe, or HDD.
Now, when you know how to find if you have SSD or HDD, let's look how to differentiate NVMe for SATA SSD.
Find out NVMe in Windows 11
- Press Win + I to open Settings.
- Go to the System > Storage page and click on the Disks and Volumes option under Advanced storage settings.
3. On the next page, click on the Properties button next to the drive name.
4. The properties page will show the NVMe line for the Bus type. Otherwise, you will see SATA.
You are done!

Note:
On some devices, NVMe is reported as 'RAID'. It must be the driver
which reports the interface type to the OS. It is also reported as RAID
in third-party tools reviewed in the next chapter. Keep this in mind.
For the completeness' sake, let's review a couple of alternative methods you can use for finding out NVMe in Windows 11.
Find if you have NVMe in Disk Properties
- Right-click the Start button and select Device Manager.
2. In Device Manager, expand the Disk drives category on the left.
3. Double-click the drive to open its properties.
4. In the Properties window, switch to the Details tab.
5. In the Property drop-down list, select Hardware Ids.
6. In the Value list, check out the list entries. It should include "NMVe" for NVMe drives.