Wednesday, February 5, 2020

iPhone Using Dual SIM with an eSIM

Set up your cellular plan with eSIM

On iPhone XS, iPhone XS Max, iPhone XR, and later, you can use a physical nano-SIM for a cellular plan and an eSIM for one or more other cellular plans. If you don't have a nano-SIM and your carrier supports it, an eSIM can serve as your only cellular plan. The eSIM provided by your carrier is stored digitally in your iPhone.
To activate your second cellular plan, you can scan the QR code your carrier gave you, use your carrier's iPhone app, install an assigned plan, or you can enter the information manually:

Scan a QR code

  1. Open the Camera app and scan your QR code.
  2. When the Cellular Plan Detected notification appears, tap it.
  3. Tap Continue, at the bottom of the screen.
  4. Tap Add Cellular Plan.
If you're asked to enter a confirmation code to activate the eSIM, enter the number that your carrier provided.

Use a carrier app

  1. Go to the App Store and download your carrier's app.
  2. Use the app to purchase a cellular plan.

Install an assigned cellular plan

With iOS 13, some carriers can assign a cellular plan for you to install. Contact your carrier for more information.
If a plan was assigned to you, follow these steps:
  1. When a notification appears that says Carrier Cellular Plan Ready to Be Installed, tap it.
  2. In the Settings app, tap Carrier Cellular Plan Ready to Be Installed.
  3. Tap Continue, at the bottom of the screen.

Enter the information manually

If necessary, you can manually enter your plan information. To enter your plan information manually, follow these steps:
  1. Go to Settings.
  2. Tap either Cellular or Mobile Data.
  3. Tap Add Cellular Plan.
  4. Tap Enter Details Manually, at the bottom of your iPhone screen.
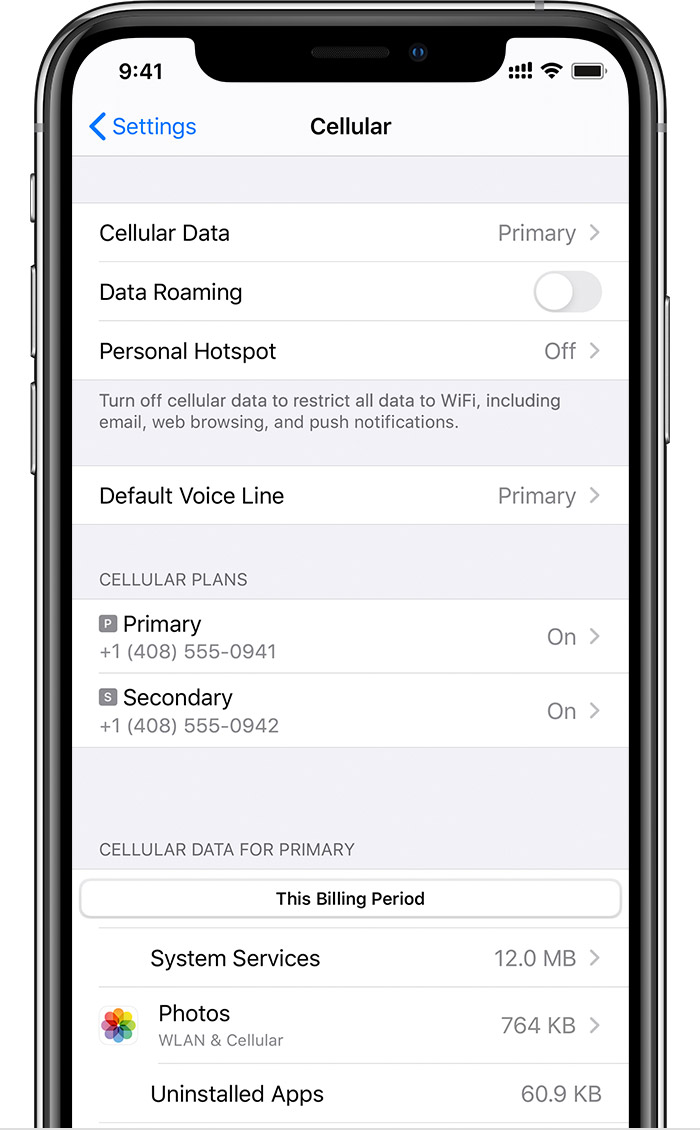
You can store more than one eSIM in your iPhone, but you can use only one at a time. To switch eSIMs, tap Settings, tap either Cellular or Mobile Data, and then tap the plan you want to use. Then tap Turn On This Line.
The next sections give you more information about the remaining setup screens on your iPhone.
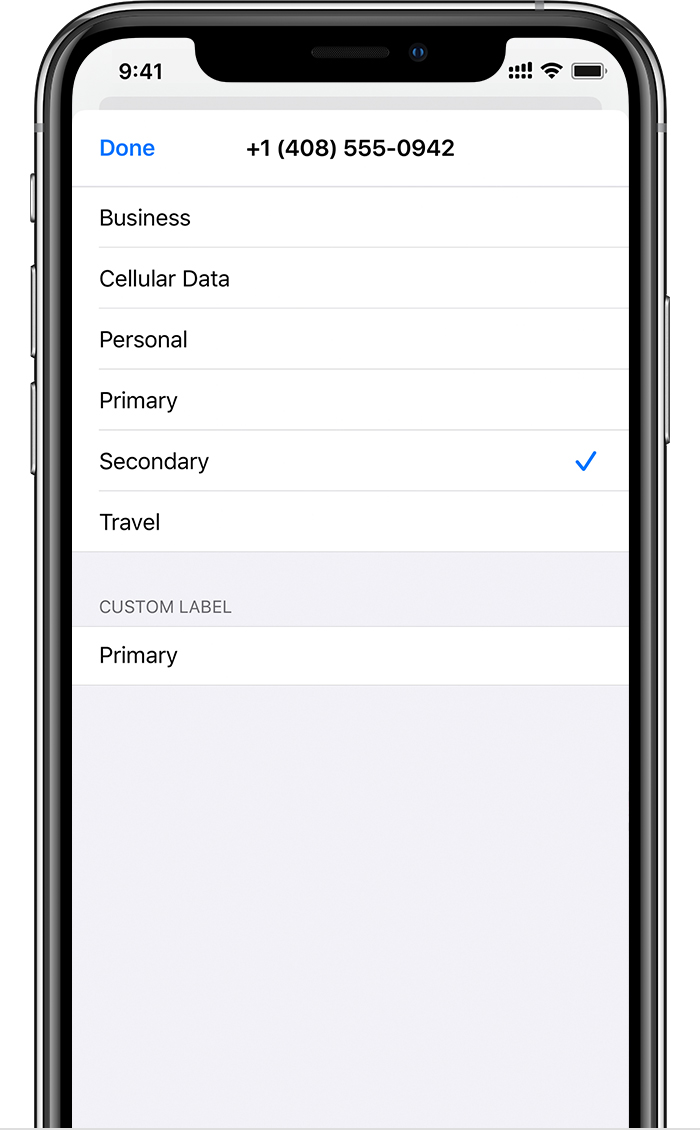
Label your plans

After your second plan is activated, label your plans. For example, you can label one plan Business and the other plan Personal.
You'll use these labels when you choose which phone number to use for making or receiving calls and messages, to designate a number for cellular data, and to assign a number to your contacts so you know which number you will use.
If you change your mind later, you can change your labels by going to Settings, tapping either Cellular or Mobile Data, and then tapping the number whose label you want to change. Then tap Cellular Plan Label and select a new label or enter a custom label.

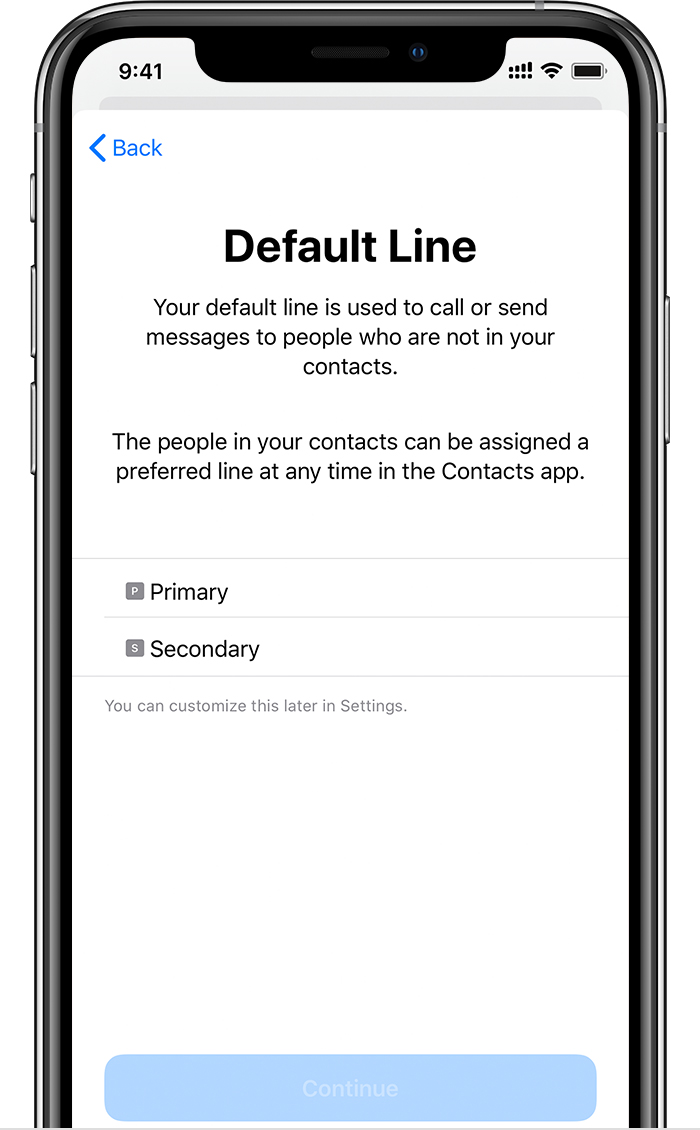
Set your default number

Choose a number to use when you call or send a message to someone who isn't in your Contacts app. With iOS 13, choose which cellular plans you want to use for iMessage and FaceTime. With iOS 13, you can choose either or both numbers.
On this screen, choose a number to be your default, or you can choose which number is to be used only for cellular data. Your other number will be your default. If you want your iPhone to use cellular data from both plans, depending on coverage and availability, turn on Allow Cellular Data Switching.

Use two phone numbers for calls, messages, and data

Now that your iPhone is set up with two phone numbers, here's how to use them. 

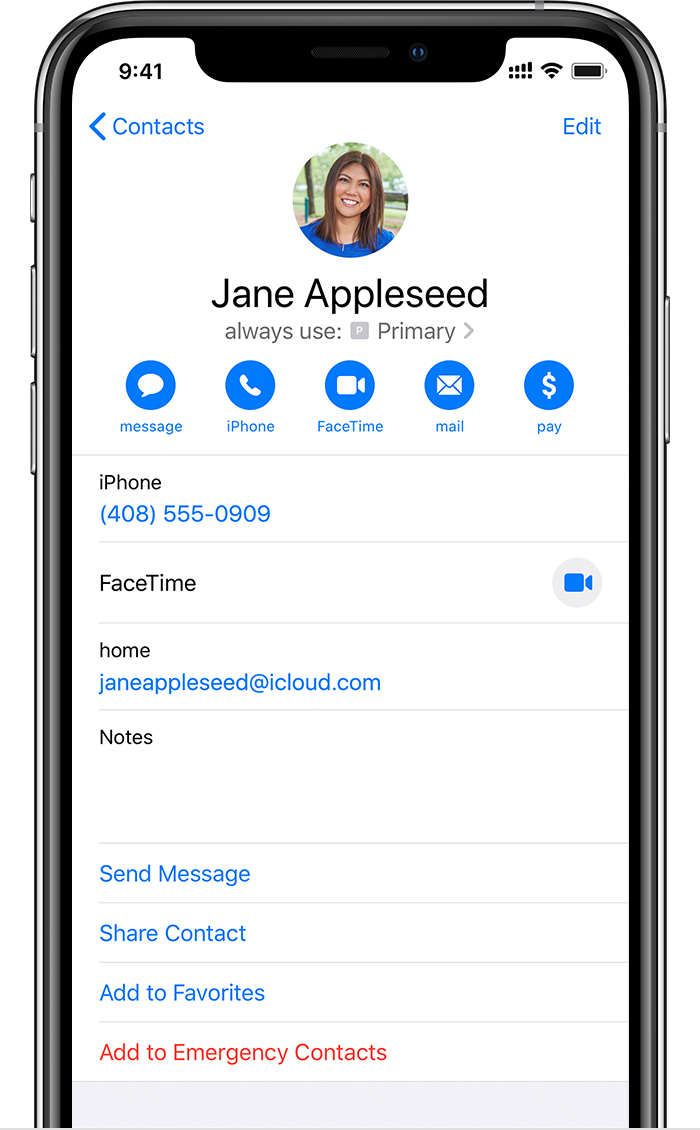
Let your iPhone remember which number to use

When you call one of your contacts, you don't need to choose which number to use every time. By default, your iPhone uses the same number that you used the last time you called that contact. If you haven't called that contact, your iPhone uses your default number. If you want to, you can specify which number to use for your calls with a contact. Follow these steps:
  1. Tap the contact.
  2. Tap Preferred Cellular Plan.
  3. Tap the number you want to use with that contact.

Make and receive calls

You can make and receive phone calls with either phone number.
With iOS 13, when you're on a call, if the carrier for your other phone number supports Wi-Fi calling, you can answer incoming calls on your other number. When you're on a call using a line that isn't your designated line for cellular data, you need to turn on Allow Cellular Data Switching to receive calls from your other line. If you ignore the call and you have voicemail set up with your carrier, you’ll get a missed-call notification and the call will go to voicemail. Check with your carrier for Wi-Fi calling availability, and find out if additional fees or data usage applies from your data provider.
If you're on a call and your other line shows No Service, either your carrier doesn't support Wi-Fi calling or you don't have Wi-Fi calling turned on.1 It could also mean Allow Cellular Data Switching is not turned on. When you're on a call, an incoming call on your other phone number will go to voicemail if you set up voicemail with your carrier.2 However, you won't get a missed-call notification from your secondary number. Call Waiting works for incoming calls on the same phone number. To avoid missing an important call, you can turn on call forwarding and forward all calls from one number to the other. Check with your carrier for availability and to find out if additional fees apply.
1. Or if you're using iOS 12. Update to iOS 13 to receive calls when you're using your other number.
2. If data roaming is on for the number that uses cellular data, then Visual Voicemail and MMS will be disabled on your voice-only number.

Switch phone numbers for a call

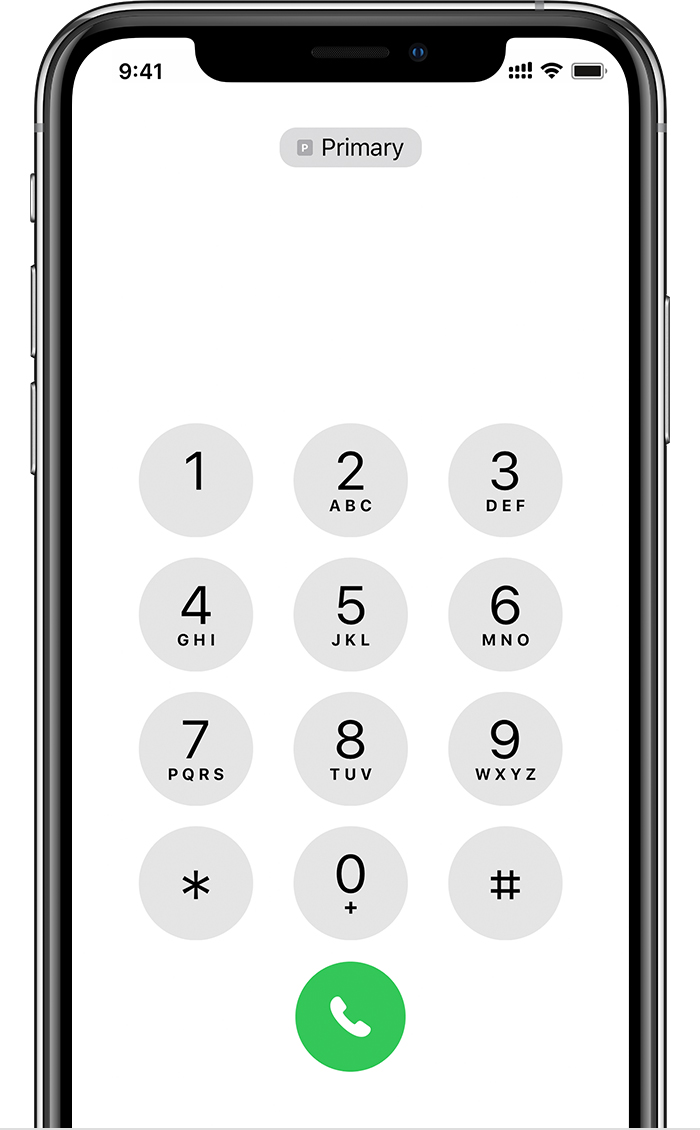
You can switch phone numbers before you make a call. If you're calling someone in your Favorites list, follow these steps:
  1. Tap .
  2. Tap the current phone number. 
  3. Tap your other number. 
If you're using the keypad, follow these steps:
  1. Enter the phone number.
  2. Tap the phone number, near the top of the screen. 
  3. Tap the number you want to use.

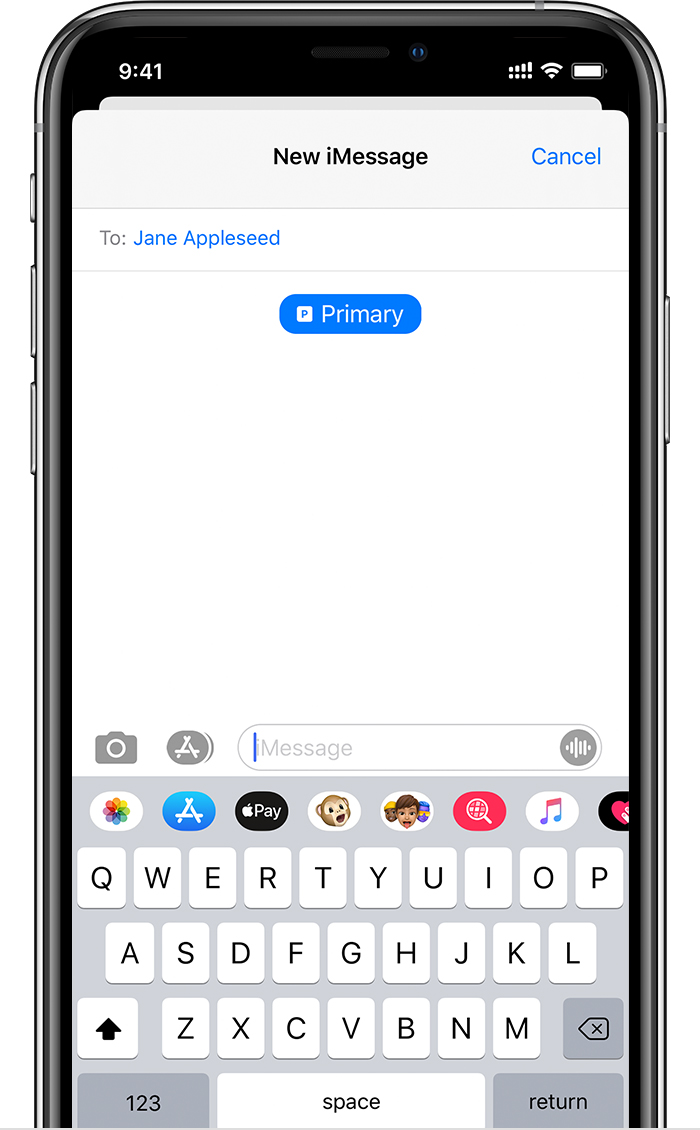
Send messages with iMessage and SMS/MMS

You can use iMessage or SMS/MMS to send messages with either phone number.* You can switch phone numbers before you send an iMessage or SMS/MMS message. Here's how:
  1. Open Messages.
  2. Tap the New button, in the upper right corner of the screen.
  3. Enter your contact's name.
  4. Tap the current phone number.
  5. Tap the number you want to use.
* Additional fees may apply. Check with your carrier.

Learn about Dual SIM status icons

The icons in the status bar at the top of the screen show the signal strength of your two carriers. Learn what the status icons mean.
You can see more status icons when you open Control Center.

When Carrier 1 is in use, the other line will show No Service. 

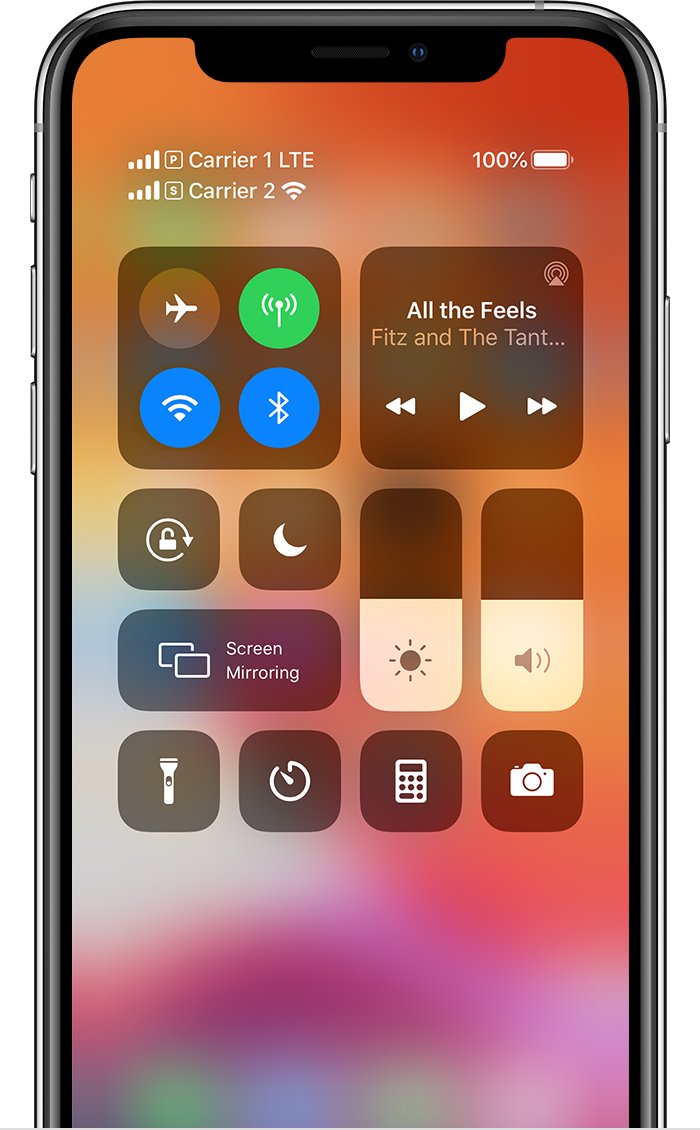
The status bar shows that Carrier 1 is using LTE, and Carrier 2 is using Wi-Fi Calling.

With Allow Cellular Data Switching turned on, the status bar shows that Carrier 1 is using LTE, and Carrier 2 is using the cellular data of Carrier 1 and has Wi-Fi calling enabled.

Change your cellular data number

One number at a time can use cellular data. To change which number uses cellular data, follow these steps: 
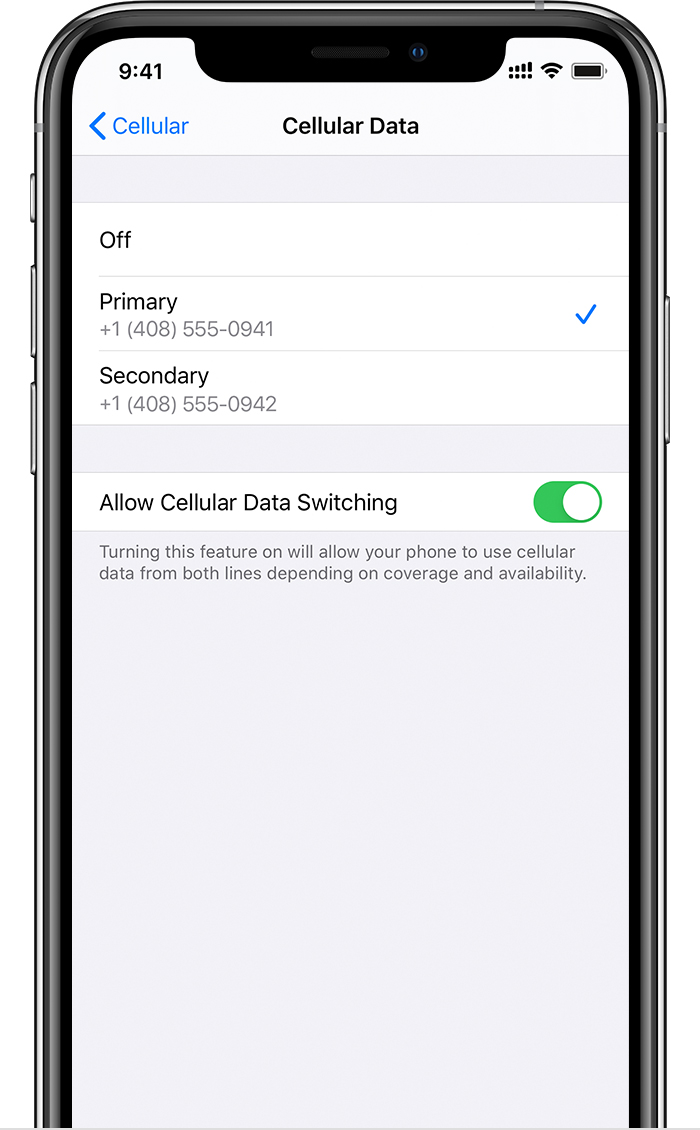
  1. Go to Settings.
  2. Tap either Cellular or Mobile Data.
  3. Tap Cellular Data. 
  4. Tap the number you want to use cellular data. 
If you turn on Allow Cellular Data Switching, then while you're on a voice call on your voice-only number, that number automatically switches to use voice and data.* This lets you use both voice and data while on the call.
If you turn off Allow Cellular Data Switching and you're active on a voice number that isn't your designated cellular-data number, then cellular data won't work while you're on the call.
To turn on Allow Cellular Data Switching, follow these steps:
  1. Go to Settings.
  2. Tap either Cellular or Mobile Data.
  3. Tap Cellular Data.
  4. Turn on Allow Cellular Data Switching.
* Your data line switches automatically for the duration of your call. This cellular-data switching will not work if you are currently using Data Roaming. Check with your carrier for availability and to find out if additional fees apply.

Manage cellular settings

To change your cellular settings for each of your plans, follow these steps:
  1. Go to Settings.
  2. Tap either Cellular or Mobile Data.
  3. Tap the number you want to change.
  4. Tap each option and set it as you normally would.

Transfer your eSIM from your previous iPhone to your new iPhone

To transfer your eSIM to your new iPhone, you can scan the QR code your carrier gave you, use your carrier's iPhone app, or install an assigned cellular plan. When your cellular plan is activated on your new iPhone, the plan on your previous iPhone will deactivate.
To set up your new iPhone, follow the steps in the Set up your cellular plan with eSIM section. If you're asked to "Transfer Cellular Plan" during Quick Start setup, follow these steps.

Erase your eSIM

If you need to erase your eSIM, follow these steps:
  1. Go to Settings.
  2. Tap either Cellular or Mobile Data.
  3. Tap the plan you want to erase.
  4. Tap Remove Cellular Plan.
If you erase all content and settings from your device, you can choose to erase your eSIM as well or keep it. If you want to cancel your cellular plan, you still need to contact your carrier.

Saturday, February 1, 2020

PIN and Fingerprint Sign-in options unavailable (greyed out) in Windows 10 1607 Enterprise

Apparently 1607 requires this registry key setting to enable PIN login on domain joined machines:
[HKEY_LOCAL_MACHINE\SOFTWARE\Policies\Microsoft\Windows\System]
"AllowDomainPINLogon"=dword:00000001

Use the System File Checker tool to repair missing or corrupted system files


If some Windows functions aren't working or Windows crashes, use the System File Checker to scan Windows and restore your files.  

Though the steps below might look complicated at first glance, just follow them in order, step-by-step, and we’ll try to get you back on track.

Run the System File Checker tool (SFC.exe)


To do this, follow these steps:
  1. Open an elevated command prompt.  
  2. If you are running Windows 10, Windows 8.1 or Windows 8, first run the inbox Deployment Image Servicing and Management (DISM) tool prior to running the System File Checker.  (If you are running Windows 7 or Windows Vista, skip to Step 3.) 
Type the following command, and then press Enter.  It may take several minutes for the command operation to be completed.
DISM.exe /Online /Cleanup-image /Restorehealth
Important: When you run this command, DISM uses Windows Update to provide the files that are required to fix corruptions. However, if your Windows Update client is already broken, use a running Windows installation as the repair source, or use a Windows side-by-side folder from a network share or from a removable media, such as the Windows DVD, as the source of the files. To do this, run the following command instead:
DISM.exe /Online /Cleanup-Image /RestoreHealth /Source:C:\RepairSource\Windows /LimitAccess
Note: Replace the C:\RepairSource\Windows placeholder with the location of your repair source. For more information about using the DISM tool to repair Windows, reference Repair a Windows Image.
  1. At the command prompt, type the following command, and then press ENTER:
sfc /scannow


Command Prompt with administrator rights - sfc /scannow
 
The sfc /scannow command will scan all protected system files, and replace corrupted files with a cached copy that is located in a compressed folder at %WinDir%\System32\dllcache.
The %WinDir% placeholder represents the Windows operating system folder. For example, C:\Windows.

Note Do not close this Command Prompt window until the verification is 100% complete. The scan results will be shown after this process is finished.
  1. After the process is finished, you may receive one of the following messages:
    • Windows Resource Protection did not find any integrity violations.

      This means that you do not have any missing or corrupted system files.
    • Windows Resource Protection could not perform the requested operation.

      To resolve this problem, perform the System File Checker scan in safe mode, and make sure that the PendingDeletes and PendingRenames folders exist under %WinDir%\WinSxS\Temp.
    • Windows Resource Protection found corrupt files and successfully repaired them. Details are included in the CBS.Log %WinDir%\Logs\CBS\CBS.log.

      To view the detail information about the system file scan and restoration, go to How to view details of the System File Checker process.
    • Windows Resource Protection found corrupt files but was unable to fix some of them. Details are included in the CBS.Log %WinDir%\Logs\CBS\CBS.log.

      To repair the corrupted files manually, view details of the System File Checker process to find the corrupted file, and then manually replace the corrupted file with a known good copy of the file.

More Information


How to view details of the System File Checker process

To view the details that included in the CBS.Log file, you can copy the information to the Sfcdetails.txt file by using the Findstr command, and then view the details in the Sfcdetails.txt. To do this, follow these steps:
  1. Open an elevated command prompt as described in the previous step 1.
  2. At the command prompt, type the following command, and then press ENTER:
    findstr /c:"[SR]" %windir%\Logs\CBS\CBS.log >"%userprofile%\Desktop\sfcdetails.txt" 
    Note The Sfcdetails.txt file contains details from every time that the System File Checker tool has been run on the computer. The file includes information about files that were not repaired by the System File Checker tool. Verify the date and time entries to determine the problem files that were found the last time that you ran the System File Checker tool.
  3. Open the Sfcdetails.txt file from your desktop.
  4. The Sfcdetails.txt file uses the following format:
    Date/Time SFC detail
    The following sample log file contains an entry for a file that could not be repaired:
    2007-01-12 12:10:42, Info                  CSI    00000008 [SR] Cannot 
    repair member file [l:34{17}]"Accessibility.dll" of Accessibility, Version = 
    6.0.6000.16386, pA = PROCESSOR_ARCHITECTURE_MSIL (8), Culture neutral, 
    VersionScope neutral, PublicKeyToken = {l:8 b:b03f5f7f11d50a3a}, Type 
    neutral, TypeName neutral, PublicKey neutral in the store, file is missing


How to manually replace a corrupted system file with a known good copy of the file

After you determine which system file was corrupted and could not be repaired through the detail information in the Sfcdetails.txt file, find where the corrupted file located, and then manually replace the corrupted file with a known good copy of the file. To do this, follow these steps:

Note You may be able to get a known good copy of the system file from another computer that is running the same version of Windows with your computer. You may perform a System File Checker process on that computer to make sure the system file that you intend to copy is a good copy.
  1. Take administrative ownership of the corrupted system file. To do this, at an elevated command prompt, copy and then paste (or type) the following command, and then press ENTER:
    takeown /f Path_And_File_Name
    Note The Path_And_File_Name placeholder represents the path and the file name of the corrupted file. For example, type takeown /f C:\windows\system32\jscript.dll
    Command Prompt with administrator rights - command succeeded
     
  2. Grant administrators full access to the corrupted system file. To do this, copy and paste (or type) the following command, and then press ENTER:
    icacls Path_And_File_Name /GRANT ADMINISTRATORS:F
    Note The Path_And_File_Name placeholder represents the path and the file name of the corrupted file. For example, type icacls C:\windows\system32\jscript.dll /grant administrators:F.
    Command Prompt with administrator rights
     
  3. Replace the corrupted system file with a known good copy of the file. To do this, copy and paste (or type) the following command, and then press ENTER:
    Copy Source_File Destination
    Note The Source_File placeholder represents the path and file name of the known good copy of the file on your computer, and the Destination placeholder represents the path and file name of the corrupted file. For example, type copy E:\temp\jscript.dll C:\windows\system32\jscript.dll.

Wednesday, January 8, 2020

Steps for Fixing Computers that Do Not Wake Up or Resume from Suspend / Hibernate Mode but Will Power On

Update the BIOS & Chipset

The first steps would be to update the BIOS and Chipset driver.
Warning: Make sure to suspend BitLocker prior to flashing the BIOS on Systems that have BitLocker enabled. If BitLocker is not suspended, the next time you reboot the system it will not recognize the BitLocker key. You will then be prompted to enter the recovery key to progress and the system will ask for this on each reboot.
How to Suspend Bitlocker
BIOS
  1. Open a Web Browser (Internet Explorer, Firefox, Chrome, etc...) and go to Dell.com/Support.
  2. Enter your System Service Tag or navigate to the specific Model of System you have.
  3. Click on the Drivers & Downloads tab.
  4. Select your Operating System in the drop down box (Figure 1).
  5. Select BIOS in the Category drop down box (Figure 1).
  6. Click on the most recent version of the BIOS (Figure 1).
  7. Click Download to begin the download (Figure 1).
    Dell.com/Support Webpage
    Figure 1
  8. Save the file to your Desktop.
  9. Once downloaded, you can Double Click the icon on your Desktop.
  10. Follow the On-Screen instructions to complete the installation. This will reboot your System and perform a BIOS update.
Chipset
  1. Open a Web Browser (Internet Explorer, Firefox, Chrome, etc...) and go to Dell.com/Support.
  2. Enter your System Service Tag or navigate to the specific Model of System you have.
  3. Click on the Drivers & Downloads tab.
  4. Select your Operating System in the drop down box (Figure 2).
  5. Select Chipset in the Category drop down box (Figure 2).
  6. Click on Intel Chipset Device (Figure 2).
  7. Click Download to begin the download (Figure 2).
    Dell.com/Support Webpage
    Figure 2
  8. Click Download. You may receive a warning and an option to run or save the file.
  9. Click Save.
  10. When the Save As window appears, designate a folder to save the file that is being downloaded and click Save. The download progress window displays.
  11. Make sure the checkbox next to "Close this dialog box when download completes" is unchecked. When the download completes click Run or Allow.
    Note: The User Account Control window may appear, click Continue.
  12. A small window will appear with Continue and Exit buttons, click Continue.
  13. In the Select the folder where you want to unzip the files to window, click Ok.
  14. If a message appears asking to create a folder, click Yes. If a message appears asking to overwrite the folder, click Yes to All.
  15. In the All files were successfully unzipped window, click Ok.
  16. A new window will appear, follow the prompts that appear to finish the installation.
Once the BIOS and Chipset Driver have been updated, the System should be tested to see if the issue is resolved.
If the issue remains, please go to the next step.


BIOS and Power Options Settings

The following settings should be changed in the BIOS and in Windows.
Note: If using a Mouse and Keyboard, make sure they are connected directly to the System or Docking Station and not a USB Hub.

BIOS:
  1. Power the system On and press the F2 key at the Dell logo to enter the BIOS.
  2. Once in the BIOS, click the plus to the left of Power Management.
  3. Then Select USB Wake Support, check the box to Enable USB Wake Support. Click Apply at the bottom (Figure 3).
    Dell BIOS Screen
    Figure 3
  4. The Block Sleep Option (can also be called Deep Sleep Control) is normally only available on Desktops, uncheck it to Disable it. Click Apply at the bottom (Figure 4).
    Dell BIOS Screen
    Figure 4
  5. Exit the BIOS.

Windows Power Options:
  1. Search for and open "Power Options" in the Start Menu.
  2. Click "Choose what the power buttons do" on the left side of the window (Figure 5).
    Windows Power Options
    Figure 5
  3. Click "Change settings that are currently unavailable" (Figure 6).
  4. Under "Shutdown settings" make sure "Turn on fast startup" is unchecked (Figure 6).
    Windows Power Options
    Figure 6

Once the BIOS and Windows Power Options have been changed, the System should be tested to see if the issue is resolved.
If the issue remains, please go to the next step.


Update Video Driver

The Video/Graphics driver should be the next item updated in the troubleshooting process. Some Systems may have two Video/Graphic drivers that need to be updated, the Intel Integrated driver. Then the nVidia or AMD discrete driver, based on which was ordered with the system.
Video/Graphics Driver
  1. Open a Web Browser (Internet Explorer, Firefox, Chrome, etc...) and go to Dell.com/Support.
  2. Enter your System Service Tag or navigate to the specific Model of System you have.
  3. Click on the Drivers & Downloads tab.
  4. Select your Operating System in the drop down box (Figure 7).
  5. Select Video in the Category drop down box (Figure 7).
  6. Click on Intel HD Graphics (Figure 7).
    Note: You may need to download the nVidia or AMD driver as well, depending on if a discrete video card was ordered with the System.
  7. Click Download to begin the download (Figure 7).
    Dell.com/Support Webpage
    Figure 7
  8. Click Download. You may receive a warning and an option to run or save the file.
  9. Click Save.
  10. When the Save As window appears, designate a folder to save the file that is being downloaded and click Save. The download progress window displays.
  11. Make sure the checkbox next to "Close this dialog box when download completes" is unchecked. When the download completes click Run or Allow.
    Note: The User Account Control window may appear, click Continue.
  12. A small window will appear with Continue and Exit buttons, click Continue.
  13. In the Select the folder where you want to unzip the files to window, click Ok.
  14. If a message appears asking to create a folder, click Yes. If a message appears asking to overwrite the folder, click Yes to All.
  15. In the All files were successfully unzipped window, click Ok.
  16. A new window will appear, follow the prompts that appear to finish the installation.
Once the Video/Graphics Driver has been updated, the System should be tested to see if the issue is resolved.
If the issue remains, please go to the next step.


Refresh hiberfil.sys File

Refresh the hiberfil.sys file by toggling the switch (Disabling and Enabling), this will reset the file if it is corrupted.
  1. You will need to run this from an Administrator Command Prompt window.
    To open one in Windows 10 or 8/8.1, right-click the Start button and select "Command Prompt (Admin)".
    To open one in Windows 7, you can search the Start Menu for Command Prompt, right-click it, and select "Run as Administrator".
  2. Copy and paste the command into the Command Prompt window, "powercfg -h off" and press enter to disable (Figure 8).
    Windows Command Prompt
    Figure 8
  3. Restart the System and go to an Administrator Command Prompt window again.
  4. Copy and paste the command into the Command Prompt window, "powercfg -h on" and press enter to enable (Figure 9).
    Windows Command Prompt
    Figure 9
  5. Restart the System one more time. The hiberfil.sys should be refreshed.
Once the hiberfil.sys file has been refreshed, the System should be tested to see if the issue is resolved.
If the issue remains, please go to the next step.
Back to Top


Windows Power Troubleshooter

You can run the Windows Power Troubleshooter to adjust your System's power settings. The Power Troubleshooter checks things like your System's timeout settings, which determine how long the System waits before turning off the monitor display or entering sleep mode.
Note: Adjusting these settings can help you conserve power and extend your Notebook's battery life.


To run the Windows Power Troubleshooter, follow these instructions:

  1. In Windows, search for and open the Control Panel.
  2. In the Control Panel Search field, type Troubleshooting (Figure 10).
  3. Click Troubleshooting (Figure 10).

    Figure 10
  4. Under System and Security, click Improve Power Usage (Figure 11).
    Windows Troubleshooting Screen
    Figure 11
  5. Click Power to run the Troubleshooting tool (Figure 12).
    Windows Troubleshooter
    Figure 12

    A "Detecting Issues" window displays while Windows detects and attempts to fix any issues.
  6. After Troubleshooting is complete, close the Troubleshooter, or click Explore Additional Options if needed.
After Windows Power Settings have been adjusted, the System should be tested to see if the issue is resolved.
If the issue remains, please go to the next step.


Clean Boot with the MS Config Utility

To perform a Clean Boot using the MS Config Utility on the System, use the following steps:
  1. From the Search Box, type msconfig and press Enter.
  2. Click the Startup tab. Click Disable all and click Apply.
  3. Click the Services tab. Check the box that says Hide all Microsoft services and then click Disable all.
  4. Restart the System and check if the issue is resolved.
If it is still present, repeat the steps above to re-enable all services and startup items. Start looking at the program, driver, or device for the issue.

If the issue is not present, you will need to re-enable services and startup items one by one until the cause of the issue is identified.
This procedure is critical in avoiding unnecessary Operating System reinstalls. This process is just temporary and is needed to check to see if a Startup Item or Service is causing the issue.
To return the Boot Process to a Normal Startup In MSCONFIG.
  1. From the Search Box, type msconfig and press Enter.
  2. Click the General tab.
  3. Click Normal startup.
  4. Click OK.
  5. Click Yes when you are prompted to restart your computer.
If the issue remains after testing, please go to the next step.
Back to Top


Create a New User Profile

To create a new user in Windows, please make sure you are logged in with an account that has Administrator privileges.
Windows 7
  1. Click on the Start Button.
  2. Click on the Control Panel menu option.
  3. You will now be in the Manage Accounts control panel
  4. Click on Create a New Account
  5. You will now be at the Create New Account screen.
  6. In the New Account Name field enter the name of the new account that you would like to create.
  7. To give full access to the account select the account type as Administrator.
Windows 8/8.1/10
  1. Swipe in from the right edge of the screen, tap Settings, and then tap Change PC Settings.
  2. Click Accounts, and then Click Other Accounts.
  3. Click Add an Account, and then click Sign in without a Microsoft Account (Not Recommended).
  4. Click Local Account.
  5. Enter a user name for the new account.
  6. If you want this person to sign in with a password, enter and verify the password, add a password hint, and then tap or click Next.
    Click Finish.
In case if the account is not an administrator account, follow the instructions below.
  1. Use the Windows key + I keyboard shortcut to open the Settings app.
  2. Click Accounts.
  3. Click Family & Other People.
  4. Under Other people, select the user account, and click Change Account Type.
  5. Under Account type, select Administrator from the drop down menu.
  6. Click OK to complete the task.
The System should be tested to see if the issue happens in the new Account. If the issue does not happen with the new Account, the issue lies in the original Account.
If the issue remains in the old Account, please go to the next step.
Back to Top


Restore System

As long as system protection is enabled on your system, Windows will automatically create a restore point whenever you install new Windows updates - if the last restore point is older than 7 days.
Note: System Restore will not delete any of your files, but you may have to reinstall any software, updates or drivers that were installed after the date you are taking the PC back to.
Windows 7
Use the following link and click on the Windows 7 Starts Correctly section.
Restore, Factory Reset or Reinstall Windows 7 on your Dell Computer.
Windows 8/8.1
Restoring Windows 8 to a previous Restore Point
Windows 10
Perform a System Restore in Windows 10
When the System Restore is done, the System should be tested to see if the issue is resolved.
If the issue remains or if this step was skipped, please go to the next step.
Back to Top


System File Checker Scan

The System File Checker (SFC) tool is built into Windows and can scan your Windows system files for corruption or any other changes. If a file has been modified, it will automatically replace that file with the correct version.
You will need to run this from and Administrator Command Prompt window.
To open one on Windows 8/8.1 or 10, right-click the Windows button and select "Command Prompt (Admin)".
On Windows 7, you can also search the Start Menu for Command Prompt, right-click it, and select Run as Administrator.
Type the following command into the Command Prompt window: sfc /scannow
Press Enter to run a full system scan:
When the SFC scanner is done, the System should be tested to see if the issue is resolved.
If the issue remains or if this step was skipped, please go to the next step.

Operating System Re-Installation

If the issue remains after all troubleshooting steps (except for the optional Connected Standby step) have been done.
The Operating System (OS) will need to be reinstalled.
Note: Programs and all Data will need to be backed up.

Prior to Re-Installing the OS, you may need to create Windows recovery media. Instructions on how to do this with your Dell System may be found in the following articles.
Windows 10
Step by step instructions for reinstalling Windows 10 can be found in the following article with videos available.
Reset or Reinstall Windows 10 on your Dell Computer
Windows 8/8.1
Step by step instructions for reinstalling Windows 8/8.1 can be found in the following article.
Windows 8.1 Upgrade and Installation Instructions
Windows 7
Step by step instructions for reinstalling Windows 7 can be found in the following article with videos available.
Restore, Factory Reset or Reinstall Windows 7 on your Dell Computer.

If you have further questions about this article, contact Dell Technical Support.
Back to Top

Install Windows Features stuck on 'Please wait'

I am trying to install some Windows features but the Windows features window does not show a list of features and is stuck on 'Please wait'. 

Image
Click Command Prompt (Admin)
Type in at the prompt OR Copy and Paste these one at a time : (Hit enter after each)

Dism /Online /Cleanup-Image /CheckHealth

Dism /Online /Cleanup-Image /ScanHealth

Dism /Online /Cleanup-Image /RestoreHealth

Saturday, December 14, 2019

How to Install a Wildcard certificate onto IIS 7.X

To install your Wildcard certificate in Microsoft IIS 7.0, perform the following steps:
Step 1 : Download your certificate
  1. You will receive an email when your certificate is issued.
  2. You will want to download the PKCS#7 format of your certificate.
 
Step 2 : Install your SSL certificate
  1. Click Start > Administrative Tools > Internet Information Services (IIS) Manager
  2. From the left menu, select the corresponding server name
  3. In the Features pane (middle pane), under Security, double-click Server Certificates
  4. From the Actions pane (right pane), select Complete Certificate Request
  5. Provide the location of the certificate file and the friendly name

    Note:  With a Wildcard certificate, you want to make sure to give it a wildcard friendly name. Example: *.domain.com. IIS 7.X will not let you set an SSL host header unless the friendly name starts with * when you start binding your certificate to your sites. You can see in this example how the binding will look later if you do not give the certificate a wildcard friendly name:

    Without wildcard friendly name:


    With wildcard friendly name:


Step 3 : Binding certificate to the web site:
  1. Click Start > Administrative Tools > Internet Information Services (IIS) Manager
  2. Browse to your Server Name > Sites > Your SSL-based site
  3. From the Actions pane, choose Bindings
  4. In the Site Bindings window, If there is no existing https binding, choose Add and change Type from HTTP to HTTPS
    Note: if there is already a https binding, select it and click Edit.
  5. From the SSL Certificate drop down, Select the Friendly Name for the SSL certificate that will be used for this site.
    Note: If you don't set a host name, when you try to configure the certificate on another site, it causes an error and the second site won't start.
  6. Click Ok

Step 4 :  Verify certificate installation:
  1. To verify the SSL certificate installation, use the GeoTrust Installation Checker
  2. In some cases you may need to Stop and start your Web server prior to any testing.
    Note: In some cases the changes may not take place after restarting IIS Services and a re-boot is needed.
Additional Notes:
If you do not specify an IP address when installing your SSL Certificate, the same ID will be used for all virtual servers created on the system.
If you are hosting multiple sites on a single server, you can specify that the ID only be used for a particular server IP address.


Wednesday, December 4, 2019

DHCP Fundamentals

The Dynamic Host Configuration Protocol (DHCP) is both a client server application and a network management protocol. When a device (such as a workstation, tablet or smartphone) connects to a network, its DHCP client requests an IP address and other network configuration data from a DHCP server. The client and server communicate using the DHCP protocol to provision the end user device accordingly. This provides several vital benefits:
  1. End users do not need to perform manual configuration of their devices when they connect to a network.
  2. It simplifies the set up and operation of small office and home networks.
  3. On larger enterprise networks, centralizes allocation and reclamation of IP addresses, which prevents problems that can cause outages.
Like DNS, DHCP provides a mission critical service that operates transparently to end users but must be managed and maintained by IT operations personnel. This article provides a basic overview of DHCPv4 and DHCPv6 from a protocol, application and deployment perspective.
In this article you will learn:
  • DHCP protocol and how DHCP works
  • DHCP deployment architectures
  • About DHCPv4 vs. DHCPv6 and SLAAC
  • NS1 Enterprise DDI - DHCP, DNS and IPAM

How DHCP Works

When a device (client machine such as a PC) boots up on a network, it does not have an IP address. It also has no information on how to access other network services such as the gateway router and DNS. DHCP provides that critical bootstrap function of automatically configuring the device with the network parameters it needs to communicate with other devices and services on the network.

The basic steps are as follows:
Step 1: DCHP Discover. The client at this stage has no IP address and does not have the address of the DHCP server. The client sends the request to the ethernet broadcast address (FF.FF.FF.FF) to destination UDP port 67. Source port of client request is UDP port 68. Note that the DHCP server must be on the same subnet as the client because ethernet broadcast messages are not routed. (This restriction can be overcome by a function called DCHP relay, discussed below).
Step 2: DHCP Offer. The DHCP server is listening on port 67 and receives the discover request. The discover request contains the client MAC (or “hardware”) address and UDP source port 68. This enables the DCHP server to respond with a DHCP Offer to the sending client. The DHCP offer includes following information:
  • The IP address that server is offering
  • The subnet mask
  • The lease duration (how long the client may use the IP address)
  • The IP address of the DHCP server
  • The IP address of the default gateway router
  • IP addresses of DNS servers
Step 3: DHCP Request. The client responds to the server requesting the IP address that was offered.

Step 4: DHCP Acknowledge. The server sends an acknowledgement packet to the client, essentially confirming the IP address and configuration parameters provided to the client.

DHCP Architectures

In small office and home networks, DHCP is typically integrated with the local router. Larger enterprise networks comprise multiple sites and it may be impractical  to deploy, configure and monitor DHCP on every subnet across the enterprise. Many enterprises take a more centralized approach to architecting DHCP in the network. As mentioned above, DHCP Discover cannot be routed so a function called DHCP relay (often implemented on routers) is used to forward DHCP traffic across the network. The relay agent needs to be configured with the IP address of one or more DHCP servers. This allows the DHCP service to be available across a wide area network.
Many enterprises take a hybrid approach to DHCP architecture, deploying DHCP on dedicated servers at regional offices and HQ which supporting multiple branch locations in each region. Because DHCP is a mission critical service it is important to deploy it in a high availability (HA) configuration. This can comprise DHCP HA pairs in active-active (DHCP load balancing) or active–hot standby mode. It can also comprise HA configurations that work over a wide area network, so if a site providing DHCP services goes down, an alternate site is available to maintain service continuity. The backup DHCP server(s) need to know what IP addresses have been issued by the primary DHCP servers so when failover is invoked, the backup does not issue leases on IP addresses that are currently in use.

Managing DHCP – Scopes and Super Scopes

As described above, DHCP servers provision IP address and other network configuration parameters to clients. To do so the DHCP servers themselves must be configured accordingly. In a deployment model where the DHCP server supports multiple subnets, each subnet is allocated a unique, continuous range of IP addresses sufficient to ensure there will always be an available IP address for devices connecting on that subnet. That range of IP addresses is referred to as a DHCP Scope. The standard model therefore is a single scope per subnet. The server is configured to associate the correct scope to the network ID of the client making a DHCP request.
This model may not always be sufficient to meet all addressing requirements. For example, there may be a need to assign more than one scope (i.e. two non-contiguous IP address ranges) to clients on the same physical network which is divided into more than one logical networks (multinet). This is called a DHCP superscope.

Static IP vs Dynamically-Allocated IP 

With DHCP, devices don’t have a permanent or “static” IP address instead, they lease IP addresses for a limited time. When the lease expires the device communicates with the DHCP server, and the server may renew its IP address or assign it a new one. This is a dynamically-allocated IP. Some devices, such as mobile phones, receive a new IP address each time they connect to a network.
Some devices need a static IP address because other devices or users frequently connect to them. A common example is a web server or a printer. IT administrators can reserve fixed IP addresses for these devices using DHCP, or their IP addresses can be manually configured.

DHCPv4, DHCPv6 and SLAAC

Internet Protocol Version 6 (IPv6) is a more recent version of the Internet Protocol (IP). It was  was introduced to vastly increase the number of possible IP addresses. The previous version, IPv4, has a 32 bit address space which supports roughly 4 billion addresses. This is insufficient to support the number of internet connected devices. IPv6 introduced a 128 bit address space which for all practical purposes supports an unlimited number of IP addresses. 

Example of IPv4 IP Address Example of IPv6 IP Address
192.168.1.1.  2001:1er8:0088:0042:0001:8e2g:0397:1247

One of the innovations in the IPv6 protocol is Stateless Address Auto-configuration (SLAAC), a protocol that enables each node to self-configure its IP address. When a device connects to a network it uses the Neighbor Discovery Protocol (an IPv6 ICMP message) to determine the network it is on. It then configures its IPv6 address by combining the 64 bit network prefix with its MAC address (plus an additional 16 bits) to construct a globally unique 128 bit IP address. This greatly simplifies networking and, in some cases, may eliminate the need for DHCP servers.

There is a version of DHCP for IPv6 – DHCPv6. Its primary functions are to provide client configuration information not included in SLAAC and/or provide centralized control and auditing over IP address assignments. However, newer versions of the Neighbor Discovery Protocol are available  that provide for discovery of recursive DNS servers so for many enterprises adopting IPv6, there may not be a need for DHCPv6 in future.