Download and install the Office Policy Templates
The Policy Templates and documentation are included in the Office Resource Kit. Use the links below to download the Resource Kit for your Outlook version.
- Office 2000 ORK
- Office 2002/XP ORK
- Office 2003 ORK
- Office 2007 Policy Templates
- Office 2010 Policy Templates
- Office 2013 Policy Templates
- Outlook Social Connector Policy Templates (more info)
Updating the Office 2003 Policies
When you installed the Office 2003 Resource Kit you must update the policy templates.
- Download the Outlook 2003 updated policies.
- Run the installer and accept the License Agreement.
- Type a location to extract the file to. For example:
C:\Office2003ORK - Open the folder in Explorer
- Select all the ADM-files (11 in total) and copy them to:
C:\Windows\inf - You’ll get prompted if you want to overwrite the files. Choose “Yes to All”
Install the Office 2007 Policies
When you downloaded the Office 2007 policy templates you must install them first.
- Run the installer and accept the License Agreement.
- Type a location to extract the file to. For example:
C:\Office2007Policies - Open the folder in Explorer
- Windows XP
Select all the ADM-files (15 in total) from the ADM\en-us folder (or your localized language when available) and copy them to:C:\Windows\inf - Windows Vista, Windows 7 and Windows 8
Select all the ADMX-files (15 in total) from the ADMX folder and the ADML-files (15) from the en-us folder (or your localized language when available) and copy them to:C:\Windows\PolicyDefinitions
If you want to control an Active Directory network environment, then you can also copy them to theSysvol\PolicyDefinitionsfolder on a domain controller.
- Windows XP
- If you get prompted if you want to overwrite the files. Choose “Yes to All”.
If you get prompted by User Account Control (UAC), press Continue or provide Administrator level credentials.
Install the Office 2010 Policies
When you downloaded the Office 2010 policy templates you must install them first. While there are separate packages for the 32-bit and 64-bit AdminTemplates, this only applies to the Office Customization Tools (OCT) and not the policy templates themselves. The adm and admx templates in both packages are exactly the same.
- Run the installer and accept the License Agreement.
- Select a location to extract the file to. For example:
C:\Office2010Policies - Open the folder in Explorer
- Windows XP:
Select all the ADM-files (13 in total) from the ADM\en-us folder (or your localized language when available) and copy them to;C:\Windows\inf - Windows Vista, Windows 7 and Windows 8:
Select all the ADMX-files (13 in total) from the ADMX folder and the ADML-files (13) from the en-us folder (or your localized language when available) and copy them to;C:\Windows\PolicyDefinitions
If you want to control a Active Directory network environment, then you can also copy them to the Sysvol\PolicyDefinitions folder on a domain controller.
- Windows XP:
- If you get prompted if you want to overwrite the files. Choose “Yes to All”.
If you get prompted by User Account Control (UAC), press Continue or provide Administrator level credentials.
Install the Office 2013 Policies
When you downloaded the Office 2013 policy templates you must install them first. While there are separate packages for the 32-bit and 64-bit AdminTemplates, this only applies to the Office Customization Tools (OCT) and not the policy templates themselves. The admx templates in both packages are exactly the same.
- Run the installer and accept the License Agreement.
- Select a location to extract the file to. For example:
C:\Office2013Policies - Open the folder in Explorer
- Windows 7 and Windows 8:
Select all the ADMX-files (13 in total) from the ADMX folder and the ADML-files (13) from the en-us folder (or your localized language when available) and copy them to;C:\Windows\PolicyDefinitions
If you want to control a Active Directory network environment, then you can also copy them to the Sysvol\PolicyDefinitions folder on a domain controller.
- Windows 7 and Windows 8:
- If you get prompted if you want to overwrite the files. Choose “Yes to All”.
If you get prompted by User Account Control (UAC), press Continue or provide Administrator level credentials.
Note: Office 2013 policies are only supported on Windows 7, Windows 8, Windows Server 2008 R2 and Windows Server 2012. Previous versions of Windows are not supported.
Setting Policies in an Active Directory network environment
This method describes how you can set Group Policies for clients in a corporate Active Directory environment. Aside from installing the policy templates for your Office version(s), you’ll need the Group Policy Management Editor (GPMC) or the Remote Server Administration Tools (RSAT) to edit and set the policies.
Download: GPMC for Windows XP
Download: RSAT for Windows Vista 32-bit (x86)
Download: RSAT for Windows Vista 64-bit (x64)
Download: RSAT for Windows 7 (32-bit and 64-bit)
Download: RSAT for Windows 8 (32-bit and 64-bit)
Download: RSAT for Windows 8.1 (32-bit and 64-bit)
Download: RSAT for Windows Vista 32-bit (x86)
Download: RSAT for Windows Vista 64-bit (x64)
Download: RSAT for Windows 7 (32-bit and 64-bit)
Download: RSAT for Windows 8 (32-bit and 64-bit)
Download: RSAT for Windows 8.1 (32-bit and 64-bit)
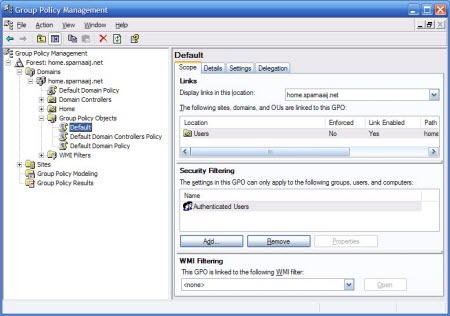
- Open the GPMC through Control panel-> Administrative Tools-> Group Policy Management
- In the left column, browse to the folder Group Policy Objects and select the Policy you wish to enforce Outlook policies on

The Group Policy Management Console on Windows XP.
(click on image to enlarge) - Right click the Policy and choose Edit…
- When you use Windows Vista, Windows 7 or Windows 8, then the policies for Office 2007, Office 2010 and Office 2013 will be loaded automatically under;
User Configuration-> Policies-> Microsoft Office Outlook version.
When you are using Windows XP or a previous version of Office, then you’ll have to load the templates first;- In the left column of the Group Policy editor right click Administrative Templates in User Configuration and choose Add/Remove Templates…
- Press Add…
- Select the file corresponding with the installed version of the Office Resource Kit;
Outlook 2000 OUTLK9.ADM Outlook 2002/XP OUTLK10.ADM Outlook 2003 OUTLK11.ADM Outlook 2007 OUTLK12.ADM Outlook 2010 OUTLK14.ADM - Press Open and then Close to return to the Group Policy editor.
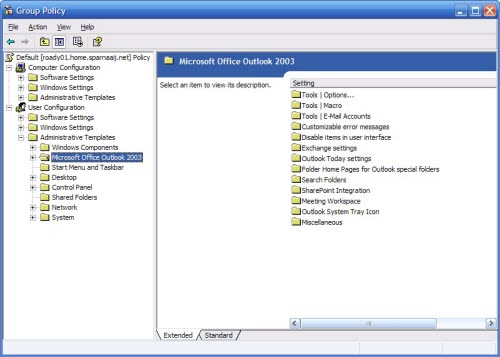
- You now will see Outlook listed and you can now enforce settings.

The Outlook 2003 policy template loaded in the Windows XP Group Policy Management Editor.
(click on image to enlarge)
Setting Policies on the local computer
Once you’ve installed the Office Resource Kit of your version you can control the Office policies on your own computer via the Group Policy editor.
Note: The Group Policy Editor is not available when you are using a “Home” version of Windows.
Note: The Group Policy Editor is not available when you are using a “Home” version of Windows.
- You can open the Group Policy Editor in the following way;
- Windows XP
Start-> Run;gpedit.msc - Windows Vista, Windows 7 and Windows 8
Start-> type;gpedit.msc
- Windows XP
- When you use Windows Vista, Windows 7 or Windows 8, then the policies for Office 2007, Office 2010 and Office 2013 will be loaded automatically under;
User Configuration-> Administrative Templates-> Microsoft Office Outlook version.
When you are using Windows XP or a previous version of Office, then you’ll have to load the templates first;- In the left column of the MMC expand Local Computer Policy then right click Administrative Templates in User Configuration and choose Add/Remove Templates…
- Press Add…
- Select the file corresponding with the installed version of the Office Resource Kit
Outlook 2000 OUTLK9.ADM Outlook 2002/XP OUTLK10.ADM Outlook 2003 OUTLK11.ADM Outlook 2007 OUTLK12.ADM Outlook 2010 OUTLK14.ADM - Press Open and then Close to return to the Local Policy editor.
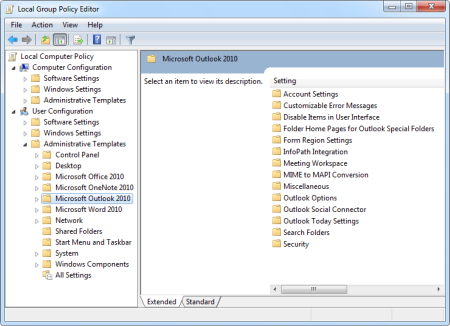
- You now will see Outlook listed and you can now enforce settings. Some of the settings will only take effect after you restart your computer.

The Outlook 2010 policy template loaded in the Windows 7 local Group Policy Editor.
(click on image to enlarge)
Note:
Local policy settings are enforced to all users of that computer; even the administrator! As an administrator you can of course change settings through the Group Policy Editor when required.
Local policy settings are enforced to all users of that computer; even the administrator! As an administrator you can of course change settings through the Group Policy Editor when required.
No comments:
Post a Comment