Friday, April 9, 2021

Migrating WSUS from one Server to another

 WSUS is running in your infrastructure for many years, and is doing a pretty good job at patching your clients and your servers, but now has come to a point where you need to migrate it to a new box. This usually happens when the OS is at the end of life support (EOL) or the hardware has reached the warranty limit. Another reason why migrate and not start with a new installation is so you don’t have to download from Microsoft the required updates and approve them all over again. I don’t know about you, but approving hundred of updates is not something I will do for a second time. In either case, the service needs to be migrated with minimal downtime and not to much headache.

To simulate this, I installed one WSUS service on a 2003 server, and this one is the WSUS that is patching the infrastructure right from the beginning. I named it WSUS-OLD for the sake of the example and for you to better follow the migration procedure. If your WSUS is not running on a 2003 server, no problem, this works with every OS version you might have. The second WSUS server will run on a 2012 R2 server and this will replace the old WSUS. I’m going to name the new server WSUS-NEW, again, for the sake of the example. Both of them are installed with a local database, but in case yours are configured with a remote SQL, don’t worry, it works either way the same. You can have your old WSUS with a local database and the new WSUS with a remote SQL server or vice versa.

Now, on the new server go ahead and install WSUS and when you get to the configuration wizard set it as a downstream replica server; point it to your working WSUS.

[notice]If there is a firewall between the two WSUS servers you will need to open the proper port (80, 8530 or 443) in order for them to be able to communicate. [/notice]


Start connecting to save and download upstream server information.


At the end of the configuration wizard choose to begin the initial synchronization then click Finish. Be patient, it will take a while.


Once the synchronization is done your two WSUS servers should look almost the same.They should have the same computer groups, approved updates, downloaded updates, etc.


One thing they are not synchronizing are the configuration options, and unfortunately these configurations will need to be done manually. Don’t worry, it’s a two minute job, but before you can do that the new WSUS server needs to be set in an autonomous mode. Go to Options > Update Source and Proxy server and un-check the box This server is a replica of the upstream server then click the radio button Synchronize from Microsoft Update.


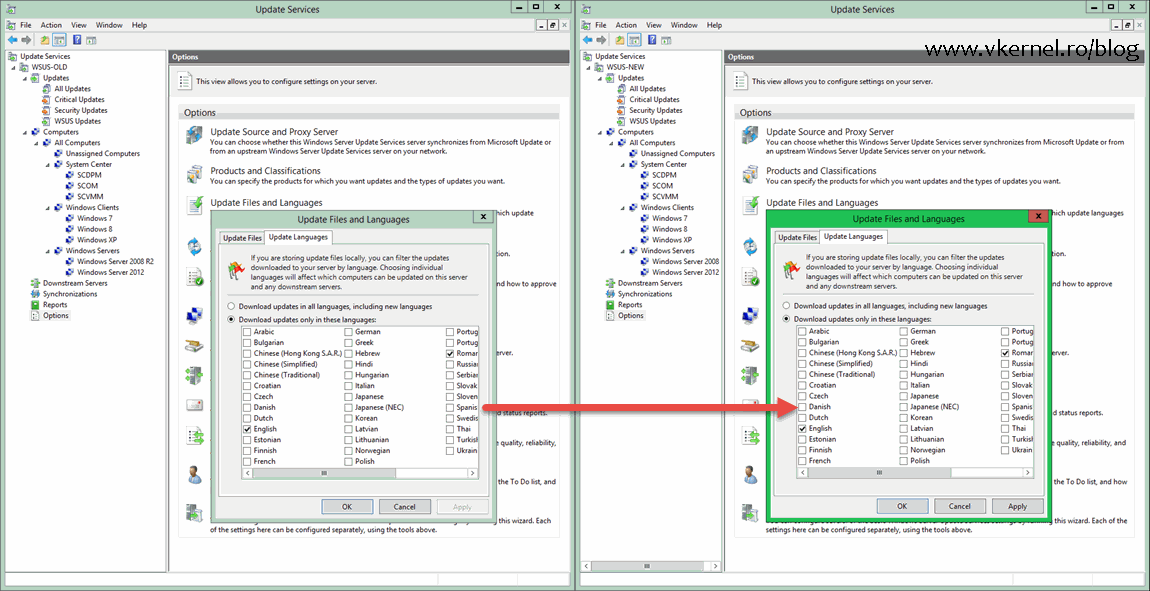
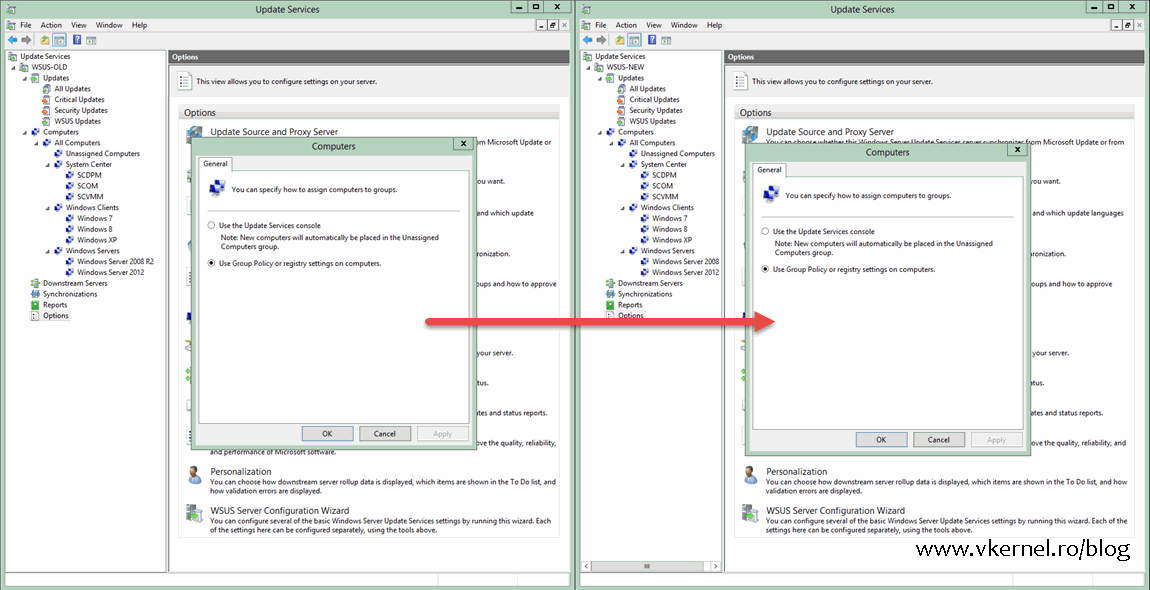
Now you can go ahead and match the rest of the options with the old WSUS server, like Products and Classifications, Update Files and Languages, computers assignment, E-Mail Notifications.

Migrating WSUS Server-07    Migrating WSUS Server-09

Once the options between the two servers match, the last step is to modify your group policy in order to point your clients to the new WSUS server. Open your GPO or GPOs and change the server name from the Specify intranet Microsoft update service location policy.


After a few hours, clients should appear in the WSUS console at the exact same patch level they were on the old WSUS server. If you want to force the process on one or two of the clients just to see if it actually works do a gpupdate /force to get the new policy then type wuauclt /detectnow and wuauclt /reportnow to force checking for updates and to report to WSUS. Wait a few days, and if everything is working fine you can go ahead and decommission the old box. And that’s it !


Migrating WSUS to a new server is not a difficult process and it can be done with minimal downtime. The hard part is to wait for all the clients to get the new policy and register themselves with the new WSUS server. Everything after that is the same as it was before, approve/decline updates and patch the systems in your environment.

Friday, March 26, 2021

How to Check Your BIOS Version

 When troubleshooting, you might need to check your BIOS version to see if an update is available. While there are a few tools that can check your BIOS version for you, it's easiest to use Windows System Information Tool, the Windows Management Instrumentation command line (typically referred to as WMI or WMIC), DirectX Diagnostic Tool (DXDiag), or even the Registry.

1: Windows System Information Tool

Those who don't like the command prompt or the registry will be glad to know that the System Information Tool is also the easiest way to check your BIOS version.

Press the Windows Key + R, type in msinfo32 and press Enter. You can see your BIOS version on the right hand side next to BIOS version/Date.


Another handy feature of using the System Information Tool is you can see your motherboard or computer brand and model number so you can effortlessly search for your manufacturer to see if there's a BIOS update. For example, with my PC, I typed in hp omen pc 870-2xx software updates in Google, and the first link was to software updates for my PC.

2: DirectX Diagnostic Tool

The DirectX Diagnostic Tool provides detailed information about DirectX and drivers on your computer. But, it also can show you additional information, including your BIOS version.

Press the Windows Key + R, type in dxdiag and press Enter.

System Information is displayed by default, including your BIOS information.


3: Command Prompt

Open the Command Prompt or PowerShell and type in wmic bios get biosversion.


4: Registry

We only mention the Windows Registry because this is where all the information you've seen so far is stored.

Open the Registry Editor and type Computer\HKEY_LOCAL_MACHINE\HARDWARE\DESCRIPTION\System\BIOS into the search bar at the top and press Enter. Click on BIOS and look for BIOSVersion.

How to Check If Your Hard Drive Is SSD or HDD

 If you recently bought a new computer or hard drive, you might be wondering if your hard drive is an SSD drive or a standard HDD.

Before we begin, let's look at the differences between the two drives.

HDD is short for Hard Disk Drive. You could almost call them old school nowadays. They contain platters and a moving actuator arm that can read and write data to the platter surface. This is why you can hear an HDD making noise. They tend to be slow and require defragmentation regularly to optimize where data is placed. All hard drives fail sooner or later because they have moving parts.

SSD is short for Solid State Drive. They use integrated circuit assemblies as memory to store data persistently and are much faster than the traditional HDD. Computer boot times of 10 seconds or less is not uncommon. When SanDisk released their 20Mb SSD drive in 1991, the cost was $1,000. SSD drives used to be so expensive in modern times that many people would purchase a smaller (128MB for example) SSD just to run their operating system and favorite programs. SSD drives became larger and more affordable in 2018 with 1TB drives costing only $100. SSD drives do not need defragmentation but instead use TRIM which tells the SSD drive which data blocks it can erase because they are no longer in use. TRIM can prolong the SSD lifespan and performance. The jury is still out on how long SSD drives last, but we've had the same drives in use for a few years.

Here's how to tell what type of hard drive you have.

1: Using Disk Defragmentor

Press the Windows Key + S and type in defrag, then click on Defragment & Optimize Drives.

As mentioned, we don't need to defrag SSD drives, but we're just looking for Solid State Drive or Hard Disk Drive.


2: Using PowerShell

Open PowerShell or the Command Prompt and type in PowerShell "Get-PhysicalDisk | Format-Table -AutoSize".


3: Using Freeware Apps

There are so many freeware system information apps available; it can be hard to pick one.

We've always liked Belarc Advisor, but you might also consider HWiNFO, HiBit System Information, and SIV (System Information Viewer).

Wednesday, March 17, 2021

Setting up Remote Desktop Connection via Router Port Forwarding


           Step 1: Enable Remote Desktop on your computer

Right-click 'My Computer' and then click 'Properties'. Click the 'Remote' tab and then choose 'Allow remote connections to this computer'. Then click the 'OK' button.

Remote Desktop

Step 2: Open Remote Desktop port (port 3389) in Windows firewall

Go into the control panel in your computer and then into 'System and security' and then into 'Windows Firewall'. Click 'Advanced settings' on the left side. Ensure that 'Inbound Rules' for Remote Desktop is 'Enabled'. Please note that if you are using a firewall other than Windows Firewall on your computer, you must open port 3389 in the firewall.

Open Windows Firewall for Remote Desktop

Open Windows Firewall for Remote Desktop

Open Windows Firewall for Remote Desktop

Step 3: Set up Port Forwarding (Port Translation) in the router

Please log into the router website (generally at http://192.168.1.1 or http://192.168.0.1) and go into the 'Port Forwarding' section. Add a new 'Port Forwarding' rule for TCP port 3389 to be forwarded to the internal IP of your computer. To get the internal IP address of the device, you may type ipconfig in "cmd.exe". It is usually in the form of "192.168.1.**".

Port Forwarding for Remote Desktop

NOTE: If you need to connect to several machines behind the same router, you should set up port forwarding for all these machines. Let's suppose machine 1 has an internal IP 192.168.1.41, machine 2 has an internal IP 192.168.1.42, and machine 3 has an internal IP 192.168.1.43. We can setup different external ports for different machines as shown in the picture below.

Port Forwarding for Remote Desktop

To see if the port forwarding has been setup correctly, you can use our Port Check network tool to see if the corresponding port is open. If you get a "Success" response from the port check, then your network has been correctly set up.

STEP 4: Map your dynamic IP to a hostname

Internet service providers change your IP address on a regular basis, but with dynamic DNS you can keep your domain pointing at the current IP of your home server or other devices.

You may register a domain name of your own (yourdomain.com) and sign up for Dynu Dynamic DNS Service for it or use a free Dynu domain name (yourdomain.dynu.com). You may refer to this Getting started tutorial for more information.

STEP 5: Use Dynu DDNS service to access your computer remotely

Download the appropriate client software and run it in the computer to keep the hostname mapped to your dynamic IP. You may also set up the DDNS service in your router if your router supports it.

You should now be able to access your computer using yourhostname.dynu.com from the internet via Remote Desktop using any compatible Remote Desktop client and your domain name.

Port Forwarding for Remote Desktop

NOTE: In the case of connecting several machines, for machine 1, you can use "yourhostname.dynu.com:3389", for machine 2, you may use "yourhostname.dynu.com:3390", and for machine 3, you may use "yourhostname.dynu.com:3391".               

Tuesday, March 16, 2021

Enable RDP through CMD Line

 Quick and simple way to enable Remote Desktop (RDP) via psexec

    4 Steps total

    Step 1: Install PSEXEC

    PSEXEC is a standalone executable file that allows you to run commands on remote machines.

    You can download the tool from here:

    http://technet.microsoft.com/en-us/sysinternals/bb897553.aspx

    Step 2: Run psexec

    You can add the location of psexec to your %PATH% variable or simple copy the psexec to C:\WINDOWS\System32\ folder.

    After that simply open a command line and type psexec /? to test its functioning accordingly

    Step 3: Enable RDP

    Open a command line and type the follwoing:

    psexec \machinename reg add hklm\system\currentcontrolset\control\terminal server /f /v fDenyTSConnections /t REG_DWORD /d 0

    This adds a registry entry enabling RDP connections.

    Step 4: Configure Machine Firewall to allow RDP

    Open a command line and type the following

    psexec \remotecomputername netsh firewall set service remoteadmin enable psexec \remotecomputername netsh firewall set service remotedesktop enable:

    With this you have successfully configured a remote machine to enable RDP sessions and configured the firewall to allow the connections on the correct ports.


    Other Examples

    The following command launches an interactive command prompt on \\marklap computer name:

    cmd
    psexec -i \\marklap cmd
    

    This command executes IpConfig on the remote system with the /all switch, and displays the resulting output locally:

    cmd
    psexec -i \\marklap ipconfig /all
    

    This command copies the program test.exe to the remote system and executes it interactively:

    cmd
    psexec -i \\marklap -c test.exe
    

    Specify the full path to a program that is already installed on a remote system if its not on the system's path:

    cmd
    psexec -i \\marklap c:\bin\test.exe
    

    Run Regedit interactively in the System account to view the contents of the SAM and SECURITY keys::

    cmd
    psexec -i -d -s c:\windows\regedit.exe
    

    To run Internet Explorer as with limited-user privileges use this command:

    cmd

    psexec -l -d "c:\program files\internet explorer\iexplore.exe"

    Wednesday, February 17, 2021

    Recovery options in Windows 10

     If you're having problems with your PC, the following table can help you decide which recovery option to use.  

    Problem

    See this section

    Your PC isn't working well and you recently installed an update.

    Remove an installed Windows update

    Your PC isn’t working well and it’s been a while since you installed an app, driver, or update.

    Reset your PC

    Your PC won't start, you haven't created a recovery drive, and resetting your PC didn't work.

    Use installation media to reinstall Windows 10

    Your PC won't start and you haven't created a recovery drive.

    Use installation media to restore your PC

    Your PC won't start and you've created a recovery drive.

    Use a recovery drive to restore or recover your PC

    You want to reinstall your previous operating system.

    Go back to your previous version of Windows

    Your PC isn't working well and you recently installed an app.

    Restore from a system restore point


    Click one of the recovery options below and follow the steps to try to get things working again.

    Remove an installed Windows update

    If you've recently installed a Windows update, uninstall the update to try to resolve the issue.

    1. Select the Start  button, then select Settings  Update & Security   Windows Update  > View your update history > Uninstall updates.
      View update history settings

    2. Right-click the update you want to remove, and then select Uninstall.

    Reset your PC

    Important: If you’ve encrypted your device, you’ll need your BitLocker key to reset your PC If you don’t know your BitLocker key, see Find my BitLocker recovery key.

    Resetting reinstalls Windows 10, but lets you choose whether to keep your files or remove them, and then reinstalls Windows. You can reset your PC from Settings, the sign-in screen, or by using a recovery drive or installation media.

    Reset your PC from Settings

    1. Select the Start  button, then select Settings  > Update & Security   > Recovery .
      Open Recovery settings

    2. Under Reset this PC, select Get started and then choose from the options and/or settings in the table below.

    Option

    What it does

    Keep my files > Change settings > Preinstalled apps On

    • Reinstalls Windows 10 and keeps your personal files.

    • Removes apps and drivers you installed.

    • Removes changes you made to settings.

    • Restores any apps your PC manufacturer installed if your PC came with Windows 10.

    Keep my files > Change settings > Preinstalled apps Off

    • Reinstalls Windows 10 and keeps your personal files.

    • Removes apps and drivers you installed.

    • Removes changes you made to settings.

    • Removes any apps your PC manufacturer installed.

    Remove everything

    • Reinstalls Windows 10 and removes your personal files.

    • Removes apps and drivers you installed.

    • Removes changes you made to settings.

    • Removes any apps your PC manufacturer installed. (If your PC came with Windows 10, apps from your PC manufacturer will be reinstalled.)

    Note: Remove everything > Change settings gives you two options.

    Data erasure On removes files and cleans the drive. If you're planning to donate, recycle, or sell your PC, use this option. This might take an hour or two, but it makes it harder for other people to recover files you've removed.

    Data erasure Off just removes files. It takes less time, but is less secure.

    Reset your PC from the sign-in screen

    If you can't open Settings, you can reset your PC from the sign-in screen. Here’s how:

    1. Press Windows logo key + L to get to the sign-in screen, and then restart your PC by pressing the Shift key while you select the Power  button > Restart in the lower-right corner of the screen.

    2. Your PC will restart in the Windows Recovery Environment (WinRE) environment.

    3. On the Choose an option screen, select Troubleshoot > Reset this PC, and then choose one of the options in the previous table.

      Choose an option screen in the Windows Recovery Environment.

    Use installation media to reinstall Windows 10

    Connect the installation media you created to your PC and reinstall Windows 10. 

    1. Open File Explorer  and select the drive with the installation media.

    2. From the root directory of the drive, double-click setup.exe, and then select Yes when asked if you’d like to allow the app to make changes to your device.

    3. Select Change what to keep.

    4. Select one of the following options, and then select Next:

      • Keep personal files and apps – This will preserve your personal data, apps, and settings.

      • Keep personal files only – This will preserve your personal data and settings, but all your apps will be removed.

      • Keep nothing – This will remove all personal data, settings, and apps.

      Warning: You cannot undo a reinstallation of Windows 10. Be sure to back up your files first if you choose the Keep nothing option. 

    5. To finish, select Install to start reinstalling Windows 10 on your PC.

    Your PC will restart several times during the resinstallation.

    Use installation media to restore your PC

    Important: If you’ve encrypted your device, you’ll need your BitLocker key to use a recovery drive to restore or reset your PC If you don’t know your BitLocker key, see Find my BitLocker recovery key.

    If your PC won't start and you haven't created a recovery drive, download installation media and use it to restore from a system restore point or reset your PC.

    1. On a working PC, go to the Microsoft software download website.

    2. Download the Windows 10 media creation tool and then run it.

    3. Select Create installation media for another PC.

    4. Choose a language, edition, and architecture (64-bit or 32-bit).

    5. Follow the steps to create installation media, and then select Finish.

    6. Connect the installation media you created to your nonfunctional PC, and then turn it on.

    7. On the initial setup screen, enter your language and other preferences, and then select Next. If you don't see the setup screen, your PC might not be set up to boot from a drive. Check your PC manufacturer's website for info on how to change your PC's boot order, and then try again.

    8. Select Repair your computer.

    9. On the Choose an option screen, select Troubleshoot. From there, you can:

      • Restore from a system restore point by selecting Advanced options > System Restore. This will remove recently installed apps, drivers, and updates that might be causing your PC problems. Restoring from a restore point won’t affect your personal files.

    Use a recovery drive to restore or recover your PC

    Important: If you’ve encrypted your device, you’ll need your BitLocker key to use a recovery drive to restore or reset your PC If you don’t know your BitLocker key, see Find my BitLocker recovery key.

    If your PC won’t start, you can use a recovery drive to restore from a system restore point or recover your PC. For info on how to create a recovery drive on a working PC, see Create a recovery drive.

    Note: If you are using a Surface, see Creating and using a USB recovery drive for Surface to download and create a USB recovery image specifically for your Surface device.

    To restore or recover using the recovery drive: 

    1. Connect the recovery drive and turn on your PC.

    2. Press Windows logo key + L to get to the sign-in screen, and then restart your PC by pressing the Shift key while you select the Power  button> Restart in the lower-right corner of the screen.

    3. Your PC will restart in the Windows Recovery Environment (WinRE) environment.

    4. On the Choose an option screen, select Troubleshoot, and then select one of the following two options. (If you don’t see the Choose your option screen, your PC might not be set up to boot from a drive. Check your PC manufacturer’s website for info on how to change your PC’s boot order.)

    Choose an option screen in the Windows Recovery Environment.

    • To restore from a system restore point, select Advanced Options > System Restore. This won't affect your personal files, but it will remove recently installed apps, drivers, and updates that might be causing your PC problems.

    • To reinstall Windows 10, select Advanced OptionsRecover from a drive. This will remove your personal files, apps and drivers you installed, and changes you made to settings.

    Go back to your previous version of Windows

    For a limited time after upgrading to Windows 10, you’ll be able to go back to your previous version of Windows by selecting the Start  button, then select Settings  > Update & Security  > Recovery and then selecting Get started under Go back to the previous version of Windows 10. This will keep your personal files, but it'll remove apps and drivers installed after the upgrade, as well as any changes you made to settings. In most cases, you'll have 10 days to go back. 
    Open Recovery settings

    To go back, you'll need to:

    • Keep everything in the windows.old and $windows.~bt folders after the upgrade.

    • Remove any user accounts you added after the upgrade.

    • Know the password you used to sign in to Windows 7 or Windows 8.1 (if you used one).

    • Have the USB drive you used to upgrade to Windows 10 (if you used one).

    Note: If you go back to Windows 8.1, some apps that came with Windows, like Mail and People, might not work anymore. To fix the apps, reinstall them from the Microsoft Store.

    Note: The option in Settings to go back to your previous version of Windows is only available for a limited time after upgrading.

    Info for Windows Insiders

    If you’re an Insider and the current preview build isn’t working for you, select the Start  button, then select Settings  > Update & Security  > Recovery . Under Go back to the previous version of Windows 10, select Get Started. This won’t remove your personal files, but it’ll remove recently installed apps and drivers, and change settings back to their defaults.

    Going back to an earlier build won’t remove you from the Insider Program. When the next preview build is ready, it'll be installed on your PC.

    Restore from a system restore point

    This option takes your PC back to an earlier point in time, called a system restore point. Restore points are generated when you install a new app or driver, and when you create a restore point manually. Restoring won’t affect your personal files, but it will remove apps, drivers, and updates installed after the restore point was made.

    1. In the search box on the taskbar, type control panel,andthen choose it from the list of results

    2. In the Control Panel search box, type recovery.

    3. Select Recovery > Open System Restore.

    4. In the Restore system files and setting box, select Next.

    5. Select the restore point that you want to use in the list of results, and then select Scan for affected programs.

      Notes: 

      • If you don’t see the restore point that you want to use, select the Show more restore points check box to see more restore points.

      • If you’re not seeing any restore points, it might be because system protection isn’t turned on. Here’s how to check:

        1. In the search box on the taskbar, type control panel,andthen choose it from the list of results.

        2. In the Control Panel search box, type recovery.

        3. Select Recovery > Configure System Restore > Configure and see if the Turn on system protection option is selected.

          • If the Turn on system protection option is not selected, system protection isn’t turned on and there aren't any restore points. In this scenario, you won't be able to recovery your PC using a system restore point and will need to use one of the other recovery options listed on this page.

          • If the Turn on system protection option is selected, continue with step 6.

    6. You'll see a list of items that will be deleted if you remove this restore point. If you're OK with the deletions, select Close> Next > Finish.

    HP PCs - Performing an HP System Recovery (Windows 7)


    Types of system recovery

    Your computer might have three types of System Recovery available, or it might have only two. Use the recovery type that resolves your issue without making more changes than necessary.
    • System Recovery: This option reformats the system drive (usually C:), reinstalls the original operating system, and reinstalls all the original hardware drivers and software. System Recovery does not impact user created partitions. If there are two hard drives, System Recovery modifies only the drive with the operating system.
        caution:
      If the size of the operating system partition (usually C:) was reduced below a minimum size requirement, other user created partitions are removed and stored data is destroyed.
    • Factory Reset: Factory Reset removes all partitions, reformats the entire hard drive, reinstalls the original operating system, and reinstalls all the original hardware drivers and software. This option also recreates the required Recovery partition (usually D:) and UEFI partition (usually E:) and reinstalls the required software.
      The Factory Reset option returns all of the notebook's software to the condition it was in at the time of purchase. All user changes or additions are removed.
    • Minimized Image Recovery: Available on many of HP's notebook computers, the Minimized Image Recovery removes all partitions, reformats the entire hard drive, reinstalls the original operating system and hardware drivers, and reinstalls HP essential software (such as HP Support Assistant and HP Recovery Manager). Minimized Image Recovery does not reinstall the trial applications and games.

    Recovery from the Windows 7 desktop screen

    If Windows 7 opens correctly, perform the following steps to start a system recovery from the Windows 7 start menu.
    note:
    1. Turn off the computer.
    2. Disconnect all peripheral devices, except for the monitor, keyboard, mouse, and power cord. Remove media from internal drives, and remove any recently added internal hardware.
    3. Turn on the computer.
    4. Click Start , click All Programs, click Recovery Manager, and then click Recovery Manager again.
      If you are prompted for an Administrator password or confirmation, type the password or provide confirmation. If a User Account Control window asks if you want to allow the program to make changes to the computer, click Yes.
      Recovery Manager
    5. Under I need help immediately, click System Recovery.
    6. The Recovery Manager asks if you want to restore the computer to its original factory shipped condition. Click Yes, and then click Next.
      Recovery Manager confirmation screen
    7. The computer restarts. If the recovery partition on the hard disk drive is functioning correctly, the Recovery Manager window displays.
      note:
      If the recovery partition on the hard disk drive is not functioning correctly, a set of recovery discs is needed to run a system recovery. Follow the instructions listed in the section Recovery from recovery discs.
      Recovery Manager after restart
    8. Click System Recovery.
    9. When System Recovery prompts you to back up your files, select a backup option:
      • If you have already backed up personal files or you do not want to back up personal files, select Recover without backing up your files, and then click Next. Continue to the next step.
      • If you want to back up your personal files, follow these steps to create a backup.
    1. Click OK in the warning that displays.
    2. After the system recovery is complete, click Finish to restart the computer. Complete the setup screens and wait until the computer finishes the setup.
    3. Once the setup is complete, turn off the computer, reconnect all devices and cables, and then turn on the computer.
    4. Before using the computer, update and protect your computer. Reinstall any virus and security software that was installed before the system recovery.
    5. Reinstall any software programs that were added after purchasing the computer, as well as any files that were backed up.

    Recovery from the startup screen (during system boot) OR when unable to boot to login in screen

    If Windows 7 does not open correctly, perform the following steps to recover the computer:
    note:
    If the recovery partition on the hard disk drive is not functioning correctly, this method does not work and an error message displays. If an error message indicates that System Recovery cannot be run from the startup screen, a set of recovery discs is needed to perform a system recovery. Follow the instructions listed in the section Recovery from recovery discs.
    1. Turn off the computer.
    2. Disconnect all peripheral devices, except for the monitor, keyboard, mouse, and power cord. Remove media from internal drives, and remove any recently added internal hardware.
    3. Turn on the computer and repeatedly press the F11 key, about once every second, until Recovery Manager opens.
      Recovery Manager
    4. Under I need help immediately, click System Recovery.
    5. When System Recovery prompts you to back up your files, select a backup option:
      • If you have already backed up personal files or you do not want to back up personal files, select Recover without backing up your files, and then click Next. Continue to the next step.
      • If you want to back up your personal files, follow these steps to create a backup.
    1. Click OK in the warning that displays.
    2. After the system recovery is complete, click Finish to restart the computer. Complete the setup screens and wait until the computer finishes the setup.
    3. Once the setup is complete, turn off the computer, reconnect all devices and cables, and then turn on the computer.
    4. Before using the computer, update and protect your computer. Reinstall any virus and security software that was installed before the system recovery.
    5. Reinstall any software programs that were added after purchasing the computer, as well as any files that were backed up.

    Recovery from recovery discs

    Perform the following steps to recover the computer using a set of recovery discs (either CDs or DVDs). These discs can be a set that was received from HP Support or discs that you created.
    note:
    HP does not include recovery discs in the box its personal computers as the recovery software comes on the hard drive. You can obtain recovery discs from HP Support, or use Recovery Manager software to create a set of recovery discs yourself. HP recommends creating a set of recovery discs when you receive your computer and storing them in a safe place. Support Sent Recovery Discs can take as long as 4 to 6 hours to complete system recovery, but recovery discs that you create often take less time to complete system recovery. For more information about creating a set of recovery discs, see Creating Recovery Discs or Saving a Recovery Image to a USB Flash Drive in Windows 7.
    1. Turn on the computer, and then insert the first recovery disc into the drive.
    2. Press and hold the power button to turn off the computer.
    3. Disconnect all peripheral devices, except for the monitor, keyboard, mouse, and power cord. Remove media from internal drives, and then remove any recently added internal hardware.
    4. Turn on the computer.
    5. Immediately press the Escape key repeatedly, about once every second, until a Startup Menu or Select boot device menu opens.
    6. The selections you need to make vary slightly depending on the type of menu that displays on your screen:
      • If a Select Boot Device menu displays, use the up or down arrow key to select the CD/DVD drive, and then press Enter to continue.
      • If a Startup Menu opens, press F9 to open "Boot Menu" or "Boot Device Options". Use the up or down arrow key to select the CD/DVD drive. Then press Enter.
        note:
        More than one CD/DVD drive selection might be available from the list of bootable devices. If so, select one of the CD/DVD selections from the list to see if HP Recovery starts. If recovery does not start or a non-system disk error displays, restart the computer by pressing the power button and then repeat these steps to select another CD/DVD drive. When recovery starts, continue using the steps to complete recovery.
    7. A window might display and prompt you to choose whether to run Recovery Manager from the hard disk or from the disc inserted. If this window displays, select the Run program from disc, and then click Next.
    8. Select an option based on the type of recovery discs you have:
    • Recovery discs created from your computer:
    • Recovery discs received from HP support:
    • Select one of the following selections, depending on which selection is shown on your screen, and then click Next.
      • Factory Reset - Reset the computer by erasing the entire drive and restoring to the factory setup
      • Reset the computer by erasing the entire drive and restoring to the factory setup
      Recovery Manager with HP-sent recovery discs
  • When System Recovery prompts you to back up your files, select a backup option:
    • If you have already backed up personal files or you do not want to back up personal files, select Recover without backing up your files, and then click Next. Continue to the next step.
    • If you want to back up your personal files, follow these steps to create a backup.
    1. Click OK in the warning that displays.
    2. Read and respond to the screens as they display. If a screen prompts for a disc, insert the next disc. In some cases, you might have to repeatedly insert the same disc several times before the screen allows you to continue.
    3. After system recovery is complete, remove the disc. If the tray does not eject the disc, press the eject button on the PC case to eject the disc.
    4. If you are presented with a “Restoration complete” screen, click Finish.
      If you are presented with a “File copy is complete” screen, click Next.
    5. Depending on which model of computer you have, the computer either turns off or restarts. If the computer shuts off, wait 5 seconds and turn on the computer.
      note:
      If you are using Support Sent Recovery discs sent from HP, it can take more than an hour to complete the recovery process. Do not interrupt the recovery process. The recovery process is complete when the Windows Setup screens appear.
    6. Complete Windows setup when the screens appear.
    7. Once Windows setup has been completed, turn off the computer, reconnect all devices and cables, and then turn on the computer.
    8. Before using the computer, update and protect your computer. Reinstall any virus and security software that was installed before the system recovery.
    9. Reinstall any software programs that were added after purchasing the computer, as well as any files that were backed up.

    Boot from USB recovery drive

    Perform the following steps to recover the computer using a USB flash drive.
    note:
    For more information about saving a recovery image to a USB flash drive, see Creating Recovery Discs or Saving a Recovery Image to a USB Flash Drive in Windows 7.
    1. Turn on the computer, and insert the USB flash drive into a USB port.
    2. Turn off the computer by pressing and holding the power button.
    3. Disconnect all peripheral devices, except for the monitor, keyboard, mouse, and power cord. Remove media from internal drives, and remove any recently added internal hardware.
    4. Immediately press the Escape key repeatedly, about once every second, until a Startup or Select Boot Device Menu opens.
    5. The selections you need to make vary slightly depending on the type of menu that displays on your screen:
      • If a "Select Boot Device" menu displays, use the up or down arrow key to select your USB Storage Device, and press Enter to continue.
      • If a "Startup Menu" opens, press F9 to open the "Boot Menu" or "Boot Device Options". Use the up or down arrow key to select the name of your USB Storage Device (the volume label of the drive). Then press Enter to continue.
      Recovery Manager welcome
    6. A window might display and prompt you to choose whether to run Recovery Manager from the hard disk or from the media inserted. If this window displays, select the USB flash drive option, and then click Next.
    7. Click System Recovery under I need help immediately. On the next screen, select Yes to confirm that you want to restore your computer to its original factory condition, and then click Next to continue.
      Restore computer verification
    8. When System Recovery prompts you to back up your files, select a backup option:
      • If you have already backed up personal files or you do not want to back up personal files, select Recover without backing up your files, and then click Next. Continue to the next step.If you want to back up your personal files, follow these steps to create a backup.
      • Do you want to back up your files first?
  • Click Next. A message displays warning you that all devices should be disconnected from the PC. Be sure all devices, except the recovery flash drive, are disconnected, and then click OK.
  • Read and respond to the screens as they appear. After system recovery is complete, a “Restoration complete” screen displays.
  • Remove the USB flash drive from the USB port.
  • Click Finish to restart your computer.
  • Depending on the model of your computer, the computer either turns off or restarts. If the computer turns off, wait 5 seconds, and then turn on the computer.
  • Complete Windows setup when the screens appear.
  • Once Windows setup has been completed, turn off the computer, reconnect all devices and cables, and then turn on the computer.
  • Before using the computer, update and protect your computer. Reinstall any virus and security software that was installed before the system recovery.
  • Reinstall any software programs that were added after purchasing the computer, as well as any files that were backed up.