Monday, April 8, 2019

.Net framework 3.5 installation fails with error code: 0x800F0954


You may receive this error when trying to install DotNet3.5 (.net) on Windows 10 and you are using a WSUS server. This error may occur of the .net installer is not approved in WSUS.
As a temporary workaround, change the registry key “UseWUServer” to 0. It is located at:
HKEY_LOCAL_MACHINE\SOFTWARE\Policies\Microsoft\Windows\WindowsUpdate\AU

After the registry change, restart the Windows Update service. You should be able to install .net at this time. Once done you should change this key back to its original value (or wait and allow Group Policy to do it for you.)

Thursday, March 21, 2019

Configure Static IP Address on a Network Adapter using PowerShell

Configure Static IP using PowerShell

So let us dive right in. To start, make sure you open an administrator PowerShell window, otherwise you will get an Access is Denied error when trying to run the command below.
We will be using two PowerShell commands, New-NetIPAddress and Set-DNSClientServerAddress.
On the server that we want to configure, we open PowerShell and type the below command:
New-NetIPAddress –IPAddress  -DefaultGateway  -PrefixLength  -InterfaceIndex (Get-NetAdapter).InterfaceIndex
Here is an example below:

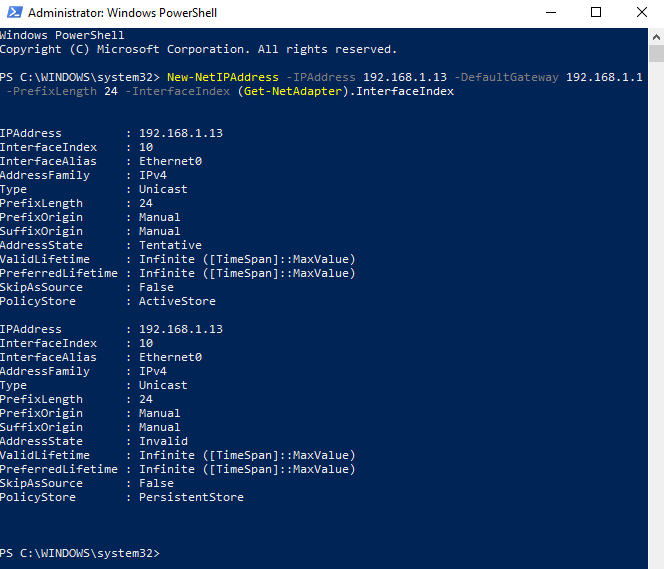
New-NetIPAddress –IPAddress 192.168.1.13 -DefaultGateway 192.168.1.1 -PrefixLength 24 -InterfaceIndex (Get-NetAdapter).InterfaceIndex
All the arguments are self-explanatory, apart from the InterfaceIndex one. Over here instead of putting in the numerical value of the Interface Index, I just ran the Get-NetAdapter command inside my current command with filtering to output only the integer value of the Interface Index.
If you have multiple network adapters on your system, you can remove the function and simply enter the numerical value corresponding to the desired interface.
If the command completes successfully, we should get the result as shown below:

Now we have our IP Address, Subnet Mask and Default Gateway configured. However, one thing is missing. These are the DNS Server addresses.
To configure the DNS Server addresses, we run the following command:
Set-DNSClientServerAddress –InterfaceIndex (Get-NetAdapter).InterfaceIndex –ServerAddresses ,, etc.
IP1 is the primary DNS Server, IP2 is the secondary and all the others are the third and so forth.
Here is an example:

Set-DNSClientServerAdress –InterfaceIndex (Get-NetAdapter).InterfaceIndex –ServerAddresses 192.1.68.1.1


Wednesday, February 20, 2019

How To Fix Outlook 2013 Search Problems

Has your Outlook 2013 search suddenly stopped working? You keep typing different words and phrases, but it does not make a difference. Everything you type in Outlook search comes up with zero results.

You’ll probably see a message that says “We couldn’t find what you were looking for.”  There’s also a chance that you can see very few results, and if you take a look at the indexing status dialog in Outlook, you will possibly see the following message: “Search results may be incomplete because items are still being indexed.”

What Causes Outlook 2013 Search Problems?

When it comes to Outlook 2013 Search not working, you will quickly discover that this is a common issue across the board with Outlook users, so don’t blame yourself. Of course there are some preventative measures you could take to help keep away any Outlook 2013 search problem, but with constant use, there’s a chance something will go wrong down the line. When you rebuild a PST file, add more mailboxes, or even just migrate emails, your search index may not update and that will kick off an Outlook 2013 search problem. Not to worry, there are things you can do to fix those issues.

Step 1: Verify that indexing is working

Outlook 2013 search indexing status
To verify that indexing in Outlook 2013 is working properly, use the following steps:
  • Click in the Search box
  • In the Search tab, select Search Tools and then click Indexing Status
  • When the indexing status dialog emerges, you might see the following:
Outlook 2013 indexing status
If you see this message, it means that the index is complete, and Outlook can’t find your item for some other reason.
If Outlook has not finished indexing all of your items, you’ll see a message that says:
Search results may be incomplete because items are still being indexed.
If you see this message, take note of the number of files remaining to be indexed, wait five to ten minutes and then check again. If you still can’t find your files, try removing then adding your Outlook files to the Windows index.

Step 2: Remove Outlook from the Windows Index:

  • Go to File > Options
  • In Search settings, click Indexing Options…
  • Click Modify
  • Un-check Microsoft Outlook from the list of Indexed Locations
  • Close Outlook completely and check the Task Manager (ctrl+alt+del) to see if no Outlook processes are running
Remove Outlook from Windows Indexing

Step 3: Make Sure Outlook Files can be Indexed

Outlook PST and OST files are indexed by Windows by default, but it may be that something strange happened during an update to either Windows or Outlook that caused this not to be the case. In order for Outlook to be able to search your emails, the contents of those emails must be allowed to be indexed by Windows. Here’s how to check:
  • Find the location of your PST or OST files
    • Go to File > Account Settings > Account Settings
    • Click on the Data Files tab
    • Select your Outlook file from the list and click Open File Location…
Outlook 2013 account settings
  • Right click on the .pst or .ost file and click Properties
  • Click Advanced
  • Make sure that the box next to ‘Allow this file to have contents indexed in addition to file’ is checked.
  • Click OK
Allow Outlook contents to be indexed

Step 4: Add Outlook to the Windows Index

Follow the steps outlined in step 2. Make sure this time that the box next to Microsoft Outlook is checked.
Give Outlook a little time to check the state of the indexing. It may be that it needs to add new items to the index. After a few minutes, you can try searching again.

Last Resort: Rebuild the Index in Outlook 2013

If you still can’t find the email you’re looking for, there may be a problem with your index. Rebuilding the index in Outlook 2013 isn’t too difficult, only time consuming. Here’s how to rebuild:
  • In Outlook 2013 click on the File tab, then click Options > Search
  • Click Indexing Options
  • You should now see what locations are being indexed. Click Advanced
  • Under Troubleshooting, click Rebuild
  • Rebuilding will take some time so make sure to leave your PC running for a while, preferably when you don’t need to work with it since indexing can impact the speed of your computer.
Outlook 2013 rebuild index
Often when you move emails around a lot, or just generally use Outlook for a long time, you’re likely to run into indexing issues. These few steps will help you get Outlook 2013 search back into shape.

Offline Files and Continuous Availability: the monstrous union you should not consecrate

The difference between Windows 8 and Windows 10

Windows 8.1 and Windows 10 support SMB3, allowing them to utilize CA, transparent failover, and Scale-out File Servers. But due to the aforementioned timeout problem that many customers reported, we decided in Windows 10 to fix the glitch.

Starting in Win10, when you connect to a CA-enabled share, there is no longer an option to use offline files. No matter the settings, files will not cache and the user will not run into timeout problems.
image
When you mark a share as “continuously available” you are essentially committing to the following contract:
  1. The SMB server must always be available.
  2. Any data written to the server needs durable persistence on disk and must be resilient to disk failures.
  3. The network between the client and the server is expected to be fault tolerant and high speed.
The CA feature tries to hide transient failures at any of the above three interfaces from applications by holding and resuming handles. Remember, it’s for high-throughput, high-availability, high-IO, mission critical server applications like SQL Server and Hyper-V. #3 above directly conflicts with “offline files” – which assumes flakey, slow, and intermittent network connectivity.
Naturally, this decision to change the behavior in Win10 may not make your day, which leads me to:

A variety of alternatives

  • Use Work Folders. The future is definitely Work Folders. CSC hasn’t had a feature update since Windows 8, and that should be a strong sign that it probably never will. We have moved into a new phase, where users want to sync their data from PCs, phones, and tablets – and not necessarily all running Windows nor SMB. Work Folders brings all that to the table, and is actively under development and accepting feedback. Heck, Jane the Work Folders PM wrote about it constantly. She never sleeps.
  • Just use CA. If you are looking for data consistency and transparent failover for non-mobile users, stop using CSC. Disable it on all your CA shares using Server Manager, Failover Cluster Manager or Set-SmbShare:
image
image
  • Just use CSC. If you are looking for mobile user and crumbling network support, stop using CA. Disable it on your shares using Server Manager, Failover Cluster Manager, Set-SmbShare, or Explorer:
image
image
  • Use a two-share combination. If you have a hybrid set of mobile users and desktop users all accessing the same data, nothing is stopping you from creating two shares to the same data – one with CA enabled and one with CSC enabled. Then your users can select the share that matches their needs.
image
imageimage

The future

We heard the Windows 8.1 feedback and changed the behavior in Windows 10 to stop the timeout issue. We then had feedback from Windows 10 customers that wanted it back the old way. So we decided to add this ability back into a future release of Windows 10; look for it here in group policy:


Software\Policies\Microsoft\Windows\LanmanWorkstation\AllowOfflineFilesforCAShares

Sunday, February 3, 2019

Split-Brain DNS Deployment Using Windows DNS Server Policies

A DNS deployment is said to be split-brain (or split-horizon) when there are two versions of a single zone, one for the internal users and one for the external users – typically users on the public internet. For Windows DNS server based deployments, such scenarios called for maintaining two different DNS servers, each catering to a different set of the users. If only a few records inside the zone were split brained or both instances of the zone (internal and external) were delegated to same parent domain this became a management conundrum.
Another variant of the split brain deployment is the selective recursion control for DNS name resolution. Sometimes the enterprise DNS servers are expected to perform recursive resolution over internet for the internal users; while they have to act as a pure name servers (authoritative) for external users and block recursion for them. Here we shall see how these two scenarios can be accomplished using DNS policies.

Two versions of the same zone

Suppose the career website of contoso.com is hosted at www.career.contoso.com . The site has two versions, one for the internal users where internal job postings are available and is available on a local IP 10.0.0.39. The public version of the same site is available on public IP 65.55.39.10. In absence of DNS policies, the administrator had to host these two zones on separate Windows DNS servers and manage them separately. Using DNS policies these zones can now be hosted on the same DNS server.
If the nameserver hosting contoso.com zone is listening on two network interfaces; one with a public IP of 208.84.0.53 for external queries and another with a private IP 10.0.0.56 for internal queries then the administrator can follow these steps to achieve this split brain deployment
* All IPs and names are purely representational

  
Create the Scopes of the Zone
Partition the zone contoso.com to create an internal zone scope. A zone scope is a unique instance of the zone. A DNS zone can have multiple zone scopes, with each zone scope containing its own set of DNS records. The same record can be present in multiple scopes, with different IP addresses.
The internal zone scope will be used to keep the internal version of www.career.contoso.com
Add-DnsServerZoneScope -ZoneName "contoso.com" -Name "internal"
By default a zone scope exists on the DNS zones. This zone scope has the same name as the zone and legacy DNS operations work on this scope. This default zone scope will host the external version of www.career.contoso.com
Add Records to the Zone Scopes
The next step is to add the records representing the web server host into the two zone scopes- internal and default (for external clients). In internal, the record www.career.contoso.com is added with IP address 10.0.0.39, which is a private IP; and in default zone scope the same record (www.career.contoso.com) is added with IP address 65.55.39.10.

Add-DnsServerResourceRecord -ZoneName "contoso.com" -A -Name "www.career" -IPv4Address "65.55.39.10" 
Add-DnsServerResourceRecord -ZoneName "contoso.com" -A -Name "www.career" -IPv4Address "10.0.0.39” -ZoneScope "internal"
Note that no –ZoneScope parameter has been provided when record is being added in default zone scope. This is same as adding records to a vanilla zone.
Create the Policies
Once the server interfaces for external network and internal network have been identified; and the partitions (zone scopes) have been created, the next step is to create policies that connect these two, in a way that when the query is received on private interface, the answer is returned form the internal scope of the zone. No policies are required for mapping default zone scope. 
Add-DnsServerQueryResolutionPolicy -Name "SplitBrainZonePolicy" -Action ALLOW -ServerInterface "eq,10.0.0.56" -ZoneScope "internal,1" -ZoneName contoso.com
* 10.0.0.56 is the IP on the private network interface.
How it all works
Now the DNS server has been configured with the required policies. When a name resolution query is incident on the DNS server so configured, each name resolution request is evaluated against the policies on the DNS server. If the server interface on which the query has been received matches any of the policy, the associated zone scope is used to respond to the query. So, in our example, the DNS queries for www.career.contoso.com  that are received on from private IP (10.0.0.56) are responded with an internal IP address; and the DNS queries that are received on the public network interface are responded with the public IP address in the default zone scope (this is same as normal query resolution).  

Selective Recursion Control

In the previous example, the same DNS server is serving both the external and internal clients and respond back with different answers. Certain deployments may require the same DNS server to perform recursive name resolution for the internal clients apart from acting as authoritative nameserver for contoso.com. For this, the recursion has to be enabled on the DNS server. But as the DNS server is also listening to the external queries, the recursion is also enabled for external clients and the DNS server becomes what is known as an open resolver. This makes the server vulnerable to resource exhaustion and can be abused by malicious clients to create reflection attacks. There is no reason why contoso.com’s DNS server should perform recursive name resolution for external clients. Essentially there is a need of recursion control such that the recursion is allowed for internal clients while blocked for external clients.

This can be achieved in following steps
Create Recursion Scopes
Recursion scopes are unique instances of a group of settings that control recursion on a DNS server. A recursion scope contains a list of forwarders and specifies whether recursion is enabled. A DNS server can have many recursion scopes.
The legacy recursion setting and list of forwarders are now referred as the default recursion scope. You cannot add or remove the default recursion scope, identified by the name “.” (Dot).
In this example, the default recursion setting is being disabled, while a new recursion scope for internal clients is being created where recursion is being enabled.

Set-DnsServerRecursionScope -Name . -EnableRecursion $False
Add-DnsServerRecursionScope -Name "InternalClients" -EnableRecursion $True 


Create Recursion Policies

DNS server recursion policies can be created to choose a recursion scope for a set of queries matching certain criteria. If the DNS server is not authoritative for those queries, these policies allow admin to control how to resolve those queries.  Here the internal recursion scope which has recursion enabled is being associated with private network interface

Add-DnsServerQueryResolutionPolicy -Name "SplitBrainRecursionPolicy" -Action ALLOW -ApplyOnRecursion -RecursionScope "InternalClients" -ServerInterfaceIP  "EQ,10.0.0.39"

 In both the examples ServerInterface has been taken as a criteria. Sometimes the split-brain may be required to be deployed on the basis of source client subnet. That can also be achieved using the client subnet criteria. (See how to use client subnet for traffic management)

How it all works

If a query for which the DNS server is non-authoritative is received, i.e. say for www.microsoft.com, then the name resolution request is evaluated against the policies on the DNS server. As these queries do not fall under any zone, the zone level policies (as defined in first case above) are not evaluated. The recursion level policies are evaluated and those queries which are received on private interface match the SplitBrainRecursionPolicy which points to a recursion scope where recursion has been enabled. The DNS server then performs recursion to get the answer for www.microsoft.com from internet and caches it locally. On the other hand if the query is received on the external interface, no policies match and default recursion setting (in this case disabled) is applied, preventing the server from acting as open resolver for external clients while it is acting as a caching resolver for internal clients. 

Thursday, January 17, 2019

V-79-57344-33859 - One or more SQL Database consistency checks have failed" appears in the backup job log while backing up Microsoft SQL Server or SQL databases

Problem

Error "0xe0008443 - One or more SQL Database consistency checks have failed" appears in the backup job log while backing up Microsoft SQL Server or SQL databases.

Error Message

Final error: 0xe0008443 - One or more SQL Database consistency checks have failed.
Final error category: Resource Errors
For additional information regarding this error refer to link V-79-57344-33859
The job log also reports the following error:
              "An unknown or unexpected database error occurred while attempting a DBCC."
V-79-65323-3224 - An error occurred on a query to database

Cause

SQL has found some inconsistencies with the database/s mentioned in the job log.

Solution

Backup Exec has the ability to check the logical and physical consistency of SQL data before and/or after a backup. SQL reports any consistency check failures in the Backup Exec job log. Veritas recommends running consistency checks either before or after SQL backups.
 
Backup Exec's backup job definition uses a 'Physical_Only' SQL consistency check before backup by default. Full checks with/without indexes are also options.  Additionally, by default a backup job will continue even if the DBCC fails.  Confirm this setting in the job definition per Figure 1 below.

The consistency check that is run is actually a part of the SQL program and Backup Exec merely triggers the consistency check. If errors are reported, try running the DBCCs manually through SQL.
How  to check the Database consistency in SQL:
1. Open SQL Management Studio and connect to the SQL instance
2. Click on "New Query".
3. Type the following commands and click on "Execute"
use DatabaseName
dbcc checkdb
Note: DatabaseName is the name of the database that is visible in the Job log of the failed SQL job.
For more information, see the Microsoft SQL Server documentation.
The results will show you if SQL has encountered any inconsistencies or not. If inconsistencies are encountered, please contact your SQL Administrator to resolve the inconsistencies.


          Figure 1

         Image
   

CodeTwo Backup User's manual

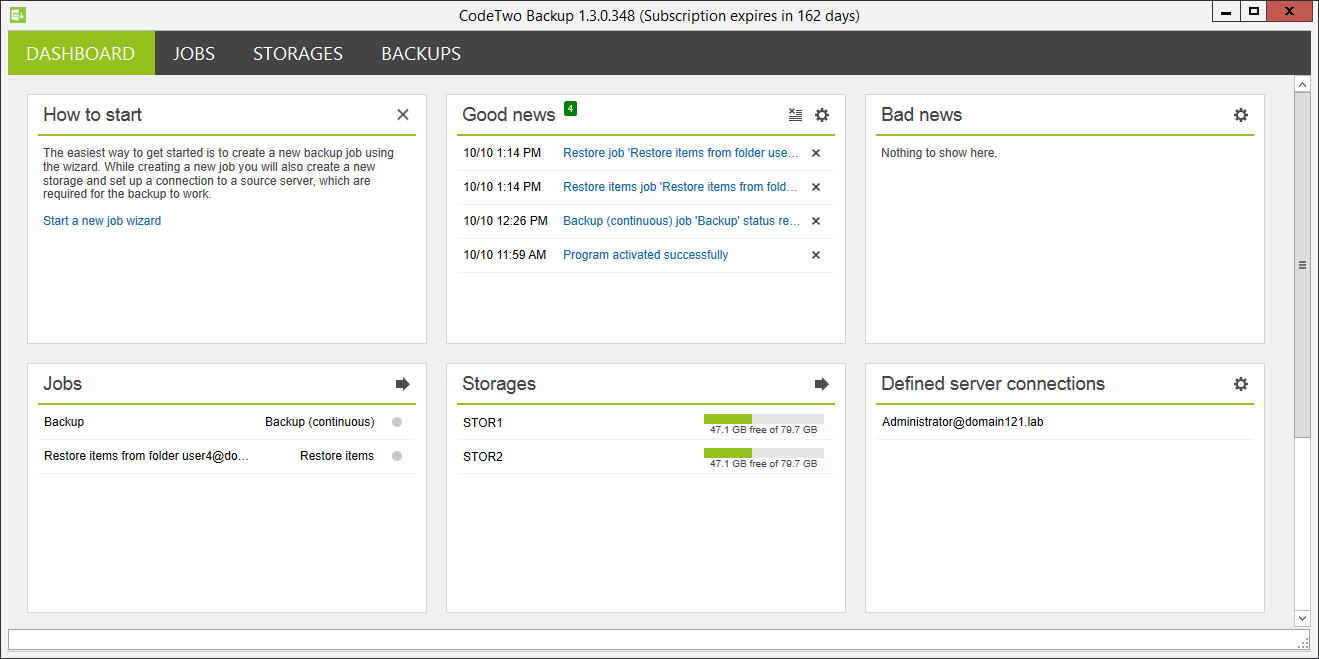
The Dashboard tab lets you monitor the operation of the program and navigate to other tabs or cards. It also allows you to control some of the functions of the program, including jobs, storages, server connections, and alerts. The Dashboard tab consists of  the following cards:
  • Good news or Bad news - show all important notifications or alerts regarding the program's operation, such as jobs' status, start and stop information, or cycle time, the number of failed items per the backup job, free storage space, jobs blocked by other jobs, etc.
  • Jobs - shows a list of jobs and their current status,
  • Storages - shows a list of storages and their available space,
  • Defined server connections - shows a list of servers admins' UPNs or email addresses used for establishing a connection with Office 365 or on-premises Exchange Servers,
  • Help - consists of links that allow you to check for program's updates, open the program's user's manual or website, open a quick tour guide, contact Customer Support, or view the licensing status.
Backup - dashboard
Fig. 1. The Dashboard view.

Alerts: Good news and Bad news

The program constantly reports various alerts, which are divided into two sections: Good news and Bad news. On the Good news card, you may encounter information regarding running jobs and the licensing. The Bad news card shows errors and warnings that may appear while different jobs are running. You can also customize what information will be displayed on the Dashboard tab or decide to deliver some of the notification types directly to a specific email address. This can be done by using a dedicated window, opened via the settings (Backup - Icon.) button located on both Good news and Bad news cards (Fig. 2.).
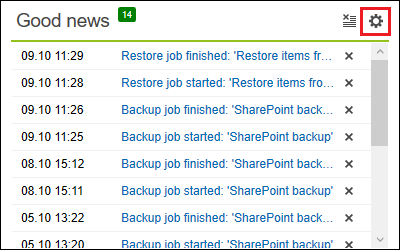
Backup good news settings button
Fig. 2. The settings button on the Good news card.
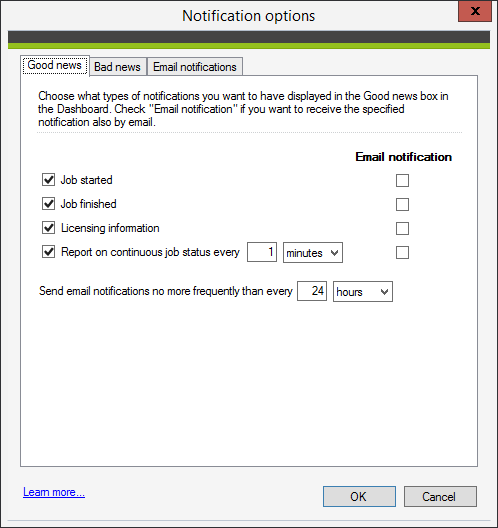
To enable or disable alert notification for the type of alert of your choice, simply select or clear, respectively, a checkbox on the left of the desired option (Fig. 3.). Similarly, to enable or disable email notifications, do the same in the Email notification column, on the right side of the window. To avoid the flood of emails in recipients' mailboxes, you can specify how frequently these messages will be sent.
Backup - notification options
Fig. 3. An example of alerts' settings.
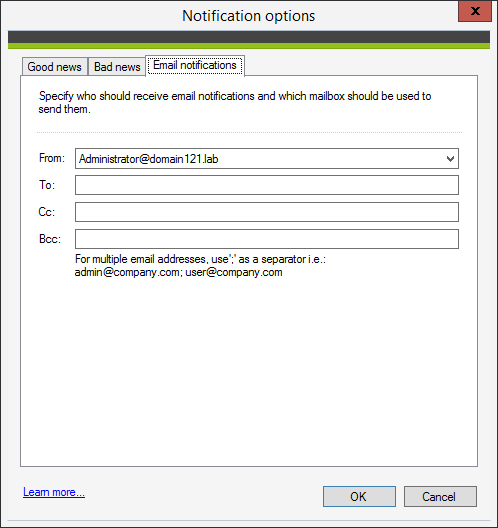
To specify the recipients of these alerts, go to the Email notifications tab (Fig. 4.). Select a configured Exchange connection from the drop-down menu in the From field. All email notifications will be sent from this email address. If you need to configure a new connection, select Manage Exchange connections instead.
Backup - email notifications options
Fig. 4. The Email notifications tab.
Warning
Note that the recipients of these email notifications cannot unsubscribe from receiving these messages on their own. Only admins with the access to the CodeTwo Backup Administration Panel can do that. Make sure not to add to the recipients' list users who might not be interested in receiving mail notifications.
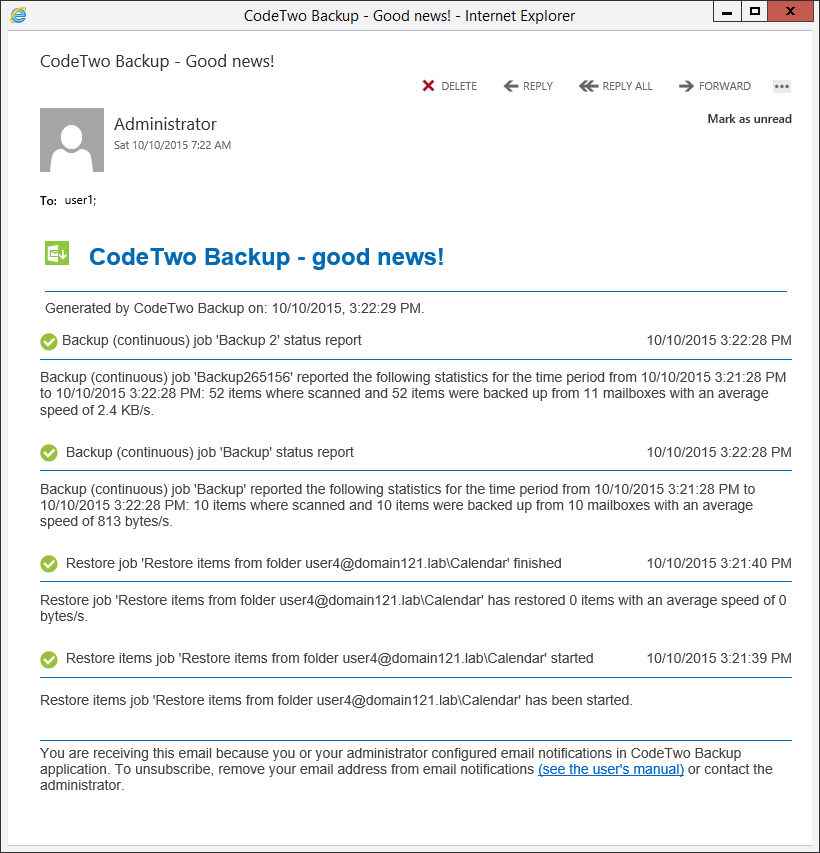
This feature will be activated once the first alert of any type is registered. When this happens, the software will collect other alerts for the specified period of time, after which all alerts will be sent together in one email (Fig. 5.).
Backup - notification email example
Fig. 5. An example of an email with alerts.

Types of dashboard alerts

Despite the alerts are divided into Good news and Bad news, there are two types of alerts displayed in the dashboard:
  • One-time - these alerts show up every time after an issue is encountered during jobs' operation or there is an important information to report. Therefore, they stay on the list until you remove them manually.
  • Permanent - these alerts show up only once per a particular job after an issue is encountered. Therefore, they stay on the list until the problem is resolved, and you cannot remove them manually.
Please study the tables below to learn more about what different alerts refer to.

Good news

Alert message Description Alert type
Job started
A job has properly started.
One-time
Job finished A one-time job has successfully finished all operations. One-time
Licensing information Trial and activation status.
One-time
Job status A continuous job status report. This alert is constantly reported by the desired amount of time, not after finishing a cycle. This behavior is by design, considering reporting completion of fairly short jobs cycles might cause flooding the Good news card.
One-time

Bad news

Alert message Description Alert type
Job failed
The program cannot execute jobs because there is a problem with starting them or the backup or restore process was interrupted. It may show up if there is a problem with a server connection or Storage failure. Information in this alert includes the cumulative description of all issues encountered while trying to execute jobs.
One-time
Failed mailbox
The program cannot process mailboxes. This alert contains a cumulative history of all jobs' cycles during which the program failed to process at least one mailbox. The history includes a list of unprocessed mailboxes with descriptions of the cause of failures.
One-time 
Failed messages
The program cannot process particular items. This alert contains a cumulative history of all jobs during which the program failed to process items. The history includes a list of issues regarding unprocessed folders and items while pushing data to target mailboxes or pulling data from source mailboxes. You can customize this alert to show up if the number of failed items is greater than the defined value. This setting is common for all jobs of both types (backup and restore).
One-time 
Job overtime
A single job cycle lasts longer than it was defined in the alert's options.
One-time 
Job blocked
One restore job was temporarily blocked by another job. This alert shows up if jobs are using the same data at the same time. Learn how the program resolves jobs' conflicts
Permanent 
Storage space
One or multiple Storages are running out of memory to save source data. This alert contains cumulative information regarding all Storages encountering free space issue. You can customize when this alert shows up by defining the value of a free space left. This setting is common for all Storages defined in the program.
Permanent 
Storage error
The program encounters a problem with communicating with Storage. It may show up if Storage is removed from the program or deleted from the local resources. Learn how to mount Storage to the program
Permanent 
Trial limitations
The program cannot restore all data in the trial version. This alert indicates that the number of items being currently restored exceeds the trial version limitations.
One-time 
No free license seats
The program tries to back up data for more source mailboxes than the number of available license seats. In such a case, the program backs up data only from the number of source mailboxes corresponding to the purchased license seats. Learn how to extend the license
One-time 
Retention failure occurred
The program failed at executing configured retention rules for Storage, Archive or PST Archive Jobs.
One-time 
Indexer failure occurred
The Indexer has registered a problem.
One-time 
Info
Note that each alert message is preceded by the exact date and time an issue was encountered.

Software's windows settings


CodeTwo Backup saves your current windows arrangement at the time of application closing, so the next time you open it, the software would bring all the windows back to the same positions and sizes. In case you ever need to reset this view you can do this by starting the software's executable with the resetsettings parameter.