Thursday, August 11, 2022

Implementing DNS Security in Windows Server 2016

 A number of options are available for protecting the DNS server, including :

• DNS cache locking
• DNS socket pool
• DNSSEC

Before we start the step by step to implement the DNS Security, lets go through a theory behind this technology.

DNS Cache Locking

Cache locking is a Windows Server 2016 security feature that allows you to control when information in the DNS cache can be overwritten. When a recursive DNS server responds to a query, it caches the results so that it can respond quickly if it receives another query requesting the same information. The period of time the DNS server keeps information in its cache is determined by the Time to Live (TTL) value for a resource record.

DNS Socket Pool

The DNS socket pool enables a DNS server to use source port randomization when it issues DNS queries. When the DNS service starts, the server chooses a source port from a pool of sockets that are available for issuing queries. Instead of using a predicable source port, the DNS server uses a random port number that it selects from the DNS socket pool. The DNS socket pool makes cache-tampering attacks more difficult because a malicious user must correctly guess both the source port of a DNS query and a random transaction ID to successfully run the attack. The DNS socket pool is enabled by default in Windows Server 2016

DNSSEC

DNSSEC enables a DNS zone and all records in the zone to be signed cryptographically so that client computers can validate the DNS response. DNS is often subject to various attacks, such as spoofing and cache-tampering. DNSSEC helps protect against these threats and provides a more secure DNS infrastructure.

So now, lets go through a simple step how you as Server Administrator can implement DNS Security.

01 – Step to configure DNSSEC

1 – Open Server Manager,  click Tools and open DNS Manager.
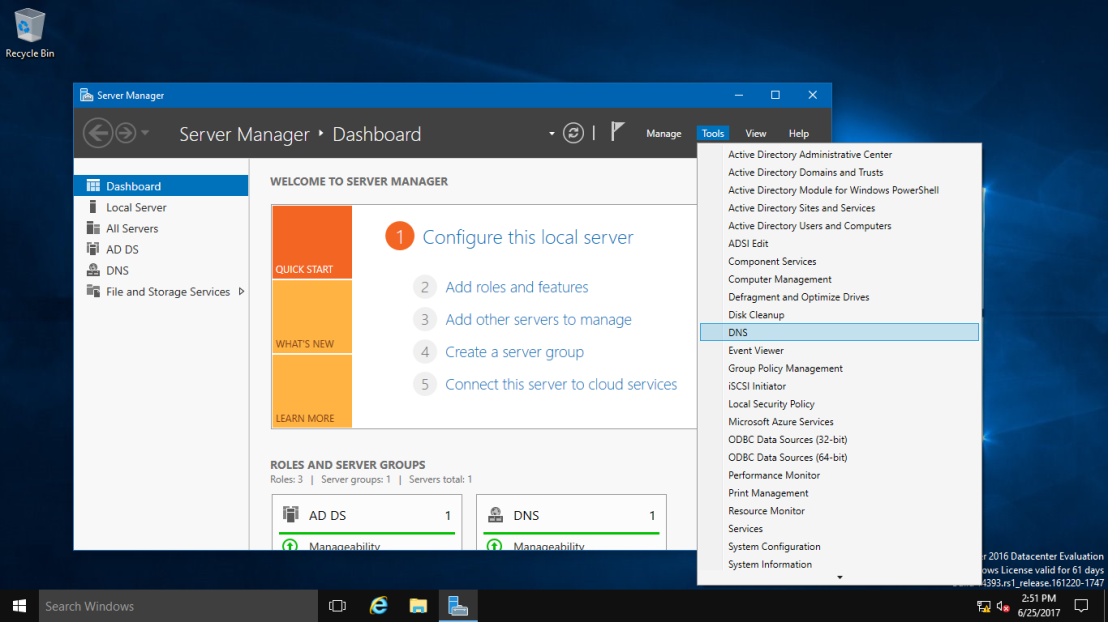
2

2 – In the DNS Manager, browse to your Domain name, then right click domain name, click DNSSEC and then click Sign the Zone.
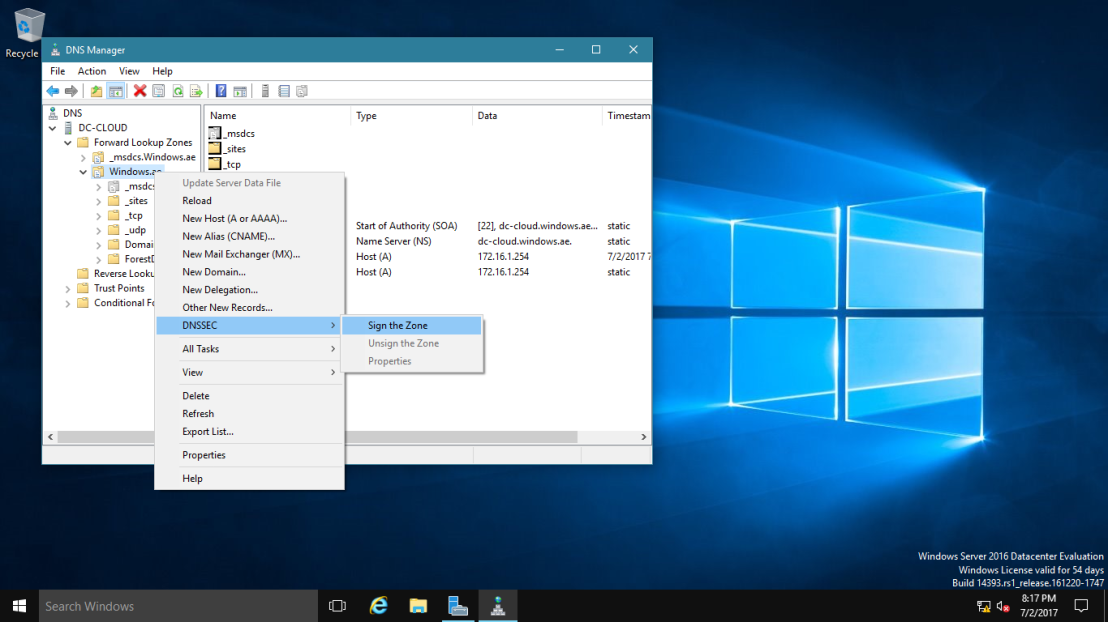
1.png


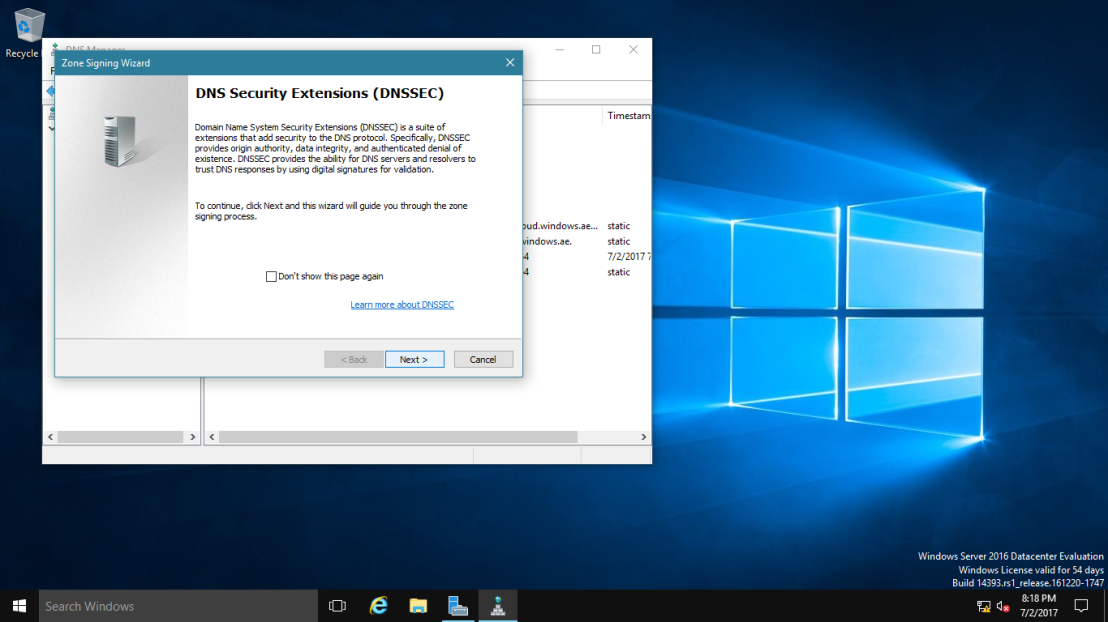
2 – In the Zone Signing Wizard interface, click Next.
2.png

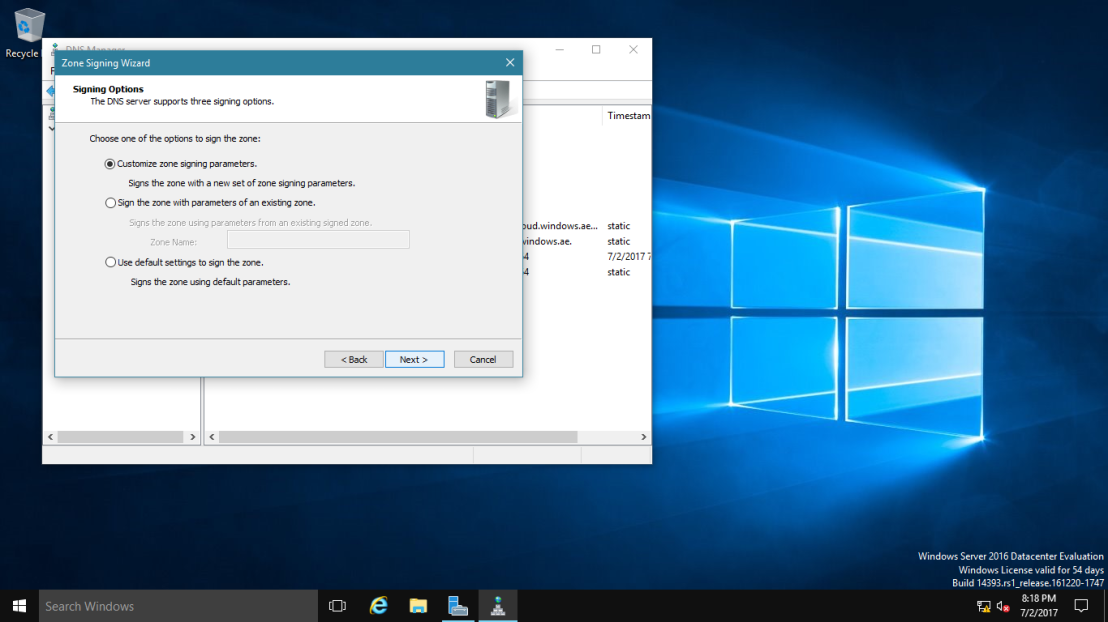
3 – On the Signing options interface, click Customize zone signing parameters, and then click Next.
3.png


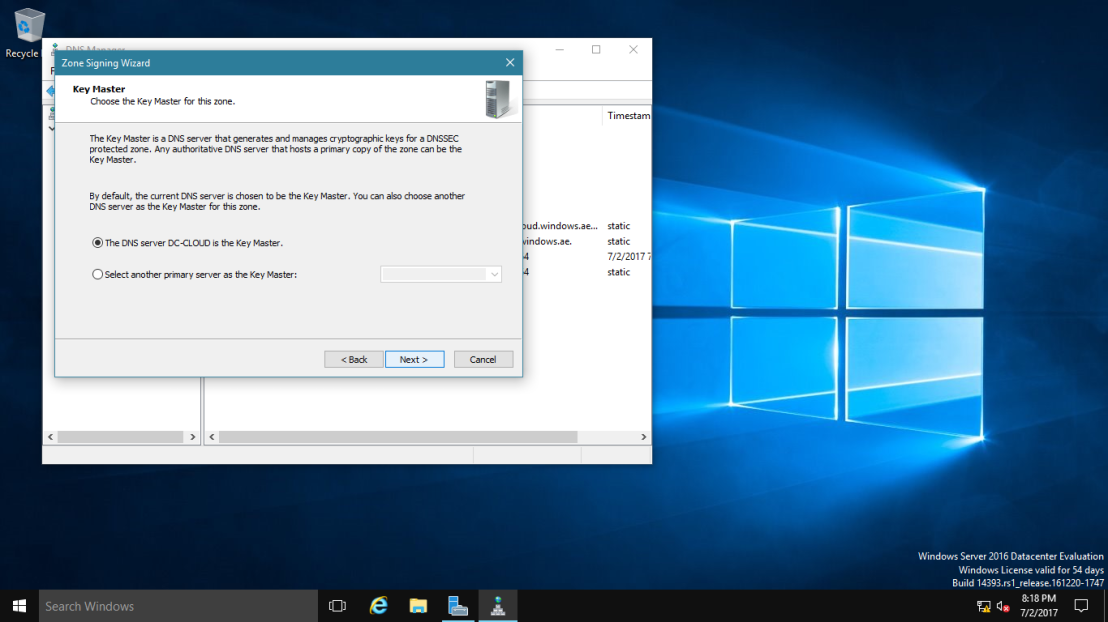
4 – On the Key Master interface, ensure that “The DNS server CLOUD-SERVER is selected as the Key Master“, and then click Next.
4.png

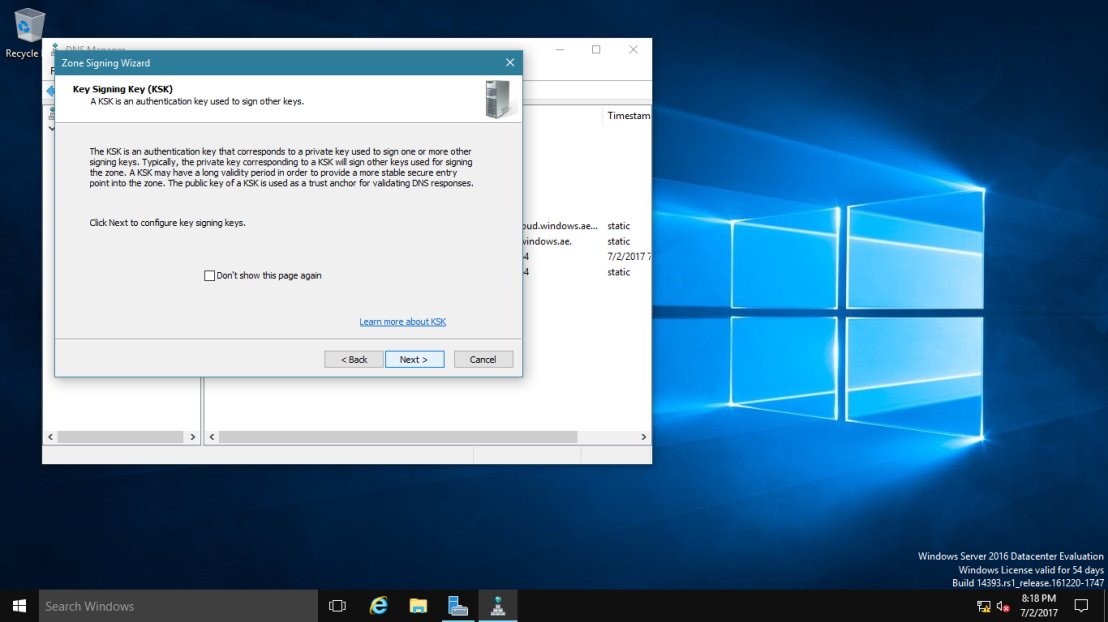
5 – On the Key Signing Key (KSK) interface, click Next.
5.png


6 – On the Key Signing Key (KSK) interface, click Add.
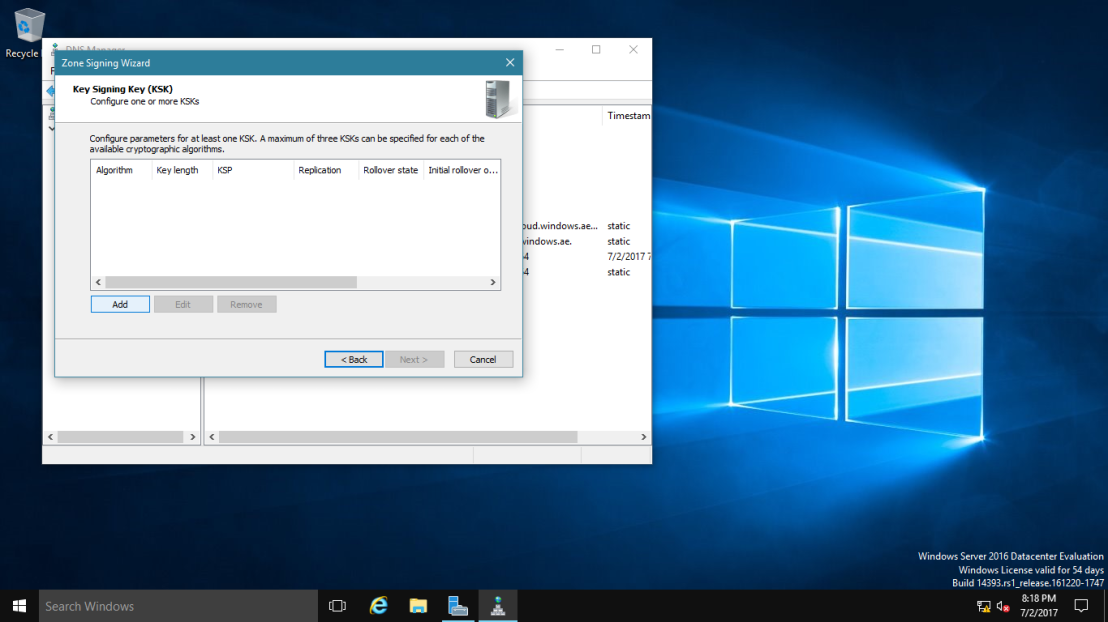
6.png

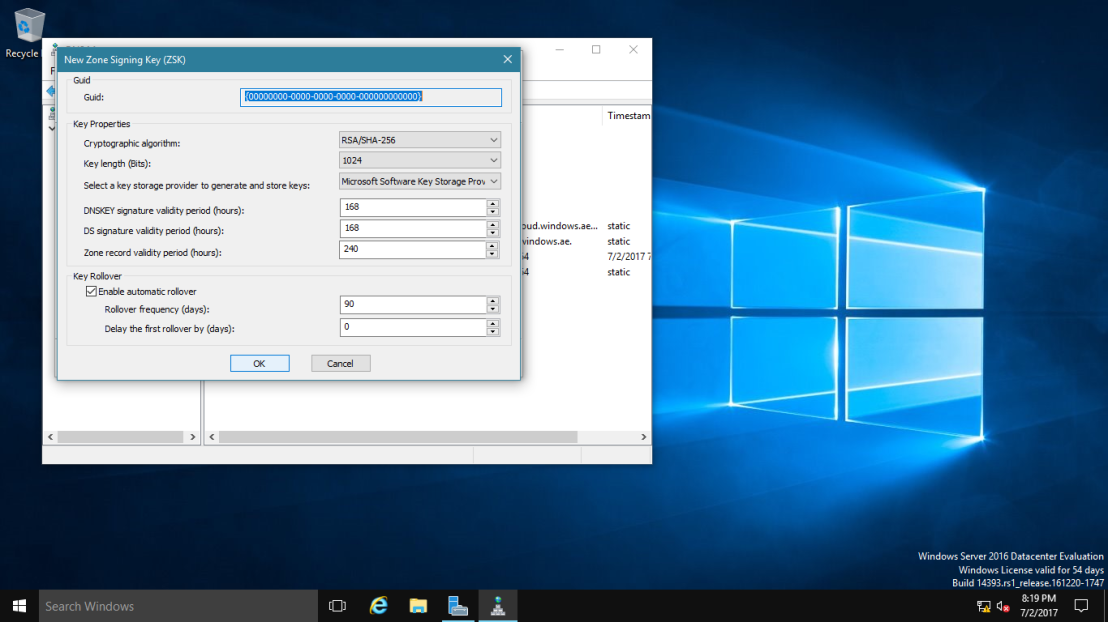
7 – On the New Key Signing Key (KSK) interface, click OK.

~*~ please spend some time to go through about key properties on the New Key Signing Key (KSK) interface.
10.png

8 – On the Key Signing Key (KSK) interface, click Next.

11.png

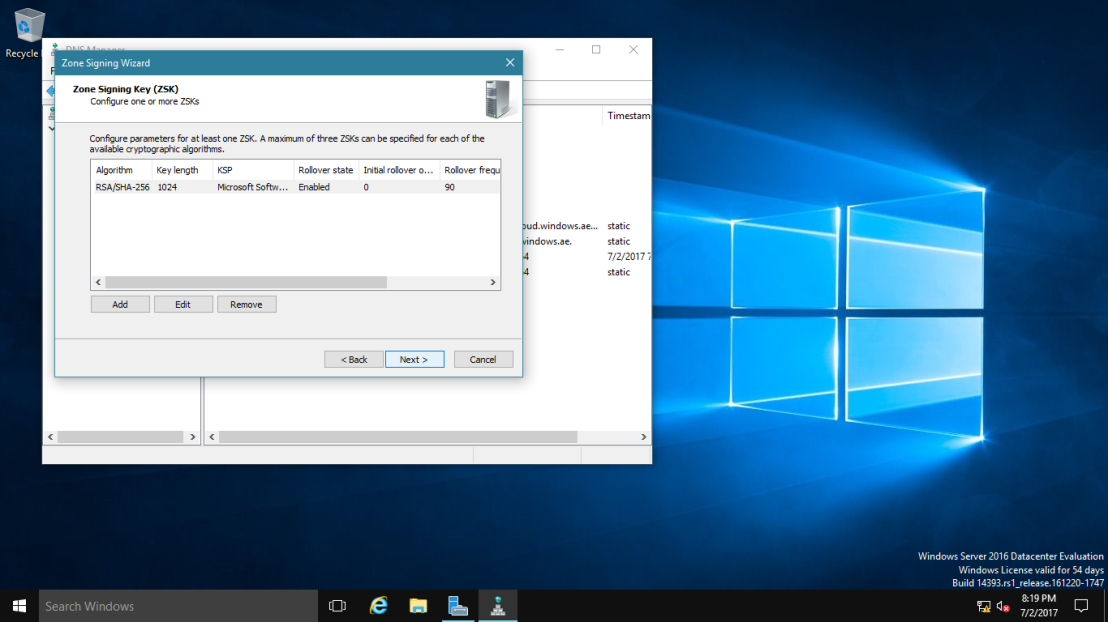
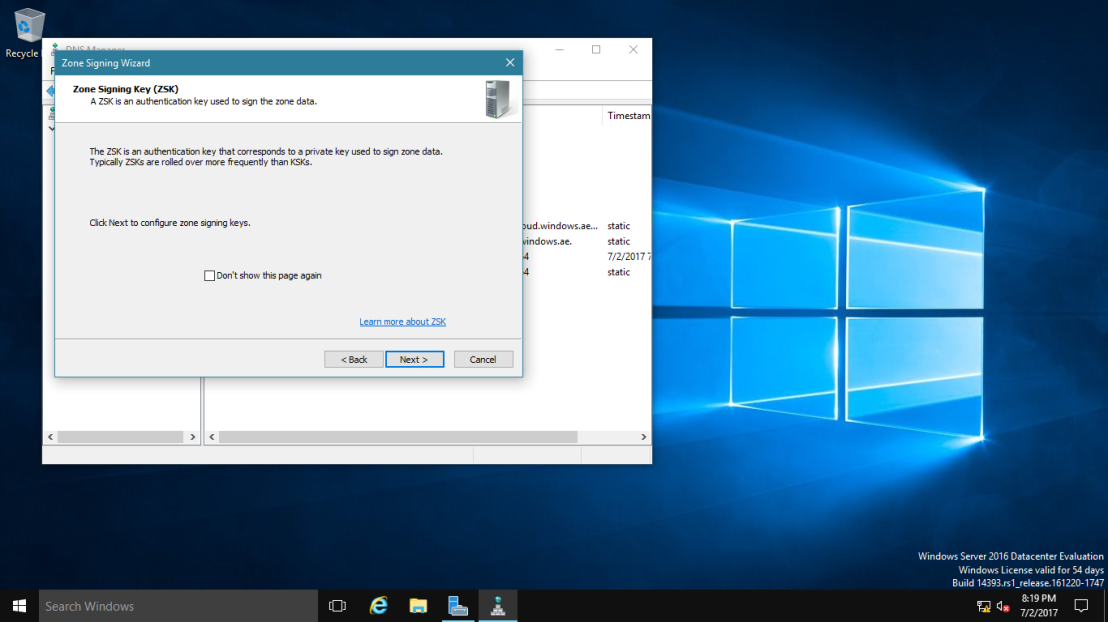
9 – On the Zone Signing Key (ZSK) interface, click Next.
9.png


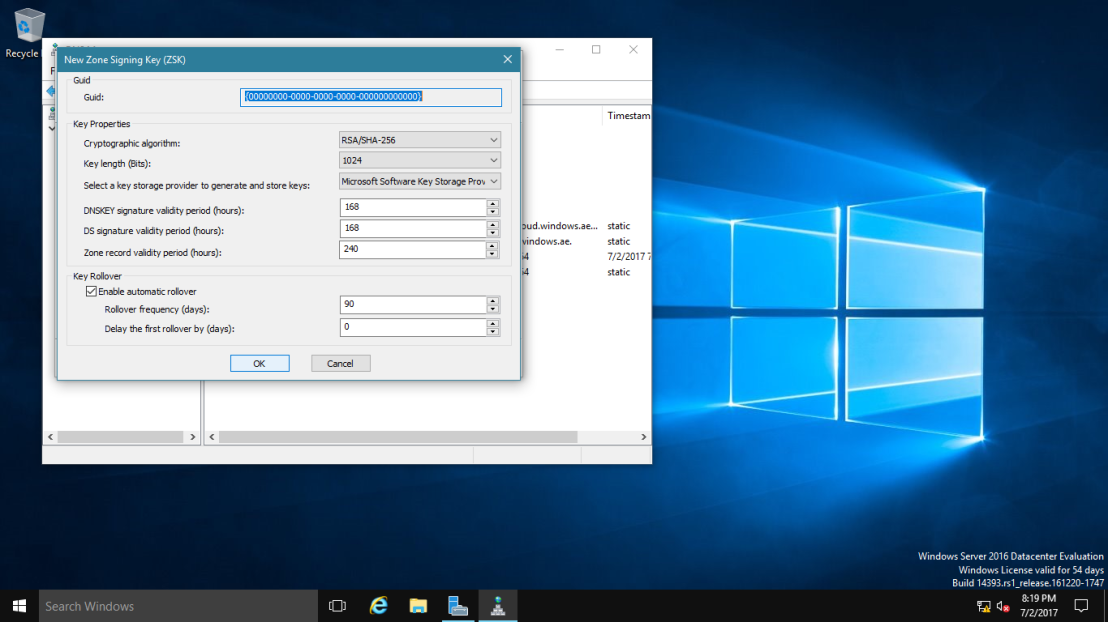
10 – On the Zone Signing Key (ZSK) interface, click Add.
10.png

11 – On the New Zone Signing Key (ZSK) interface, click OK.
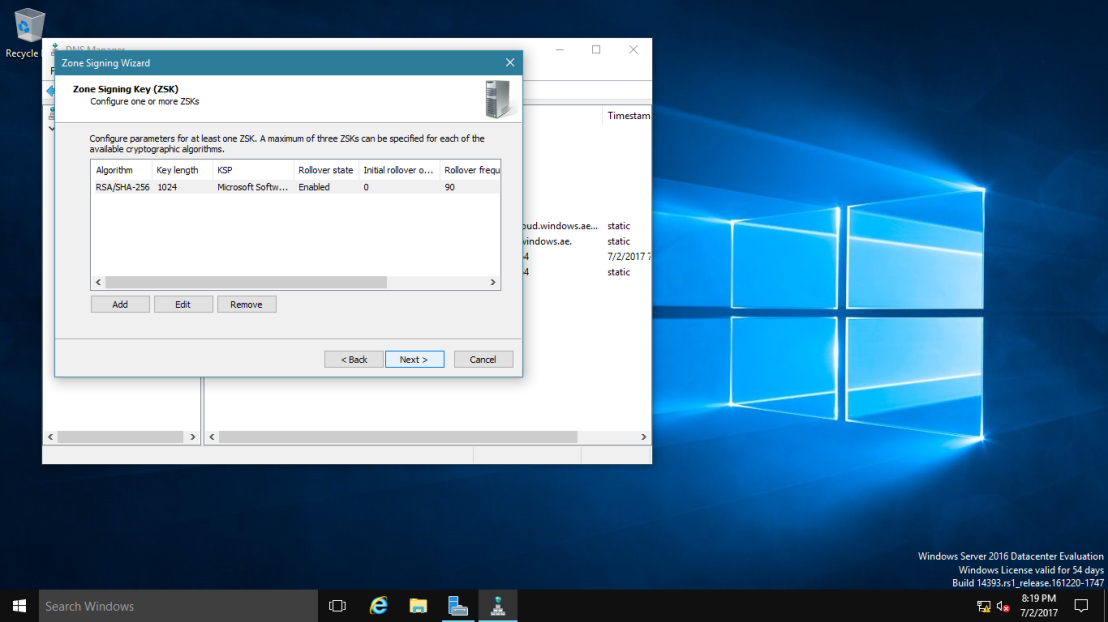
11.png

12 – On the Zone Signing Key (ZSK) interface, click Next.
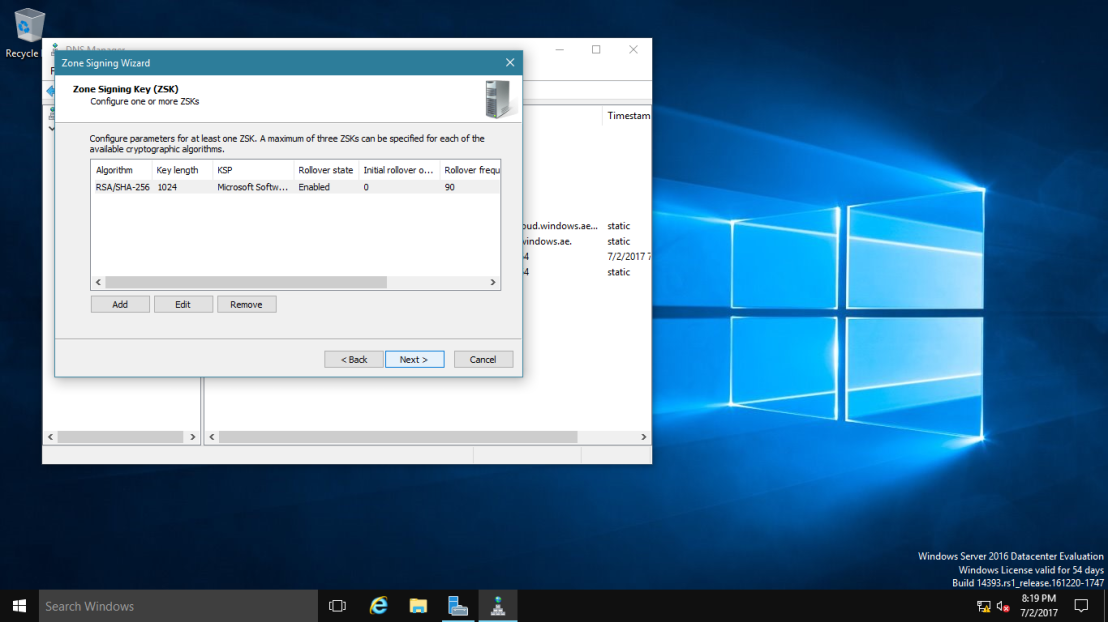
11.png

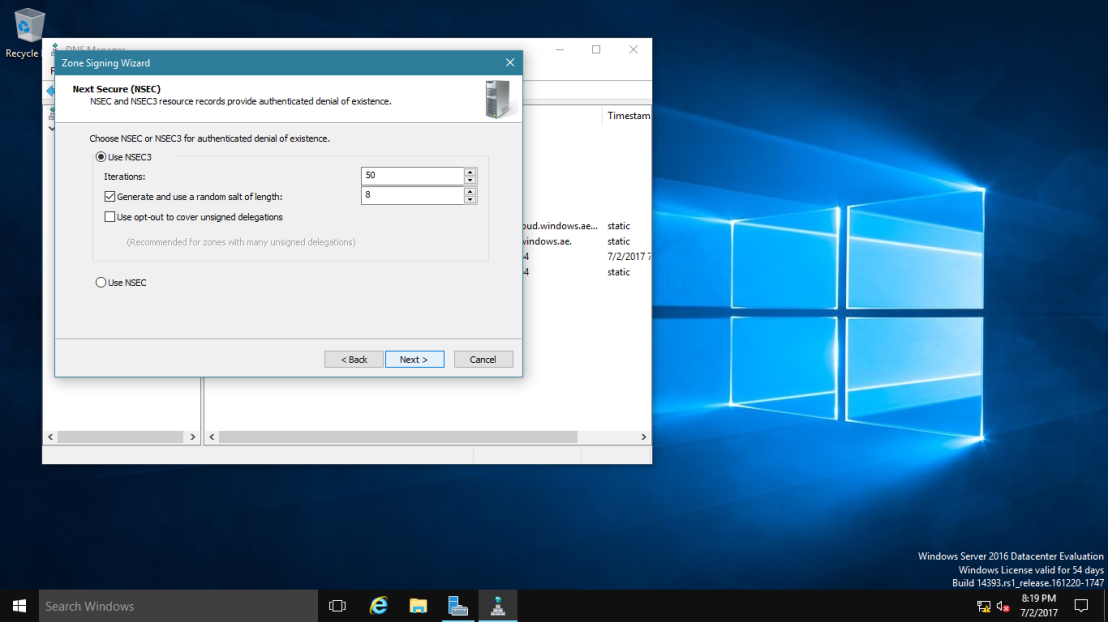
13 – On the Next Secure (NSEC) interface, click Next.

~*~ NSEC is when the DNS response has no data to provide to the client, this record authenticates that the host does not exist.
12.png

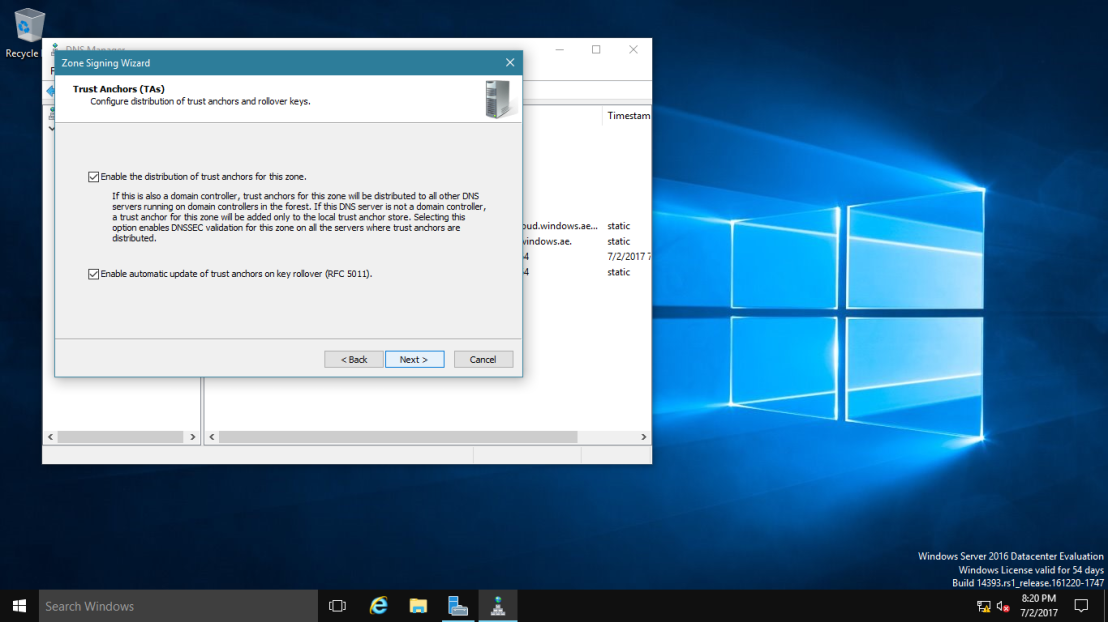
14 – On the Trust Anchors (TAs) interface, check the Enable the distribution of trust anchors for this zone check box, and then click Next.

~*~ A trust anchor is an authoritative entity that is represented by a public key. The TrustAnchors zone stores preconfigured public keys that are associated with a specific zone.
14.png

15 – On the Signing and Polling Parameters interface, click Next.
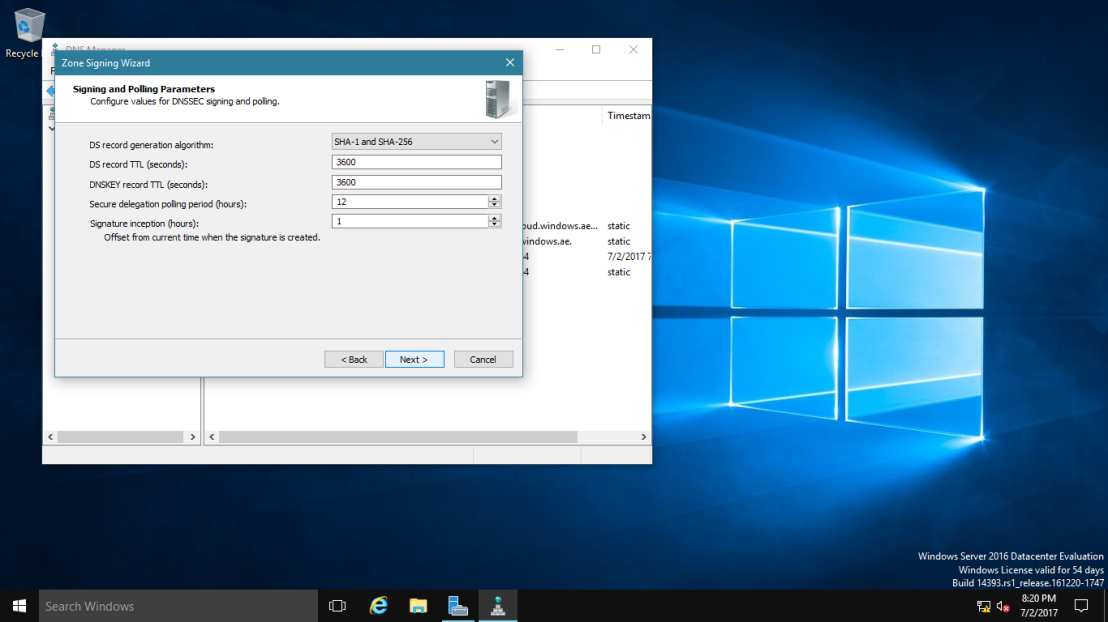
15.png

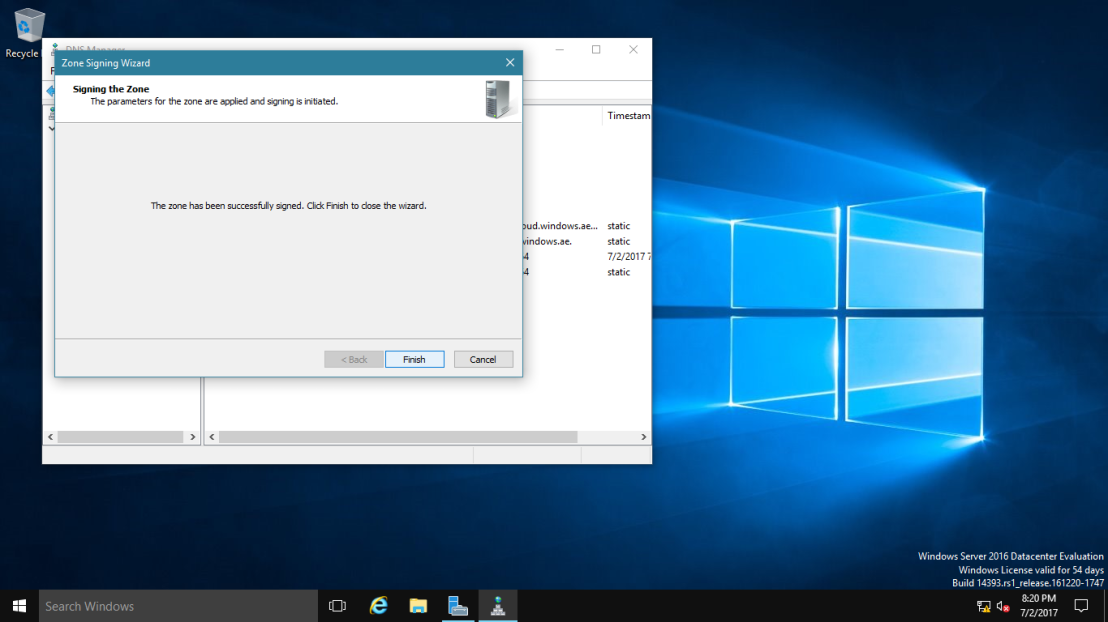
16 – On the DNS Security Extensions (DNSSEC) interface, click Next, and then click Finish.
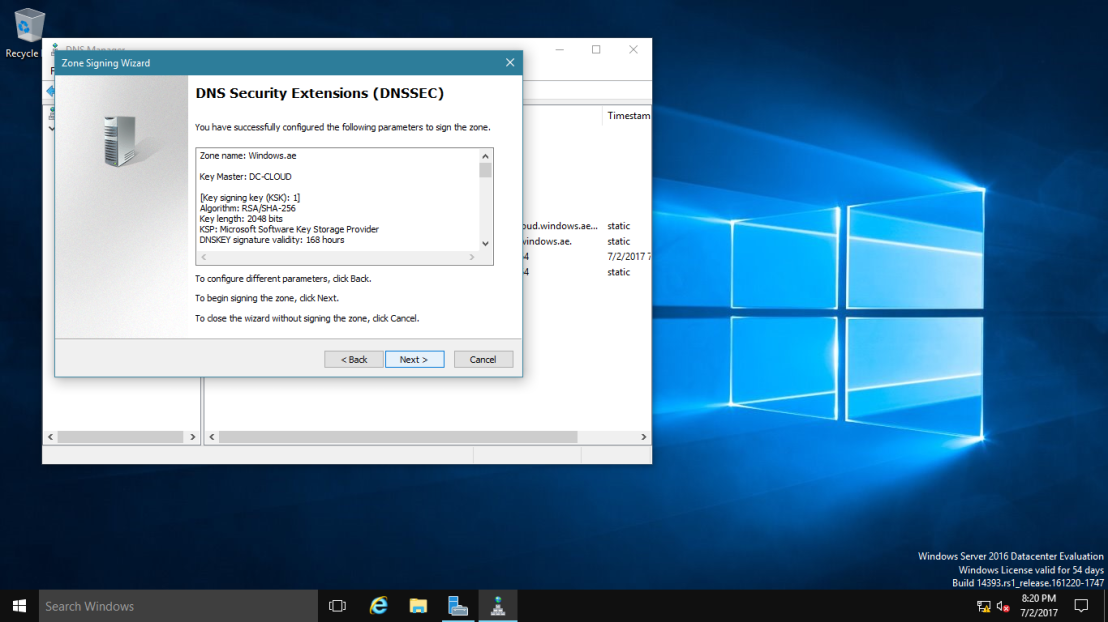
16.png17.png

17 – In the DNS console, expand Trust Points, expand ae, and then click your domain name.

Ensure that the DNSKEY resource records display, and that their status is valid.
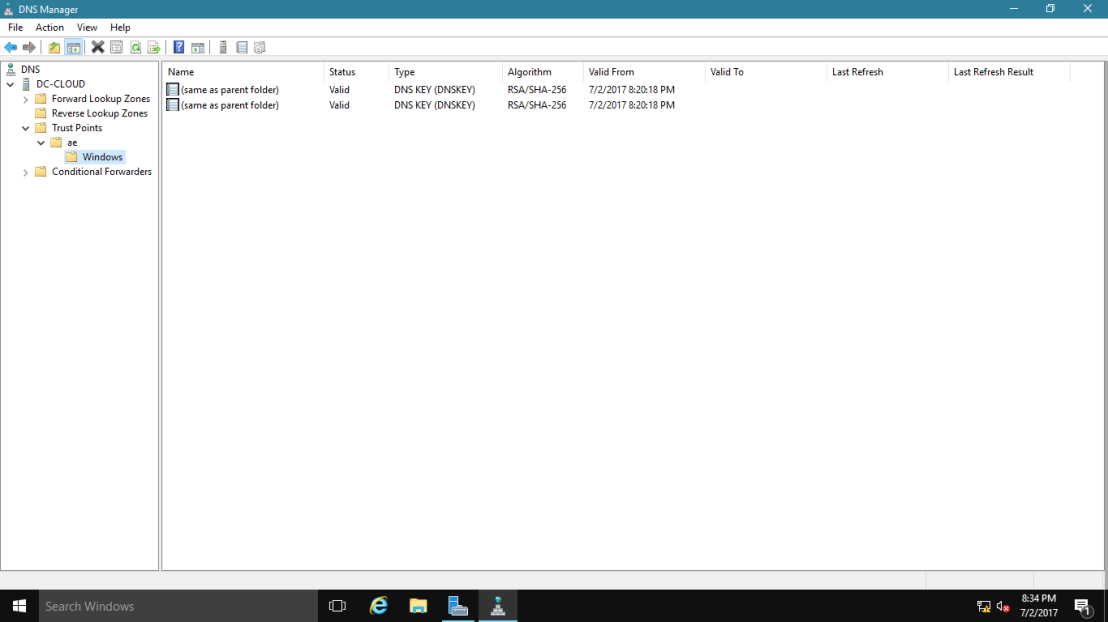
18.png

18 – Open Server Manager,  click Tools and open Group Policy Management.

19.png

19 – Next, open Group Policy Management, expand Forest: Windows.ae, expand Domains, expand Windows.ae, right-click Default Domain Policy, and then click Edit.
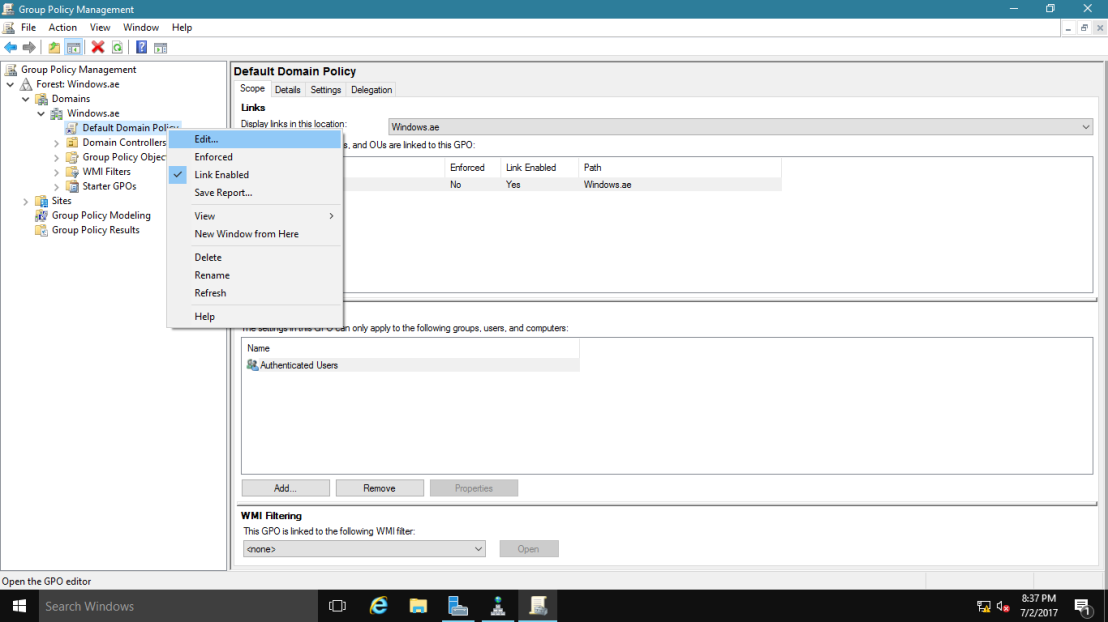
20.png

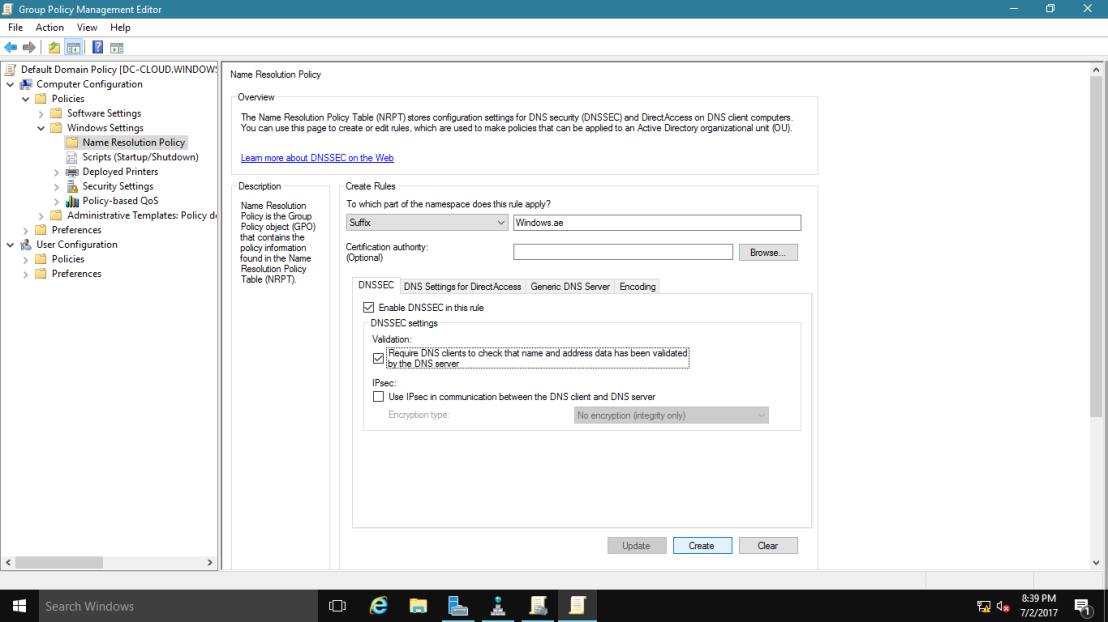
20 – In the Group Policy Management Editor interface, under Computer Configuration, expand Policies, expand Windows Settings, and then click Name Resolution Policy.

~*~ In the right pane, under Create Rules, in the Suffix box, type Windows.ae to apply the rule to the suffix of the namespace.

~*~ Select both the Enable DNSSEC in this rule check box and the Require DNS clients to check that the name and address data has been validated by the DNS server check box, and then click Create.
22.png

02 – Configure the DNS Socket Pool

1 – In domain Server, open Windows PowerShell and type : Get-DNSServer

~*~ This command displays the current size of the DNS socket pool (on the fourth line in the ServerSetting section). Note that the current size is 2,500.

~*~ Please take note that the default DNS socket pool size is 2,500. When you configure the DNS socket pool, you can choose a size value from 0 to 10,000. The larger the value, the greater the protection you will have against DNS spoofing attacks.

23.png

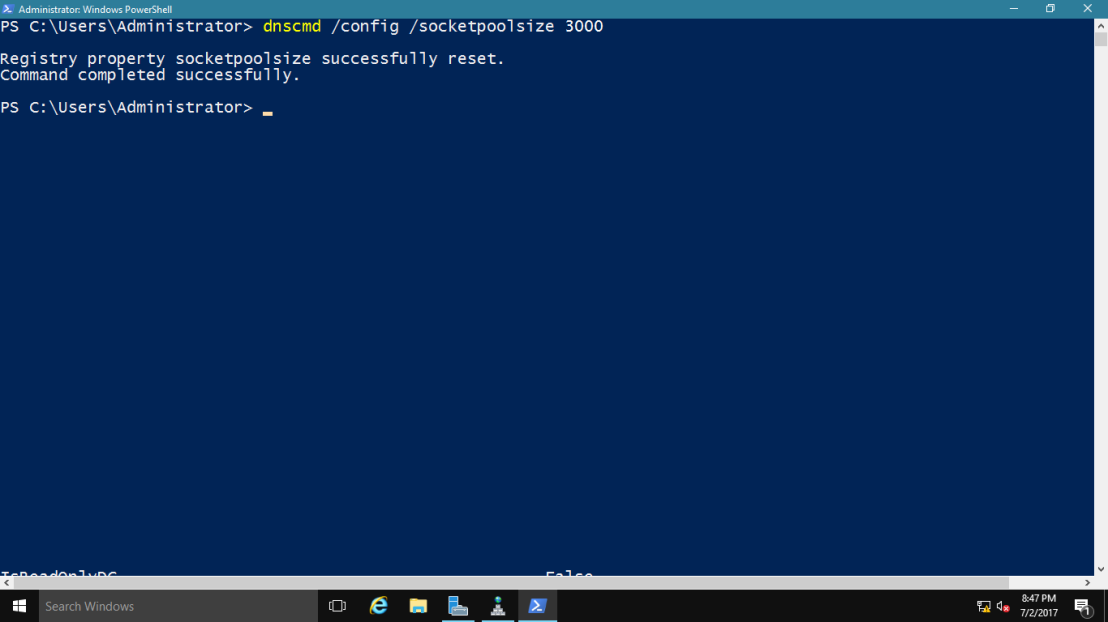
2 – Now lets change the socket pool size to 3,000.

type : dnscmd /config /socketpoolsize 3000
24.png

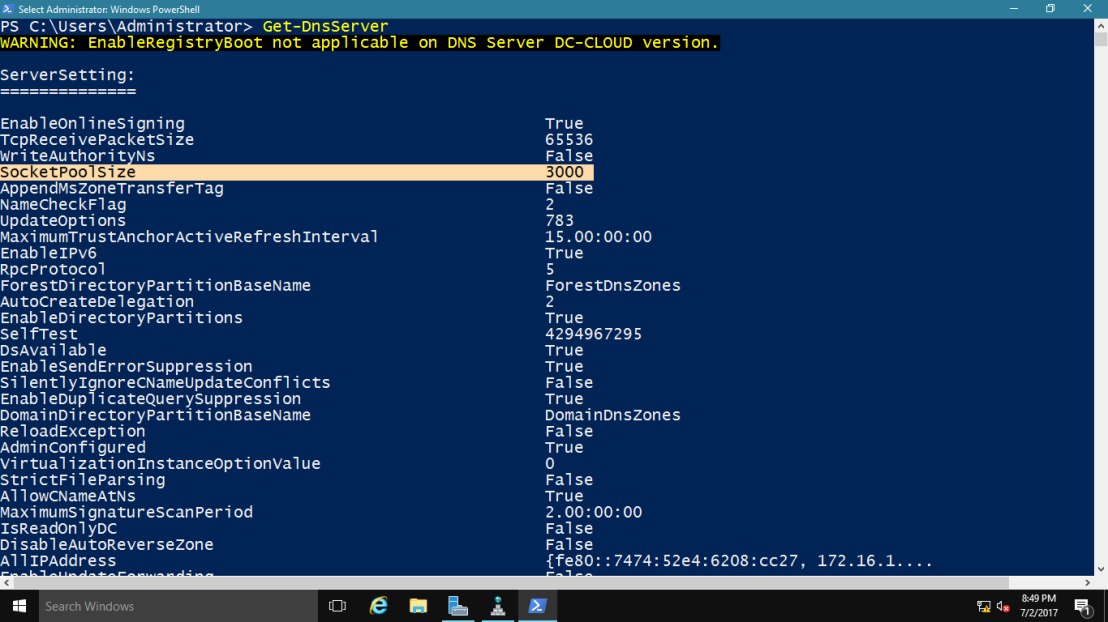
3 – Restart your DNS Server for the changes to take effect.

~*~ confirm that the new socket pool size now is 3000
25.png

04 – Configure the DNS Cache Locking

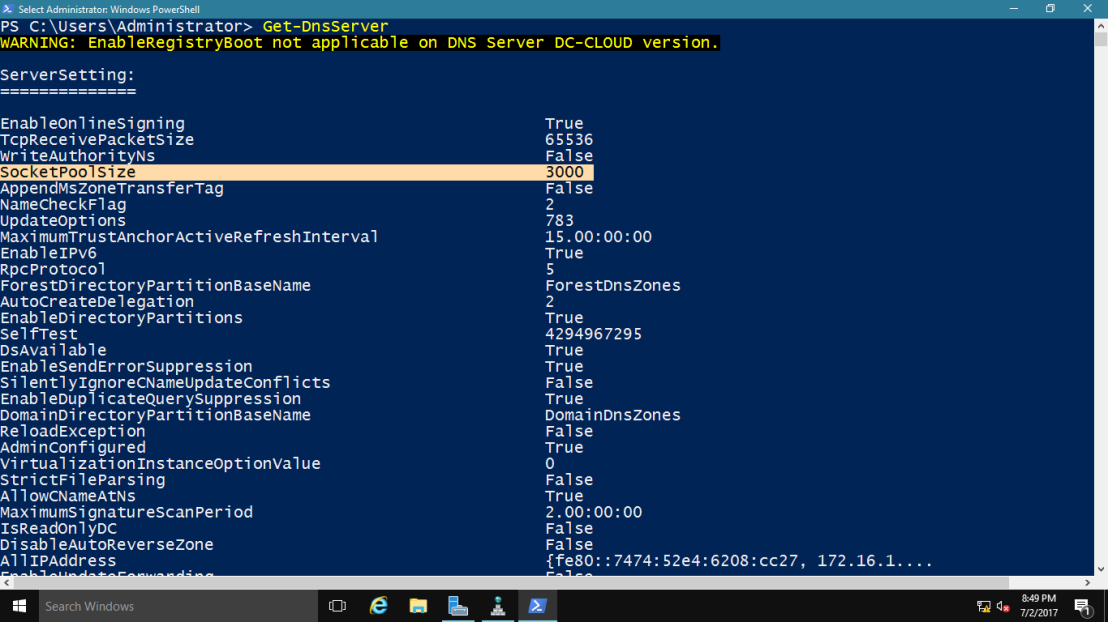
1 – In Windows PowerShell, type Get-Dnsserver

~*~ This command will displays the current percentage value of the DNS cache lock.

~*~ Note that the current value is 100 percent.
25.png

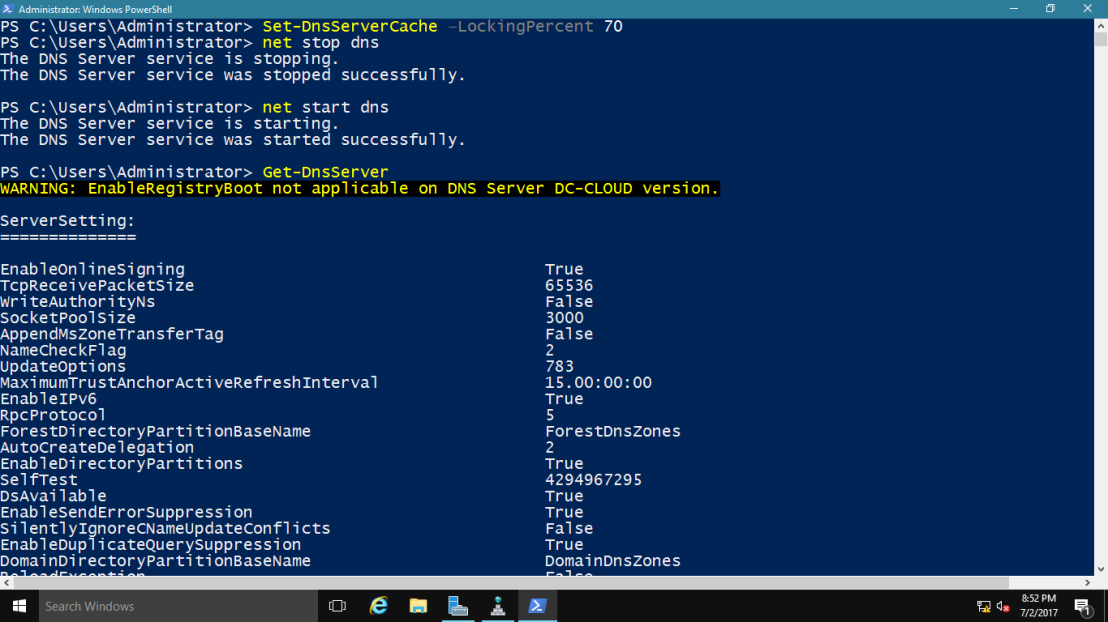
2 – type Set-DnsServerCache –LockingPercent 70

~*~ This changes the cache lock value to 70 percent
26.png

~*~ Please take note that you configure cache locking as a percentage value.

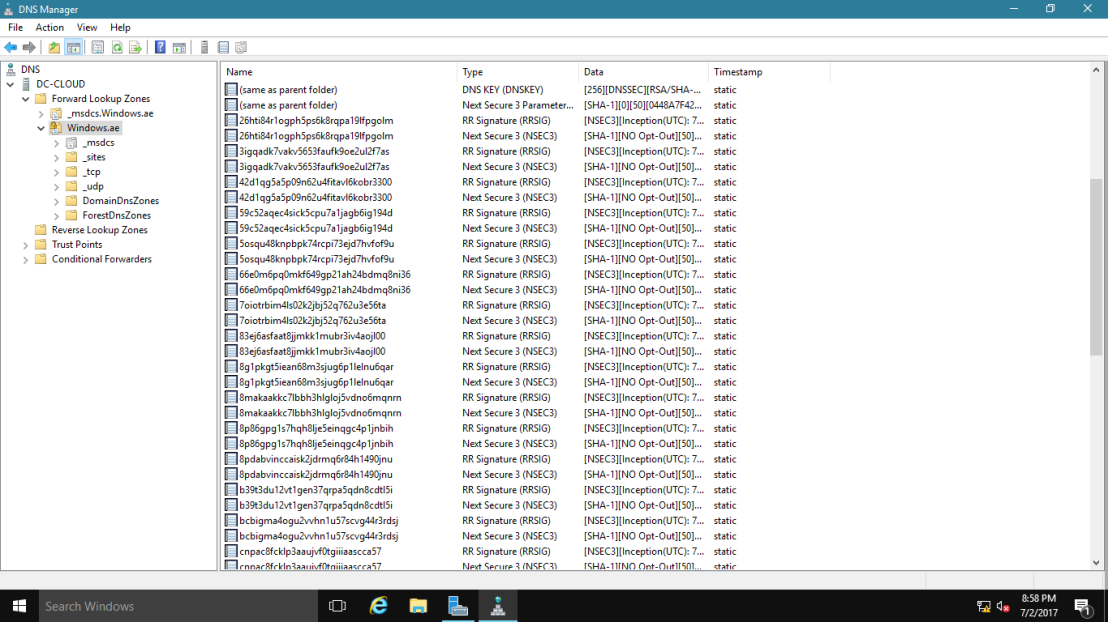
3 – Looking your DNS Manager Verify.
27.png

Tuesday, July 26, 2022

Configure SPF Record for Office 365


SPF record information

SPF is a protocol that helps to reduce spam via email. An SPF record is set in the DNS zone of the domain name. Receiving mail servers can check for the presence of an SPF record. This check verifies that the server from which an email is being sent has permission to do so. The server that has permission to send emails on behalf of the domain name is listed in the SPF record.

Find Office 365 SPF record

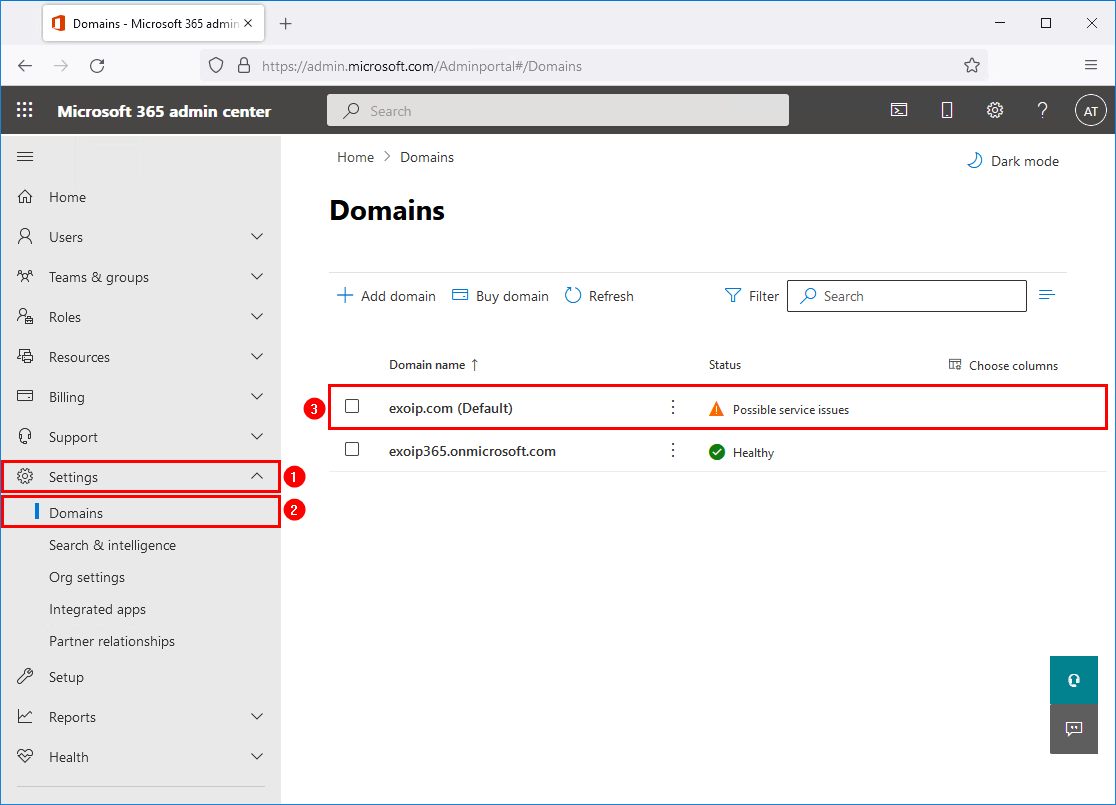
Sign in to Microsoft 365 admin center. Go to Settings > Domains. Click on the domain that you want to configure the SPF record for. In this example, it’s the domain exoip.com.

Edit domain in Microsoft 365 admin center

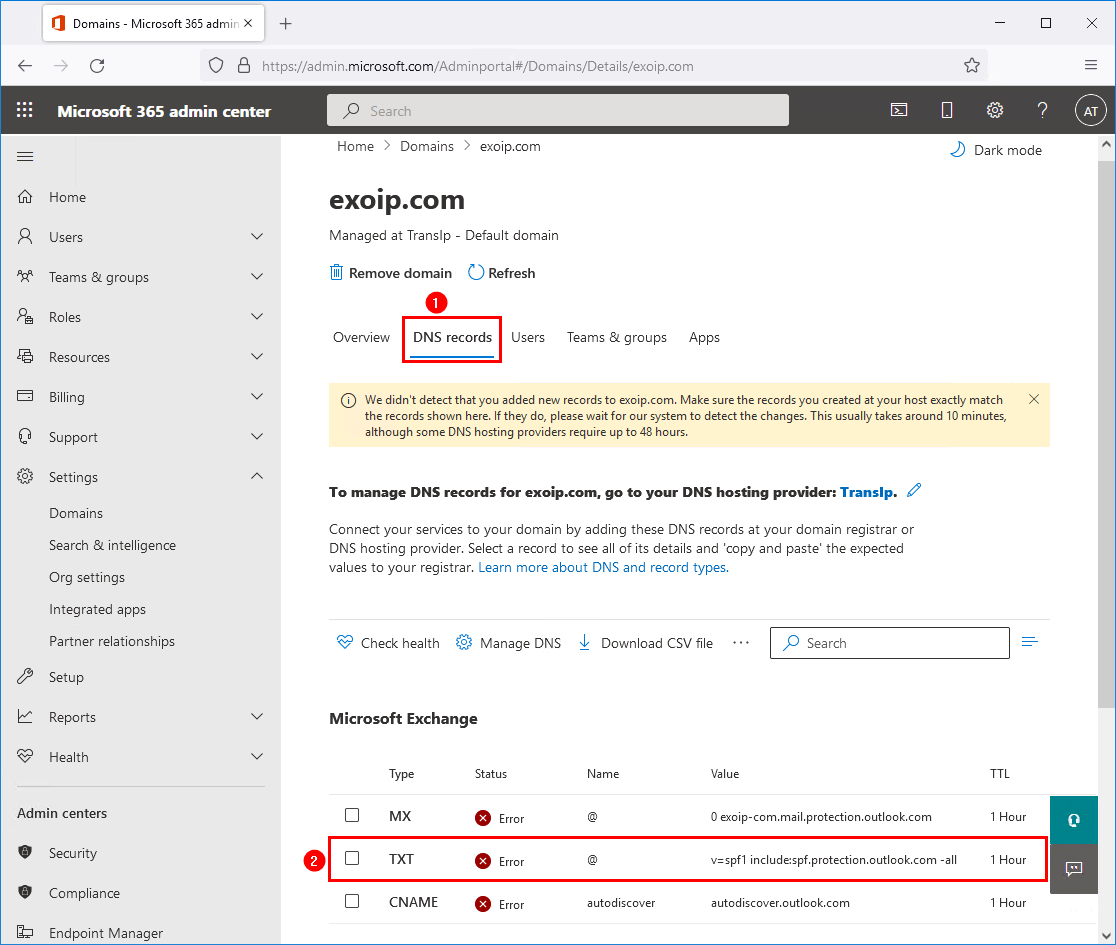
Click on the tab DNS records, and down below, there are three records for Exchange Online:

  1. MX
  2. TXT
  3. CNAME

The one that we are interested in for now is the TXT record, which is the SPF record for Exchange Online. Click on the TXT record.

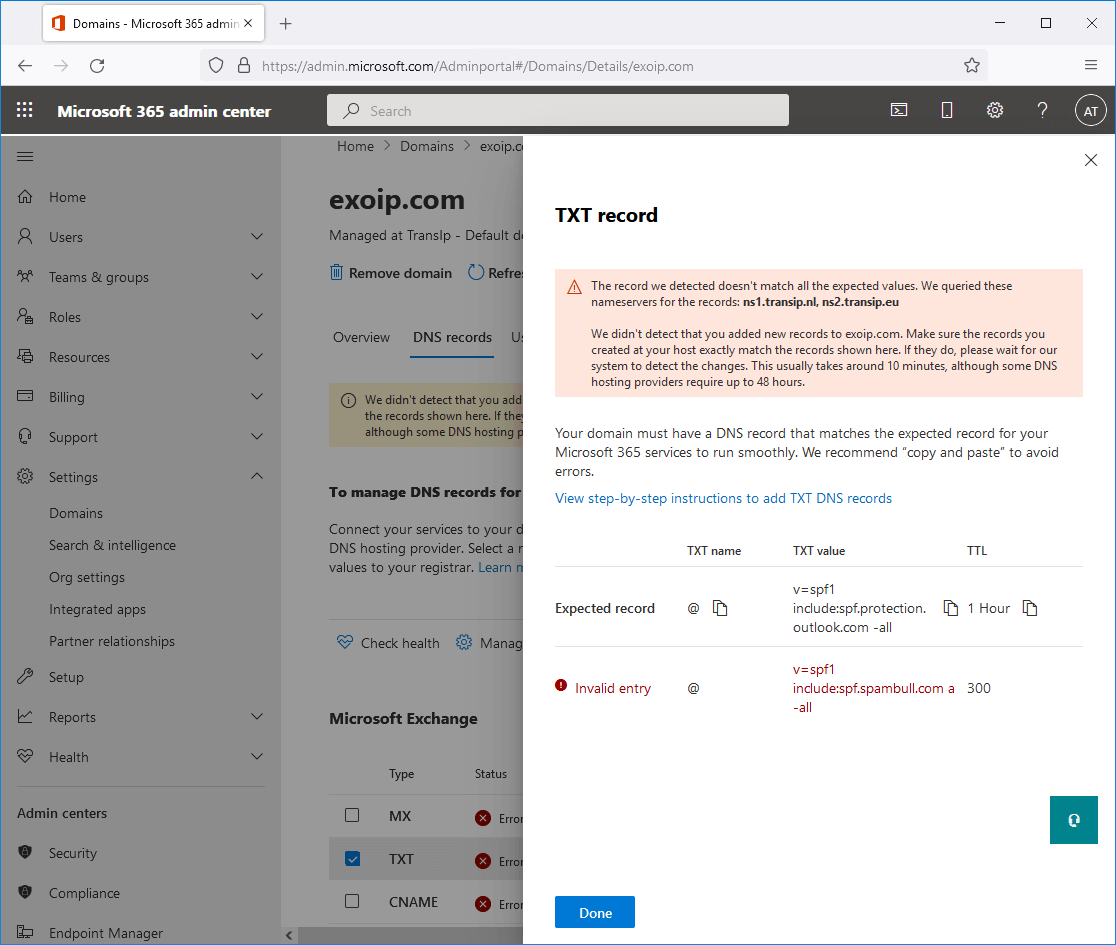
Configure SPF record for Office 365 TXT record status error

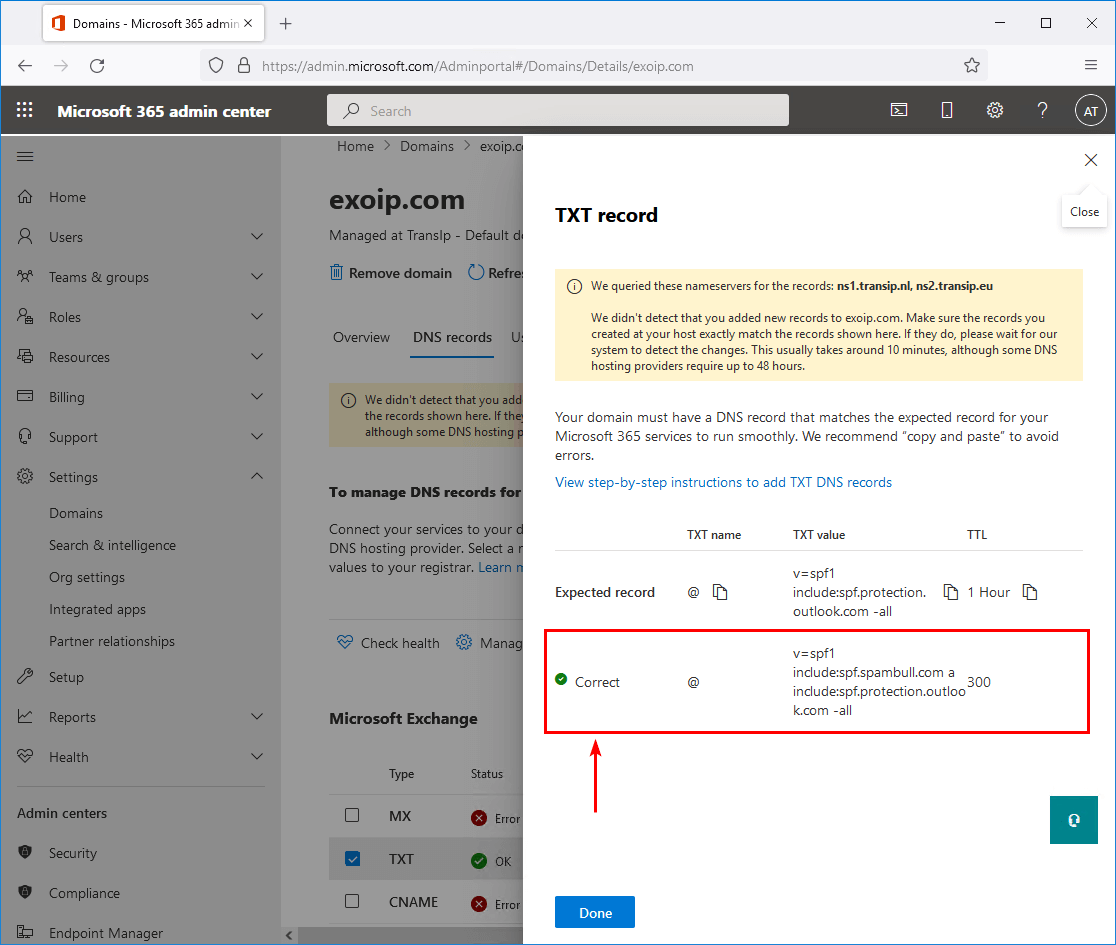
The domain already has an SPF record configured, v=spf1 include:spf.spambull.com a -all. The SPF record tells that the SpamBull spam filter and A record is an approved sender for the domain. Therefore, email coming from the SpamBull spam filter and A record is authorized, and everything else is not.

The message shows Invalid entry because we don’t have the include:spf.protection.outlook.com statement in our SPF record. We want to merge the Exchange Online SPF record into the existing exoip.com domain SPF record. That’s why we will only copy the include statement, include:spf.protection.outlook.com, to the clipboard.

Configure SPF record for Office 365 TXT record invalid entry

Add SPF record for Office 365

Sign in to the domain’s registrar and open the domain DNS settings. In our example, the domain exoip.com.

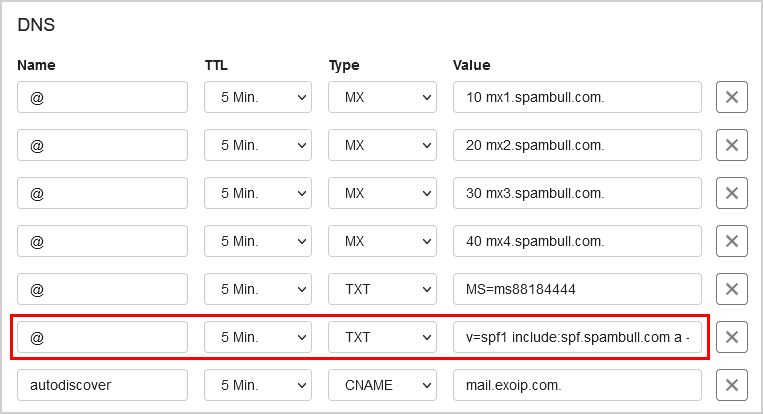
The TXT record value for SPF looks like v=spf1 include:spf.spambull.com a -all.

Configure SPF record for Office 365 DNS before

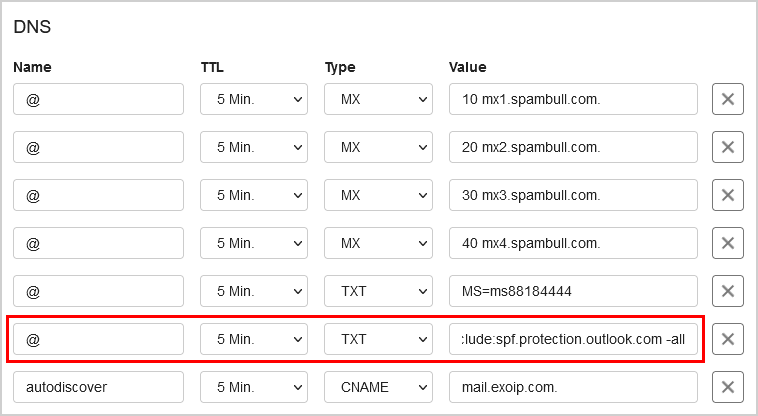
Edit the existing SPF record and paste the include statement include:spf.protection.outlook.com. The effect is that it will also authorize Exchange Online servers to send emails for the exoip.com domain name.

The TXT record value for SPF looks like v=spf1 include:spf.spambull.com a include:spf.protection.outlook.com -all.

Configure SPF record for Office 365 DNS after

The change can take up to 24 hours, but most of the time, this will resolve within 5-15 minutes.

Verify Office 365 SPF record

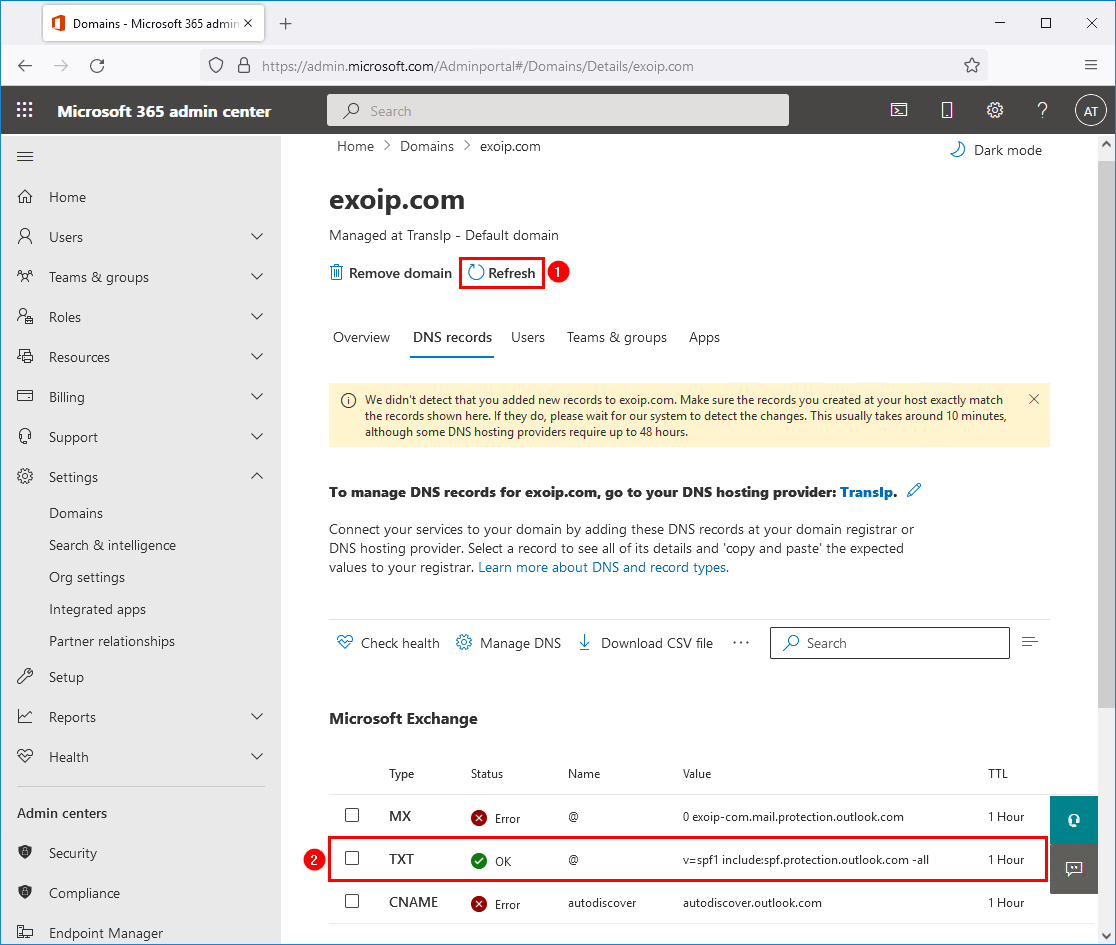
Click on Refresh to refresh the page. The TXT status changed from Error to OK. Click on the TXT record.

Configure SPF record for Office 365 TXT record status OK


It shows that the record is Correct.

Configure SPF record for Office 365 TXT record correct

We did configure the SPF record for Office 365 successfully. Exchange on-premises and Exchange Online are both authorized to send emails from the domain.

Configure Office 365 SMTP relay


Introduction

Most IT environments have some applications or devices that need to send emails, such as:

  • Multifunction printers (scan to email)
  • UPS system
  • Backup applications
  • Monitoring applications
  • And a lot more

Let’s look at how to configure a connector in Exchange Online for on-premises devices and applications for SMTP relay.

Office 365 SMTP relay settings

When you set up Office 365 SMTP relay, you will need to:

  1. Find Public IP address from where it will send the emails
  2. Find Office 365 domain MX record
  3. Open port 25 on the organization firewall
  4. Add Public IP to domain’s SPF record

Find Public IP address

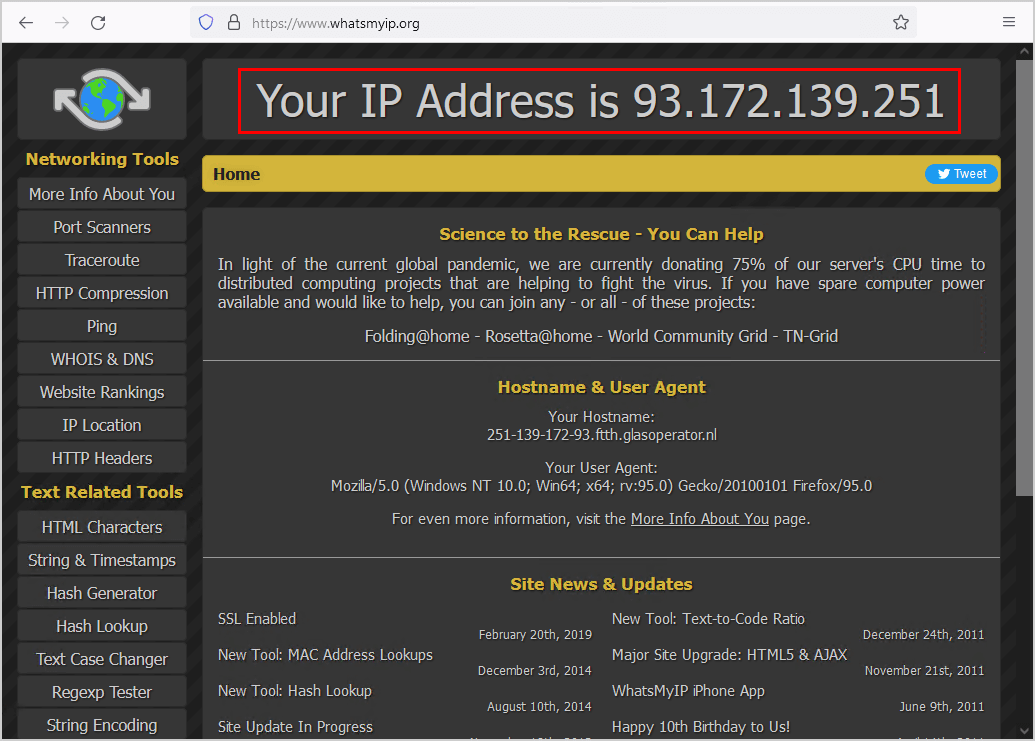
Go to www.whatsmyip.org or any other website that reveals your public IP address. Note down the Public IP address because you need it in the next step.

Note: Get the public IP address from the organization you want to send mail from. This can be multiple IP addresses.

In our example, it’s the Public IP address 93.172.139.251.

Find Public IP address

Find Office 365 MX record

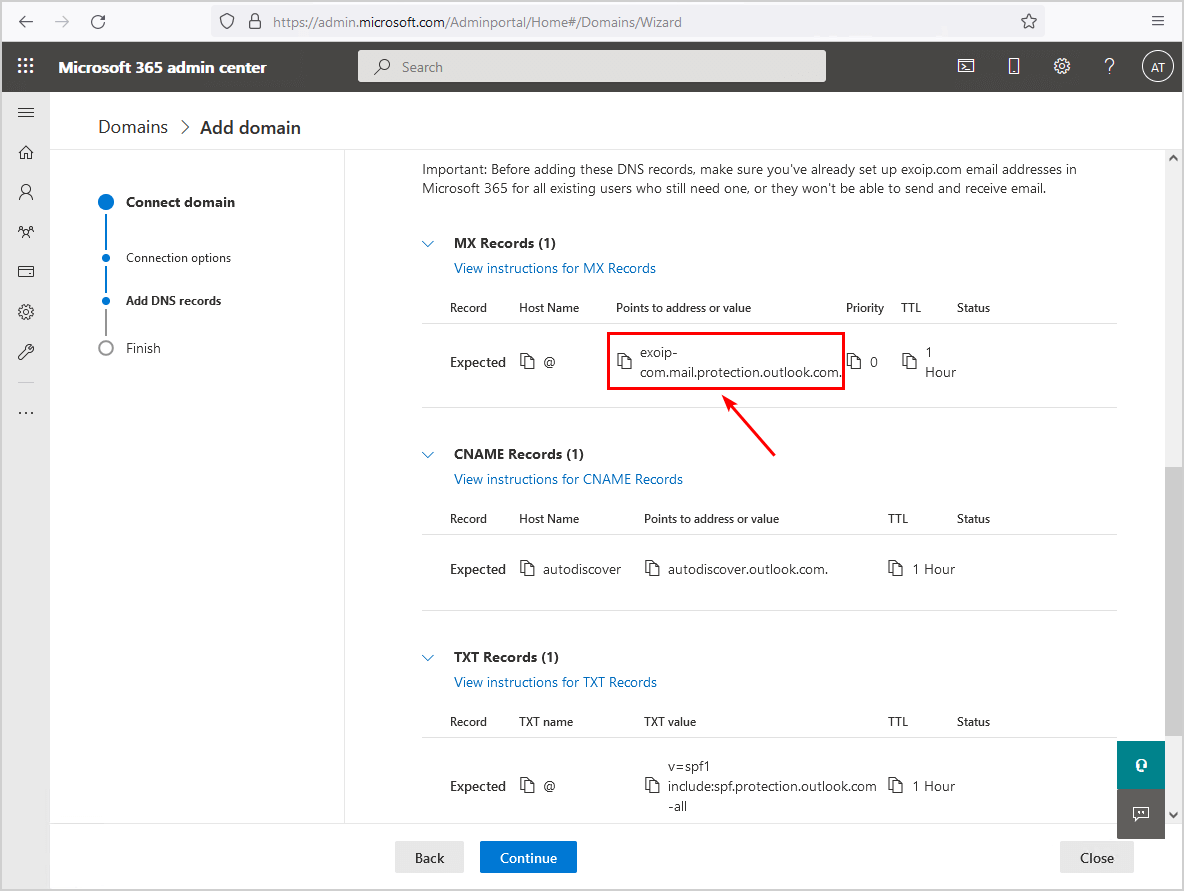
The MX record l is what you will add to the scanner or application that needs to relay SMTP using Office 365.

To find Office 365 MX record, follow these steps:

  • Sign in to Microsoft 365 portal
  • Expand Settings and click on Domains
  • Click on your domain
  • Go through the wizard and find the MX record
  • Copy the Points to address or value field

In our example, it’s the MX record exoip-com.mail.protection.outlook.com.

Configure Office 365 SMTP relay MX records

Open port 25 on firewall

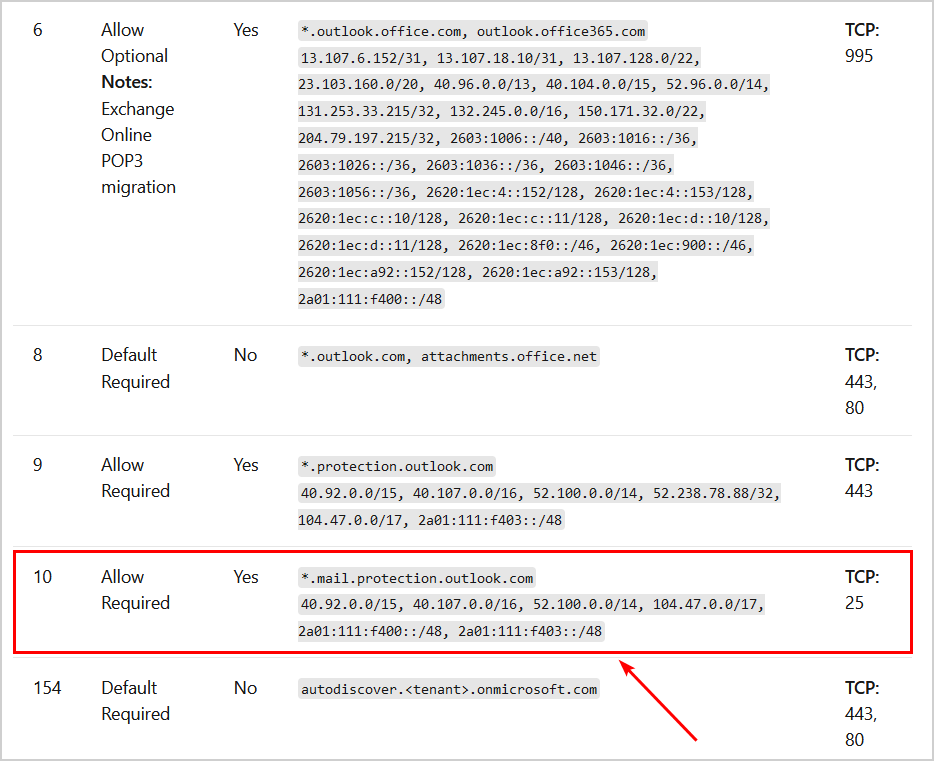
To relay through Office 365 SMTP, you need to open port 25 from the organization firewall to external. The most secure way is to only add the Exchange Online IP addresses in the destination address and not ALL (everyone).

Configure Office 365 SMTP relay IP address ranges

Add public IP to domain’s SPF record

Sign in to the domain’s registrar and open the domain DNS settings. In our example, the domain exoip.com.

The TXT record value for SPF looks like this:

v=spf1 mx include:spf.protection.outlook.com

Edit the existing SPF record and add the Public IP address. The effect is that it will also authorize the organization’s Public IP address servers to send emails for the exoip.com domain name.

The new TXT record value for SPF looks like this:

v=spf1 mx include:spf.protection.outlook.com ip4:93.172.139.251 -all

Note: The change can take up to 24 hours, but most of the time, this will resolve within 5-15 minutes.

Read more: Configure SPF record for Office 365 »

Now that you did all the steps, it’s time to configure Office 365 SMTP relay.

How to set up SMTP relay for Office 365

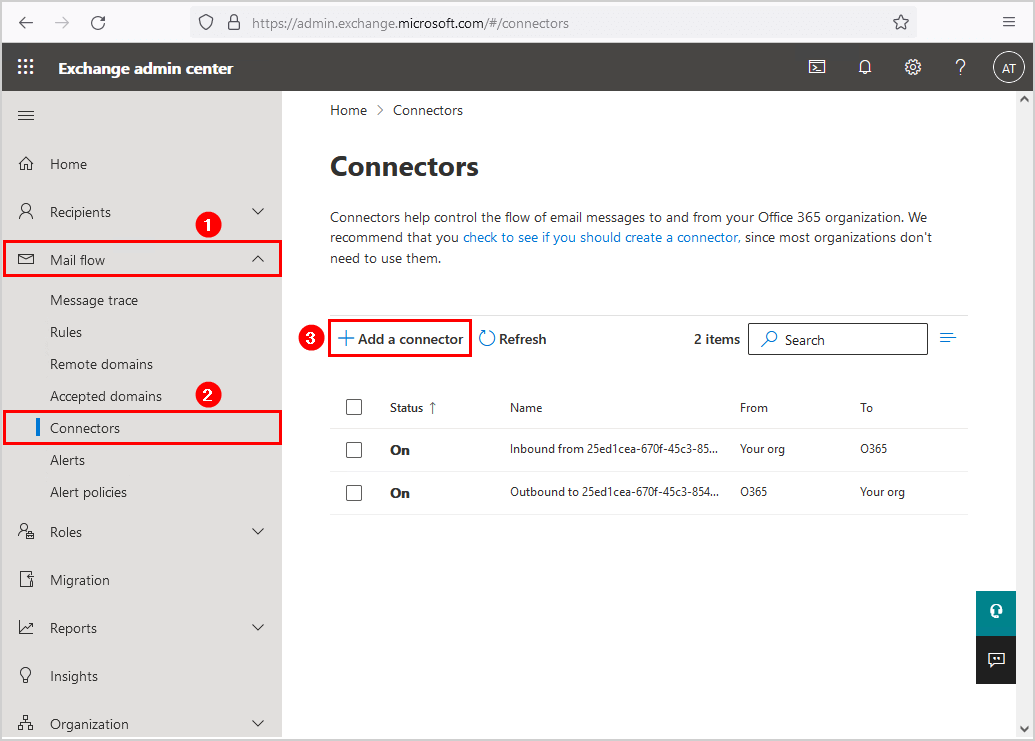
To set up SMTP relay for Office 365, follow these steps:

Configure Office 365 SMTP relay connectors

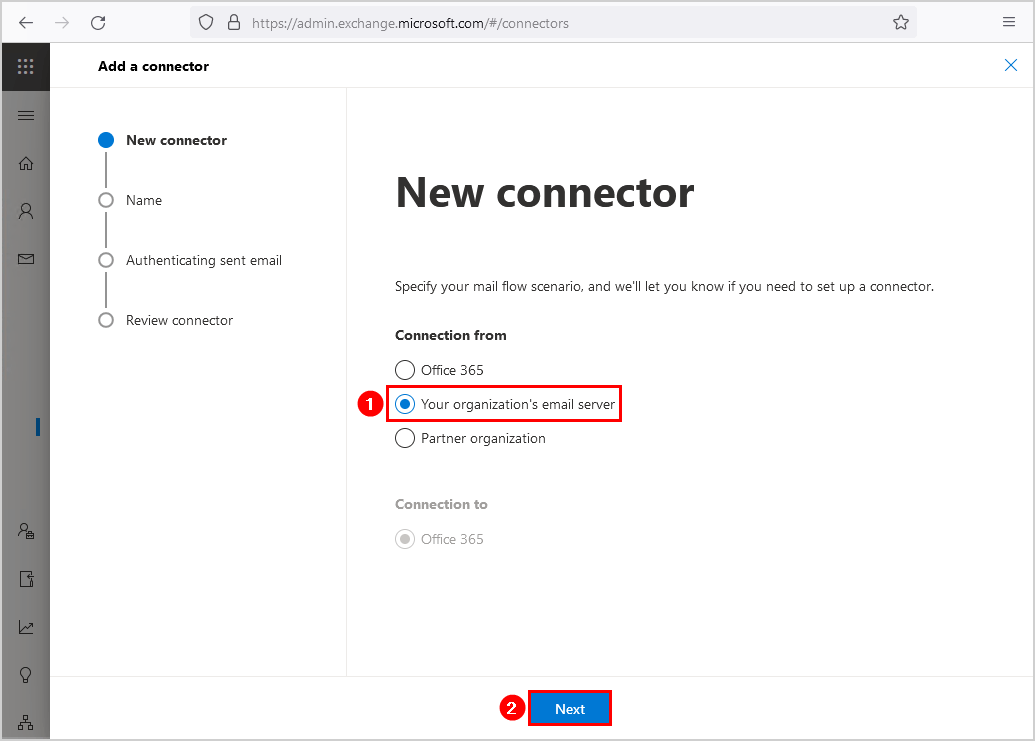
Select Your organization’s email server. Click Next.

Configure Office 365 SMTP relay new connector

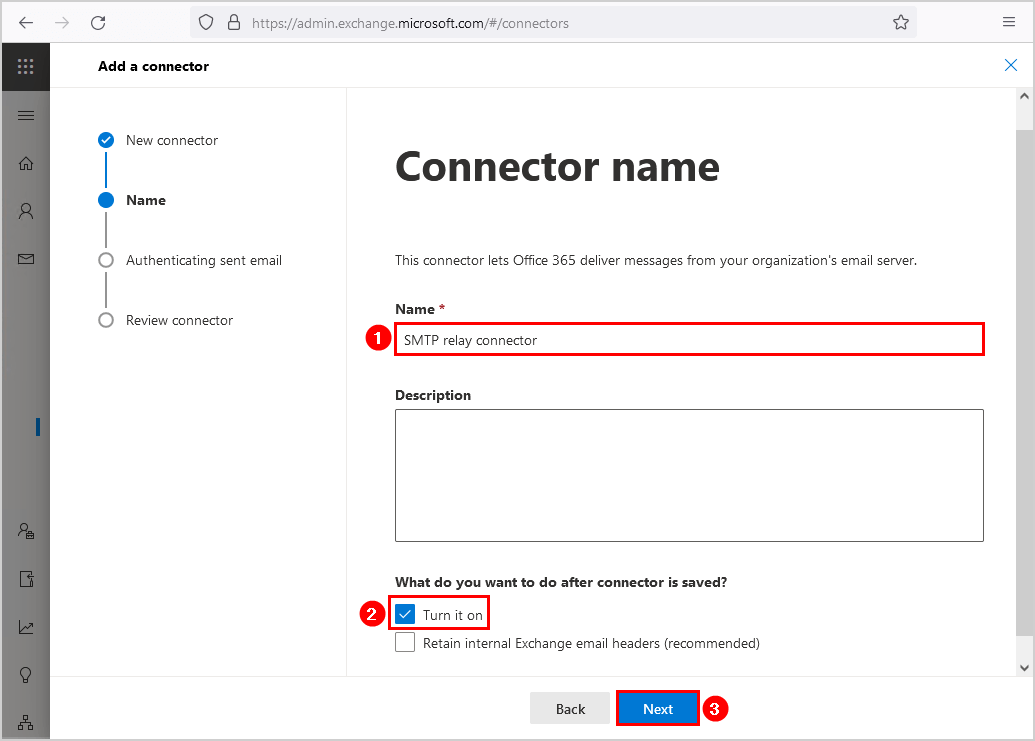
Fill in the connector name SMTP relay connector and Turn it on. Click Next.

Configure Office 365 SMTP relay connector name


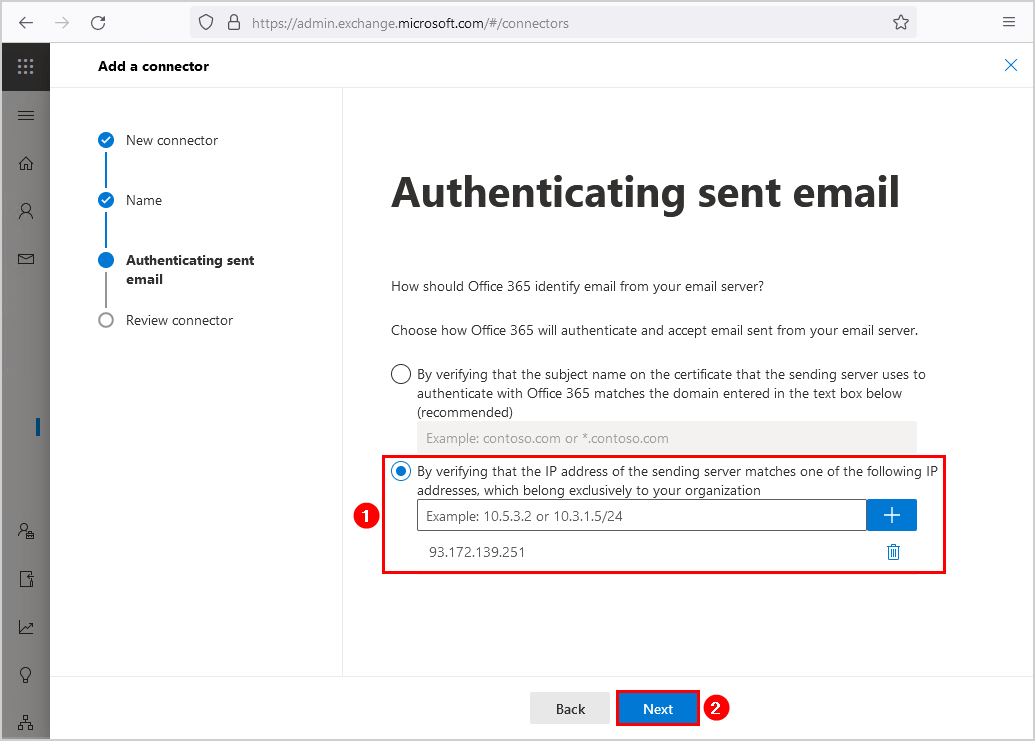
Select By verifying that the IP address of the sending server matches one of the following IP addresses, which belong exclusively to your organization.

Add the Public IP address which you copied from the previous step. Click Next.

Configure Office 365 SMTP relay authenticating sent email

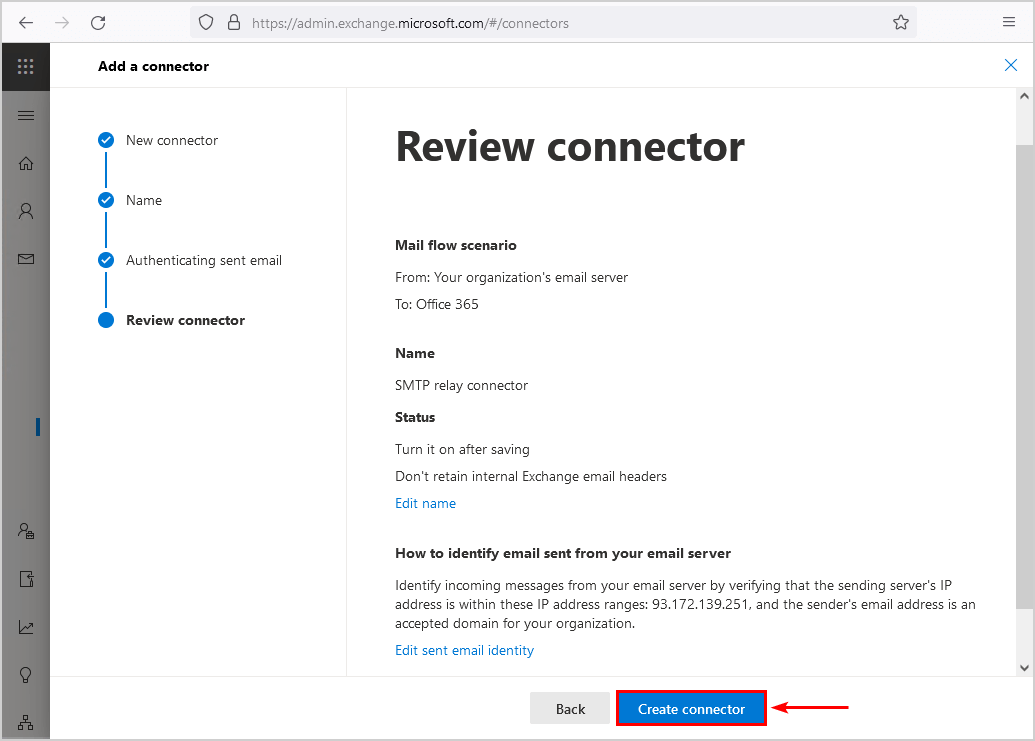
Review the connector and click on Create connector.

Configure Office 365 SMTP relay rewiew connector
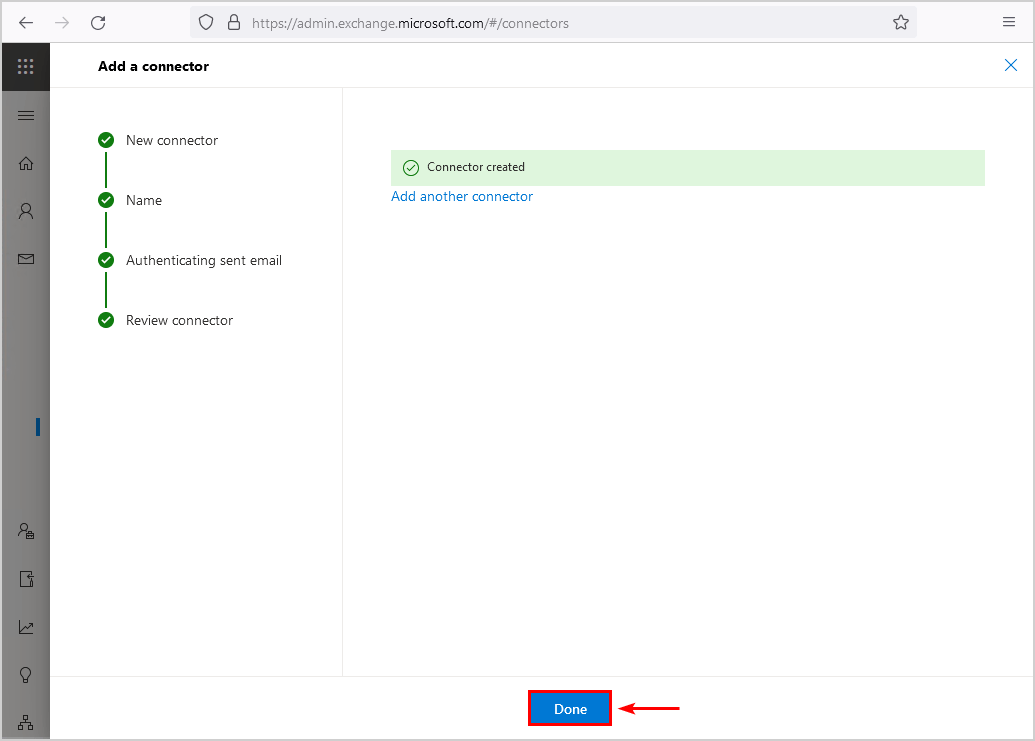
Exchange Online connector created

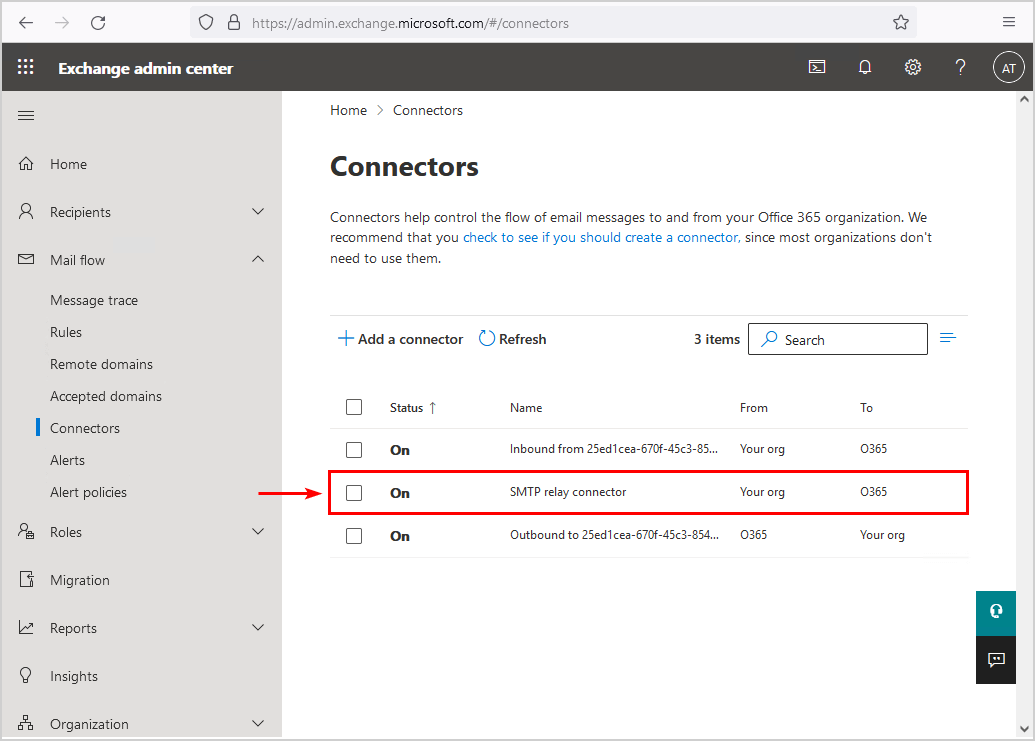
The connector shows up in the Connectors list.

Exchange Online admin center connectors

You successfully added an SMTP relay connector in Office 365. As a result, the organization is ready to send emails through Office 365.

Test Office 365 SMTP relay

Test that everything is set up correctly and that email relays through Office 365 successfully. An excellent way to test Office 365 SMTP relay is with the Send-EmailOffice365.ps1 PowerShell script.

Run PowerShell as administrator. Copy the below script or download the Send-EmailOffice365.ps1 PowerShell script. Before you run the script change the fields:

  • To
  • From
  • SmtpServer

$EmailMessage = @{
    To         = "exoip@gmail.com"
    From       = "scanner@exoip.com"
    Subject    = "Test email"
    Body       = "Test email sent using Office 365 SMTP relay"
    SmtpServer = "exoip-com.mail.protection.outlook.com"
    Port       = "25"
}

Send-MailMessage @EmailMessage

The output should not give you an error, and the email will arrive in the inbox you added in the To field.

Office 365 URLs / IP Address Ranges and Ports


Exchange Online

ID Category ER Addresses Ports
1 Optimize
Required
Yes outlook.office.com, outlook.office365.com
13.107.6.152/31, 13.107.18.10/31, 13.107.128.0/22, 23.103.160.0/20, 40.96.0.0/13, 40.104.0.0/15, 52.96.0.0/14, 131.253.33.215/32, 132.245.0.0/16, 150.171.32.0/22, 204.79.197.215/32, 2603:1006::/40, 2603:1016::/36, 2603:1026::/36, 2603:1036::/36, 2603:1046::/36, 2603:1056::/36, 2620:1ec:4::152/128, 2620:1ec:4::153/128, 2620:1ec:c::10/128, 2620:1ec:c::11/128, 2620:1ec:d::10/128, 2620:1ec:d::11/128, 2620:1ec:8f0::/46, 2620:1ec:900::/46, 2620:1ec:a92::152/128, 2620:1ec:a92::153/128, 2a01:111:f400::/48
TCP: 443, 80
2 Allow
Required
Yes smtp.office365.com
13.107.6.152/31, 13.107.18.10/31, 13.107.128.0/22, 23.103.160.0/20, 40.96.0.0/13, 40.104.0.0/15, 52.96.0.0/14, 131.253.33.215/32, 132.245.0.0/16, 150.171.32.0/22, 204.79.197.215/32, 2603:1006::/40, 2603:1016::/36, 2603:1026::/36, 2603:1036::/36, 2603:1046::/36, 2603:1056::/36, 2620:1ec:4::152/128, 2620:1ec:4::153/128, 2620:1ec:c::10/128, 2620:1ec:c::11/128, 2620:1ec:d::10/128, 2620:1ec:d::11/128, 2620:1ec:8f0::/46, 2620:1ec:900::/46, 2620:1ec:a92::152/128, 2620:1ec:a92::153/128, 2a01:111:f400::/48
TCP: 587
3 Default
Required
No r1.res.office365.com, r3.res.office365.com, r4.res.office365.com TCP: 443, 80
5 Allow
Optional
Notes: Exchange Online IMAP4 migration
Yes *.outlook.office.com, outlook.office365.com
13.107.6.152/31, 13.107.18.10/31, 13.107.128.0/22, 23.103.160.0/20, 40.96.0.0/13, 40.104.0.0/15, 52.96.0.0/14, 131.253.33.215/32, 132.245.0.0/16, 150.171.32.0/22, 204.79.197.215/32, 2603:1006::/40, 2603:1016::/36, 2603:1026::/36, 2603:1036::/36, 2603:1046::/36, 2603:1056::/36, 2620:1ec:4::152/128, 2620:1ec:4::153/128, 2620:1ec:c::10/128, 2620:1ec:c::11/128, 2620:1ec:d::10/128, 2620:1ec:d::11/128, 2620:1ec:8f0::/46, 2620:1ec:900::/46, 2620:1ec:a92::152/128, 2620:1ec:a92::153/128, 2a01:111:f400::/48
TCP: 143, 993
6 Allow
Optional
Notes: Exchange Online POP3 migration
Yes *.outlook.office.com, outlook.office365.com
13.107.6.152/31, 13.107.18.10/31, 13.107.128.0/22, 23.103.160.0/20, 40.96.0.0/13, 40.104.0.0/15, 52.96.0.0/14, 131.253.33.215/32, 132.245.0.0/16, 150.171.32.0/22, 204.79.197.215/32, 2603:1006::/40, 2603:1016::/36, 2603:1026::/36, 2603:1036::/36, 2603:1046::/36, 2603:1056::/36, 2620:1ec:4::152/128, 2620:1ec:4::153/128, 2620:1ec:c::10/128, 2620:1ec:c::11/128, 2620:1ec:d::10/128, 2620:1ec:d::11/128, 2620:1ec:8f0::/46, 2620:1ec:900::/46, 2620:1ec:a92::152/128, 2620:1ec:a92::153/128, 2a01:111:f400::/48
TCP: 995
8 Default
Required
No *.outlook.com, attachments.office.net TCP: 443, 80
9 Allow
Required
Yes *.protection.outlook.com
40.92.0.0/15, 40.107.0.0/16, 52.100.0.0/14, 52.238.78.88/32, 104.47.0.0/17, 2a01:111:f403::/48
TCP: 443
10 Allow
Required
Yes *.mail.protection.outlook.com
40.92.0.0/15, 40.107.0.0/16, 52.100.0.0/14, 104.47.0.0/17, 2a01:111:f400::/48, 2a01:111:f403::/48
TCP: 25
154 Default
Required
No autodiscover.<tenant>.onmicrosoft.com TCP: 443, 80

SharePoint Online and OneDrive for Business

ID Category ER Addresses Ports
31 Optimize
Required
Yes <tenant>.sharepoint.com, <tenant>-my.sharepoint.com
13.107.136.0/22, 40.108.128.0/17, 52.104.0.0/14, 104.146.128.0/17, 150.171.40.0/22, 2603:1061:1300::/40, 2620:1ec:8f8::/46, 2620:1ec:908::/46, 2a01:111:f402::/48
TCP: 443, 80
32 Default
Optional
Notes: OneDrive for Business: supportability, telemetry, APIs, and embedded email links
No ssw.live.com, storage.live.com TCP: 443
33 Default
Optional
Notes: SharePoint Hybrid Search - Endpoint to SearchContentService where the hybrid crawler feeds documents
No *.search.production.apac.trafficmanager.net, *.search.production.emea.trafficmanager.net, *.search.production.us.trafficmanager.net TCP: 443
35 Default
Required
No *.wns.windows.com, admin.onedrive.com, officeclient.microsoft.com TCP: 443, 80
36 Default
Required
No g.live.com, oneclient.sfx.ms TCP: 443, 80
37 Default
Required
No *.sharepointonline.com, spoprod-a.akamaihd.net TCP: 443, 80
39 Default
Required
No *.gr.global.aa-rt.sharepoint.com, *.svc.ms, <tenant>-admin.sharepoint.com, <tenant>-files.sharepoint.com, <tenant>-myfiles.sharepoint.com TCP: 443, 80

Skype for Business Online and Microsoft Teams

ID Category ER Addresses Ports
11 Optimize
Required
Yes 13.107.64.0/18, 52.112.0.0/14, 52.120.0.0/14, 2603:1063::/38 UDP: 3478, 3479, 3480, 3481
12 Allow
Required
Yes *.lync.com, *.teams.microsoft.com, teams.microsoft.com
13.107.64.0/18, 52.112.0.0/14, 52.120.0.0/14, 52.238.119.141/32, 52.244.160.207/32, 2603:1027::/48, 2603:1037::/48, 2603:1047::/48, 2603:1057::/48, 2603:1063::/38, 2620:1ec:6::/48, 2620:1ec:40::/42
TCP: 443, 80
13 Allow
Required
Yes *.broadcast.skype.com, broadcast.skype.com
13.107.64.0/18, 52.112.0.0/14, 52.120.0.0/14, 52.238.119.141/32, 52.244.160.207/32, 2603:1027::/48, 2603:1037::/48, 2603:1047::/48, 2603:1057::/48, 2603:1063::/38, 2620:1ec:6::/48, 2620:1ec:40::/42
TCP: 443
15 Default
Required
No *.sfbassets.com TCP: 443, 80
16 Default
Required
No *.keydelivery.mediaservices.windows.net, *.streaming.mediaservices.windows.net, mlccdn.blob.core.windows.net TCP: 443
17 Default
Required
No aka.ms TCP: 443
18 Default
Optional
Notes: Federation with Skype and public IM connectivity: Contact picture retrieval
No *.users.storage.live.com TCP: 443
19 Default
Optional
Notes: Applies only to those who deploy the Conference Room Systems
No *.adl.windows.com TCP: 443, 80
22 Allow
Optional
Notes: Teams: Messaging interop with Skype for Business
Yes *.skypeforbusiness.com
13.107.64.0/18, 52.112.0.0/14, 52.120.0.0/14, 52.238.119.141/32, 52.244.160.207/32, 2603:1027::/48, 2603:1037::/48, 2603:1047::/48, 2603:1057::/48, 2603:1063::/38, 2620:1ec:6::/48, 2620:1ec:40::/42
TCP: 443
26 Default
Required
No *.msedge.net, compass-ssl.microsoft.com TCP: 443
27 Default
Required
No *.mstea.ms, *.secure.skypeassets.com, mlccdnprod.azureedge.net TCP: 443
127 Default
Required
No *.skype.com TCP: 443, 80

Microsoft 365 Common and Office Online

ID Category ER Addresses Ports
41 Default
Optional
Notes: Microsoft Stream
No *.microsoftstream.com TCP: 443
43 Default
Optional
Notes: Microsoft Stream 3rd party integration (including CDNs)
No nps.onyx.azure.net TCP: 443
44 Default
Optional
Notes: Microsoft Stream - unauthenticated
No *.azureedge.net, *.media.azure.net, *.streaming.mediaservices.windows.net TCP: 443
45 Default
Optional
Notes: Microsoft Stream
No *.keydelivery.mediaservices.windows.net TCP: 443
46 Allow
Required
Yes *.officeapps.live.com, *.online.office.com, office.live.com
13.107.6.171/32, 13.107.18.15/32, 13.107.140.6/32, 52.108.0.0/14, 52.238.106.116/32, 52.244.37.168/32, 52.244.203.72/32, 52.244.207.172/32, 52.244.223.198/32, 52.247.150.191/32, 2603:1010:2::cb/128, 2603:1010:200::c7/128, 2603:1020:200::682f:a0fd/128, 2603:1020:201:9::c6/128, 2603:1020:600::a1/128, 2603:1020:700::a2/128, 2603:1020:800:2::6/128, 2603:1020:900::8/128, 2603:1030:7::749/128, 2603:1030:800:5::bfee:ad3c/128, 2603:1030:f00::17/128, 2603:1030:1000::21a/128, 2603:1040:200::4f3/128, 2603:1040:401::762/128, 2603:1040:601::60f/128, 2603:1040:a01::1e/128, 2603:1040:c01::28/128, 2603:1040:e00:1::2f/128, 2603:1040:f00::1f/128, 2603:1050:1::cd/128, 2620:1ec:c::15/128, 2620:1ec:8fc::6/128, 2620:1ec:a92::171/128, 2a01:111:f100:2000::a83e:3019/128, 2a01:111:f100:2002::8975:2d79/128, 2a01:111:f100:2002::8975:2da8/128, 2a01:111:f100:7000::6fdd:6cd5/128, 2a01:111:f100:a004::bfeb:88cf/128
TCP: 443, 80
47 Default
Required
No *.cdn.office.net, contentstorage.osi.office.net TCP: 443
49 Default
Required
No *.onenote.com TCP: 443
50 Default
Optional
Notes: OneNote notebooks (wildcards)
No *.microsoft.com, *.office.net TCP: 443
51 Default
Required
No *cdn.onenote.net TCP: 443
53 Default
Required
No ajax.aspnetcdn.com, apis.live.net, officeapps.live.com, www.onedrive.com TCP: 443
56 Allow
Required
Yes *.auth.microsoft.com, *.msftidentity.com, *.msidentity.com, account.activedirectory.windowsazure.com, accounts.accesscontrol.windows.net, adminwebservice.microsoftonline.com, api.passwordreset.microsoftonline.com, autologon.microsoftazuread-sso.com, becws.microsoftonline.com, ccs.login.microsoftonline.com, clientconfig.microsoftonline-p.net, companymanager.microsoftonline.com, device.login.microsoftonline.com, graph.microsoft.com, graph.windows.net, login.microsoft.com, login.microsoftonline.com, login.microsoftonline-p.com, login.windows.net, logincert.microsoftonline.com, loginex.microsoftonline.com, login-us.microsoftonline.com, nexus.microsoftonline-p.com, passwordreset.microsoftonline.com, provisioningapi.microsoftonline.com
20.190.128.0/18, 40.126.0.0/18, 2603:1006:2000::/48, 2603:1007:200::/48, 2603:1016:1400::/48, 2603:1017::/48, 2603:1026:3000::/48, 2603:1027:1::/48, 2603:1036:3000::/48, 2603:1037:1::/48, 2603:1046:2000::/48, 2603:1047:1::/48, 2603:1056:2000::/48, 2603:1057:2::/48
TCP: 443, 80
59 Default
Required
No *.hip.live.com, *.microsoftonline.com, *.microsoftonline-p.com, *.msauth.net, *.msauthimages.net, *.msecnd.net, *.msftauth.net, *.msftauthimages.net, *.phonefactor.net, enterpriseregistration.windows.net, management.azure.com, policykeyservice.dc.ad.msft.net TCP: 443, 80
64 Allow
Required
Yes *.compliance.microsoft.com, *.protection.office.com, *.security.microsoft.com, compliance.microsoft.com, defender.microsoft.com, protection.office.com, security.microsoft.com
52.108.0.0/14, 2603:1006:1400::/40, 2603:1016:2400::/40, 2603:1026:2400::/40, 2603:1036:2400::/40, 2603:1046:1400::/40, 2603:1056:1400::/40, 2a01:111:200a:a::/64, 2a01:111:2035:8::/64, 2a01:111:f406:1::/64, 2a01:111:f406:c00::/64, 2a01:111:f406:1004::/64, 2a01:111:f406:1805::/64, 2a01:111:f406:3404::/64, 2a01:111:f406:8000::/64, 2a01:111:f406:8801::/64, 2a01:111:f406:a003::/64
TCP: 443
65 Allow
Required
Yes account.office.net
52.108.0.0/14, 2603:1006:1400::/40, 2603:1016:2400::/40, 2603:1026:2400::/40, 2603:1036:2400::/40, 2603:1046:1400::/40, 2603:1056:1400::/40, 2a01:111:200a:a::/64, 2a01:111:2035:8::/64, 2a01:111:f406:1::/64, 2a01:111:f406:c00::/64, 2a01:111:f406:1004::/64, 2a01:111:f406:1805::/64, 2a01:111:f406:3404::/64, 2a01:111:f406:8000::/64, 2a01:111:f406:8801::/64, 2a01:111:f406:a003::/64
TCP: 443, 80
66 Default
Required
No *.portal.cloudappsecurity.com, suite.office.net TCP: 443
67 Default
Optional
Notes: Security and Compliance Center eDiscovery export
No *.blob.core.windows.net TCP: 443
68 Default
Optional
Notes: Portal and shared: 3rd party office integration. (including CDNs)
No firstpartyapps.oaspapps.com, prod.firstpartyapps.oaspapps.com.akadns.net, telemetryservice.firstpartyapps.oaspapps.com, wus-firstpartyapps.oaspapps.com TCP: 443
69 Default
Required
No *.aria.microsoft.com, *.events.data.microsoft.com TCP: 443
70 Default
Required
No *.o365weve.com, amp.azure.net, appsforoffice.microsoft.com, assets.onestore.ms, auth.gfx.ms, c1.microsoft.com, dgps.support.microsoft.com, docs.microsoft.com, msdn.microsoft.com, platform.linkedin.com, prod.msocdn.com, shellprod.msocdn.com, support.content.office.net, support.microsoft.com, technet.microsoft.com, videocontent.osi.office.net, videoplayercdn.osi.office.net TCP: 443
71 Default
Required
No *.office365.com TCP: 443
72 Default
Optional
Notes: Azure Rights Management (RMS) with Office 2010 clients
No *.cloudapp.net TCP: 443
73 Default
Required
No *.aadrm.com, *.azurerms.com, *.informationprotection.azure.com, ecn.dev.virtualearth.net, informationprotection.hosting.portal.azure.net TCP: 443
75 Default
Optional
Notes: Graph.windows.net, Office 365 Management Pack for Operations Manager, SecureScore, Azure AD Device Registration, Forms, StaffHub, Application Insights, captcha services
No *.sharepointonline.com, dc.services.visualstudio.com, mem.gfx.ms, staffhub.ms TCP: 443
78 Default
Optional
Notes: Some Office 365 features require endpoints within these domains (including CDNs). Many specific FQDNs within these wildcards have been published recently as we work to either remove or better explain our guidance relating to these wildcards.
No *.microsoft.com, *.msocdn.com, *.office.net, *.onmicrosoft.com TCP: 443, 80
79 Default
Required
No o15.officeredir.microsoft.com, officepreviewredir.microsoft.com, officeredir.microsoft.com, r.office.microsoft.com TCP: 443, 80
83 Default
Required
No activation.sls.microsoft.com TCP: 443
84 Default
Required
No crl.microsoft.com TCP: 443, 80
86 Default
Required
No office15client.microsoft.com, officeclient.microsoft.com TCP: 443
88 Default
Required
No insertmedia.bing.office.net TCP: 443, 80
89 Default
Required
No go.microsoft.com TCP: 443, 80
91 Default
Required
No ajax.aspnetcdn.com, cdn.odc.officeapps.live.com TCP: 443, 80
92 Default
Required
No officecdn.microsoft.com, officecdn.microsoft.com.edgesuite.net TCP: 443, 80
93 Default
Optional
Notes: ProPlus: auxiliary URLs
No *.virtualearth.net, c.bing.net, excelbingmap.firstpartyapps.oaspapps.com, ocos-office365-s2s.msedge.net, peoplegraph.firstpartyapps.oaspapps.com, tse1.mm.bing.net, wikipedia.firstpartyapps.oaspapps.com, www.bing.com TCP: 443, 80
95 Default
Optional
Notes: Outlook for Android and iOS
No *.acompli.net, *.outlookmobile.com TCP: 443
96 Default
Optional
Notes: Outlook for Android and iOS: Authentication
No login.windows-ppe.net TCP: 443
97 Default
Optional
Notes: Outlook for Android and iOS: Consumer Outlook.com and OneDrive integration
No account.live.com, login.live.com TCP: 443
105 Default
Optional
Notes: Outlook for Android and iOS: Outlook Privacy
No www.acompli.com TCP: 443
114 Default
Optional
Notes: Office Mobile URLs
No *.appex.bing.com, *.appex-rf.msn.com, c.bing.com, c.live.com, d.docs.live.net, directory.services.live.com, docs.live.net, partnerservices.getmicrosoftkey.com, signup.live.com TCP: 443, 80
116 Default
Optional
Notes: Office for iPad URLs
No account.live.com, auth.gfx.ms, login.live.com TCP: 443, 80
117 Default
Optional
Notes: Yammer
No *.yammer.com, *.yammerusercontent.com TCP: 443
118 Default
Optional
Notes: Yammer CDN
No *.assets-yammer.com TCP: 443
121 Default
Optional
Notes: Planner: auxiliary URLs
No www.outlook.com TCP: 443, 80
122 Default
Optional
Notes: Sway CDNs
No eus-www.sway-cdn.com, eus-www.sway-extensions.com, wus-www.sway-cdn.com, wus-www.sway-extensions.com TCP: 443
124 Default
Optional
Notes: Sway
No sway.com, www.sway.com TCP: 443
125 Default
Required
No *.entrust.net, *.geotrust.com, *.omniroot.com, *.public-trust.com, *.symcb.com, *.symcd.com, *.verisign.com, *.verisign.net, apps.identrust.com, cacerts.digicert.com, cert.int-x3.letsencrypt.org, crl.globalsign.com, crl.globalsign.net, crl.identrust.com, crl3.digicert.com, crl4.digicert.com, isrg.trustid.ocsp.identrust.com, mscrl.microsoft.com, ocsp.digicert.com, ocsp.globalsign.com, ocsp.msocsp.com, ocsp2.globalsign.com, ocspx.digicert.com, secure.globalsign.com, www.digicert.com, www.microsoft.com TCP: 443, 80
126 Default
Optional
Notes: Connection to the speech service is required for Office Dictation features. If connectivity is not allowed, Dictation will be disabled.
No officespeech.platform.bing.com TCP: 443
128 Default
Required
No *.config.office.net, *.manage.microsoft.com TCP: 443
147 Default
Required
No *.office.com TCP: 443, 80
148 Default
Required
No cdnprod.myanalytics.microsoft.com, myanalytics.microsoft.com, myanalytics-gcc.microsoft.com TCP: 443, 80
149 Default
Required
No workplaceanalytics.cdn.office.net TCP: 443, 80
152 Default
Optional
Notes: These endpoints enables the Office Scripts functionality in Office clients available through the Automate tab. This feature can also be disabled through the Office 365 Admin portal.
No *.microsoftusercontent.com TCP: 443
153 Default
Required
No *.azure-apim.net, *.flow.microsoft.com, *.powerapps.com TCP: 443
156 Default
Required
No *.activity.windows.com, activity.windows.com TCP: 443
157 Default
Required
No ocsp.int-x3.letsencrypt.org TCP: 80
158 Default
Required
No *.cortana.ai TCP: 443
159 Default
Required
No admin.microsoft.com TCP: 443, 80
160 Default
Required
No cdn.odc.officeapps.live.com, cdn.uci.officeapps.live.com TCP: 443, 80

Wednesday, July 6, 2022

2 Ways to Reset Forgotten Windows Server Password

 Method 1: Reset Windows Server 2016 Password with Installation Disk

If you have the original Windows installation disk, you can reset forgotten Windows Server 2016 password by following these steps:

  1. Boot the server from the Windows Server 2016 Installation DVD. When the Setup screen appears, press SHIFT + F10 keys to open Command Prompt.
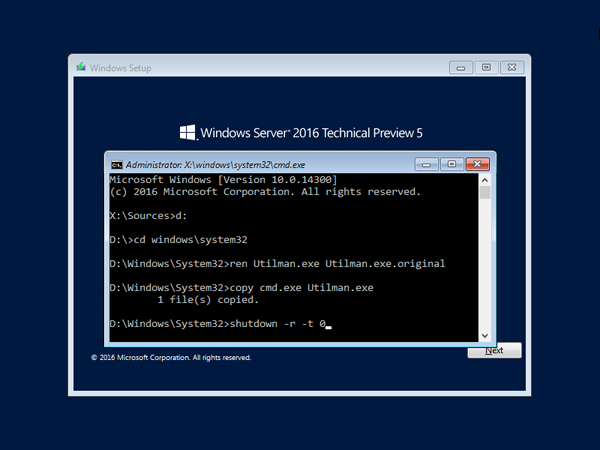
  2. At the Command Prompt, run the following commands:
    d:
    cd Windows\System32
    ren Utilman.exe Utilman.exe.original
    copy cmd.exe Utilman.exe
    shutdown -r -t 0

    replace-utilman-with-cmd

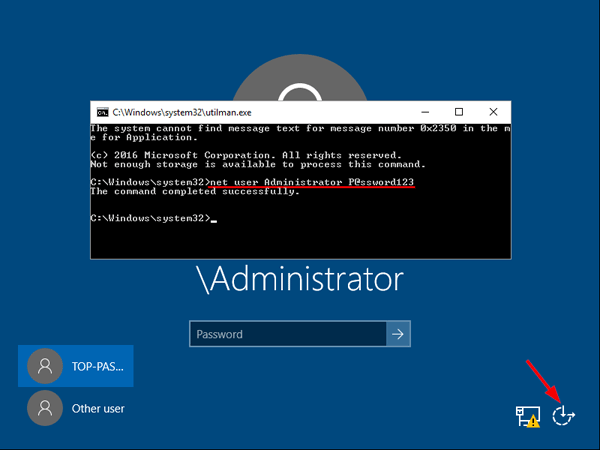
  3. The server should now reboot and present the logon screen. Press Windows Key + U or click the Ease of Access button, Command Prompt will pop up and type:
    net user Administrator P@ssword123

    reset-windows-server-2016-passwordThis will set the password for the Administrator to be P@ssword123 (case sensitive).
  4. Close the Command Prompt and you should now be able to log back onto Windows Server 2016 using the password you have provided in the previous step. After logging in, browse to the directory C:\Windows\System32, delete Utilman.exe and rename Utilman.exe.original back to Utilman.exe.

Method 2: Reset Windows Server 2016 Password with PCUnlocker

PCUnlocker is easy to use bootable utility that can help you reset domain & local administrator password in Windows Server 2016. Here’s how:

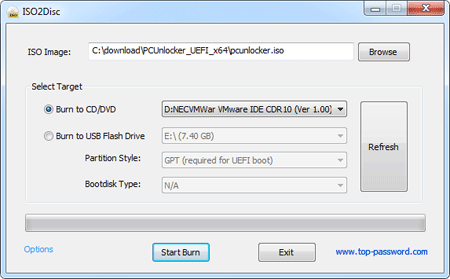
  1. Boot your server from PCUnlocker Live CD (or USB drive). If you don’t have one, you need to create it from another working PC. Download the PCUnlocker ISO file and burn it to CD (or USB drive) using the ISO2Disc software.

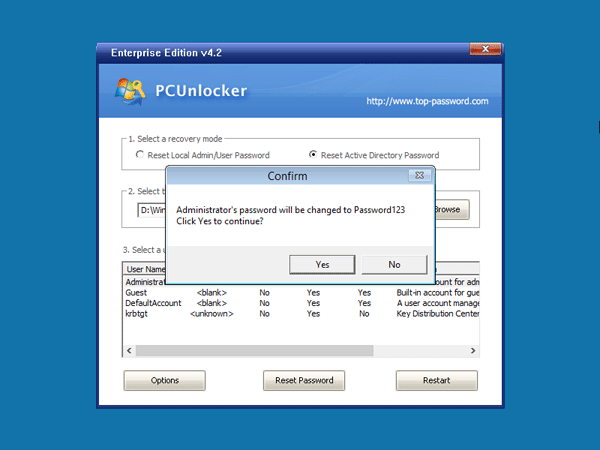
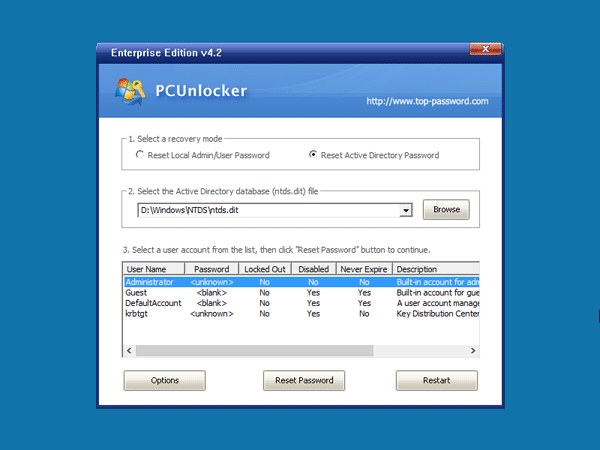
  2. When booting to the PCUnlocker program, you’ll see two options: Reset Local Admin/User Password, Reset Active Directory Password. The latter option is for domain controller only.

    pcunlocker

  3. Select the Administrator account and click the Reset Password button. Depend on your account type (local account or domain account), the program will set the password to be empty or Password123.

    reset-server-2016-domain-password

  4. After resetting the password, reboot the server and take out CD. You can then log into Windows Server 2016 administrator account successfully.

After a successful restore of a Windows client, windows gives a message of "The trust relationship between this workstation and primary domain failed"


Problem

After a successful full restore of a Windows client, Windows gives a message of  "The trust relationship between this workstation and primary domain failed" when trying to log on.

Error Message

No error message seen on restore - restore is successful

When trying to log on to the restored Windows machine, Windows gives a message of  "The trust relationship between this workstation and primary domain failed" 

Cause

In a Windows Active Directory (AD) environment, machines (as well as users) have domain passwords. While users change their own passwords manually, machines change their own passwords regularly in the background - by default every 30 days - and this happens transparently.

When a restore is done, it will restore the machine to the state it was in at that point  - which includes the machine password as it was at that time.

However if this machine's password had been subsequently changed (as part of the normal AD process), then the machine password stored on the restored image may no longer be valid, and would result in the windows machine no longer being able to log on to the domain, with the corresponding message of "The trust relationship between this workstation and primary domain failed" being seen.

Solution

As the restore was successful, no action is possible on the NetBackup side - the machine has been restored to the exact same state it was in at the time of the backup,

Instead, the machine's domain password on the restored machine would need to be updated so it matches the current one in Active Directory.

This is an OS/AD function, and the machine password can be updated using OS commands such as netdom or Reset-ComputerMachinePassword

Microsoft reference articles: