Showing posts with label Add-in. Show all posts

Sunday, May 17, 2020

Where is my Microsoft Teams Meeting Add-in for Outlook?

You’ve installed the Teams desktop app and you’re ready to start scheduling Teams meetings in Outlook. One problem…there is no option to make it a Teams Meeting. Well you’re not alone, because apparently this has been an issue among many Teams users. As luck would have it, there are quick fixes if you run into this issue.

Here are some of the steps you should take to troubleshoot:
Option 1: Install the Teams desktop application as an Administrator of the Windows computer.
  • One of the requirements to successfully install the Teams add-in is that you have administrator permissions on that computer. This is due to the COM Add-ins (seen below) in Outlook write to a specific Windows registry. If you’re not an administrator of that computer you must have someone with the correct permissions install the Teams application. Once that is complete you should be able to open Outlook and see the add-in.
Option 2: Run Outlook in normal user mode, not as an administrator.

  • When starting Outlook, do not run it with elevated permissions. This can often interfere with identifying the COM Add-ins that were mentioned above.
Option 3: 1) Download Teams –> 2) Install Teams –> 3) Sign into Teams –> 4) Restart Teams –> Restart Outlook – IN THAT ORDER
  • In order to ensure that the add-in was installed successfully, this may require you to restart your Teams application as well as Outlook. Follow the steps above to see if this does the trick.
Option 4: Make sure that you have the Teams Meeting add-in enabled. If the first 3 options haven’t worked for you try taking a look at your Outlook Options.
  • In Outlook, click FILE and then OPTIONS
  • Select the ADD-INS tab of the Outlook Options box.

  • Confirm that “MICROSOFT TEAMS MEETING ADD-IN FOR MICROSOFT OFFICE” is listed in the “ACTIVE APPLICATION ADD-INS”
  • If not, look in the “DISABLED APPLICATION ADD-INS” list. If it is in this list, select the “COM ADD-INS” in the MANAGE drop down and select GO.

  • Make sure “Microsoft Teams Meeting Add-in for Microsoft Office” is checked and select OK. 
  • Restart Outlook and you should see the Teams Meeting option available when you go to schedule a meeting in Outlook.

BEFORE


AFTER

Get an Office Add-in for Outlook

Microsoft has partnered with leading companies to build programs that help you get things done right from your inbox. These programs are called Office Add-ins in Outlook 2016 and Outlook 2019, and Apps for Office in Outlook 2013, and help you speed up the way you access information on the web.
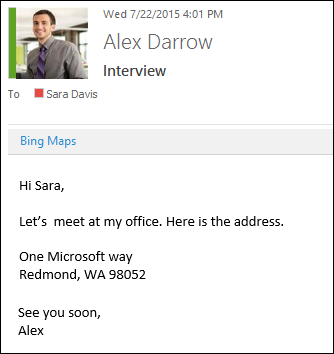
For example, the Bing Maps add-in becomes available in an email that contains an address, and you can use it to check the online map for that location right from your email.

Some add-ins are installed by your email administrator, but you can install other ones from the Office Store.


Select a tab below for instructions for your version of Outlook.

Install an add-in from the Office Store

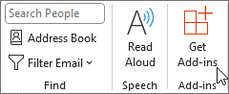
  1. In Outlook, click Home > Get Add-ins on the ribbon.
    Select Get Add-ins from the ribbon.
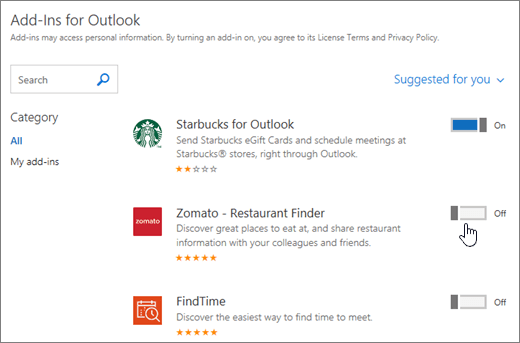
    1. On the Add-Ins for Outlook page, browse for the add-in you want by selecting All and scrolling through the list, or search for an add-in by using the Search box. When you find an add-in you want, review its privacy policy.
      For free add-ins, use the toggle controls to turn them on or off. For paid add-ins and free trials, select Get it to finish your purchase.
      Screenshot of the Add-ins for Outlook page where you can see installed add-ins and search for and select more add-ins.
  2. When the add-in is installed, go to File > Manage Add-ins or Manage Apps to make sure it's turned on. When you’re prompted to sign in, type the email address and password you use to sign in to Office programs.
    Note: If you don’t see the Manage add-ins (or Manage Apps) button, you won’t be able to get add-ins for Outlook. To get them, you’ll need Office 2013 or Office 2016 and Exchange 2013 or Exchange 2016, and your administrator needs to activate add-ins for Outlook.

Use an add-in for Outlook

The add-ins that you have installed automatically appear in the gray add-in bar near the top of the message when there is data in the email that is related to the add-in.
For example, when you open an email message that has a street address, you'll see that the add-in's name, Bing Maps, is displayed in the add-in bar.
Choose the add-in to access the data it offers.
Bing Maps add-in

When you're writing a new email message (Home > New Email), you can access other installed add-ins from the Message ribbon.

Screenshot of  the Outlook ribbon with the focus on the Message tab where the cursor points to add-ins at the far left side. In this example, the add-ins are Office Add-ins, PayPal, Evernote, Yelp, and Starbucks.
When you're in the main Outlook window (without a new message open), you can access your installed add-ins from the ribbon.
Note: If the Reading Pane (View > Reading Pane) is set to Off, all add-ins will appear disabled.

Manage your add-ins

In Outlook, go to File > Manage Add-ins or Manage Apps. When you’re prompted to sign in, type the email address and password you use to sign in to Office programs.
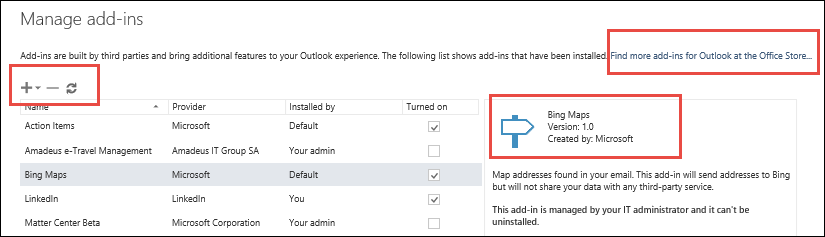
Manage add-ins in Outlook
On the Manage add-ins page, you can do the following:
  • Select Find more add-ins for Outlook at the Office Store to go to the Office Store.
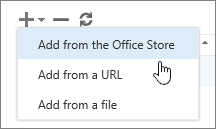
  • Use the options on the toolbar to add more add-ins, uninstall an add-in, or refresh the page to see a list of the latest add-ins.
    Screenshot of the available options on the Manage add-ins toolbar, which include add, delete, and refresh. The selections in Add are shown, which include Add from the Office Store, Add from a URL, and Add from a file.
  • Turn on or turn off an add-in by checking or clearing its check box in the Turned on column.
  • Select an add-in to see more information about it on the right side of the page.
Tip: You can also use Outlook Web App to manage your add-ins. On the top right corner of the page, choose Settings Settings > Manage integrations.