Showing posts with label Network Configuration. Show all posts

Thursday, March 21, 2019

Configure Static IP Address on a Network Adapter using PowerShell

Configure Static IP using PowerShell

So let us dive right in. To start, make sure you open an administrator PowerShell window, otherwise you will get an Access is Denied error when trying to run the command below.
We will be using two PowerShell commands, New-NetIPAddress and Set-DNSClientServerAddress.
On the server that we want to configure, we open PowerShell and type the below command:
New-NetIPAddress –IPAddress  -DefaultGateway  -PrefixLength  -InterfaceIndex (Get-NetAdapter).InterfaceIndex

Here is an example below:

New-NetIPAddress –IPAddress 192.168.1.13 -DefaultGateway 192.168.1.1 -PrefixLength 24 -InterfaceIndex (Get-NetAdapter).InterfaceIndex
All the arguments are self-explanatory, apart from the InterfaceIndex one. Over here instead of putting in the numerical value of the Interface Index, I just ran the Get-NetAdapter command inside my current command with filtering to output only the integer value of the Interface Index.
If you have multiple network adapters on your system, you can remove the function and simply enter the numerical value corresponding to the desired interface.
If the command completes successfully, we should get the result as shown below:
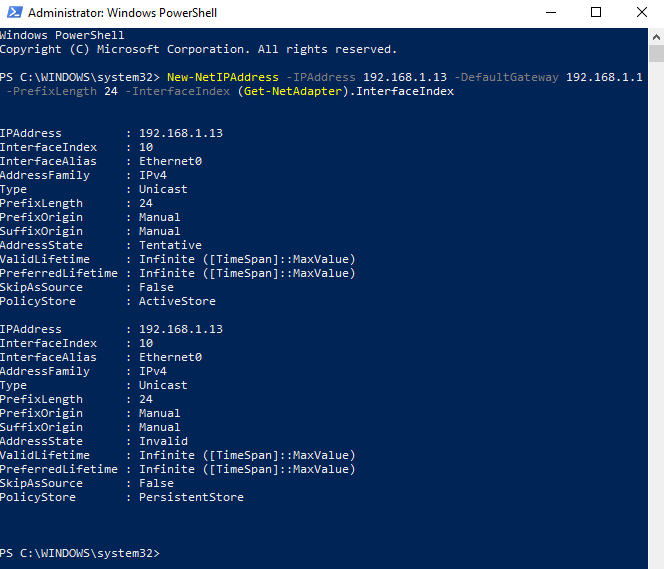
Now we have our IP Address, Subnet Mask and Default Gateway configured. However, one thing is missing. These are the DNS Server addresses.
To configure the DNS Server addresses, we run the following command:
Set-DNSClientServerAddress –InterfaceIndex (Get-NetAdapter).InterfaceIndex –ServerAddresses ,, etc.
IP1 is the primary DNS Server, IP2 is the secondary and all the others are the third and so forth.
Here is an example:

Set-DNSClientServerAdress –InterfaceIndex (Get-NetAdapter).InterfaceIndex –ServerAddresses 192.1.68.1.1


Tuesday, April 15, 2014

Network Configuration in Solaris

Configuration Files :

File containing the domain name:
/etc/defaultdomain

File containing the IP address of default router:
/etc/defaultrouter

File containing the name resolution order:
/etc/nsswitch.conf

File containing the ip address on hme0 interface :
/etc/hostname.hme0

To set DNS server and search order :
/etc/resolv.conf

To set hostname :
/etc/nodename

File containing the IP Address to hostname mapping :
/etc/inet/hosts

File containing network services and their corresponding port numbers :
/etc/inet/services

File containing the subnet mask:
/etc/inet/netmask

Create the below file to prevent the startup of in.routed daemon :
/etc/notrouter

Internet Super Daemon Configuration File:
/etc/inet/inetd.conf

Commands :

1.. To show link status of a network adapter :
 
a. To show link status on ce1
# kstat ce:1 | grep link

        link_asmpause             0
        link_duplex                  2 
        link_pause                   0
        link_speed                  100
        link_T4                        0
        link_up                        1

where link_duplex = 0 means link down
                                1 means half duplex
                                2 means full duplex

where link_speed=0 means link down
                             10 means 10MBPS
                             100 means 100MBPS
                             1000 means 1GBPS

For ce and bge interface, you should use kstat command to return NIC settings.
All other interfaces should use ndd  to determine NIC settings.

b. To how link status of hme0

# ndd -set /dev/hme instance 0
# ndd -get /dev/hme link_mode
# ndd -get /dev/hme link_speed

2. To set duplex and link speed of a network interface :

a. To set 100 full dupled on hme1 interface

# ndd -set /dev/hme instance 1
# ndd -set /dev/hme adv_100hdx_cap 0
# ndd -set /dev/hme adv_100fdx_cap 1
# ndd -set /dev/hme adv_autoneg_cap 0
# ndd -set /dev/hme link_speed 100

Then add the below lines to /etc/system

 set hme:hme_adv_autoneg_cap=0
 set hme:hme_adv_100hdx_cap=0
 set hme:hme_adv_100fdx_cap=1
 set hme:hme_link_speed=100

For ce interface,
Use the below command to set the current values and add these to a startup script.

DONT ADD THIS TO /etc/system as it would not work. !!!!

ndd -set /dev/ce instance 0
ndd -set /dev/ce adv_1000fdx_cap 0
ndd -set /dev/ce adv_1000hdx_cap 0
ndd -set /dev/ce adv_100fdx_cap 1
ndd -set /dev/ce adv_100hdx_cap 0
ndd -set /dev/ce adv_10fdx_cap 0
ndd -set /dev/ce adv_10hdx_cap 0
ndd -set /dev/ce adv_autoneg_cap 0

3. To set default router :

# route add default 192.168.1.1
Also add this into /etc/detaultrouter to make this permanent.

4. To remove the current default route :

# route delete default 192.168.1.1
Also remove it from /etc/defaultrouter to make this change permanent.

5.How to change the hostname?

a. Change the hostname in the file /etc/nodename to make this change permanent.
b. Use uname command to change the current value
# uname -S newname
c. Change the name in /etc/hosts
d. Chagne the name in DNS records
e. Change the hostname in /etc/hostname.networkinterface
f. Change the name in the files /etc/net/ticlts/hosts, /etc/net/ticots/hosts, /etc/net/ticotsord/hosts if applicable.
g. Change the name in /etc/inet/ipnodes (For solaris 10 only).
h. Please reboot the system to avoid any issues.

6. To disable a network interface :
# ifconfig hme1 unplumb

7. To enable it :
# ifconfig hme1 plumb

8. To down id :
# ifconfig hme1 down

9. To display network interface table :
# ifconfig -a
# netstat -i
# netstat -in

10. To set IP address on qfe0 network interface :
# ifconfig qfe0 191.133.23.10 netmask 255.255.255.0 up

Also set the ip label in /etc/hostname.qfe0, add hostname, IP mapping in /etc/hosts and add the netmasks into /etc/netmasks

11. To set IP alias on qfe0 :
ifconfig qfe0:1 191.133.23.10 netmask 255.255.255.0 up

Also set the ip label in /etc/hostname.qfe0:1, add hostname, IP mapping in /etc/hosts and add the netmasks into /etc/netmasks

12. To add static route to a network :

# route add -net 140.110.43.0 140.110.3.1

Also add this command to a startup script (normally located under /etc/rc2.d).
