Showing posts with label AD. Show all posts

Friday, September 27, 2019

What Is the Global Catalog?

The global catalog is a distributed data repository that contains a searchable, partial representation of every object in every domain in a multidomain Active Directory Domain Services (AD DS) forest. The global catalog is stored on domain controllers that have been designated as global catalog servers and is distributed through multimaster replication. Searches that are directed to the global catalog are faster because they do not involve referrals to different domain controllers.
Note
In Windows Server® 2003 and Microsoft Windows® 2000 Server, the directory service is named Active Directory. In Windows Server 2008 R2 and Windows Server 2008, the directory service is named Active Directory Domain Services. The rest of this topic refers to AD DS, but the information is also applicable to Active Directory.
In addition to configuration and schema directory partition replicas, every domain controller in a forest stores a full, writable replica of a single domain directory partition. Therefore, a domain controller can locate only the objects in its domain. Locating an object in a different domain would require the user or application to provide the domain of the requested object.
The global catalog provides the ability to locate objects from any domain without having to know the domain name. A global catalog server is a domain controller that, in addition to its full, writable domain directory partition replica, also stores a partial, read-only replica of all other domain directory partitions in the forest. The additional domain directory partitions are partial because only a limited set of attributes is included for each object. By including only the attributes that are most used for searching, every object in every domain in even the largest forest can be represented in the database of a single global catalog server.
Note
A global catalog server can also store a full, writable replica of an application directory partition, but objects in application directory partitions are not replicated to the global catalog as partial, read-only directory partitions.
The global catalog is built and updated automatically by the AD DS replication system. The attributes that are replicated to the global catalog are identified in the schema as the partial attribute set (PAS) and are defined by default by Microsoft. However, to optimize searching, you can edit the schema by adding or removing attributes that are stored in the global catalog.
In Windows 2000 Server environments, any change to the PAS results in full synchronization (update of all attributes) of the global catalog. Later versions of Windows Server reduce the impact of updating the global catalog by replicating only the attributes that change.
In a single-domain forest, a global catalog server stores a full, writable replica of the domain and does not store any partial replica. A global catalog server in a single-domain forest functions in the same manner as a non-global-catalog server except for the processing of forest-wide searches.

Common Global Catalog Scenarios

The following events require a global catalog server:
  • Forest-wide searches. The global catalog provides a resource for searching an AD DS forest. Forest-wide searches are identified by the LDAP port that they use. If the search query uses port 3268, the query is sent to a global catalog server.
  • User logon. In a forest that has more than one domain, two conditions require the global catalog during user authentication:
    • In a domain that operates at the Windows 2000 native domain functional level or higher, domain controllers must request universal group membership enumeration from a global catalog server.
    • When a user principal name (UPN) is used at logon and the forest has more than one domain, a global catalog server is required to resolve the name.
  • Universal Group Membership Caching: In a forest that has more than one domain, in sites that have domain users but no global catalog server, Universal Group Membership Caching can be used to enable caching of logon credentials so that the global catalog does not have to be contacted for subsequent user logons. This feature eliminates the need to retrieve universal group memberships across a WAN link from a global catalog server in a different site.
    Note
    Universal groups are available only in a domain that operates at the Windows 2000 native domain functional level or higher.
  • Exchange Address Book lookups. Servers running Microsoft Exchange Server rely on access to the global catalog for address information. Users use global catalog servers to access the global address list (GAL).

Search Requests

Because a domain controller that acts as a global catalog server stores objects for all domains in the forest, users and applications can use the global catalog to locate objects in any domain within a multidomain forest without a referral to a different server.
When a forest consists of a single domain, every domain controller has a full, writable copy of every object in the domain and forest. However, it is important to retain the global catalog on at least one domain controller because many applications use port 3268 for searching. For example, if you do not have any global catalog servers, the Search command on the Start menu cannot locate objects in AD DS.
The replicas that are replicated to the global catalog also include the access permissions for each object and attribute. If you are searching for an object that you do not have permission to access, you do not see the object in the list of search results. Users can find only objects to which they are allowed access.

User Logon Support

In addition to its role as a search provider, in a forest that has more than one domain, the global catalog has a role as an identity source during the user logon process. Universal groups can provide access to resources outside of the user’s domain. User principal names (UPNs) can specify a domain other than the domain of the user. By making universal group membership and UPN domain-user mapping information available on all global catalog servers, the global catalog provides the definitive source for groups that are capable of providing access in more than one domain and names that do not unequivocally identify the domain of the user.

Universal Group Membership

During the domain logon process, the user must be authenticated. During the authentication process, the user is validated (the domain controller verifies the identity of the user) and the user receives authorization data for access to resources. To provide authorization data of a user, the authenticating domain controller retrieves the security identifiers (SIDs) for all security groups of which the user is a member and adds these SIDs to the user’s access token. In a forest that has more than one domain, the global catalog is the only location where memberships of all universal groups in that forest can be ascertained. For this reason, access to a global catalog server is required for successful authentication in a domain that can have universal groups.
The global catalog stores the membership (the member attribute) of only universal groups. The membership of other groups can be ascertained at the domain level.
Because a universal group can have members from domains other than the domain where the group object is stored and can be used to provide access to resources in any domain, only a global catalog server is guaranteed to have all universal group memberships that are required for authentication.
For example, a user might be a member of a universal group that has its group object stored in a different domain but provides access to resources in the user’s domain. To ensure that the user can be authorized to access resources appropriately in this domain, the domain controller must have access to the membership of all universal groups in the forest.
If a global catalog server is not available, the user logon fails.

User Principal Name

A user principal name (UPN) is a logon name that takes the form of an e-mail address. A UPN specifies the user ID followed by a DNS domain name, separated by an "@" character (for example, jsmith@contoso.com). UPNs allow administrative management of the UPN suffix to provide logon names that:
  • Match the user’s e-mail name.
  • Do not reveal the domain structure of the forest.
When a user account is created, the UPN suffix is generated by default as userName@ DnsDomainName, but it can be changed administratively. For example, in a forest that has four domains, the UPN suffix might be configured to map to the external DNS name for the organization. The userPrincipalName attribute of the user account identifies the UPN and is replicated to the global catalog.
When you use a UPN to log on to a domain, your workstation contacts a global catalog server to resolve the name because the UPN suffix is not necessarily the domain for which the contacted domain controller is authoritative. If the DNS domain name in the UPN suffix is not a valid DNS domain, the logon fails. Assuming the UPN suffix is a valid DNS name, the global catalog server returns the name of the AD DS domain to your workstation, which then queries DNS for a domain controller in that domain.
If a company has more than one forest and uses trust relationships between the domains in the different forests, a UPN cannot be used to log on to a domain that is outside the user’s forest because the UPN is resolved in the global catalog of the user’s forest.

Universal Group Membership Caching

Universal Group Membership Caching eliminates the need for a domain controller in a multidomain forest to contact a global catalog server during the logon process in domains where universal groups are available. Caching group membership reduces WAN traffic, which helps in sites where updating the cached group membership of security principals, including user and computer accounts, generates less traffic than replicating the global catalog to the site.
Use the following criteria to determine if a site is a good candidate for Universal Group Membership Caching:
  • Number of users and computers in the site: The site has less than 500 combined users and computers, including transient users who log on occasionally but not on a regular basis. The cache of a user who logs on once continues to be updated periodically for 180 days after the first logon. A general limit of 500 membership caches can be updated at a time. If greater than 500 security principals have cached group memberships, some caches might not be updated.
  • Number of domain controllers: Each domain controller performs a refresh on every user in its site once every eight hours. Depending on the number of domains in the forest, 500 security principals and two domain controllers could generate more WAN traffic than placing a global catalog server in the site. Therefore, you need to rationalize the WAN costs when exceeding 500 security principals and two domain controllers.
  • Tolerance for high latency in group updates. Because domain controllers in the site where Universal Group Membership Caching is enabled update the membership caches every eight hours, and because credentials are always taken from the cache, updates to group memberships are not reflected in the security principal’s credentials for up to eight hours.

Address Book Lookups

Exchange Server uses the global catalog to store mail recipient data that enables clients in a forest to send and receive e-mail messages.

Global Catalog Dependencies and Interactions

Global catalog servers have the following dependencies and interactions with other Windows Server technologies:
  • AD DS installation. When AD DS is installed on the first domain controller in a forest, the installation application creates that domain controller as a global catalog server.
  • AD DS replication. The global catalog is built and maintained by AD DS replication:
    • Subsequent to forest creation, when a domain controller is designated as a global catalog server, AD DS replication automatically transfers PAS replicas to the domain controller, including the partial replica of every domain in the forest other than the local domain.
    • To facilitate intersite replication of global catalog server updates, AD DS replication selects global catalog servers as bridgehead servers whenever a global catalog server is present in a site and domains that are not present in the site exist in other sites in the forest.
  • Domain Name System (DNS). Global catalog server clients depend on DNS to provide the IP address of global catalog servers. DNS is required to advertise global catalog servers for domain controller location.
  • Net Logon service. Global catalog advertisement in DNS depends on the Net Logon service to perform DNS registrations. When replication of the global catalog is complete, or when a global catalog server starts, the Net Logon service publishes service (SRV) resource records in DNS that specifically advertise the domain controller as a global catalog server.
  • Domain controller Locator: When a global catalog server is requested (by a user or application that launches a search over port 3268, or by a domain controller that is authenticating a user logon), the domain controller Locator queries DNS for a global catalog server.
In the following diagram, global catalog interactions include tracking a global catalog server through the following interactions, which are indicated by boxes:
  • Active Directory installation of a new forest: Global catalog creation occurs during AD DS installation of the first domain controller in the forest.
  • Net Logon registration: Resource records are registered in DNS to advertise the domain controller as a global catalog server.
  • AD DS replication:
    • When a new domain controller (DC2) is created and an administrator designates it as a global catalog server, replication of the PAS from DC1 occurs.
    • DC1 in DomainA replicates changes for DomainA to DC2, and DC2 replicates updates to data for DomainB to DC1.
  • DC location: The dotted lines enclose the processes whereby two clients locate a global catalog server by querying DNS:
    • A through C: (A) ClientX sends a query to the global catalog, which prompts (B) a DNS query to locate the closest global catalog server, and then (C) the client contacts the returned global catalog server DC2 to resolve the query.
    • 1 through 5: (1) ClientY logs on to the domain, which prompts (2) a DNS query for the closest domain controllers. (3) ClientY contacts the returned domain controller DC3 for authentication. (4) DC3 queries DNS to find the closest global catalog server and then (5) contacts the returned global catalog server DC2 to retrieve the universal groups for the user.
Interactions with Other Windows Technologies

The global catalog solves the problem of how to locate domain data that is not stored on a domain controller in the domain of the client that requires the information. By using different ports for standard LDAP queries (port 389) and global catalog queries (port 3268), AD DS effectively separates forest-wide queries that require a global catalog server from local, domainwide queries that can be serviced by the domain controller in the user’s domain.

Thursday, September 19, 2019

OS X Active Directory Integration – How to Bind a Mac to AD

OS X Active Directory Integration – The Process

Minimum Requirements:

  • Server hardware running Windows Server 2000-2012 Standard
  • Active Directory Domain Services (ADDS) setup and configured
  • Domain Administrator-level account
  • Apple desktop or laptop running OS X 10.5 or newer

Step 1: Bind OS X to a Windows Domain

  1. Login to the Mac as an Administrator
  2. Open ‘System Preferences’ and select ‘Users & Groups’
  3. Select the ‘Login Options’ menu in the sidebar and use the “Join” button
  4. Enter the fully-qualified domain name of the AD domain being bound
  5. AD Domain level credentials will be needed

Step 2: Modify Directory Services Settings

  1. From the ‘Login Options’ menu again, edit the ‘Network Account Server’ settings
  2. Configure the “Force Local home directory on startup” option
  3. Configure the “Use UNC path from Active Directory to derive network home location”
  4. Select ‘Mapping’ which specifies unique IDs for certain attributes that server to identify a computer account
  5. Finally, there will be three optional settings to choose from, “Prefer this domain server”, “Allow administration by” and “Allow authentication from any domain in the forest.” Select whichever option is most applicable.

Now for the good news. Once your Mac clients have been joined to your AD domain, other software services that rely on AD will be able to perform necessary functions for both security and convenience.  For example, with a Mac that is bound to an AD domain, the PortalGuard Desktop Client can be installed and your end users will be able to enjoy the same Self-service Password Reset and Recovery feature that Windows users appreciate.

Tuesday, November 6, 2018

Active Directory FSMO Roles

Flexible single-master operations (FSMO) operations performed by the Active Directory domain controllers, which require a mandatory server uniqueness for each operation. Various FSMO types can be performed on the same or on multiple domain controllers. Server operating FSMO roles known as Operations Master DC.

Most operations in AD can be made on any domain controller. AD Replication service copies the changes to other domain controllers, ensuring the AD database identity on all the controllers of the same domain. Conflict resolution is as follows: if the two DC trying to change attributes of one AD object at the same time, automatic conflict resolution sуstem keep track of which change was made last.


However, there are several actions (such as changing the AD schema), in which conflicts are unacceptable. The task of a servers with FSMO roles is to avoid such conflicts. Thus, each FSMO role can be performed only simultaneously on one server. And if necessary, it can be transferred to another domain controller at any time.

FSMO roles

There are 5 FSMO roles: 2 unique roles for AD forest and 3 for every domain.
  • Schema Master responsible for changes to the Active Directory schema. There can be only one for the entire domain forest.
  • Domain Naming Master responsible for the unique name for a domain and application partitions in the forest. There can be only one for the entire domain forest.
  • Infrastructure Master stores data about users from other domains, that are part of your domain local groups. There can be one for each domain in the forest.
  • RID pool manager responsible for assigning unique relative ID (RID), required when creating domain accounts. There can be one for each domain in the forest.
  • PDC (Primary Domain Controller) Emulator responsible for compatibility with NT4 domain and pre-Windows 2000 clients, for the domain time synchronization in the forest, for changing passwords and tracks locks when users enter the wrong password.

Recommended Best Practice for placement of FSMO roles

When you install a new AD domain, all FSMO roles are placed on a single server. According to Microsoft recommendation, the Best Practice is to spread the FSMO roles between the different domain controllers.


The forest FSMO roles should be placed on one DC, and the domain role to another. In that case, if you have only one domain controller, it is recommended to deploy 1 additional DC. Thus, in an AD domain with a minimum configuration (2 DC), you need to place FSMO role as follows:

Place the following domain roles on a DC1:
  • RID Master
  • Infrastructure Master
  • PDC Emulator
Place the forest roles on a DC2:
  • Schema Master
  • Domain Master
To determine current FSMO Roles holders, perform the following command:

netdom query fsmo


In this case, the FSMO roles are distributed between the two DC.

However, you should be note, that there is no FSMO role which failure would lead to a significant loss of functionality of AD. Even in case of failure of all FSMO roles, infrastructure can operate normally within a few days, weeks or even months. Therefore, if you are going to bring DC, that contains some or all of the roles to a maintenance for some time, there is no need to transfer available FSMO roles on the other DC, your AD some time will work normally.
Failure of a DCs with FSMO roles does not lead malfunction of a domain. However, it makes it impossible for many operations, actually shifting the domain to the “read-only” mode. In case of failure of a domain controller with the FSMO roles, you can resort to the procedure of seizing FSMO roles from a failed DC.

Tools to admin FSMO roles

To manage and transfer FSMO roles in Active Directory domain use a command line utility NTDSUTIL or GUI MMC snap-ins:
  • Active Directory Domains and Trusts Domain Naming Master role
  • Active Directory Users and Computers Relative ID Master,  Infrastructure Master and Primary Domain Controller Emulator roles
  • Active Directory Schema Schema Master role


That’s all. Hope that we were able to clarify the situation with the FSMO role a bit. In future articles, we will take a closer look at each FSMO role and their features.

Wednesday, April 25, 2018

Active Directory Recovery Agent GRT Backups complete with exception "Backup Exec Remote Agent on the resource does not support the option to enable the restore of individual items"

Problem

When performing a GRT (Granular Recovery Technology) enabled Remote Agent backup of a Windows Domain controller the job completes with an exception indicating the backup source or remote server is running a later version of Windows than the Backup Exec server.

Error Message

The Agent for Windows on this backup source does not support Granular Recovery Technology because the backup source is running a later version of Windows than the Backup Exec server. A backup was run, but you will not be able to restore individual items from the backup sets.
 
To ensure that you can restore individual items from the backup sets, rerun the backup. Use a Backup Exec server that runs the same version or a later version of Windows than the backup source is running.
 
The Backup Exec Remote Agent on the resource does not support the option to enable the restore of individual items.  A backup was run, but  you will not be able to restore individual items from this backup set.


Cause

The Active Directory Application Server and the Backup Exec server must have compatible versions of Microsoft Windows. Also, a version of the Windows operating system that supports minifilter drivers must be installed on the Backup Exec server when you restore GRT-enabled data.

Solution

To perform a GRT-enabled backup of an Active Directory Application Server on Windows 2012 R2 or later, the Backup Exec server must be the same version or a later version of Microsoft Windows. See the following table for compatible versions:
 
AD Application ServerBackup Exec Server
Windows 2008Windows 2008 or later
Windows 2008 R2Windows 2008 or later
Windows 2012Windows 2008 or later
Windows 2012 R2Windows 2012 R2 or later
Windows 2016Windows 2016 or later

Restore of Active Directory Users/Group/Organizational Unit from the Active Directory Recovery Agent (ADRA) based backup set fails with the error "Unable to restore File Attributes Security or Directory Security information"

Problem

Restore of Active Directory Users/Group/Organizational Unit from the Active Directory Recovery Agent (ADRA) based backup set fails with the below mentioned error message.

Error Message

0xe000848e - Unable to restore File Attributes Security or Directory Security information.

Cause

This behavior is by design. The restore job fails while restoring the group membership information.

Solution


Even though the restore job status shows failure , the user/group is still restored with all the details.
If the Group being restored has users from another OU's, then the first restore will not restore the membership of those users (belonging to another OU's). Run another restore with only the group selected and the group membership information will be restored. 

Tuesday, September 19, 2017

Step-By-Step: Setting Up Active Directory Sites, Subnets & Site-Links

Two topologies are found in a successful network, Physical Topology and Logical Topology. Physical Topology represents the structure of the network which includes network topologies, hardware placements, IP address allocations. Logical Topology represents the security boundaries of said network, network services etc. In  an Active Directory infrastructure setup, the Domain represents the logical topology while Sites and Subnets represent the physical topology.

Active_Directory_Sites_Subnets_001 
A site can simply be defined as a physical location or network. It can be separate building, separate city or even in separate country. This Step-By-Step will provide example of this by detailing steps on setup and configuration of sites and subnets. Two sites, Site A and Site B will be created then assigned to the relevant servers along with the subnets.
The environment to be created is as follows:
 
Server Name
Roles
Operating System
Site
Subnets
DC1.contoso.com
Primary Domain Controller
Windows server standard 2012 R2
Site A (HQ)
192.168.148.0/24
SRV1.contoso.com
Additional Domain Controller
Windows server standard 2012 R2
Site B (Branch Office)
10.10.10.0/24
In this demo, SRV1 server is located in Branch office which is located in different geographical location. It is connected to primary domain via 256kb link. It is currently setup under the default AD site.
Step 1: Creating a new site
  1. Navigate to Server Manager > Tools > Active Directory Sites and Services 
  2. In the Active Directory Sites and Service window, right-click Sites and select New Site
     
    Active_Directory_Sites_Subnets_002
     
  3. Enter SiteA in the Name: box
     
  4. Select the DEFAULTIPSITELINK and click OK 
     
    Active_Directory_Sites_Subnets_003
     
  5.  Click OK to complete the site creation
     
  6. Repeat steps 1 to 5 and create SiteB. Once completed, you should see the following:
     
    Active_Directory_Sites_Subnets_004 
     
Step 2: Creating Subnets
  1. In the Active Directory Sites and Services MMC, right-click Subnets and select New Subnet… 
     
    Active_Directory_Sites_Subnets_005
     
  2. In the New Object – subnet windowtype 192.168.148.0/24
     
  3. In the Select a site object for this prefix option select SiteA and click OK 
     
    Active_Directory_Sites_Subnets_006
     
  4. Repeat steps 1 to 3 and use prefex 10.10.10.0/24 assigned to SiteB
Step 3: Creating Site Links
  1. In the Active Directory Sites and Services MMC,  right-click Inter-Site Transports > IP and then click New Site Link 
     
    Active_Directory_Sites_Subnets_007
     
  2. In the New Object – subnet window, enter a desired name for the link, select both SiteA and SiteB, and click add
     
    Active_Directory_Sites_Subnets_008
     
  3. Click OK to continue 
     
  4. The link is then created link with the default values however it can be optimized. Right-click on the link and select properties 
     
    Active_Directory_Sites_Subnets_009
     
  5. In the SiteA-SiteB Dedicated Link Properties window, the cost defines the links assigned bandwidth. Further details in regards to cost can be found here 
     
    Active_Directory_Sites_Subnets_010
     
  6. Replication changes can also be defined between sites. To accomplish this, click on Change Schedule 
     
  7. Define a custom schedule and click OK 
     
    Active_Directory_Sites_Subnets_011
     
  8.  Click OK to apply the changes

Step 4: Moving the Domain controllers to the newly created sites
  1. In the Active Directory Sites and Services MMC, navigate to Default-First-Site-Name > Servers 
     
  2. Right-click on the Domain controller required to move and select Move… 
     
    Active_Directory_Sites_Subnets_012
     
  3. In the Move Server window, select SiteA which will be site the Domain Controller will be moving to and click OK 
     
    Active_Directory_Sites_Subnets_013
     
  4. Repeat steps 1 to 3 to move SRV1 to SiteB
     
    Active_Directory_Sites_Subnets_014 
     
This completes the configuration of sites, subnets and site links.

Sunday, December 11, 2016

Common Misconfigurations of Active Directory

Misconfiguration 1.
    Issue: Administrator cannot join workstation to domain.
Common Cause: 
DHCP is provided by gateway router that receives and subsequently hands the ISP’s DNS servers to clients. Clients there for are unable to query DNS for the AD SRV records.
Fix1: Log into the routers interface, under the DHCP settings, change the dns handed out to point to the Active Directory server(s). Note: If you only have one AD server, hand out only that IP for DNS – do not have an ISP DNS server for a secondary
Fix2: 
If the router cannot be changed then move the DHCP function to a windows server and configure the appropriate options in the scope
    Fix3: Statically set each client’s DNS settings to the server – this is really the option of last resort, I never recommend manually touching each PC – commonly called sneakerware

Misconfiguration 2.
Issue: SRV records for DC are missing in DNS
Common Cause: DC points to invalid DNS server or Nic does not have the checkbox to Register in DNS selected.
Fix1: Change the DNS to a valid DC if only one DC then point to its IP Address as primary DNS and its loopback (127.0.0.1) as secondary DNS
Fix2: Check the box under TCPIPV4 to Register in DNS
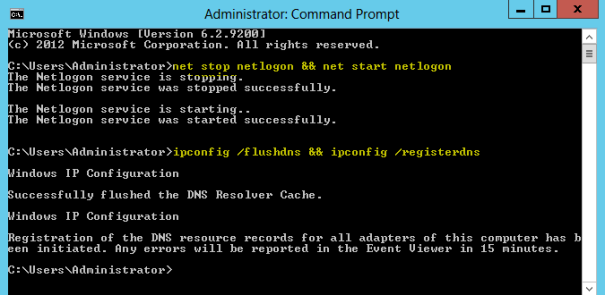
Note: After either of these fixes are applied run the following highlighted commands from an administrative command prompt


Misconfiguration 3.
    Issue: Multiple IP’s are registered for the same domain controller – replication and authentication issues ensue.
Common Cause: Multiple nics in the server, whether or not they are used.
Fix1: Under network and sharing center, disable all unused nics – delete all invalid dns records for this server in DNS
Fix2: If this is a multi-homed server (more than 1 nic enabled and ip’d), select 1 nic to register in DNS and disable registering in DNS for the other nic(s) – delete all invalid dns records for this server in dns
Fix3: If this is a multi-homed server (more than 1 nic enabled and ip’d) and the goal is for load balancing or redundancy – look at the teaming options on the nic which will allow the redundancy and load balancing under a single IP (Windows 2012+ does this natively now)

Misconfiguration 4.
    Issue: Adding a new domain controller to replace old domain controller, when old domain controller is shut down nobody can login
Common Cause: 
Sysvol and Netlogon not shared due 
Fix1: 
Old DC is in journal wrap for the sysvol folder http://blogs.msmvps.com/acefekay/2013/08/28/how-to-recover-a-journal-wrap-error-jrnl_wrap_error-and-a-corrupted-sysvol-from-a-good-dc-what-option-do-i-use-d4-or-d2-whats-the-difference-between-d4-and-d2/
Fix2:
 If replicating via DFS-r, source server may be in dirty shutdown, check for 2213 events in the event log. http://support.microsoft.com/kb/2846759/en-us
Fix3:

Misconfiguration 5
Issue: Multiple issues joining domain controllers, AD stops replicating
Common Cause: IPv6 has been disabled or uninstalled

Monday, March 21, 2016

GPO – Deploying Java 8 Update 60

Extracting the MSI

To extract the MSI, run the “jre-8u60-windows-i586.exe” or  “jre-8u60-windows-x64.exe” EXE do not proceed with the installation. Open the folder “%LOCALAPPDATA%Low\Oracle\Java”, depending if you ran the i586 or x64 version you will see one of the following folders.
  • jre1.8.0_60
  • jre1.8.0_60_x64
Open up the correct folder, and within the folder you will see the MSI file “jre1.8.0_60.msi”. Copy this MSI to another location then cancel the installation.

Silent Install Error

Now that you have the MSI file you have probably tried to install it from the command line using “msiexec /qb /i jre1.8.0_60.msi”. If you used a command prompt that isn’t elevated you get the following error in the event viewer, even though you elevate the MSI installation.
“Error 1722. There is a problem with this Windows Installer package. A program run as part of the setup did not finish as expected. Contact your support personnel or package vendor.”

MSI Fixes

The reason for the error above is that the MSI executes an installer that is embedded into the MSI, but when it runs this installer it doesn’t run it with administrative privileges instead it runs it in the logged on users security context. To fix this you need to modify the MSI DB with an MSI DB editor such as Orca (My personal preference is InstED http://www.instedit.com/). Open the MSI in your editor of choice and open up the table “CustomAction” and select the row “installexe” and change the value of the field “Type” to decimal 3090 or hexadecimal 0x0C12. This will set the msidbCustomActionTypeNoImpersonate bit so that it runs the embedded installer with administrative privileges.
Once the change above has been made the installer will now fail with the following error.
“Unable to install Java. Unable to open file C:\ProgramData\Oracle\Java\java.settings.cfg. Check that the configuration file exists and that the path to the file is correct.”
To fix this error an empty configuration file “java.settings.cfg” needs to be added to the “%ALLUSERSPROFILE%\Oracle\Java” folder by the installer. To do this we need to add 6 new entries to various tables in the MSI DB.
Once again open the MSI in your editor of choice and perform the following:
  1. Insert a new row into the table “Directory”
    • Directory Field = CommonAppDataFolder
    • Directory_Parent Field = TARGETDIR
    • DefaultDir Field = .:Common~1|CommonAppData
  2. Insert a new row into the table “Directory”
    • Directory Field = OracleDir
    • Directory_Parent Field = CommonAppDataFolder
    • DefaultDir Field = Oracle
  3. Insert a new row into the table “Directory”
    • Directory Field = JavaDir
    • Directory_Parent Field = OracleDir
    • DefaultDir Field = Java
  4. Insert a new row into the table “Component”
    • Component Field = emptycfgComponent
    • ComponentId Field =
    • Directory_  Field = JavaDir
    • Attributes Field = Decimal 0 or Hexadecimal 0x0000
    • Condition Field =
    • KeyPath Field =
  5. Insert a new row into the table “FeatureComponents”
    • Feature_ Field = jrecore
    • Component_ Field = emptycfgComponent
  6. Insert a new row into the table “File”
    • File Field = java.settings.cfg
    • Component_ Field = emptycfgComponent
    • FileName Field = java~1.cfg|java.settings.cfg
    • FileSize Field = 0
    • Version Field =
    • Language Field =
    • Attributes Field = Decimal 8192 or Hexidecimal 0x2000
    • Sequence Field = 2
  7. Insert a new row into the table “Media”
    • DiskId Field = 2
    • LastSequence Field = 2
    • DiskPrompt Field =
    • Cabinet Field =
    • VolumeLabel Field =
    • Source Field =
  8. Insert a new row into the table “RemoveFile”
    • FileKey Field = java.settings.cfg
    • Component_ Field = emptycfgComponent
    • FileName Field = java~1.cfg|java.settings.cfg
    • DirProperty Field = JavaDir
    • InstallMode Field = 3
This adds a reference to the file in the installer DB, now you need to create an empty “java.settings.cfg” file. To do this open the folder where the MSI is located and create the folder structure “CommonAppData\Oracle\Java” and then within the “Java” folder create an empty file called “java.settings.cfg”.
The last thing to be done is to set the embedded installer so that it installs silently when the UI level is set to “Basic UI” (/qb switch) , the current configuration is that it only installs silently if the UI level is set to “No UI” (/qn switch). To change this open the MSI in your editor and open the table “InstallExecuteSequence”, within that table locate the action “SetSilentInstall” and change the condition from “UILevel=2” to “UILevel<=3”.
With the changes above you will find that the MSI installer should work as expected.

Customisations

There are many articles out on the web on how to customise the installation of Java 7 by changing/adding properties to the “Properties” table in the MSI, the same properties still apply. Here are the ones that I’ve chosen to set in our deployment.
Disable Java Auto Update
  • AUTO_UPDATE=0
  • AUTOUPDATECHECK=0
  • JU=0
  • JAVAUPDATE=0
Disable the EULA
  • EULA=0
Disable the installation Java with sponsored software
  • SPONSORS=0
Lower the web Java security level (Note: High is the lowest setting in Java 8)
  • WEB_JAVA_SECURITY_LEVEL=H
Disable the sending of  installation-related statistics to Oracle
  • WEB_ANALYTICS=0

Tuesday, June 30, 2015

Changing Active Directory and Exchange username

         Steps (17 total)

1

Open Active Directory Users and Computers


2

Navigate to the Employees Organizational Unit (OU)


3

Right-click on the name of the employee for the name change and select rename


4

Rename the employee


5

Rename User dialog box appears

-Full Name should be correct
-First Name should be correct
-Last Name should be changed to the new Last Name
-Display Name will change in the above step
-User Logon Name should be changed to the new Last Name
-User Logon name (pre-Windows 2000) will be changed in the above step
6

Open Exchange Management Console


7

Under Recipient Configuration click on Mailbox to view all user mailboxes


8

Right click the employee name and select Properties


9

In the General Tab

-Change the Alias to match username changed in Active Directory Users and computers
-Click Apply button
10

In the E-Mail Addresses Tab

-SMTP address with the new name should be bold
-Highlight the old address, right click and select remove
11

Update the Offline Address Book, navigate to Organization Configuration and select Mailbox


12

Select the Offline Address Book Tab


13

Right click on the Default Offline Address Book select Update


14

Click Yes in the dialog box

That should do it for both AD and Exchange.
15

Log into user computer as admin

Make sure to log out of the user account before logging in as admin.
16

Rename the user folder

User folders in Windows 7\8 are located C:\Users\
-To change the user folder name, right click folder and choose "Rename" and press Enter
17

Re-Link the correct user account folder in the registry

-Press Windows Key + R combination, type put Regedt32.exe in Run dialog box and hit Enter to open the Registry Editor.
-Navigate to the following location:
HKEY_LOCAL_MACHINE\SOFTWARE\Microsoft\Windows NT\CurrentVersion\ProfileList
-Under the hood of ProfileList key, you’ll find the subkeys specific to a profile.
For example, I found out myself S-1-5-21-2944774474-1080414133-2956492554-1001. You’ll have these long subkeys equal to the number of user accounts on your system. All you need to do is that make sure the expandable registry string (REG_EXPAND_SZ) named ProfileImagePath in the right pane of these keys exists and linked properly to the correct user account folder. If you find that this is not the case, just point it to correct the location.