Showing posts with label Windows 2016. Show all posts
Showing posts with label Windows 2016. Show all posts
Monday, November 9, 2020


Saturday, September 19, 2020
Saturday, June 13, 2020
Tuesday, June 9, 2020
Tuesday, May 26, 2020
Wednesday, May 20, 2020
Tuesday, May 19, 2020
Monday, May 18, 2020
Sunday, May 10, 2020
Wednesday, July 10, 2019
How To Configure Managed Service Accounts Windows Server 2016
Managed Service Account (MSA) Is a new type of Active Directory Account type where AD responsible for changing the account password every 30 days.
With MSA no one needs to set up the account password or even know it, the entire password management process Is managed by Active Directory.
In my example, I’ll use the Managed Service Account to run my IIS Application Pool.
Requirements
To use MSA, Active Directory forest level will have to be set to Windows Server 2012 at a minimum.You will need Active Directory Management Tools to run the cmdlets In this post
Before we start
I have to say that before I wrote this article I visited a few blogs and most of them overcomplicated the process, This post will show you how to deploy MSA In 10 minutes.Just make sure to test it in the lab before deploying Into production.
Master Root key
The first step In the MSA deployment process Is to create a Master root Key using the cmdlet below.Add-KdsRootKey -EffectiveTime ((get-date).addhours(-10)) -Verbose

Create Service Account
To create and configure the service. I’ll use 4 cmdlets.The first cmdlet will create the account and also create a DNS name for the account.
New-ADServiceAccount sms -DisplayName "WDS Service" -DNSHostName sms.test.local
Once the account has been created, I will grant the Server (WDS) access to it, which mean the Server (WDS) will have permission to request a password reset every 30 days from Active Directory.
I could add multiple server names If needed.
Set-ADServiceAccount sms -PrincipalsAllowedToRetrieveManagedPassword wds$
With the cmdlet below, I can test the account (return result should be true).
Test-ADServiceAccount sms |fl
And the final cmdlet will Install the Service Account on the WDS Server.
install-ADServiceAccount sms

Set Windows Service
To setup Windows Server service to use the managed Service account, I’ll open the service and use the format belowTest\sms$ without typing the password.

If the account needs the log in as a service right you will see the prompt below.

Once configured, I can start the service

Just remember that If the service account needs to be part of the Domain Admins group or any other group you will need to add the service to the group as well.
SET IIS Application Pool
Next, I’ll configure IIS Application Pool to use the Service Account.Using the Application Pools menu and right click on the DefaultAppPool

Select Advanced Settings

In the Advanced Setting -> Process Model -> Identity I’ll change the account

No need to type the password

As you can see below, The Application Pool started and Is using the Service Account.

Get-ADServiceAccount -Filter *

Rollback
To remove the Service Account from Active Directory, I’ll use the cmdlet below:Remove-adservcieaccount sms
To remove the account from a Windows service, I’ll run the line below (from command line) with the service name
sc config audiosvr obj= test\Admin password=Password123
Tuesday, October 3, 2017
Step-By-Step: Migrating Active Directory FSMO Roles From Windows Server 2012 R2 to 2016
With Windows server 2016 was released for public (GA), many businesses
are working on migrating their services to the new offering. This post will
walk you through the steps needed to migrate Active Directory FSMO roles
running on Windows Server 2012 R2 to Windows Server 2016 Active Directory. The
same steps are valid for migrating from Windows Server 2012, Windows Server
2008 R2 and Windows Server 2008.
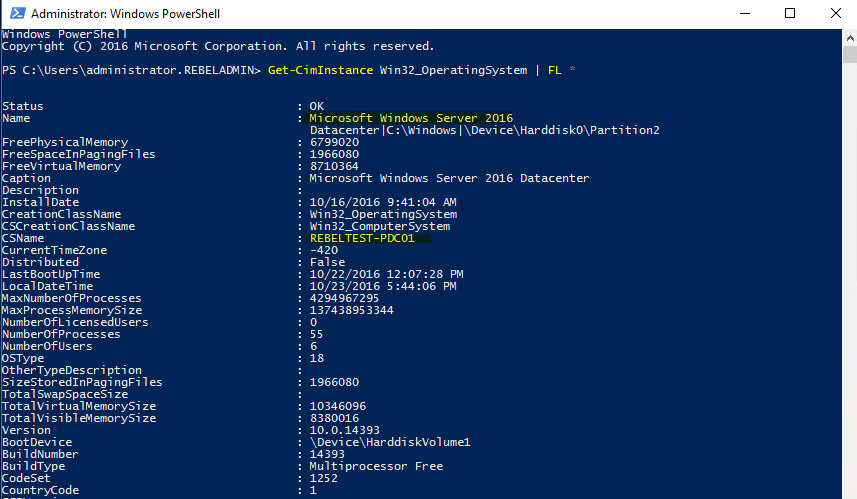
In this setup, the Windows Server 2012 R2 domain controller is setup as
a PDC. The Windows Server 2016 machine has already been added to the existing
domain.


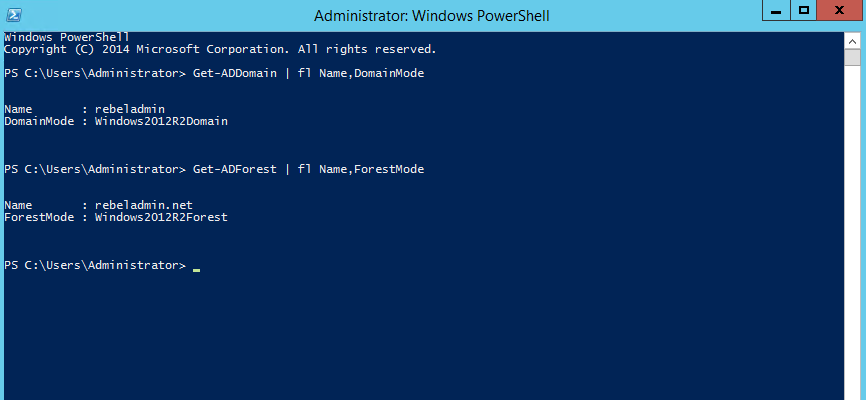
Current domain and forest functional level of the domain is windows
server 2012 R2.


So, let's start with the migrate process.
Install Active Directory on windows server 2016
1. Log in to windows server 2016 as domain administrator or
enterprise administrator
2. Check the IP address details and put the local host IP address
as the primary DNS and another AD server as secondary DNS. This is because
after AD install, server itself will act as DNS server
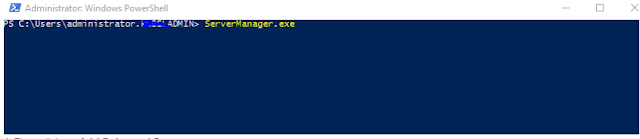
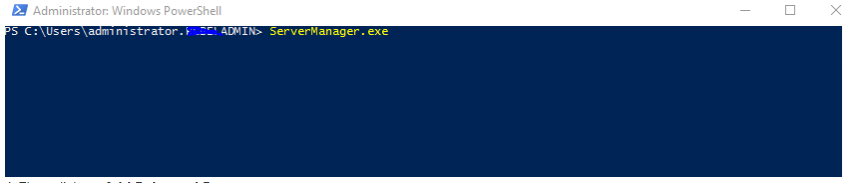
3. Run servermanager.exe form PowerShell to open
server manager (there is many ways to open it)
4. Then click on Add Roles and Features


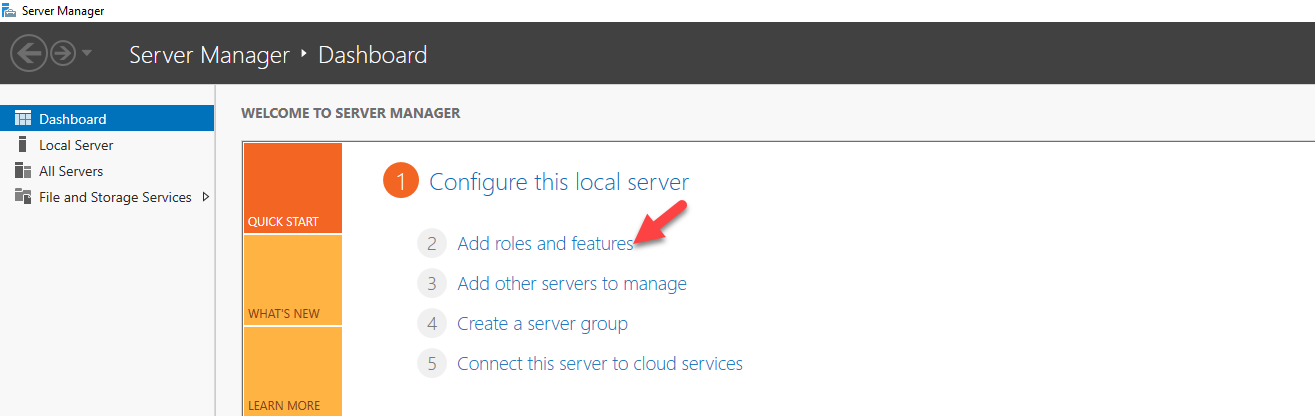
5. It will open up the wizard, click next to
continue
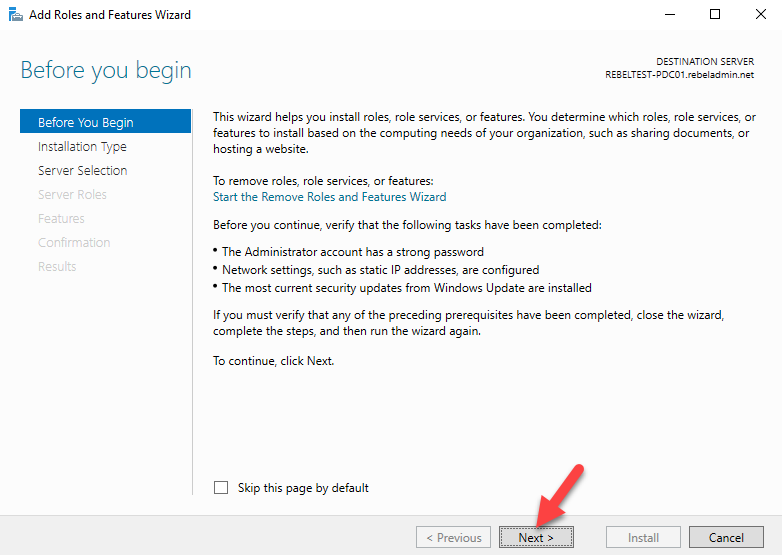
6. In next window keep the default and click next
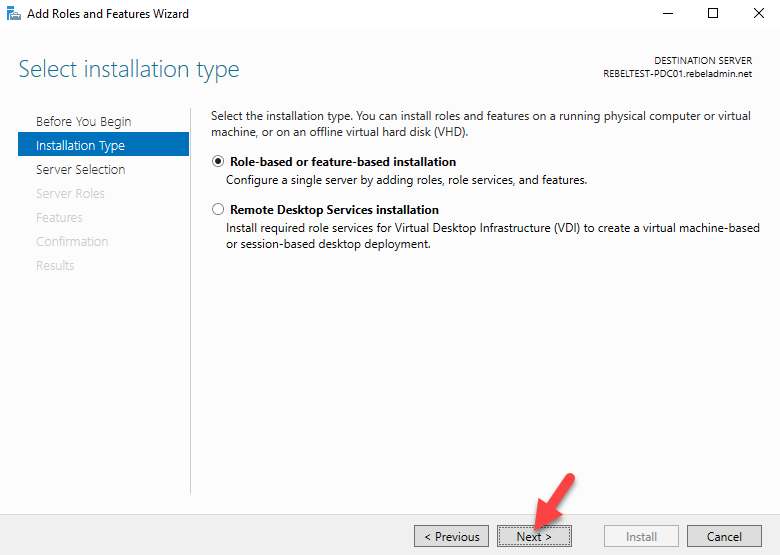
7. Roles will be installed on same server, so leave the default
selection and click next to continue
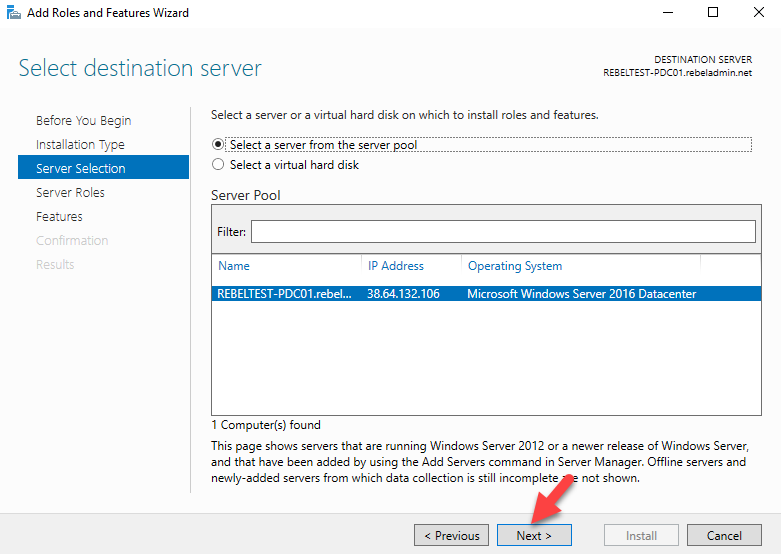
8. Under the server roles tick on Active Directory Domain
Services, then it will prompt with the features needs for the role. Click
on add features. Then click next to proceed


 9. On the features windows keep the default and click next


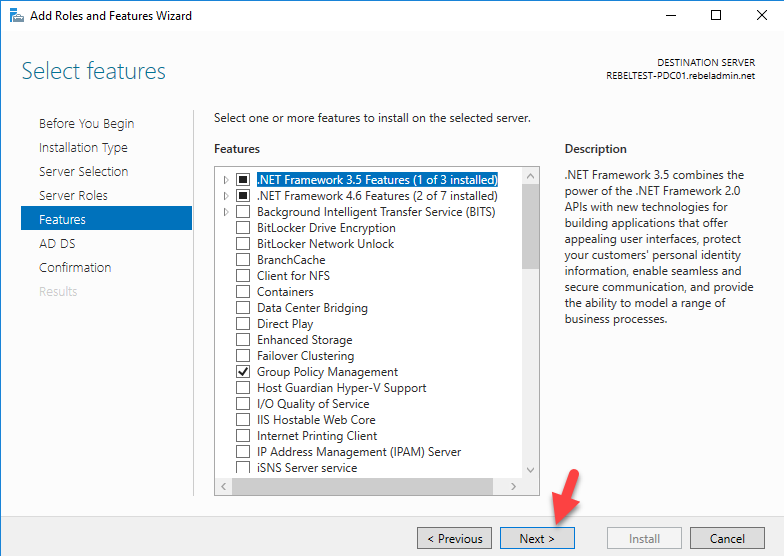
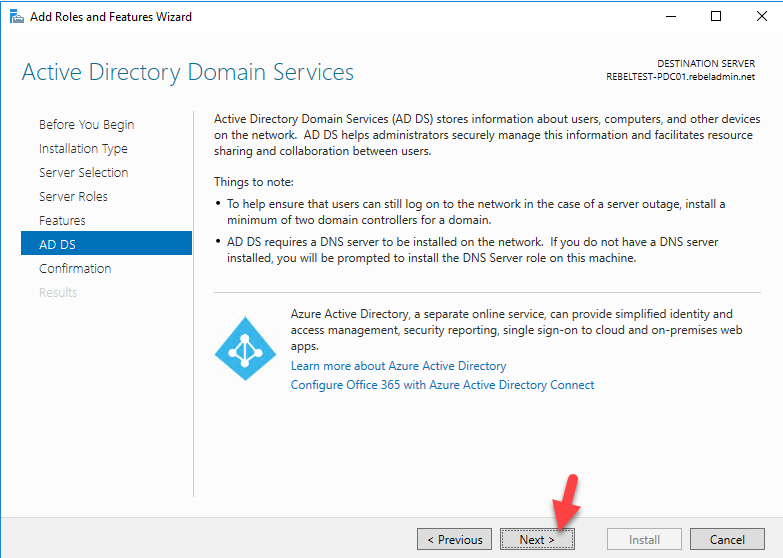
10. In next window, it will give brief description about AD DS,
click next to proceed
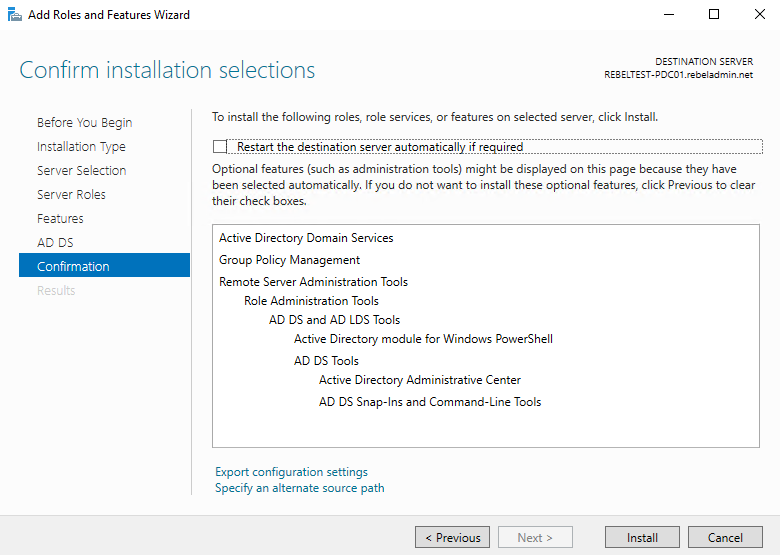
11. Then in next window it will give brief description about
configuration and click on install to start the role
installation process.
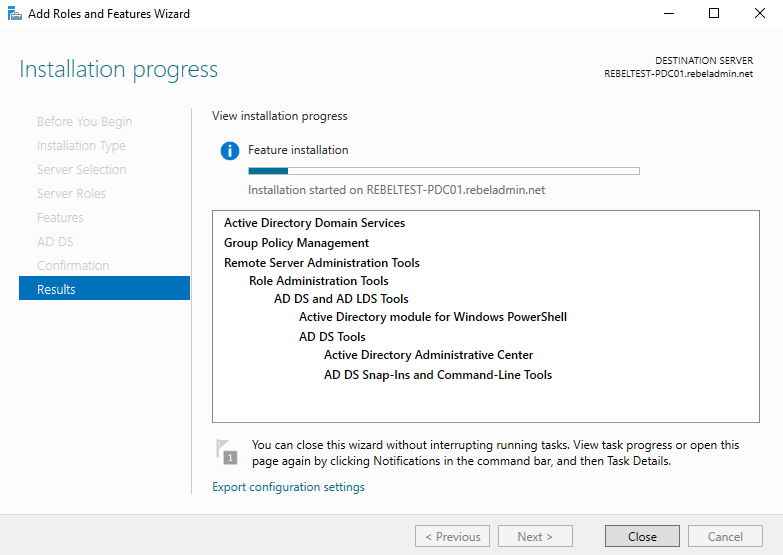
12. Once installation completed, click on promote this
server to a domain controller option


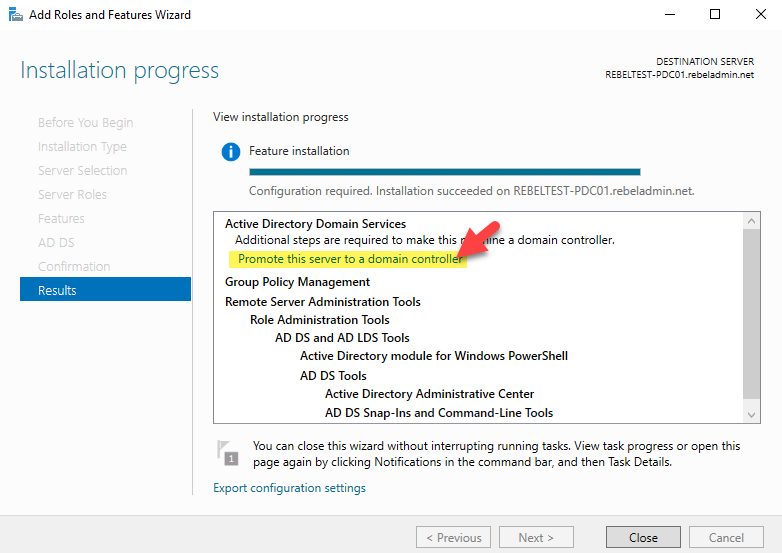
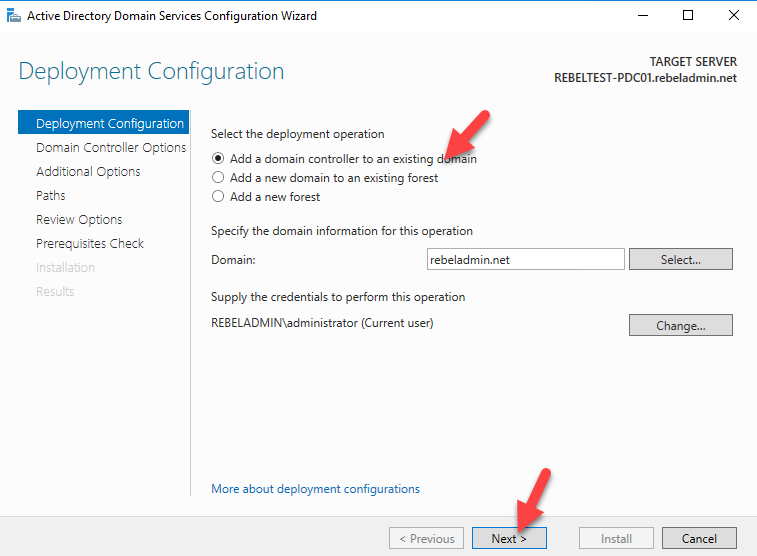
13. It will open up the Active Directory Domain Service
configuration wizard, leave the option Add a domain controller to
existing domain selected and click next.


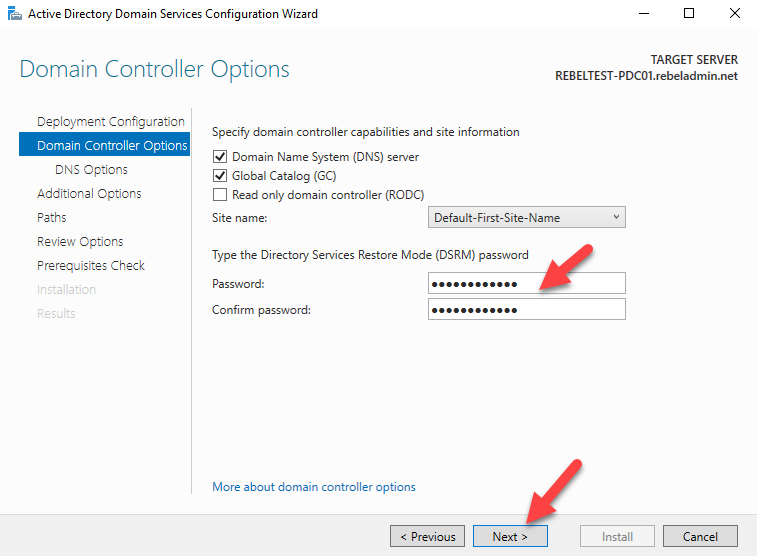
14. In next window define a DSRM password and
click next


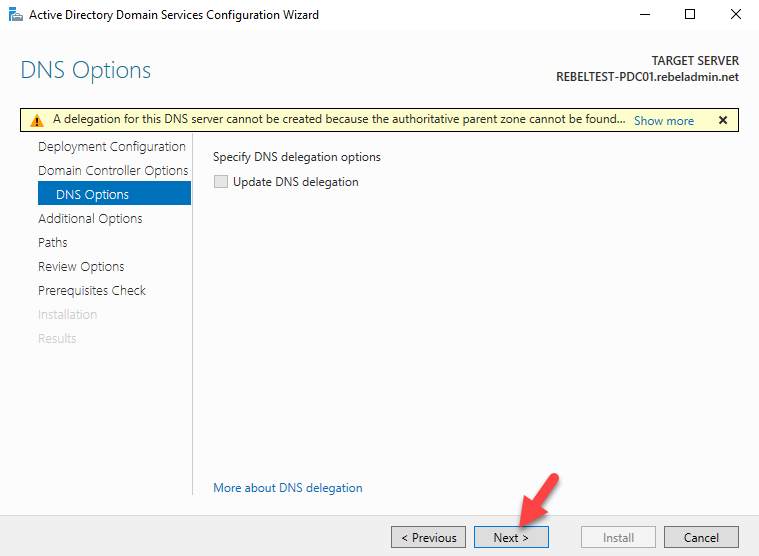
15. In next window click on next to proceed
16. In next windows, it asks from where to replicate domain
information. You can select the specific server or leave it default. Once done
click next to proceed.Â
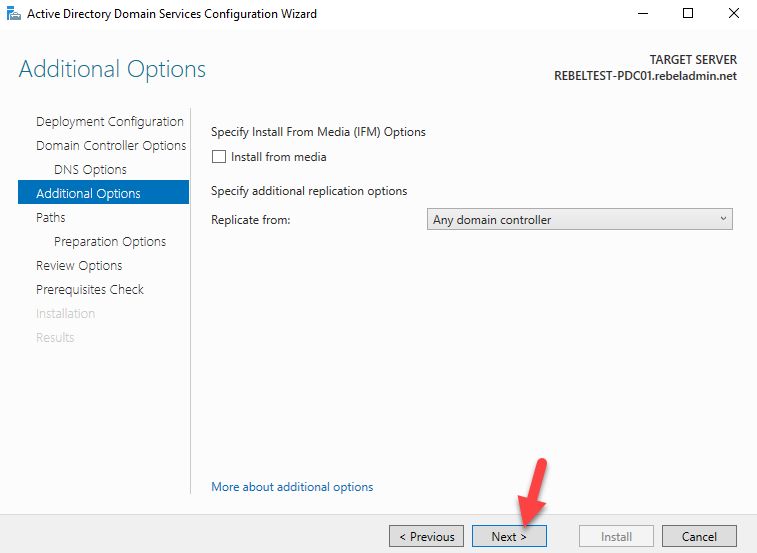
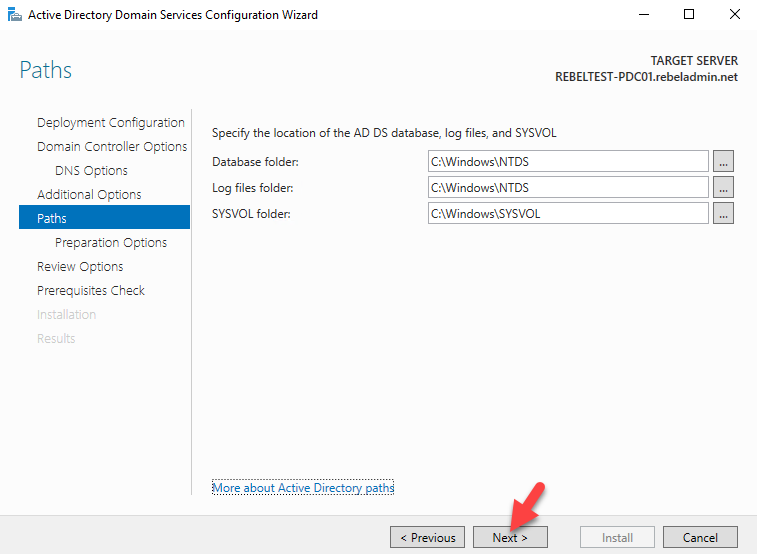
17. Then it shows the paths for AD DS database, log files and
SYSVOL folder. You can change the paths or leave default. In demo, I will keep
default and click next to continue
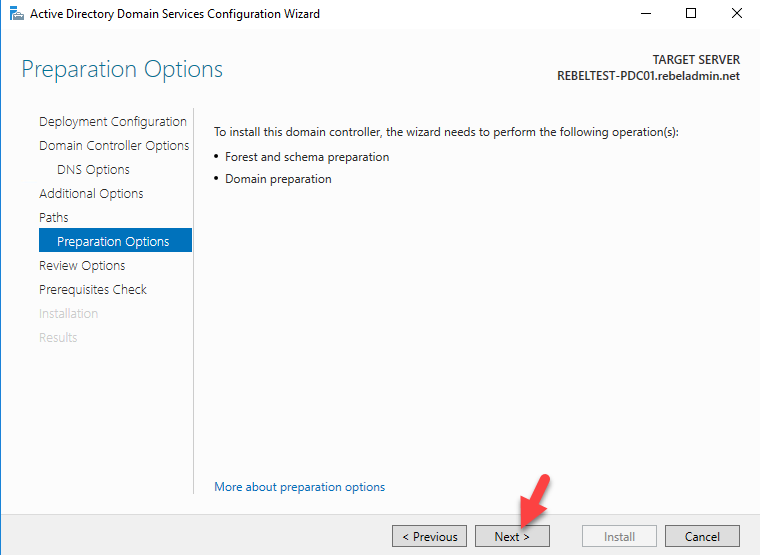
18. In next windows, it will explain about preparation options.
Since this is first windows server 2016 AD on the domain it will run forest and
domain preparation task as part of the configuration process. Click next to
proceed.
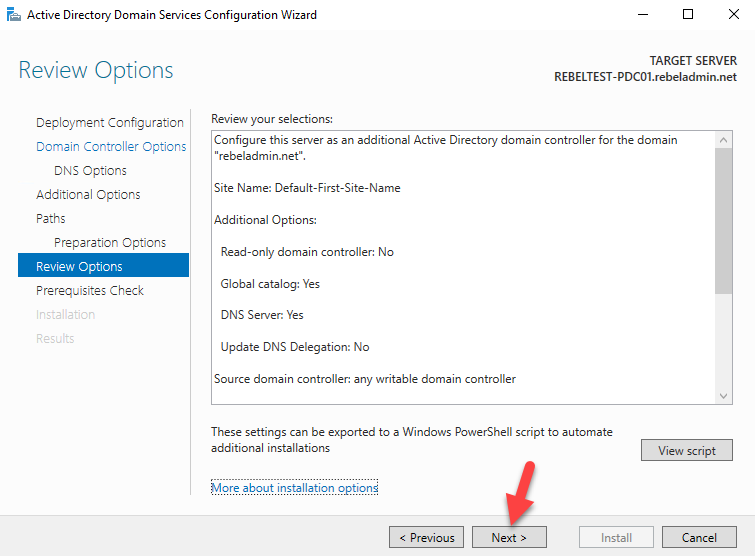
19. In next window, it will list down the options we selected.
Click next to proceed.


20. Then it will run prerequisite check, if all good
click on install to start the configuration process.


21. Once the installation completes it will restart the server.
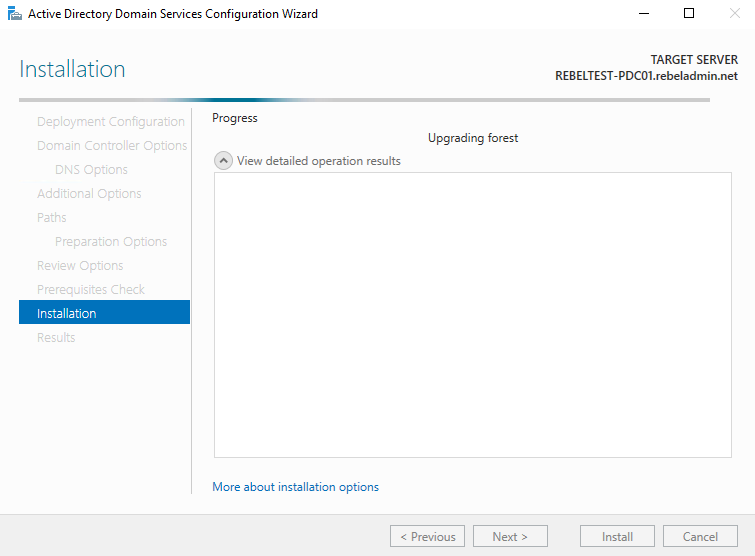
Migrate FSMO Roles to windows server 2016 AD
I assume by now you have idea what is FSMO roles. If not search my blog
and you will find article explaining those roles.
There are 2 ways to move the FSMO roles from one AD server to another.
One is using GUI and other one is using command line. I had already written
articles about GUI method before so I am going to use PowerShell this time to
move FSMO roles. If you like to use GUI mode search my blog and you will find
articles on it.
1) Log in to windows server 2016 AD as enterprise administrator
2) Open up the Powershell as administrator. Then type netdom query
fsmo. This will list down the FSMO roles and its current owner.


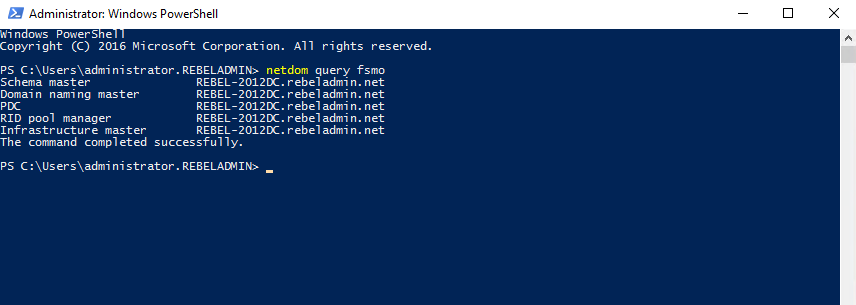
3) In my demo, the windows server 2012 R2 DC server holds all 5
fsmo roles. Now to move fsmo roles over, type Move-ADDirectoryServerOperationMasterRole
-Identity REBELTEST-PDC01 -OperationMasterRole SchemaMaster,
DomainNamingMaster, PDCEmulator, RIDMaster, InfrastructureMaster and
press enter

In here REBELTEST-PDC01 is the windows server 2016 DC. If FSMO roles are
placed on different servers, you can migrate each and every FSMO roles to
different servers.
4) Once its completed, type netdom query fsmo again
and you can see now its windows server 2016 DC is the new FSMO roles owner.
Uninstall AD role from windows server 2012 R2
Now we moved FSMO roles but we still running system on windows 2012 R2
domain and forest functional levels. In order to upgrade it, first we need to
decommission AD roles from existing windows server 2012 R2 servers.
1) Log in to windows 2012 R2 domain server as enterprise
administrator
2) Open the PowerShell as administrator
3) Then type Uninstall-ADDSDomainController
-DemoteOperationMasterRole -RemoveApplicationPartition and press
enter. It will ask for local administrator password. provide
new password for local administrator and press enter.
4) Once its completed it will restart the server.
Upgrade the forest and domain functional levels to windows server 2016
Now we have the windows server 2012 R2 domain controllers demoted, next
step is to upgrade domain and forest functional levels.
1) Log in to windows server 2016 DC as enterprise administrator
2) Open PowerShell as administrator
3) Then type Set-ADDomainMode -identity rebeladmin.net
-DomainMode Windows2016Domain to upgrade domain functional level to
windows server 2016. In here rebeladmin.net is the
domain name.Â
4) Then type Set-ADForestMode -Identity rebeladmin.net
-ForestMode Windows2016Forest to upgrade forest functional level.

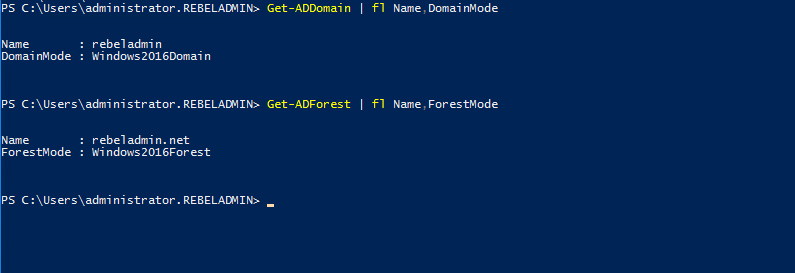
5) Once done you can run Get-ADDomain | fl Name,DomainMode and Get-ADForest
| fl Name,ForestMode to confirm new domain and functional level
Sunday, October 1, 2017
KRBTGT Account Password Reset Scripts now available for customers
Credential theft and reuse attacks continue to be top of mind for many of the CISOs I have talked to recently. We have discussed this topic several times in the past:
- New Strategies and Features to Help Organizations Better Protect Against Pass-the-Hash Attacks
- New Guidance to Mitigate Determined Adversaries’ Favorite Attack: Pass-the-Hash
- Targeted Attacks Video Series
- You asked, we answered: #AskPtH Questions and Answers
 Although pass-the-hash credential theft and reuse attacks aren’t new, more recently security researchers have been focusing on attack methods for Kerberos authentication. Kerberos authentication is achieved by the use of tickets enciphered with a symmetric key derived from the password of the server or service to which access is requested. To request such a session ticket, a special ticket, called the Ticket Granting Ticket (TGT) must be presented to the Kerberos service. The TGT is enciphered with a key derived from the password of the krbtgt account, which is known only by the Kerberos service[i].
A stolen krbtgt account password can wreak havoc on an organization because it can be used to impersonate authentication throughout the organization thereby giving an attacker access to sensitive data.
One way to help mitigate the risk of a bad actor using a compromised krbtgt key to forge user tickets is by periodically resetting the krbtgt account password. Resetting this password on a regular basis reduces the useful lifetime of krbtgt keys, in case one or more of them is compromised.
Today we are sharing the krbtgt account password reset script and associated guidance that will enable customers to interactively reset and validate replication of the krbtgt account keys on all writable domain controllers in the domain. By providing this script and associated guidance, we hope to help customers perform the reset in a way which reduces the likelihood of authentication errors caused by delayed distribution of the new krbtgt account keys in their environment.
The Reset-KrbtgtKeyInteractive-v1.4 enables customers to:
- Perform a single reset of the krbtgt account password (it can be run multiple times for subsequent resets).
- Validate that all writable DC’s in the domain have replicated the keys derived from the new password, so they are able to begin using the new keys.
The krbtgt account password reset script guide includes detailed information on how to use the reset script and its three modes- Informational, Estimation Mode, and Reset and offers:
- A step-by-step list of tasks associated with performing the krbtgt account password reset.
- Information for customers wishing to invalidate all existing TGTs by performing a double reset of the krbtgt account secret during a comprehensive Active Directory recovery.
We’ve also provided a detailed guide which helps system administrators understand the required tasks, impact to the organization, schedule and timeline, and other considerations. Together, this combination covers necessary tasks, tests, and validations that should be performed before and after the reset.
It is important to remember that resetting the krbtgt is only one part of a recovery strategy and alone will likely not prevent a previously successful attacker from obtaining unauthorized access to a compromised environment in the future. We strongly advise that customers create a comprehensive recovery plan using guidance found in the Mitigating Pass-the-Hash and Other Credential Theft, version 2.
Friday, August 4, 2017
Windows Server 2012 How To Create System Restore Point Using Windows Server Backup Feature
In this article, let us see how to enable and use the backup features of Windows Server 2012/2016. Let us go step by step as usual.
1. Go To Server Manager.

2. Click on Next.

3. Select Role-based or Feature based installation and click Next.

4. Select the Server and Click Next.

5. The default roles will be selected. Don’t bother about them and click next.

6. On the Features Wizard, Select the Windows Server Backup Feature and click Install.

7. Once, the installation completes, do a restart of the server and execute the below exe from the Run.

8. The following wizard will appear.

9. On the Right Panel, you will find various options like Backup Schedule, Backup Once, Recover etc., they are self-explanatory as the name explains. Now, let us go with a Backup Once option. For this wizard, I request you to follow the screen shots as there is no explanation required for them.


Now, After the Backup, the System Restore Point will be Created.
Issues faced while creating a Backup.
1. Backup failed to complete. A Volume Shadow Copy Service Operation failed. Please check "VSS" and "SPP" application event logs for more information. Detailed error: The operation ended before completion.
Looking into the EventVWR, the detailed exception was like
The backup operation that started at '2013-10-08T07:37:24.827000000Z' has failed because the Volume Shadow Copy Service operation to create a shadow copy of the volumes being backed up failed with following error code '0x807800A1'. Please review the event details for a solution, and then rerun the backup operation once the issue is resolved.
To resolve this, I had a look into the below link and got out.
2. System Writer not found.
This is one of the important exception, which I got struck for 2 days and after a long time, I found a useful link about this. There are already a lot of discussions are going on around this.
And moreover, a recent patch for this from Microsoft can be downloaded from here.
Install the hotfix and do a restart. System writer will be listed on your system. To confirm, run the command prompt as administrator and type “vssadmin list writers”.
3. Make sure that, the VSS Service is running.
Probably, that’s all about this. Please do let me know, if you feel that something has been missed.
Subscribe to:
Posts (Atom)