WSUS can be used to automatically download Windows update files and store them locally. Other Windows servers in your network will then download the updates from the WSUS server rather than the Internet, saving you Internet bandwidth and speeding up the Windows update process.
With WSUS we can configure all of our servers to be automatically updated, ensuring that security updates are installed quickly from a central location. This will provide us with useful information such as reports advising which servers have or have not been patched with a specific update.
Install WSUS with PowerShell
Installing WSUS with PowerShell is the fastest and easiest way, simply run the command below in PowerShell.
Install-WindowsFeature -Name UpdateServices, UpdateServices-WidDB, UpdateServices-Services, UpdateServices-RSAT, UpdateServices-API, UpdateServices-UI
In this case we are using the Windows Internal Database (WID), if you’re going to be using an SQL database instead, include the UpdateServices-DB option rather than UpdateServices-WidDB.
1. From within Server Manager, select “Add roles and features”


5. On the Select server roles screen, scroll down and select “Windows Server Update Services”.


7. On the Windows Server Update Services screen, read the things to note and click next. It’s basically just advising you that at least one WSUS server in your network must be able to connect to the Internet in order to download the updates from Microsoft. It’s then possible for other downstream WSUS servers in your network to connect to your primary upstream WSUS server that connects to the Internet in order to get their updates.

9. On the Content location selection, we have the option of selecting where the WSUS updates will be stored. In my experience I suggest dedicating a secondary disk drive for the updates, this way you will not risk filling up the primary operating system drive. The amount of space that you will need will depend on the amount of Microsoft products that you select to store updates for.
Alternatively you can untick the store updates check box and update files will not be stored locally, they will be downloaded from Microsoft as needed. This is not recommended unless you are really pressed for disk space as the update process will take a lot longer.
Also keep in mind that update files will not be downloaded until they have been approved. We can manually or automatically approve individual updates, as we’ll see later.
 1


Configuring WSUS
Once you have installed WSUS through either PowerShell or the GUI we can proceed to configure WSUS. To start this process, simply open the WSUS console from within the Tools menu in Server Manager.

From the Complete WSUS Installation window, we will select that we wish to store our updates locally in the folder specified.

After you click Run, the WSUS Configuration Wizard will open which we will now run through.
- On the Windows Server Update Services Configuration Wizard before you begin page, read the information and click Next. Basically you should confirm that other Windows machines can connect to the WSUS server, and that the WSUS server can connect to the Internet to download updates.

2. Choose whether or not you want to join the Microsoft Update Improvement Program, as I am running a test instance I have select to not join and provide any false test data.

3. Next you will choose your upstream server. If this is your first WSUS server, you will likely want to leave the default setting to synchronize from Microsoft update over the Internet. This will download update files from Microsoft to your WSUS server. Alternatively if you already have another WSUS server that stores the update files, you can specify it here to synchronize with it as a downstream server.

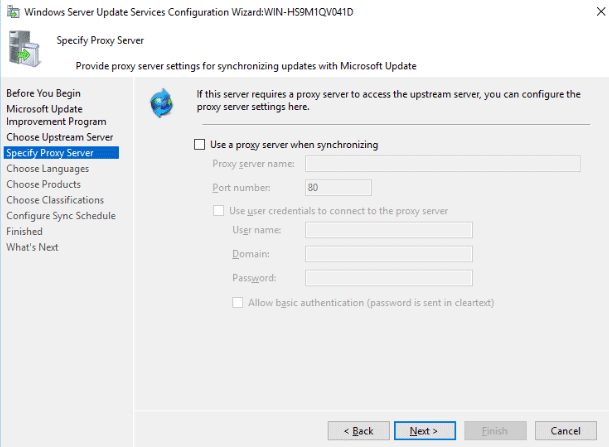
4. Next specify if your WSUS server needs to connect through a proxy server in order to connect to the Internet. In my test environment the WSUS server connects directly out to the Internet so I’ll just select next, however if you’re using a proxy server specify its details here.
5. Now we are asked to connect to an upstream server, click the start connecting button to save the information entered so far. You’ll need to wait a while while WSUS attempts to connect to an upstream server, either from the Internet or within your own network based on your selection in the last step. This took quite a long time (over 30 minutes) to complete for me even with a decent connection.

6. Choose the languages that you want to download updates for. Note that you should only select the languages that you actually support, if you select additional languages additional update files will be downloaded for each update to include your language selection which can quickly increase your disk space requirements.

7. On the Choose products screen simply select the Microsoft products in your network that you plan on updating with WSUS. Updates for the selected products will be stored on our WSUS server, so the more you pick the more disk space you will require.

8. We can now choose the types of updates to download, for example we can specify that we only want to download critical and security updates.

9. Finally we can set the synchronization schedule which will specify when WSUS will check for new updates to download. By default manual synchronization is set, however we will change this to happen a few times per day.

10. That’s it, on the finished screen you can optionally check to begin the initial synchronization which will start downloading updates from the Internet after you click finish.


