Showing posts with label Outlook 2007 / 2010. Show all posts

Sunday, September 28, 2014

Microsoft Outlook PST File Access Denied

When I open the Outlook archive File (.pst), it displays error message like “Unable to open PST file error details access to the path is denied” on system.

Cause:
File attribute is read-only

Solution:

Right click the .pst file >> Properties >> Uncheck the Read Only.


Wednesday, March 12, 2014

Creating, using and managing Signatures

Creating a new signature

As stated before, creating a simple signature in Outlook isn’t a hard task. Most likely you already have one. To create a signature and set options for it you go to;
  • Outlook 2007 and previous
    Tools -> Options -> tab Mail Format -> button: Signatures…
  • Outlook 2010 and Outlook 2013
    File-> Options-> section Mail-> button Signatures…
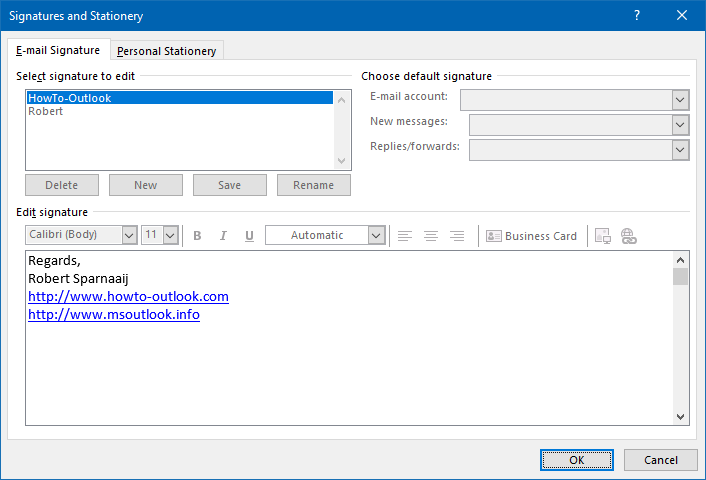
When pressing the Signatures… button you’ll get an overview of the already configured signatures. Press the “New” button to create a new signature.
New signature wizard in Outlook 2003 and previous
When you create a new signature in Outlook 2003 or previous, you’ll be presented with the following Wizard to create a new signature.
New Signature wizard Outlook 2003
Create New Signature Wizard in Outlook 2003 and previous.
When you’ve specified a name you’ve got 3 options;
  • Start with a blank signature; this will start the editor with a blank screen
  • Use this existing signature as a template; this will start the editor with a copy of the selected signature (this option is only available when you already have at least one signature)
  • Use this file as a template; this will let you choose a htm or html-file you’ve already created with e.g. FrontPage or Word. Outlook will copy the content of the file into the editor.
Note:Even though using existing signatures or files as a template is no longer possible in Outlook 2007 and 2010, you can still achieve this by copying existing signatures to the Signatures folder. 

Using the Signature Editor

While the Signature Editor got a major visual overhaul in Outlook 2007, the available functions are still similar to the Signature Editor which can be found in Outlook 2003 and previous.
Using different Fonts
Modifying the font setting is probably pretty much self-explanatory. The only real thing to note is that you shouldn’t use too exotic fonts for your signature. This is because in order for the receiver to see your signature as you intended, that font also needs to be installed on the machine of the recipient. If that font is not installed, then the receiver would see that text in a different font, the wrong characters or even just placeholder characters (empty square boxes).
Tip!
In general, it is pretty safe to use the Windings font if you want to use characters such as * 8 ( to represent information for things such as e-mail address, web address and phone number.
However, use it with caution as recipients working on non-Windows computers might not have this font installed. It is also needed to edit your Plain Text signature as otherwise you’ll only see the characters * 8 (
Adding a picture/logo
Adding a picture or a logo to a signature is quite easy but there are a few tricks to it to do it properly.
First, you must prepare the picture or logo that you want to use; edit it in a picture editing program so that it has exactly the dimensions as how you want to use it in your signature.
Second, save it in a format that makes the file size as small as possible. The jpg-format works well for pictures, the png-format works well for detailed graphics and the gif-format works well for simple graphics. You should aim for an end-result not larger than 10KB.
Third, decide whether you want to embed the image into each and every message that you send or to locate it on the web and have it load from there. In case of the last, you must also set the option for Outlook to send a link instead of a copy for linked images.
Once that you have prepared your image, you can insert it in the following way;
  • Outlook 2003 and previous
    In the signature editor, right click on the place where you image should come and choose; Insert Image…
  • Outlook 2007, Outlook 2010 and Outlook 2013
    In the signature editor, press the image icon (between the Business Card icon and the Hyperlink icon)
In the dialog that pops-up, you can browse to the location of the image that you want to insert. If your picture is located on the web, than type its URL in full. For instance; http://www.yourdomain/images/signaturepic.png
To maintain the URL reference to the picture in Outlook 2007, Outlook 2010 and Outlook 2013, you must also use; Insert-> Link to File
Inserting a link to a picture on the Internet in Outlook 2007 and Outlook 2010
Link to File will load image from the Internet.
While you could add a link to a website by simply typing it in full, it will probably look nicer when you type for instance the name of your company and make that link to your corporate website or have the word, “Facebook” or “Twitter” link to your profile page.
To add such a link, first type and then select the word that you want to make clickable. If you are using Outlook 2007 or Outlook 2010, you can add the link by pressing the globe icon on the right. If you are using Outlook 2003 or previous, right click on the selected word and choose “Edit Hyperlink…”.
You can even combine this with inserting a picture or logo and then make this image clickable via a hyperlink.
Add links to social networking sites with images and hyperlinks in your signature
Link images to social pages in your signature.
Note:If you insert clickable text in your signature, only your text will be shown in the Plain Text signature and the link itself will be gone. 
Adding a business card
Another option is to include a business card (vCard) to your signature. A vCard is a vcf-file that contains contact information. The Signature editor will let you easily create a vcf-file based on a contact you’ve stored in you’re address book. People receiving the vcf-file can now easily add all you’re contact information in their favorite address book as the vcf-format is supported by many contact management programs.
In Outlook 2007, Outlook 2010 and Outlook 2013, adding a business card will also add an image representation of your business card to your signature. You can edit this image by opening your contact from the Contacts folder and press the Business Card button in the Options section. If you remove the vCard image in the signature editor, it will also remove the vcf-file from your signature.
Tips!
If you want to create a signature with a vcf-file but do not want to have an image of it added to your signature design, then see this Quick Tip; Add Business Card to signature without image
If you want to create a signature with just the image of your business card and not attach a vcf-file see the Quick Tip; Add Business Card image to signature without vcf-file
You can also type something like “Get my vCard” in your signature and link it to a vcf-file you uploaded to the Internet to let people easily add your contact details without needing to add a vcf-attachment to your e-mails.
In Outlook 2013, if you have the People view selected for your Contacts folder, you won’t be able to modify the Business Card or Contact Image. To do this, you must open the full contact editing form first.
Advanced Edit
If you are using Outlook 2003 or previous, you’ll also see a button called “Advanced Edit…”. When you press this button you’ll open your default HTML-editor to create your signature in, instead from within the built-in Signature editor.
The default HTML-editor has nothing to do with having Word or Outlook set as your e-mail editor. The default HTML-editor is an option which you can set in Windows;
  1. From the Windows Start Menu select Control Panel.
  2. Open Internet Options.
    (in Windows Vista, Windows 7 and Windows 8, you can can find this under the Network and Internet category)
  3. Select the Programs tab.
  4. You can use the drop down list to select from the available HTML-editors installed on your computer.
Setting your default HTML editor in Internet Options
The Advanced Editor can be set via Internet Options.

Assigning default signatures

To have your signature always be added to your messages, you can set it as the default. When using Outlook 2003 or previous, you can do this directly on the Mail Format tab of the Options dialog. In Outlook 2007, Outlook 2010 and Outlook 2013, you can do this in the Signature editor itself. You can specify a default signature for new e-mails and the same or another signature on replies and forwards.
Starting with Outlook 2003 (with Word as the e-mail editor), you can even specify different default signatures on an account basis. This means that when you have multiple e-mail accounts and you were to change your sending account when composing a message, your signature would change automatically as well.
Note:
For the automatic signature feature to work, you must have a default signature assigned to each account. This can even be an empty signature or a signature with just a space, a full stop or some dashes (–) in it.

Tip!With VBOffice SAM, you can also let Outlook automatically select the correct signature for you based on the folder that you are in, which category has been assigned to a message or who you are sending your message to.

Inserting and changing signatures manually

If you do not like to have a default signature set, you can still add a signature manually when you are composing your message.
Outlook 2003 and previous
With Outlook 2003 and previous and having Outlook set as the e-mail editor, you can press the signature button or use Insert-> Signature to insert a signature. It will automatically expand when you have more than one signature configured.
When you use Outlook 2003 or previous and have set Word as the e-mail editor, you must have a default signature configured or you won’t be able to select another signature while composing the e-mail. To select another signature, right click on the left side of the signature and a list of available signatures will pop-up.
Tip!
If you don’t want a default signature, you can easily workaround this by configuring an empty signature (just containing spaces or Enters or a single dot) as the default signature. This will still enable the right click menu so you can choose a signature when you want to.

Right click in the Signature area to change the signature
Manually change the signature via a right click.
Outlook 2007, Outlook 2010 and Outlook 2013
In Outlook 2007, Outlook 2010 and Outlook 2013, it is no longer needed to have a default signature configured in order to make the manual or automatic signature switching work (it is for automatic switching though!).
To manually insert a signature into your message, you can use the Signature button in the Include section of the Message tab. To manually change a signature, you can also use this button or right click in the left margin of the signature area and select your signature from the pop-up dialog.

Note:
If changing the signature removes (part of) your messages as well, you’ve been typing into the signature area. When that happens, undo the signature change immediately (CTRL+Z), select the text portion of your message and press CTRL+X (to cut to Clipboard). After this, change your signature and paste the text back into your message (CTRL+V). 

Backing up your signatures

After you’ve carefully created your signatures, you probably want to back them up or migrate them to another or new computer. The process is very simple; copy all the files from the Signatures folder to your backup location. To restore them, you can copy them back to the Signatures folder.
By default you can find the Signatures folder in the following location;
  • Windows XP
    C:\Documents and Settings\%username%\Application Data\Microsoft\Signatures
  • Windows 8, Windows 7 and Windows Vista
    C:\Users\%username%\AppData\Roaming\Microsoft\Signatures
Hold CTRL and click on the Signatures button to open the Signatures folder
Or quickly open the folder by holding CTRL when clicking the Signatures… button.
If you want to backup just a single signature, look for the following files and folders;
  • .htm
    This file is used when creating HTML messages.
  • .rtf
    This file is used when creating Rich Text messages.
  • .txt
    This file is used when creating Plain Text message.
  • _files
    This folder is used in Outlook 2007, 2010 and 2013 to store supporting files for your signature such as formatting, images and/or business cards (vcf-files).

Tip!
With Windows Live Mesh (which is part of the Windows Live Essentials 2011 suite) you can sync Signatures across your computers so that your signatures will be the same on all your computers. This will also create a backup of your Signature on your SkyDrive account.

Modifying the Plain Text signature

Once you’ve created a signature you might want to edit the signature to make it look better in Plain Text formatted mail.
Plain Text, as the name suggests, does not support any type of formatting and thus your signature might look quite different from your HTML version. Common reasons for why you want to edit just your Plain Text signature afterwards are;
  • Your signature contains an image with relevant information.
    As the image is not displayed, this information is missing. Examples are having a business card picture or a company logo inserted instead of a company name in text.
  • Special text formatting
    If you used Wingdings or tables, your text could be display wrong. By modifying the Plain Text signature manually, you can replace those characters and fix the aligning.
  • Hyperlinks
    If you’ve got linked words such as for instance to a website, then in the Plain Text version of your signature only the text remains and the links are gone. Editing the Plain Text signature will allow you to add back the URL in full.
To edit just your Plain Text signature, you can open the txt-file directly from the Signatures folder. It is highly recommended to make a backup of your signature afterwards, as your changes will be overwritten when you were to edit your signature in the Signature Editor afterwards.

Adding variables, random quotes and more

If you want to go beyond the feature that Outlook has to offer for signatures, there are various add-ins available.
Random Quote Insert
Add a famous quote to the end of your emails with the Random Quote Insert add-in. It comes packed with already 500 quotes to choose from and you can easily add your own as well.
Discount code: BH93RF24
Live Signatures
With Live Signatures you can use variable in your signature which will be filled automatically when you insert your signature. This will allow you to insert up-to-date last minute information when sending out your message. Common uses for this is to include content which is updated by somebody else or from an RSS feed (latest headline from your company for instance).
Discount code: 4PM76A8
Bells & Whistles for Outlook
Amongst many other features that Bells & Whistles for Outlook has to offer it will let you create multiple rich text or HTML email signatures and have them automatically inserted into your emails. Using the rules options, you can setup different signatures for different email accounts or contacts.

Creating signatures in OWA

If you are working in a corporate environment and also have access to your Exchange mailbox via Outlook Web Access (OWA), then you’ll notice that your Outlook signatures are not available there. You’ll have to set these up again in OWA as well.
You can find the Signature option in OWA in the following locations;
  • OWA 2003
    Options button in the left bottom corner-> section Messaging Options-> button Edit Signature…
  • OWA 2007
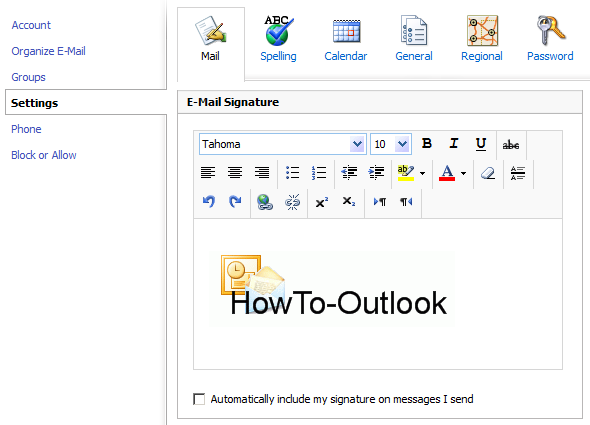
    Options button in the top right corner-> section Messaging-> E-mail Signature
  • OWA 2010
    Options button in the top right corner-> section Settings-> tab Mail
Adding images to OWA signatures
You’ll find the options available to you to be quite similar to the options that are available in Outlook. However, an option that you mind find missing is to add an image to your signature. Via a workaround, it is still possible to add this in the following way;
  1. Place the picture on a web location if it is not available on-line yet like for instance the company logo on the corporate website.
  2. Browse to this location on the web.
  3. Right click on the picture that you want to add and choose Copy.
  4. Right click in the signature in OWA and choose Paste.
  5. Click “No” when you get a security prompt about content coming from a non-HTTPS source.
  6. Don’t forget to save the signature by pressing the Save button in the Options screen.
Note:
If the picture does not show up and a text-based link is displayed instead, disable the S/MIME control in OWA via the Security section.

Adding a picture to an OWA signature (click on image to enlarge)
It’s possible to add a picture to a signature in OWA as well.
(click on image to enlarge)

Signatures in a corporate environment

When you are in a corporate environment and are responsible for proper signature usage in your corporation, then you might want to consider ways to centrally manage signature usage. This can be achieved in various ways such as via a script to generate personalized signatures on the client or mail server or a combination thereof.
Such a client script and instructions how you can configure Exchange to automatically generate user signatures or append corporate disclaimers to outgoing messages can be found in the guide Setting up a Corporate Signature.
Disabling the signature option in Outlook
When you are centrally managing your user’s signatures, then disabling the Signature option would be recommended. This will prevent users from adding signatures of their own and ending up with messages with a double signature.
Disabling the signature feature can be done via Group Policies. You’ll find back the option in;
Outlook Options-> Mail Format-> option: Do not allow signatures for e-mail messages
Note:
When you set this option, don’t forget to inform your users about it so that won’t be confused about the option being not available and to instruct them not to type in a signature manually into each message.

Using Group Policy to disable signature usage (click on image to enlarge)
The signature section will appear grayed out after setting
this Group Policy setting. (click on image to enlarge)

Disclaimer text
If you need to add a disclaimer text and you are responsible for adding it; keep it short! There is nothing more annoying for the receiver to see a short message become massive just because of some disclaimer text.
Consider posting the disclaimer text to a page on the corporate website and only add a link to it at the bottom of the message with “Please read our disclaimer” or something like that.

If you are automatically adding the signature via Exchange, you can configure it in such a way that the disclaimer is only added for external messages. For an example see Setting up a Corporate Signature.

Setting Outlook Group Policies

Download and install the Office Policy Templates

The Policy Templates and documentation are included in the Office Resource Kit. Use the links below to download the Resource Kit for your Outlook version.

Updating the Office 2003 Policies

When you installed the Office 2003 Resource Kit you must update the policy templates.
  1. Download the Outlook 2003 updated policies.
  2. Run the installer and accept the License Agreement.
  3. Type a location to extract the file to. For example: C:\Office2003ORK
  4. Open the folder in Explorer
  5. Select all the ADM-files (11 in total) and copy them to: C:\Windows\inf
  6. You’ll get prompted if you want to overwrite the files. Choose “Yes to All”

Install the Office 2007 Policies

When you downloaded the Office 2007 policy templates you must install them first.
  1. Run the installer and accept the License Agreement.
  2. Type a location to extract the file to. For example: C:\Office2007Policies
  3. Open the folder in Explorer
    • Windows XP
      Select all the ADM-files (15 in total) from the ADM\en-us folder (or your localized language when available) and copy them to:
      C:\Windows\inf
    • Windows Vista, Windows 7 and Windows 8
      Select all the ADMX-files (15 in total) from the ADMX folder and the ADML-files (15) from the en-us folder (or your localized language when available) and copy them to:
      C:\Windows\PolicyDefinitions
      If you want to control an Active Directory network environment, then you can also copy them to the Sysvol\PolicyDefinitions folder on a domain controller.
  4. If you get prompted if you want to overwrite the files. Choose “Yes to All”.
    If you get prompted by User Account Control (UAC), press Continue or provide Administrator level credentials.

Install the Office 2010 Policies

When you downloaded the Office 2010 policy templates you must install them first. While there are separate packages for the 32-bit and 64-bit AdminTemplates, this only applies to the Office Customization Tools (OCT) and not the policy templates themselves. The adm and admx templates in both packages are exactly the same.
  1. Run the installer and accept the License Agreement.
  2. Select a location to extract the file to. For example: C:\Office2010Policies
  3. Open the folder in Explorer
    • Windows XP:
      Select all the ADM-files (13 in total) from the ADM\en-us folder (or your localized language when available) and copy them to;
      C:\Windows\inf
    • Windows Vista, Windows 7 and Windows 8:
      Select all the ADMX-files (13 in total) from the ADMX folder and the ADML-files (13) from the en-us folder (or your localized language when available) and copy them to;
      C:\Windows\PolicyDefinitions
      If you want to control a Active Directory network environment, then you can also copy them to the Sysvol\PolicyDefinitions folder on a domain controller.
  4. If you get prompted if you want to overwrite the files. Choose “Yes to All”.
    If you get prompted by User Account Control (UAC), press Continue or provide Administrator level credentials.

Install the Office 2013 Policies

When you downloaded the Office 2013 policy templates you must install them first. While there are separate packages for the 32-bit and 64-bit AdminTemplates, this only applies to the Office Customization Tools (OCT) and not the policy templates themselves. The admx templates in both packages are exactly the same.
  1. Run the installer and accept the License Agreement.
  2. Select a location to extract the file to. For example: C:\Office2013Policies
  3. Open the folder in Explorer
    • Windows 7 and Windows 8:
      Select all the ADMX-files (13 in total) from the ADMX folder and the ADML-files (13) from the en-us folder (or your localized language when available) and copy them to;
      C:\Windows\PolicyDefinitions
      If you want to control a Active Directory network environment, then you can also copy them to the Sysvol\PolicyDefinitions folder on a domain controller.
  4. If you get prompted if you want to overwrite the files. Choose “Yes to All”.
    If you get prompted by User Account Control (UAC), press Continue or provide Administrator level credentials.
Note: Office 2013 policies are only supported on Windows 7, Windows 8, Windows Server 2008 R2 and Windows Server 2012. Previous versions of Windows are not supported.

Setting Policies in an Active Directory network environment

This method describes how you can set Group Policies for clients in a corporate Active Directory environment. Aside from installing the policy templates for your Office version(s), you’ll need the Group Policy Management Editor (GPMC) or the Remote Server Administration Tools (RSAT) to edit and set the policies.
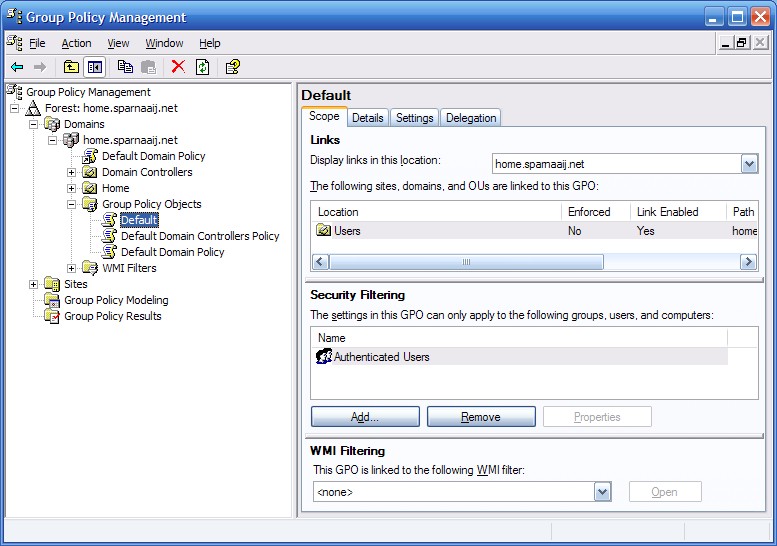
  1. Open the GPMC through Control panel-> Administrative Tools-> Group Policy Management
  2. In the left column, browse to the folder Group Policy Objects and select the Policy you wish to enforce Outlook policies on
    Group Policy Management Console (click on image to enlarge)
    The Group Policy Management Console on Windows XP.
    (click on image to enlarge)
  3. Right click the Policy and choose Edit…
  4. When you use Windows Vista, Windows 7 or Windows 8, then the policies for Office 2007, Office 2010 and Office 2013 will be loaded automatically under;
    User Configuration-> Policies-> Microsoft Office Outlook version.
    When you are using Windows XP or a previous version of Office, then you’ll have to load the templates first;
    1. In the left column of the Group Policy editor right click Administrative Templates in User Configuration and choose Add/Remove Templates…
    2. Press Add…
    3. Select the file corresponding with the installed version of the Office Resource Kit;

      Outlook 2000OUTLK9.ADM
      Outlook 2002/XPOUTLK10.ADM
      Outlook 2003OUTLK11.ADM
      Outlook 2007OUTLK12.ADM
      Outlook 2010OUTLK14.ADM
    4. Press Open and then Close to return to the Group Policy editor.
  5. You now will see Outlook listed and you can now enforce settings.
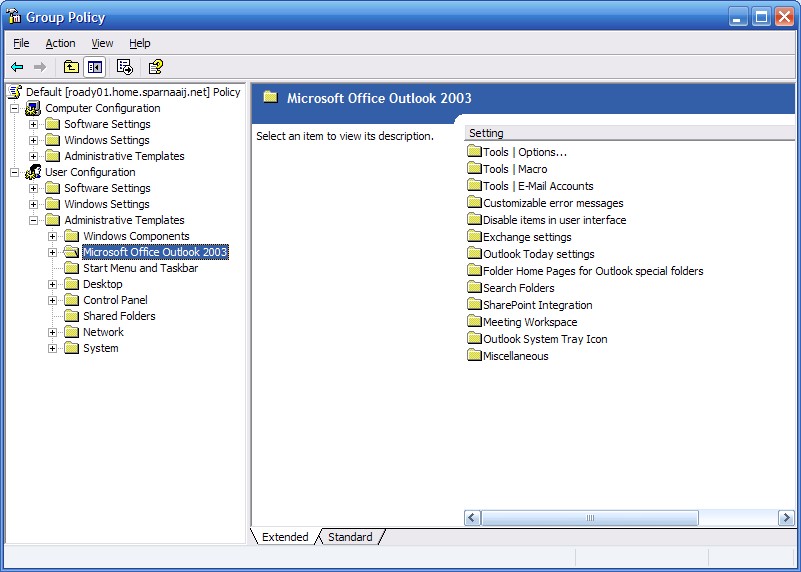
Group Policy Management Editor (click on image to enlarge)
The Outlook 2003 policy template loaded in the Windows XP Group Policy Management Editor.
(click on image to enlarge)

Setting Policies on the local computer

Once you’ve installed the Office Resource Kit of your version you can control the Office policies on your own computer via the Group Policy editor.
Note: The Group Policy Editor is not available when you are using a “Home” version of Windows.
  1. You can open the Group Policy Editor in the following way;
    • Windows XP
      Start-> Run; gpedit.msc
    • Windows Vista, Windows 7 and Windows 8
      Start-> type; gpedit.msc
  2. When you use Windows Vista, Windows 7 or Windows 8, then the policies for Office 2007, Office 2010 and Office 2013 will be loaded automatically under;
    User Configuration-> Administrative Templates-> Microsoft Office Outlook version.
    When you are using Windows XP or a previous version of Office, then you’ll have to load the templates first;
    1. In the left column of the MMC expand Local Computer Policy then right click Administrative Templates in User Configuration and choose Add/Remove Templates…
    2. Press Add…
    3. Select the file corresponding with the installed version of the Office Resource Kit

      Outlook 2000OUTLK9.ADM
      Outlook 2002/XPOUTLK10.ADM
      Outlook 2003OUTLK11.ADM
      Outlook 2007OUTLK12.ADM
      Outlook 2010OUTLK14.ADM
    4. Press Open and then Close to return to the Local Policy editor.
  3. You now will see Outlook listed and you can now enforce settings. Some of the settings will only take effect after you restart your computer.
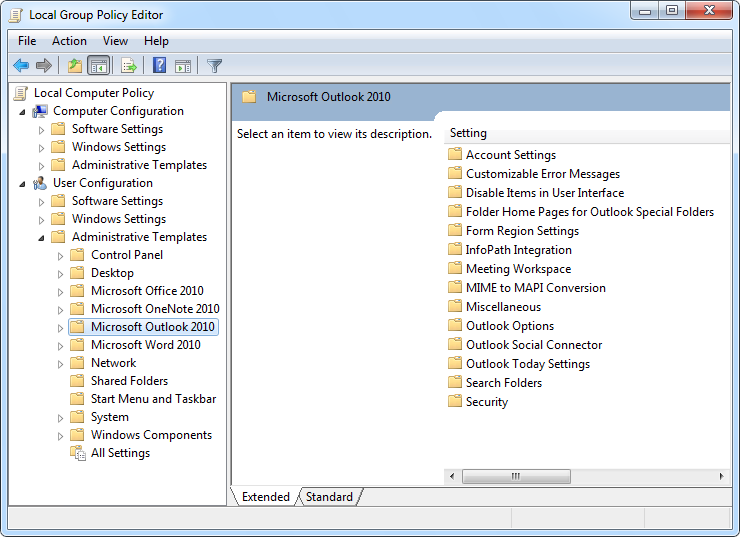
    Local Group Policy Editor (click on image to enlarge)
    The Outlook 2010 policy template loaded in the Windows 7 local Group Policy Editor.
    (click on image to enlarge)
Note:
Local policy settings are enforced to all users of that computer; even the administrator! As an administrator you can of course change settings through the Group Policy Editor when required.

Files and Settings guide for Outlook

How this guide works

In the “Folder locations” section, you’ll find an overview of the folders Outlook uses to store files in or read files from. Aside from its location a short description is provided and a list of files types which are stored in that specific folder. These folder names are also referenced in the “File names” section.
The “File names” and “Registry locations” include a “Migrate?” column to inform about the possibilities to move to another computer or user profile in the following way;
  • possible
  • not needed (automatically recreated)
  • not recommended (dependencies)
  • not possible
Not recommended
This means that the single file could hold dependencies on other settings, making it not usable after the migration or could break something else. It could also mean that the file holds data or settings which is automatically recreated after the migration and therefore not required to migrate.
If you want to move these files, it is recommended that you use a backup/restore tool that supports migrating these settings by also copying or taking out certain dependencies. 
Restoring it on the same computer for the same user is basically always possible unless otherwise specified.
Required Windows View settings
To be able to view all files, folders and file extensions, you might need to make 3 changes first in;
Control Panel-> Folder Options-> tab View
  • Show hidden files and folders (selected)
  • Hide extensions for known file types (disabled)
  • Hide protected operating system files (disabled; only needed to see contents of the Protect folder)
After finishing this guide, it is recommended to turn the above options back to their original settings.

Folder locations

Unless otherwise specified, no advise is given to migrate the entire folder to another machine because of its mixed contents. Look at the list of individual files to determine if you can move the contents of the folder as a whole or not.
Name and example filesDescription contents and Locations
Main installation folder
  • *.exe
  • *.dll
  • other installation files
Installation files and folders.
For the main part this folders consists out of *.exe and *.dll files.
32-bit Windows:
C:\Program Files\Microsoft Office\Office\
64-bit Windows:
C:\Program Files (x86)\Microsoft Office\Office\
Shared installation folder
  • *.exe
  • *.dll
  • other installation files
Additional installation files and folders which are often shared between Office applications or other applications.
For the main part this folders consists out of *.exe and *.dll files.
32-bit Windows:
C:\Program Files\Common Files\Microsoft Shared\
64-bit Windows:
C:\Program Files (x86)\Common Files\Microsoft Shared\
Roaming Profile settings
  • .nk2
  • .srs
  • .xml
  • outcmd.dat
  • OutlPrnt
  • VbaProject.OTM
  • *.pab
Contains files and settings of the user which are being synced back to the server when Roaming Profiles is enabled in a domain.
Windows XP:
C:\Documents and Settings\%username%\Application Data\Microsoft\Outlook\
Windows 8, Windows 7 and Windows Vista:
C:\Users\%username%\AppData\Roaming\Microsoft\Outlook\
Local Profile settings
  • .sharing.xml.obi
  • .xml.kfl
  • *.pst
  • *.ost
  • *.nst
  • *.oab
  • extend.dat
Contains files and settings of the user which are not being synced back to the server when Roaming Profiles in enabled in a domain.
Windows XP:
C:\Documents and Settings\%username%\Local Settings\Application Data\Microsoft\Outlook\
Windows 8, Windows 7 and Windows Vista:
C:\Users\%username%\AppData\Local\Microsoft\Outlook\
RoamCache
  • Stream_Autocomplete_*.dat
  • Stream_AvailabilityOptions_*.dat
  • Stream_Calendar_*.dat
  • Stream_CategoryList_*.dat
  • Stream_ContactPrefs_*.dat
  • Stream_ConversationPrefs_*.dat
  • Stream_Weather_*.dat
Contains an extracted cache of (list) properties and settings which are stored within the mailbox itself.
Windows XP:
C:\Documents and Settings\%username%\Local Settings\Application Data\Microsoft\Outlook\RoamCache\
Windows 8, Windows 7 and Windows Vista:
C:\Users\%username%\AppData\Local\Microsoft\Outlook\RoamCache\
Forms Roaming
  • outlook.box
  • RefEdit.exd
Contains files with settings for the Form Designer in Outlook.
Other (Office) applications can also use this location to store their own form design settings and data.
Windows XP:
C:\Documents and Settings\%username%\Application Data\Microsoft\Forms\
Windows 8, Windows 7 and Windows Vista:
C:\Users\%username%\AppData\Roaming\Microsoft\Forms\
Forms Local Cache
  • FRMCACHE.DAT
Here are forms cached which are not native or local to the Outlook environment. Usually these are custom forms from Public Folders.
This folder holds a subfolder for each cached form. These folders are named after the message class and have a tmp-file within that folder.
Windows XP:
C:\Documents and Settings\%username%\Local Settings\Application Data\Microsoft\FORMS\
Windows 8, Windows 7 and Windows Vista:
C:\Users\%username%\AppData\Local\Microsoft\FORMS\
Protect
  • Encrypted data
Folder with system files holding encrypted information.
The folder is named after the Security ID (SID) of the user.
It is used by Outlook 2003 and later and replaces the Protected Storage registry key.
It is not possible to migrate this folder but removing this folder can solve mail account password issues on Windows 8, Windows 7 and Windows Vista.
Windows XP:
C:\Documents and Settings\%username%\Application Data\Microsoft\Protect\
Windows 8, Windows 7 and Windows Vista:
C:\Users\%username%\AppData\Roaming\Microsoft\Protect\
Signatures
  • *.htm
  • *.txt
  • *.rtf
Your signatures are being stored here in 3 formats;
HTML, Plain Text and Rich Text
The folder could hold additional data for your signature such as CSS, themes and images. 
Windows XP:
C:\Documents and Settings\%username%\Application Data\Microsoft\Signatures\
Windows 8, Windows 7 and Windows Vista:
C:\Users\%username%\AppData\Roaming\Microsoft\Signatures
Templates
  • normal.dot
  • normalemail.dotm
Default folder to store templates in. This folder is shared with other Office applications and could hold additional files.
Windows XP:
C:\Documents and Settings\%username%\Application Data\Microsoft\Templates\
Windows 8, Windows 7 and Windows Vista:
C:\Users\%username%\AppData\Roaming\Microsoft\Templates
Stationery
  • *.htm
  • *.jpg
  • *.gif
  • other image formats
Contains files used for personal stationery.
Windows XP:
C:\Documents and Settings\%username%\Application Data\Microsoft\Stationery\
Windows 8, Windows 7 and Windows Vista:
C:\Users\%username%\AppData\Roaming\Microsoft\Stationery\
Proof
  • custom.dic
Holds additional personal dictionaries in the ANSI format (Outlook 2003 and previous).
Windows XP:
C:\Documents and Settings\%username%\Application Data\Microsoft\Proof\
Windows 8, Windows 7 and Windows Vista:
C:\Users\%username%\AppData\Roaming\Microsoft\Proof\
UProof
  • custom.dic
Holds additional personal dictionaries in the UNICODE format (since Outlook 2007)
Windows XP:
C:\Documents and Settings\%username%\Application Data\Microsoft\UProof\
Windows 8, Windows 7 and Windows Vista:
C:\Users\%username%\AppData\Roaming\Microsoft\UProof\
Local Office Settings
  • *.qat
  • *officeUI
Holds various local Office settings including your customizations to the Quick Access Toolbars and Ribbons in Outlook.
For an overview of qat-files used by Outlook 2007 see this post. Outlook 2010 and Outlook 2013 use officeUI-files instead.
Windows XP:
C:\Documents and Settings\%username%\Local Settings\Application Data\Microsoft\Office\
Windows 8, Windows 7 and Windows Vista:
C:\Users\%username%\AppData\Local\Microsoft\Office\
Roaming Office Settings
  • *.acl
Holds various roaming Office settings which are being synced back to the server when Roaming Profiles is enabled in a domain. Plain Text AutoCorrect entries created via Outlook are kept here as well.
Windows XP:
C:\Documents and Settings\%username%\Application Data\Microsoft\Office\
Windows 8, Windows 7 and Windows Vista:
C:\Users\%username%\AppData\Roaming\Microsoft\Office\
Secure Temp (OLK)
  • any file format
This is the Temp folder for Outlook where it stores files to when they are directly opened from within Outlook instead of being saved to disk first by the user.
The folder name is variable and its exact location is exposed in the registry.
Windows XP:
C:\Documents and Settings\%username%\Local Settings\Application Data\Microsoft\Windows\Temporary Internet Files\\
Windows 8, Windows 7 and Windows Vista:
C:\Users\%username%\AppData\Local\Microsoft\Windows\Temporary Internet Files\\

File Names

 refers to name of the profile you have configured for Outlook. By default this is either "Outlook" or "Microsoft Outlook Internet Settings".
NameDescription contents and LocationsMigrate?
*.pstPersonal Message Store
Main data file for Outlook containing all you Mail, Calendar, Contacts, Tasks, Notes and Journal items. In addition to that it can contain "hidden" data or settings such as Views, Rules, Categories (since Outlook 2007), per folder AutoArchive settings, etc…
By default the first pst-file is called outlook.pst. When you have AutoArchive enabled, you'll have a file called archive.pst as well.
If you connect to a SharePoint List, then you'll also have a file called "SharePoint Lists.pst". IMAP accounts also uses this file format to cache their data in.
Additional automatically created pst-files are appended with a number e.g.; outlook0,pst, outlook1.pst, archive0.pst, etc…
You can create additional pst-files if you want and can place them in a different location but network locations are not supported.
Corruption of the main pst-file can prevent Outlook from loadingcorrectly and could also lead to data loss. Therefore you should backup these files on a regular basis.
Possible
Location: Local Profile Settings
*.ostOffline Message Store
Similar to a pst-file but represents an offline cache of an on-line mailbox intended to enable offline access and to reduce network traffic or to increase Outlook performance when using a slow connection. These files were originally used only to cache an Exchange mailbox but the Outlook Connector also uses this file format to cache Live Hotmail mailboxes.
By default the file is called outlook.ost when connecting to Exchange and .ost when created by the Outlook Connector e.g.; yourname_hotmail.ost or yourname_live.ost.
Additional automatically created ost-files are appended with a number e.g.; outlook0.ost, outlook1.ost
As it is merely a cache and the actual data remains on the server, there is no need to backup this file. When it gets corrupted it an prevent Outlook from loading correctly but as long as you still have access to the Exchange server you can recover by renaming it to .old. Upon deletion (or renaming) it will be automatically recreated when you connect to the mail server again.
Not needed
Location: Local Profile Settings
*.nstNotes Message Store
Similar to an ost-file but then used for an offline cache for use by Lotus Notes Connector accounts. It may also be used by other connector type accounts. Older versions of the Outlook Connector for instance also have used this file format.
Not needed
Location: Local Profile Settings
*.pst.tmpA temporary file indicating a file lock on or queued data to be written to the similarly named pst-file.Not needed
Location: Local Profile Settings
*.ost.tmpA temporary file indicating a file lock on or queued data to be written to the similarly named ost-file.Not needed
Location: Local Profile Settings
*.oabOffline Address Book files for Exchange accounts.
It consist out of 6 files all containing different information or indexes about the users in the corporate global address book (GAL). Similar to the ost-file it is designed for offline usage, reducing network traffic and optimizing responsiveness when working on a slow connection.
Not needed
Location: Local Profile Settings
*.oftOutlook Form Template
Templates and custom forms are stored in the oft-format when saved outside of Outlook.
You should make a backup of these files and you can also migrate them for use on another computer.
Possible
Location: Templates
*.xnkExchange Shortcuts
These files represent shortcut links to folders accessible within Outlook. They are similar to computer shortcuts (lnk-files) which point to other files on the computer.
Since Outlook 2007 the file format is no longer registered for direct execution but that can be enabled again.
You can migrate these files to another computer or even share them (when they link to a Public Folder for instance) but of course that location should also be available on the other computer.
Possible
Location: Folder of choice
*.pabThis is the Personal Address Book file.
Previous versions of Outlook allowed you to store your contacts in a pab-file if you didn't use the Contact folder. The main reason for having a pab-file was that the Contacts folder in Outlook 97/98 didn't support personal distribution lists. This feature was added in Outlook 2000. In Outlook XP/2002 a pab-file was no longer created or linked by default but could be manually added. Since Outlook 2007 you can only directly import pab-files into your Contacts folder.
If you still use pab-files for some reason, you should either back it up or import them into the Contacts folder and stop using them completely.
Possible/
not needed
Location: Roaming Profile Settings
*.rwzOutlook Rules Wizard
This file format can store your rules that you have configured in Outlook. Since Outlook XP/2002, rules are stored within the mailbox itself instead of a separate file. You can still create a backup of your rules in the rwz-format and import them.
You can make a backup of this file for local use when you still use Outlook 2000 or previous but due to in-file dependencies you shouldn't attempt to migrate this file.
Not possible/
not needed
Location: Roaming Profile Settings
*.qatContains the Quick Access Toolbar (QAT) configuration information for Outlook 2007. There are up to 19 qat-files for Outlook 2007. Possible
Location: Local Profile Settings
*.officeUIContains the Quick Access Toolbar (QAT) and Ribbon configuration information for Outlook 2010 and Outlook 2010. There are up to 20 qat-files for Outlook 2010 and Outlook 2013. Possible
Location: Local Profile Settings
*.msgOutlook uses the msg-format to store messages and other mailbox items outside of Outlook without losing the Outlook interface when you open them from outside of Outlook. Any attachments that the message holds are also contained within this file. This allows you to open individual items on another computer on which Outlook is installed. Note that msg-files created in the Unicode format cannot be opened in Outlook XP/2002 or previous.Possible
Location: Folder of Choice
*.htm
*.txt
*.rtf
Outlook uses these "well known formats" to store the signatures in or to store Outlook messages in a format which can be used by other applications as well.
In case of the signatures, additional files and folders can be created in the signatures folder to save formatting information or pictures which have been used in the signature.
When saving a message in this format, attachments will not be saved with it.
Possible
Location: Signatures
Location: Folder of choice (when saving messages)
*.mlogLog file created by the Outlook Connector mainly for use of handling meeting requests correctly.
This file is automatically created or recreated when missing upon starting Outlook.
Not needed
Location: Local Profile Settings
*.otm
vbaproject.otm
Outlook VBA Module
Contains your configured macros and VBA programs created in the Visual Basic Editor. The default first project is stored in a file vbaproject.otm. If you have any macros configured, it is highly recommended to make a backup of this file or document your code elsewhere. You can also migrate these files to another computer.
Possible
Location: Roaming Profile Settings
outcmd.datOutlook Commands
This file contains the command bar and menu customizations that you make in Outlook. is corrupted, it can prevent Outlook from loading correctly.
You can make a backup of this file for local use but due to dependencies of installed addins, it is not recommended to migrate this file between computers. It is worth a shot to try it though as in case you run into issues, you simply rename the file to outcmd.old to reset.
Not recommended
Location: Roaming Profile Settings
extend.datThis file contains information and settings for registered Exchange Client Extensions (ECE).
When it is corrupted, it can prevent Outlook from loading correctly.
There is no need to make a backup of this file. Upon deletion it is automatically recreated from registry information. You shouldn't migrate this file between computers as there is no need to do so since it is recreated from information on the local computer. When migrating, you'll likely end up corrupting the configuration.
Not needed
Local: Local Profile Settings
views.datContains view settings for displaying of the folders.
This file is used by Outlook XP/2002 and previous and no longer used by later versions of Outlook as since Outlook 2003 this information is contained in the mailbox or pst-file.
You can make a backup of this file for local use when you still use Outlook XP/2002 or previous but due to in-file dependencies you shouldn't attempt to migrate this file.
Not possible
Location: Roaming Profile Settings
frmcache.datForms Cache
A cache file holding information about the cached custom forms in the local Forms folder. If it gets corrupted, custom forms might prevent from loading, display older versions of the form or my cause other unexpected results. Recovering can be achieved by clearing the folder which can be done in several ways.
Not needed
Location: Forms Local Cache
Normail.dotNormal.dot is the default file Word 2003 and previous use to store settings such as formatting styles, AutoText, custom toolbars and macros.
When you use Word as your email editor, in Outlook 2003 or previous, then this file gets loaded as well. It is also used when you have Word set as your default HTML editor and use the "Advanced Editor" to create a signature.
If the normal.dot file gets corrupted or if certain addins or ActiveX components are installed in Word, this will affect Outlook's behavior as well. Resetting the normal.dot file can be done by renaming it to .old.
This file should be backed up if you made custom changes and the file can be migrated between machines although certain addin dependencies can prevent it from working correctly.
Possible
Location: Templates
NormalEmail.dotmNormalEmail.dotm is similar to the normal.dot file and has been introduced in Outlook 2007 to support the new email editor and to break the dependencies with Word and to offer Outlook specific support. Quick Parts information is also stored in this file.
This file should be backed up if you made custom changes and the file can be migrated between machines.
Possible
Location: Templates
custom.dicThis file contains the words which you add to the dictionary via the spell check options. Since Outlook 2007 it is stored in the Unicode format and its location changed from the Proof folder to the UProof folder.
This is a shared file between other Office applications. The file can be edited via the spell check options in the Office applications that use it or directly via Notepad.
This file should be backed up if you made custom changes and the file can be migrated between machines.
Possible
Location: Proof (Outlook 2003 and previous)
Location: UProof (Since Outlook 2007)
MSO####.aclPlain Text AutoCorrect entries are store in this file. The #### is replace with the localized language ID number for the language it applies to. For instance, the English version is named MSO1033.acl, the Dutch version MSO1043.acl and the German version MSO1031.acl. You can find an overview of the numbers here. You need to look in the "LCID Dec" column for the correct number.
This is a shared file between other Office applications. The file can be edited via the AutoCorrect options in the Office applications.
This file should be backed up if you made custom changes and the file can be migrated between machines.
Possible
Location: Roaming Office Settings
offitems.log
outitems.log
These files contain items that have been added to the Journal or should still be added to the Journal.
When all the latest changes have been committed to the mailbox, then you can safely remove these files without losing data.
The file outitems.log tracks Outlook items that have been created during the last Outlook session and the file offitems.log tracks documents created by other Office applications which have been committed to Outlook during the last Outlook session or should still be committed when Outlook is closed.
Not needed
Location: Roaming Profile Settings
RefEdit.exdA cache of used form controls to speed up inserting the control again at a later time.Not needed
Location: Forms Roaming
outlook.boxContains settings for the custom Toolbox when designing a form.Not recommended
Location: Forms Roaming
.nk2Outlook AutoSuggest file (sometimes also named "AutoComplete file" or "nickname cache")
This file is used in Outlook 2002/XP, Outlook 2003 and Outlook 2007 to cache up to 1000 addresses that have been used before to address an email, meeting request, task request, etc…
This file holds no relation to the Contacts folder and shouldn't be relied on to securely save contact information as it is only a cache. You should really use the Contacts folder for that.
If you like to keep the cached information, you can migrate this file between machines as long as you rename the file after the name of the mail profile and the version of Outlook is the same. However, corruption of the file could break the mail profile or vice versa. In that case the mail profile should be recreated.
Possible
Location: Roaming Profile Settings
.nickSame as above but then used in Outlook 2000.Possible
Location: Roaming Profile Settings
.favThis file is used in Outlook 2002/XP and previous to hold the configured shortcuts (Favorites) in the Outlook Bar for the corresponding mail profile. The Outlook Bar has been replaced by the Navigation Pane in Outlook 2003 and later (see ).Possible
Location: Roaming Profile Settings
.srsThis file holds the send/receive settings for the corresponding mail profile.
You can make a backup of this file for local use but due to in-file dependencies you shouldn't attempt to migrate this file.
Not possible
Location: Roaming Profile Settings
.xmlThis file holds customization settings for the Navigation Pane in Outlook 2003 and later. Most notable settings are, Favorite Folders, Shortcuts from the Shortcuts Navigation and opened shared folder lists in the Calendar, Contacts, Tasks and Notes and Journal Navigation.
A corruption of the file can lead to loss of these configuration settings, being unable to remove certain folders or wrong folders showing up in the described sections.
You can make a backup of this file for local use but due to in-file dependencies you shouldn't attempt to migrate this file.
Not possible
Location: Roaming Profile Settings
.sharing.xml.obi
~last~.sharing.xml.obi
Contains information about the last sync process of (shared) services subscriptions such as RSS feeds, Exchange, SharePoint and Internet Calendar.
~last~.sharing.xml.obi contains the latest sync information of RSS feeds with Internet Explorer (Common Feed List).
Not needed
Location: Local Profile Settings
.xml.kflKnown Feed List.
This files contains information about which RSS feeds the specified Outlook mail profile syncs with the Common Feed List feature of Internet Explorer.
Not needed
Location: Local Profile Settings
OutlPrntThis file contains the print style settings.
When it gets corrupted or if it becomes very large (in general, even with a lot of custom printing styles, this file shouldn't be larger than a couple of hundred KB in size), you could run into printing errors. Rename it or delete it to recover.
Possible
Location: Roaming Profile Settings

Registry locations

 refers to the version number of Outlook which is installed.
NameContents and LocationMigrate
Main Outlook settings (user)Most settings for options you can set in Outlook are saved here.
Some keys will refer to folder paths on the local machine or contain other local data such as the machine name. When you filter out these keys, then you can migrate this registry hive to another machine.
Possible
(once filtered)
HKEY_CURRENT_USER\Software\Microsoft\Office\\Outlook\
Generic Office settings (user)Additional Outlook settings and generic Office settings are stored here.
The settings Outlook save here usually depend on components from other or generic Office applications. As long as you heavily filter this registry hive, then you can migrate the remaining settings. Due to the limited amount of valuable Outlook settings which are stored here, it's not recommended to spend your time migrating this key unless you'll need it for other Office applications as well.
Possible
(once filtered)/
Not recommended
HKEY_CURRENT_USER\Software\Microsoft\Office\\Common\
Registered addins (user)Installed addins which allow themselves to be enabled/disabled on a per user basis are exposed here.
Since these keys are created when the addins are installed, there is no need to migrate this key.
Not needed
HKEY_CURRENT_USER\Software\Microsoft\Office\Outlook\AddIns\
Registered Exchange Client Extensions (user)Sometimes created by mistake on Windows Vista by a custom ECE. This key should be removed then.Not needed
HKEY_CURRENT_USER\Software\Microsoft\Office\\Outlook\Exchange Client Extension\
Mail Profile settingsConfigured mail profiles are stored here.
These keys have a very high interrelation with each other and heavily depend on exact file locations on the local machine. Due to this, small errors in this registry hive could lead to a fully non-functional Outlook until the mail profile is recreated.
While you can make a backup of this registry hive for local use, due to the reasons above and because of most settings in this hive are stored in hexadecimal values, it is not recommended to try to migrate the mail profiles to another machine. For this, it is recommended to use a backup application suitable for mail profile migration or manually recreate it.
Not recommended/
Not possible
HKEY_CURRENT_USER\Software\Microsoft\Windows NT\CurrentVersion\Windows Messaging Subsystem\Profiles\
Outlook 97 – 2000 in IMO use:
HKEY_CURRENT_USER\Software\Microsoft\Windows Messaging Subsystem\Profiles\
Protected StorageThis key is used by Outlook to store the passwords for mail profiles on Windows XP.
Windows Vista and later do not support this old method anymore for read/write use anduses a newer mechanism which is supported by Outlook 2003 and later.
Migrating this key is not possible but removing this key can solve account password issueson Windows XP.
Not possible
Windows XP: HKEY_CURRENT_USER\Software\Microsoft\Protected Storage System Provider\
Last logon settings for ExchangeThe last settings used to logon to an Exchange Server are stored here. It is used to pre-fill some dialogs like the username for the login dialog and caches some other settings.
There is no need to backup this hive or migrate it to another machine but it can come in handy in certain scenarios to pre-write the LogonDomain and UserName registry key to increase first-use experience for end-users.
Not needed
HKEY_CURRENT_USER\Software\Microsoft\Exchange\
Main Outlook settings (computer)System wide Outlook settings are stored here although you are likely to find only component registrations.
Since all of the options are system wide, these settings are not directly exposed to the end-user via the Outlook interface so it is very unlikely that any changes have been applied to this hive after installation. Therefore, there is no need to migrate this hive. In case there is a specific need for it, you'll have to filter the registry hive first from unneeded keys.
Not needed
32-bit Windows: HKEY_LOCAL_MACHINE\SOFTWARE\Microsoft\Office\\Outlook\
64-bit Windows: HKEY_LOCAL_MACHINE\SOFTWARE\Wow6432Node\Microsoft\Office\\Outlook\
Generic Outlook settings (computer)This key is similar to the "Main Outlook Settings (computer)" but then for shared Office components.
Similar to that hive, you'll find no need to migrate this.
Not needed
32-bit Windows: HKEY_LOCAL_MACHINE\SOFTWARE\Microsoft\Office\Common\
64-bit Windows:HKEY_LOCAL_MACHINE\SOFTWARE\Wow6432Node\Microsoft\Office\Common\
Registered addins (computer)Similar to "Registered Addins (user)" but then for installed addins which allow themselves only to be enabled/disabled on a system wide basis by an administrator.
Since these keys are created when the addins are installed, there is no need to migrate this key.
Not needed
32-bit Windows: HKEY_LOCAL_MACHINE\SOFTWARE\Microsoft\Office\Outlook\Addins\
64-bit Windows:HKEY_LOCAL_MACHINE\SOFTWARE\Wow6432Node\Microsoft\Office\Outlook\Addins\
On a 64-bit Windows version, additional settings can be found in the 32-bit Windows location as well
Form RegionsSimilar to the "Registered addins (computer)" but then for Form Regions.
Only when you are developing Form regions for yourself and have manually added the keys, then it would be recommended to make a backup of the hive. In all other cases, it will be recreated automatically when you reinstall or reregister the Form Region.
Not needed
32-bit Windows:HKEY_LOCAL_MACHINE\SOFTWARE\Microsoft\Office\Outlook\FormRegions\
64-bit Windows:HKEY_LOCAL_MACHINE\SOFTWARE\Wow6432Node\Microsoft\Office\Outlook\FormRegions\
Generic properties for Exchange accountsSeveral generic Exchange provider settings and options are stored here.
Unless you made any explicit changes to it yourself, there is no need to migrate this hive. If you did make changes here, then only migrate the settings that you have actually changed. The hive is small enough to go through it manually.
Not recommended/ Not needed
32-bit Windows: HKEY_LOCAL_MACHINE\SOFTWARE\Microsoft\Exchange\
64-bit Windows: HKEY_LOCAL_MACHINE\SOFTWARE\Wow6432Node\Microsoft\Exchange\
Registered Exchange Client Extensions (computer)Installed Exchange Client Extensions have made themselves known here to Outlook.
As these keys are automatically created by the installed ECE, there is no need to migrate this hive.
Not needed
32-bit Windows:HKEY_LOCAL_MACHINE\SOFTWARE\Microsoft\Exchange\Client\Extensions\
64-bit Windows:HKEY_LOCAL_MACHINE\SOFTWARE\Wow6432Node\Microsoft\Exchange\Client\Extensions\