Showing posts with label LUN. Show all posts

Tuesday, June 4, 2019

Fibre Channel SAN Part 2 – Zoning and LUN Masking

Zoning


For security, zoning is configured on our Fibre Channel switches to control which Fibre Channel ports are allowed to communicate with each other. We allow the ports on the client hosts (the initiators) to talk to the ports on the storage system (the targets). Initiators are not allowed to communicate with each other over the Fibre Channel network. This increases security and reduces traffic, which makes the Fibre Channel network more reliable and stable.

Popular manufacturers of Fibre Channel switches are Cisco and Brocade. The example below is for a Cisco switch, but Brocade uses a similar configuration.

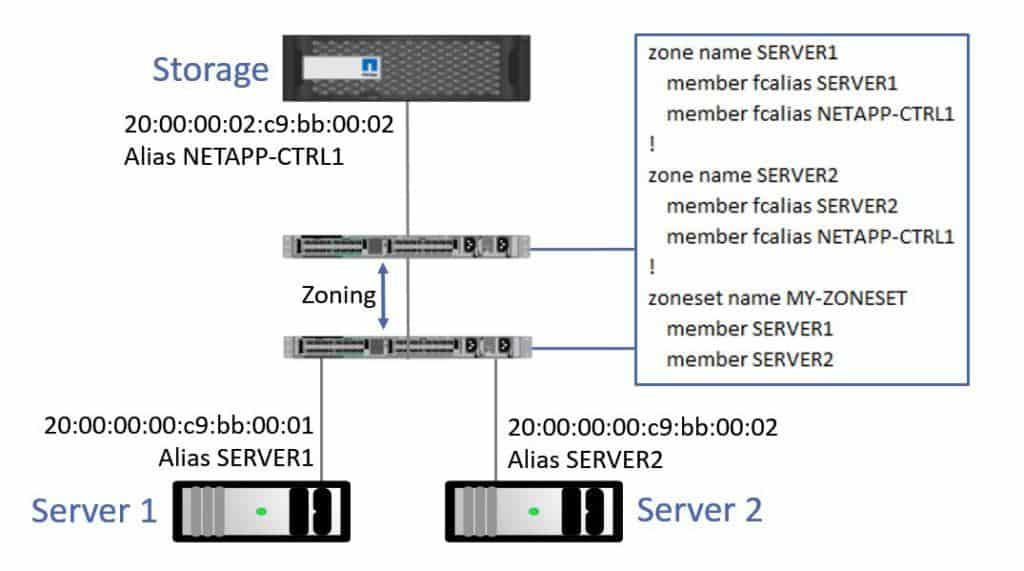
In the example, I've got a couple of servers down at the bottom of the diagram which are clients of the storage system up at the top. Aliases are used to map the long WWPN name to a more convenient alias name chosen by the administrator. I've configured aliases on my Fibre Channel switch for the WWPNs on the servers and on the storage system.
Fibre Channel Zoning


Fibre Channel Zoning
Separate zones are configured for each separate set of connectivity requirements. I configure a zone which enables Server 1 to communicate with the storage system, and a separate zone which allows Server 2 to communicate with the storage system.

Zone name SERVER1 includes member fcalias SERVER1 and member fcalias NETAPP-CTRL1. This allows SERVER1 to talk to its storage.

Zone name SERVER2 includes member fcalias SERVER2 and member fcalias NETAPP-CTRL1. This allows SERVER2 to talk to its storage.

Then, I group all of those zones together into a zone set and apply that on the switch. I've named the zoneset MY-ZONESET, and it includes zones SERVER1 and SERVER2.

With this configuration, Server 1 can talk to its storage and Server 2 can talk to its storage. The two servers can't talk to each other over the fibre channel network because they’re not included in a zone with each other.

Note: This is a simple example to make initial learning easier. Typically we’ll have at least two storage controllers and switches for redundancy. Please see the final part 3 of this series where I cover redundant fabrics for a more realistic example of how zoning is configured in real world deployments.

LUN Masking


As well as configuring zoning on our switches, we also need to configure LUN masking on the storage system. It's critical that the right LUN is presented to the right host. If the wrong host was able to connect to a LUN then it would be liable to corrupt it.

The zoning on the switches make sure that the servers can't talk to each other, but they can talk to the storage. So how do I make sure that they can't connect to each other's LUNs? That's where LUN masking comes in.

Zoning on the switches prevents unauthorized hosts from reaching the storage system, and it prevents hosts from talking to each other over the fibre channel network, but it doesn't prevent a host from accessing the wrong LUN once it gets to the storage system. LUN masking is configured on the storage system to lock a LUN down to the host or hosts who are authorized to access it. To secure your storage, you need to configure zoning on your switches and LUN masking on your storage system.

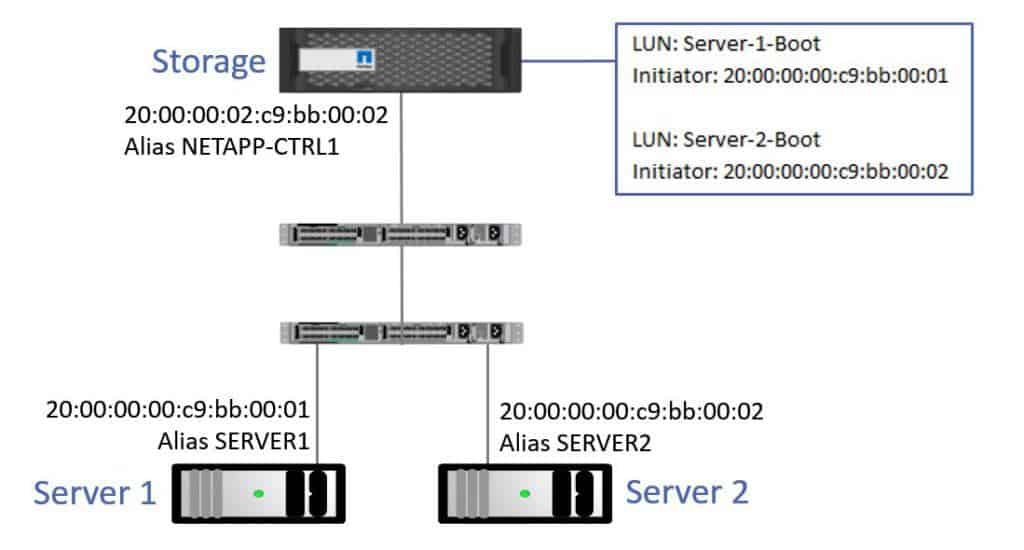
Here's an example of how we would configure LUN masking. Server 1 and Server 2 are both diskless servers. I've configured Boot LUNs for both Server 1 and Server 2 on the storage system. For my Server 1 Boot LUN, the only initiator that can connect to that is Server 1's WWPN. And for the Server 2 Boot LUN, the only initiator that can connect to that is Server 2's WWPN. This prevents the wrong server connecting to and potentially corrupting the other server’s LUN. I could also have used aliases here rather than typing in the WWPN in my configuration.
LUN Masking

LUN Masking

Switch Domain IDs


The next thing to talk about is Switch Domain IDs. Each switch in in the fibre channel network will be assigned a unique Domain ID. The name can be a bit confusing, because if you’re like me, you’d think a Domain ID would be an ID number which represented the entire domain of switches, but it doesn't mean that at all. The Domain ID is actually a unique ID for each individual switch in that fibre channel network.  The Domain ID is a value from 1 to 239 on both Cisco and Brocade switches.

One switch in the network will be automatically assigned as the Principle Switch. It is in charge of ensuring each switch in the network has a unique Domain ID.

Each switch learns about the other switches in the network and how to route to them, based on their Domain ID.

Sunday, October 7, 2018

Creating a Windows Server 2012 R2 Cluster Shared Volume

Windows Server Cluster Shared Volume (CSV): Introduction

Cluster Shared Volume was introduced in Windows Server 2008 R2 (W2008 R2). Before W2008 R2 Hyper-V we pretty much had to deploy one LUN on a SAN for each virtual machine. (It wasn’t a Windows requirement, but it was good practice). As you could imagine, this made self-service an impossibility, and it made SAN administration a nightmare. Careful naming was required, and I would sweat bullets when it came to decommissioning virtual machines and LUNs, hoping that I wasn’t about to accidentally delete a customer’s virtual machine that was placed on the wrong volume.
CSV was added to failover clustering in W2008 R2 to provide a file system that could be shared and active across each node in the cluster. This means that you can store lots of virtual machines one a few easily managed volumes (try to have one per cluster node) and run those virtual machines across any or all of the cluster nodes. The W2008 R2 version of CSV was restricted to being used just for storing Hyper-V virtual machines. Windows Server 2012 (WS2012) expanded this to include the SOFS, and Microsoft continues to evaluate other scenarios where CSV can be of use.
The high level architecture of CSV is as follows:
  • One or more LUNs are created in the SAN. There are only a few LUNs, maybe one per node in the cluster that is directly connected to the shared storage.
  • The LUNs are zoned/connected to every node in the cluster. At this point, the LUN is only accessible by one of the nodes in the cluster (known as shared-nothing).
  • The disks are formatted (one volume per LUN) and added to the cluster’s pool of managed storage in Failover Cluster Manager (FCM).
  • Each disk is converted into a CSV (a right-click operation in FCM).
Cluster Shared Volume CSV, shown in a simple Hyper-V Cluster
The concept of CSV, shown in a simple Hyper-V Cluster.
The Windows concept of “shared nothing” still applies: One node remains the owner of volume. However, the CSV is mounted in C:\ClusterStorage\Volume on each node in the cluster. The CSV owner, also known as the CSV coordinator, delegates rights to the other cluster nodes to read and right to/from files and folders in the CSV. The volume, formatted with NTFS will appear to now run a file system called CSVFS in administration tools. This indicates to administrators and disk management tools that the CSV is a cluster file system and should be treated differently than a non-shared volume.
Don’t worry about the CSV owner role. It is created by Windows for you and managed by Windows. The role is highly available.
Every CSV has an owner. A node can be the owner of one or any number of the volumes. In older versions of Windows Server the placement of the CSV owner role was best effort but you could manipulate it. In WS2012 R2, the CSV owner roles are balanced across the nodes; this is used in conjunction with SMB connection redirection in the SOFS architecture to obtain the best flow of data from host to physical storage.
If you want to dig much deeper on CSV then the best source of information is a blog post by Microsoft’s Elden Christensen.

Create a Cluster Shared Volume (CSV)

There are a number of steps in the process of creating a CSV. By the way, this entire process is much easier if you have deployed System Center Virtual Machine Manager (SCVMM) to manage your hosts and your storage. SCVMM will perform the work with a few clicks, including provisioning the physical storage.
Tip: Create one LUN/CSV at a time so you can track what disk is what volume and name them consistently.

Create and Connect the LUN

  • Log into the administration tool of your cluster’s shared storage. Create a LUN and connect the new LUN to each node in the cluster.
Tip: Name the LUN after the cluster and desired CSV name, for example, HVC1

Create and Format a Volume

  • Determine which node on the cluster that the LUN has become active one. Log into that node, open Disk Manager and select the new LUN.
  • Create and format a new volume that fills the LUN; you should have one CSV per LUN. Do not assign a drive letter to the volume; the CSV will be mounted in the C:\ClusterStorage folder on each node instead.

Tip: Label the volume with the name of the desired CSV.

Add the Disk to the Cluster

  • Open FCM, browse to Storage, and select the Add Disk option. The new disk should be listed in the pop-up window.
  • Check the box beside the disk to add the disk. The new disk will appear in Storage in FCM.
Note: If you are using Storage Spaces as the shared storage, then the disk will be automatically added to the cluster after you create the new virtual disk in the pool.
Tip: Edit the properties of the disk and rename it match the desired CSV name.

Convert the Disk into a CSV

  • Right-click the new available disk in FCM and select Add To Cluster Shared Volumes. The disk will go offline for a second and then reappear back online as a new CSV. Note that the volume is now mounted under what looks like a folder (see Volume1 in the below screen shot) in C:\ClusterStorage on each node in the cluster that has access to the disk.

Tip: Rename the mount point from the anonymous Volume1 to match the name of the CSV.

Use the CSV

You now can deploy virtual machines to your new CSV by specifying the path of the CSV under C:\ClusterStorage.

Using a CSV for the virtual machine’s files mean that the files are available to each host in my cluster and the virtual machine can fail over or live migrate within the cluster without:

  • Moving the virtual machine’s files
  • Any downtime to the disk