A web server is a system that manipulates requests via HTTP protocol, you request a file from the server and it responds with the requested file, which might give you an idea that web servers are only used for the web.
Actually, web servers can also be found embedded in devices such as printers, routers, when you open your router configuration page, there is a web server behind it.
When you open the printer configuration page, there is also a web server behind it serving your requests, so web servers are important today because they are used everywhere.
The server takes the requested file or page from you and maps it to the corresponding file from the server. The server sends the file back to the browser with some information such as its MIME type, the length of the content and some other useful information.
Sometimes the requested file is a static page like HTML pages or dynamic pages like PHP, Java, Perl or any other server side language.
For example, when you type www.yourDomain.com, the browser queries the DNS server about the IP address of the computer: www.yourDomain.com. Once the browser gets the response from the DNS, it starts a TCP connection on port 80 and asks for the default web page, then this page is sent to you and that’s all.
The most used web servers are Apache and Nginx.
In this post, we will use Apache server for several reasons:
To view these request headers in chrome, open chrome devtools, then open network panel and visit google.com and check the request headers, you should see something like this:
The request header also includes information about the client, like the user agent and the accepted formats.
Additional information may be sent with the request header. For example, if you click on a link that will open another website, the header will include the referral site.
After receiving the request header completely, the server responds with the requested file or page along with a response header.
The response header includes information about the received content, its type, and other information.
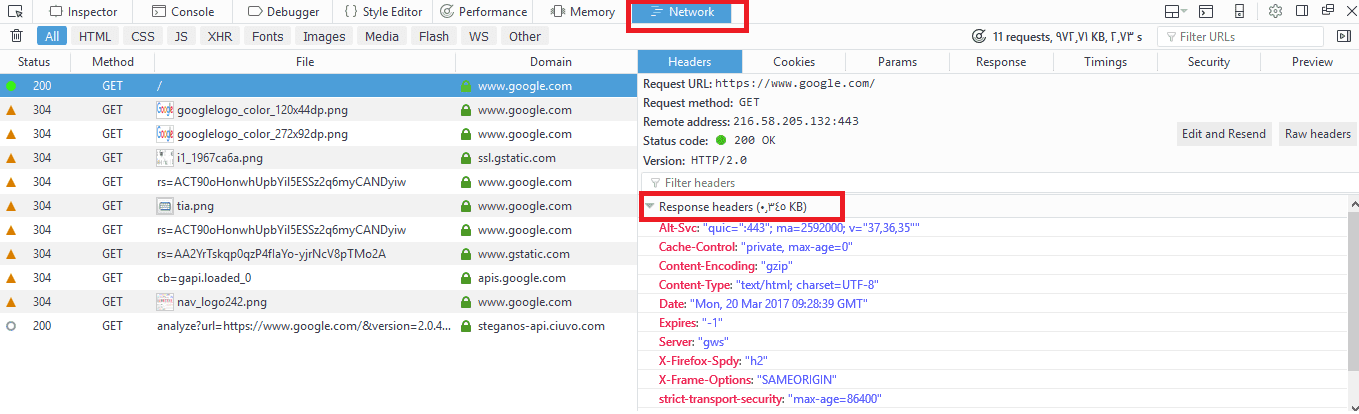
You can check the response headers from the browser network panel.
$ dnf -y httpd
Or if you are using a Debian-based distro, you can install it like this:
$ apt-get -y install apache2
The Apache web server service is called httpd on Red Hat based distros like CentOS, while it is called apache2 in Debian based distros.
If you are using a firewall like iptables, you should add a rule for port 80.
$ iptables -I INPUT 1 -m state --state NEW -m tcp -p tcp --dport 80 -j ACCEPT
Or if you are using firewalld, you can use the following command:
$ firewall-cmd --add-port=80/tcp
To start your service and enable it on boot:
$ systemctl enable httpd
You can check if your service is running or not, using the following command:
$ systemctl status httpd
Now open your browser and visit http://localhost or http://[::1]/ if you are using IP v6 and if your installation goes well, you should see your HTML homepage.
Just remember to make sure that any files or directories placed in that directory are world-readable.
The default index page is index.html.
The Apache configuration files are in /etc/httpd/conf/ directory.
On Debian based systems like Ubuntu, you may find it at /etc/apache2/apache2.conf file.
We can’t discuss every option for Apache on a single post, but we will discuss the most important options.
You call them options or directives.
ServerRoot /etc/httpd
The default value for this option is 80 for nonsecure connections and 443 for secured connections.
If you have multiple IP addresses on your server, you can assign which IP should listen for connection using Listen option.
You can specify a different port other than 80, just make sure that it’s not in use.
You can run many HTTP servers on the same hardware every one on a unique port.
When a server runs on a non-standard port such as port 8080, it will require the port number to be explicitly stated like this:
www.example.com:8080
Listen 80
ServerName FQDN
The default path is /var/www/html .
DocumentRoot /var/www/html
There are a lot of Apache modules like these:
mod_cgid: This module is used to run CGI scripts using Apache web server.
mod_ssl: Provides secure connections via SSL and TLS protocols.
mod_userdir: This module allows you to serve content from users specific directories.
If you want to disable loading a specific module, you can comment the Load module line that contains that module.
Or if you use Debian based distros like Ubuntu, you can use these commands:
$ a2enmod modulename
This command to enable the module.
$ a2dismod modulename
This command to disable the module.
All these commands do is create a symlink under /etc/apache2/mods-enabled directory with the file that contains the module you want to enable. All files under this directory are included in Apache configuration by default, so any file will exist in this directory will be included.
And if you use a2dismod, the symlink will be removed.
If you enable or disable a module, you have to reload or restart apache web server.
LoadModule mod_cgid.so
You can store all the configuration for different virtual domains, and Apache will include them at runtime.
Include filePath
For example, if you have a user adam who wants to make his web content available via Apache web server.
First, we make a public_html folder under his home directory.
Then set the permission for the public_html folder:
$ chmod 644 public_html
Now if we put an index.html file, it will be accessible via the browser like this:
http://YOURHOSTNAME/~adam
UserDir public_html
Like you have files outside DocumentRoot and you want them to be available to the visitors.
Alias URL_Path Actual_Path
ErrorLog /var/log/httpd/error_log
The idea is that the content is served based on the requested hostname.
To setup a virtual host for the host www.example.com. First, create a VirtualHost option in /etc/httpd/conf/httpd.conf file.
And specify the DocumentRoot and ServerName like this:
Keep in mind that the ServerName option must be resolvable via DNS.
These are the most used Apache options.
If you have more than one IP address and you want to use SSL certificate, the website must be on a dedicated IP address. You can write IP-based virtual hosts like this:
This fact is true for all processes except for applications with the SETUID bit set, they inherit permissions from the owner, not the parent process. A good example is the /bin/su.
If a normal user runs /bin/su program, it does not inherit the permission from adam, but it acts as a root user running it.
Since Apache web server needs to bind port 80, and this needs root privileges.
After binding to port 80, Apache can run as a normal user and read only files that have permissions to read them.
Based on the Linux distro you use, the user could be one of the following:
nobody, www, apache, www-data, or daemon.
I delayed introducing two more options for apache till reaching that point.
User www-data
Group www-data
Security is very important for sites that use executable scripts such as CGI or PHP scripts.
The use that you will use will have permission to read and write the content of all sites on the server. But we want to ensure that only the members of a particular site can read their own site only.
This is very important because if a site got compromised, the attacker will be able to read all files since the apache user has permission to do that.
So how to solve this problem?
You can specify the user on each virtual host like this:
Just that simple.
In Apache, you can store authentication information file called .htpasswd file.
You can use the htpasswd command to do that.
First, create the .htpasswd file using the htpasswd command:
$ htpasswd -c /home/adam/.htpassswd myuser
The -c option is needed the first time you run htpasswd, but when you need to add more users you shouldn’t use -c because it will overwrite the file.
Then create a .htaccess file in the public_html folder and write the following:
AuthName is required, you can use any string you want.
AuthType Basic says that you’re using htpasswd style user file.
AuthUserFile points to the file that contains the generated password from htpasswd command.
The Order line indicates that Apache must deny access by default, and only allow access for users specified in the htpasswd file.
The require directive means any user in the .htpasswd file is allowed.
The two main log files for apache are error_log and access_log files.
You can find these files in /var/log/httpd/ directory in Red Hat based distros, or in /var/log/apache2/ directory if you are using Debian based distros.
The access_log file contains every request to Apache web server with the details about client requested that resource.
The error_log file contains errors of Apache web server.
You can use tail command to watch the log file:
$ tail -f /var/log/httpd/error_log
I recommend you to review the Linux syslog server to know more about logging.
Actually, web servers can also be found embedded in devices such as printers, routers, when you open your router configuration page, there is a web server behind it.
When you open the printer configuration page, there is also a web server behind it serving your requests, so web servers are important today because they are used everywhere.
How Webserver Works
First, your browser sends a request to the server.The server takes the requested file or page from you and maps it to the corresponding file from the server. The server sends the file back to the browser with some information such as its MIME type, the length of the content and some other useful information.
Sometimes the requested file is a static page like HTML pages or dynamic pages like PHP, Java, Perl or any other server side language.
For example, when you type www.yourDomain.com, the browser queries the DNS server about the IP address of the computer: www.yourDomain.com. Once the browser gets the response from the DNS, it starts a TCP connection on port 80 and asks for the default web page, then this page is sent to you and that’s all.
Linux Webserver Implementations
There are many Linux web server implementations available for you to use:- Apache server
- Nginx
- Lighttpd
- Apache Tomcat
- Monkey HTTP Daemon (used especially for embedded systems)
The most used web servers are Apache and Nginx.
In this post, we will use Apache server for several reasons:
- It is stable.
- It is flexible.
- It is secure.
Understanding HTTP
When you request a file or a page from a web server, the client at first connects to the server on port 80. After successful connection, the client then sends HTTP commands (also methods) to the server. This command includes a request header which includes information about the client.To view these request headers in chrome, open chrome devtools, then open network panel and visit google.com and check the request headers, you should see something like this:
The request header also includes information about the client, like the user agent and the accepted formats.
Additional information may be sent with the request header. For example, if you click on a link that will open another website, the header will include the referral site.
After receiving the request header completely, the server responds with the requested file or page along with a response header.
The response header includes information about the received content, its type, and other information.
You can check the response headers from the browser network panel.
Install Apache Webserver
You can install Apache server on Red Hat based distros using the following command:$ dnf -y httpd
Or if you are using a Debian-based distro, you can install it like this:
$ apt-get -y install apache2
The Apache web server service is called httpd on Red Hat based distros like CentOS, while it is called apache2 in Debian based distros.
If you are using a firewall like iptables, you should add a rule for port 80.
$ iptables -I INPUT 1 -m state --state NEW -m tcp -p tcp --dport 80 -j ACCEPT
Or if you are using firewalld, you can use the following command:
$ firewall-cmd --add-port=80/tcp
To start your service and enable it on boot:
$ systemctl start httpd
$ systemctl enable httpd
$ systemctl status httpd
Now open your browser and visit http://localhost or http://[::1]/ if you are using IP v6 and if your installation goes well, you should see your HTML homepage.
Configuring Apache Webserver
You can add files to Apache in the /var/www/html directory for top-level pages.Just remember to make sure that any files or directories placed in that directory are world-readable.
The default index page is index.html.
The Apache configuration files are in /etc/httpd/conf/ directory.
On Debian based systems like Ubuntu, you may find it at /etc/apache2/apache2.conf file.
We can’t discuss every option for Apache on a single post, but we will discuss the most important options.
You call them options or directives.
ServerRoot Option
This option specifies the configuration folder for Apache web server. On Red Hat based distros, the ServerRoot option is /etc/httpd/ directory. On Debian distros the ServerRoot option is /etc/apache2/.ServerRoot /etc/httpd
Listen Option
This is the port that Apache web server will use to wait for incoming connections.The default value for this option is 80 for nonsecure connections and 443 for secured connections.
If you have multiple IP addresses on your server, you can assign which IP should listen for connection using Listen option.
You can specify a different port other than 80, just make sure that it’s not in use.
You can run many HTTP servers on the same hardware every one on a unique port.
When a server runs on a non-standard port such as port 8080, it will require the port number to be explicitly stated like this:
www.example.com:8080
Listen 80
ServerName Option
This option specifies the hostname of the web server that appears to the visitors.ServerName FQDN
DocumentRoot Option
This defines the path that will contain your files that will be served.The default path is /var/www/html .
DocumentRoot /var/www/html
MaxRequestWorkers Option
This option sets the maximum number of concurrent connections that the server will receive.LoadModule Option
This option is used to load modules into Apache web server.There are a lot of Apache modules like these:
mod_cgid: This module is used to run CGI scripts using Apache web server.
mod_ssl: Provides secure connections via SSL and TLS protocols.
mod_userdir: This module allows you to serve content from users specific directories.
If you want to disable loading a specific module, you can comment the Load module line that contains that module.
Or if you use Debian based distros like Ubuntu, you can use these commands:
$ a2enmod modulename
This command to enable the module.
$ a2dismod modulename
This command to disable the module.
All these commands do is create a symlink under /etc/apache2/mods-enabled directory with the file that contains the module you want to enable. All files under this directory are included in Apache configuration by default, so any file will exist in this directory will be included.
And if you use a2dismod, the symlink will be removed.
If you enable or disable a module, you have to reload or restart apache web server.
LoadModule mod_cgid.so
Include Option
This option allows you to include other configuration files.You can store all the configuration for different virtual domains, and Apache will include them at runtime.
Include filePath
UserDir option
This option specifies the directory that will contain the files that will be accessible via the web server. This directory is usually named public_html and its location in user’s home directory.For example, if you have a user adam who wants to make his web content available via Apache web server.
First, we make a public_html folder under his home directory.
Then set the permission for the public_html folder:
$ chmod 644 public_html
Now if we put an index.html file, it will be accessible via the browser like this:
http://YOURHOSTNAME/~adam
UserDir public_html
Alias Option
This option specifies the location of the files that are outside the DocumentRoot location and need to be served by the Apache web server.Like you have files outside DocumentRoot and you want them to be available to the visitors.
Alias URL_Path Actual_Path
ErrorLog Option
This option specifies the error log file for Apache web server.ErrorLog /var/log/httpd/error_log
VirtualHost Option
This option allows you to host multiple websites on the same server.The idea is that the content is served based on the requested hostname.
To setup a virtual host for the host www.example.com. First, create a VirtualHost option in /etc/httpd/conf/httpd.conf file.
And specify the DocumentRoot and ServerName like this:
These are the most used Apache options.
Virtual Host Types
There are two types of virtual hosts that you can define in Apache web server:- Name-based virtual hosts
- IP-based virtual hosts
Apache Process Ownership
We know from the Linux process management that each process inherits its permissions of its parent process.This fact is true for all processes except for applications with the SETUID bit set, they inherit permissions from the owner, not the parent process. A good example is the /bin/su.
If a normal user runs /bin/su program, it does not inherit the permission from adam, but it acts as a root user running it.
Since Apache web server needs to bind port 80, and this needs root privileges.
After binding to port 80, Apache can run as a normal user and read only files that have permissions to read them.
Based on the Linux distro you use, the user could be one of the following:
nobody, www, apache, www-data, or daemon.
I delayed introducing two more options for apache till reaching that point.
User Option
This specifies the user ID which the web server will use to answer requests.User www-data
Group Option
This specifies the group that Apache web server will use to read files.Group www-data
Security is very important for sites that use executable scripts such as CGI or PHP scripts.
The use that you will use will have permission to read and write the content of all sites on the server. But we want to ensure that only the members of a particular site can read their own site only.
This is very important because if a site got compromised, the attacker will be able to read all files since the apache user has permission to do that.
So how to solve this problem?
suEXEC Support
A popular method is to use suEXEC. suEXEC is a program that runs with root permissions and makes CGI programs run as the user and group IDs of a specific user, not the Apache server user.You can specify the user on each virtual host like this:
Apache Authentication
You may want to restrict some parts to specific visitors. It’s like a password protected directory.In Apache, you can store authentication information file called .htpasswd file.
You can use the htpasswd command to do that.
First, create the .htpasswd file using the htpasswd command:
$ htpasswd -c /home/adam/.htpassswd myuser
The -c option is needed the first time you run htpasswd, but when you need to add more users you shouldn’t use -c because it will overwrite the file.
Then create a .htaccess file in the public_html folder and write the following:
AuthType Basic says that you’re using htpasswd style user file.
AuthUserFile points to the file that contains the generated password from htpasswd command.
The Order line indicates that Apache must deny access by default, and only allow access for users specified in the htpasswd file.
The require directive means any user in the .htpasswd file is allowed.
Troubleshooting Apache Webserver
If you modify the httpd.conf file and restart or reload Apache web server and it did not work, then you have typed a wrong configuration, however, this is not the only case that you need to troubleshoot Apache, you may look at the apache logs to see how the service works so you can diagnose the problem and solve it.The two main log files for apache are error_log and access_log files.
You can find these files in /var/log/httpd/ directory in Red Hat based distros, or in /var/log/apache2/ directory if you are using Debian based distros.
The access_log file contains every request to Apache web server with the details about client requested that resource.
The error_log file contains errors of Apache web server.
You can use tail command to watch the log file:
$ tail -f /var/log/httpd/error_log
I recommend you to review the Linux syslog server to know more about logging.


