Saturday, October 23, 2021

How to Enable Copy and Paste in the Windows 10 Command Prompt

With Windows 10, Microsoft finally updated the long-neglected command prompt. You can now quickly select and paste text within the command prompt window, but first you have to enable the keyboard shortcuts. Here's how to do it.

Previously if you wanted to copy and paste in the command prompt you had to jump through hoops: Open the context menu with the Alt+E keyboard combination, go to Edit > Mark to tell Windows you want to mark text to select, and then use a lasso tool to create a box around the text you wanted to select. You needed to go back into the context menu to copy and to paste.

The upgraded command prompt in Windows 10 is much simpler. You can copy and paste with the familiar CTRL + C to copy and CTRL + V to paste keyboard shortcuts. To get this functionality, head to the application's properties settings.

1. Open Command Prompt. The quickest way to do this is to click the Windows key, type in cmd, and hit Enter or clicking on the app.


2. Right-click on the command prompt's title bar and choose Properties

3. Uncheck the box next to "Use legacy console (requires relaunch)". This should automatically check the "Enable Ctrl key shortcuts" option.

4. Click OK.

Windows 10: Missing Processor Power Management Settings Option In Advanced Power Options

 It is very possible that you cannot easily reduce the maximum performance of your CPU because the PROCESSOR POWER MANAGEMENT option is missing from ADVANCED POWER OPTIONS.  Fortunately there is an easy fix:

  1. Click the START button and type REGEDIT
  2. Click on REGISTRY EDITOR
  3. Expand HKEY_LOCAL_MACHINE >  SYSTEM  > CurrentControlSet > Control > Power > PowerSettings>  54533251-82be-4824-96c1-47b60b740d00 > bc5038f7-23e0-4960-96da-33abaf5935ec
  4. Right Click in an empty area and select NEW > DWORD(32 Bit) VALUE
  5. Set the name to Attributes and the value to 2
  6. Right click on the START BUTTON and select POWER OPTIONS
  7. click ADDITIONAL POWER OPTIONS (on the right or bottom)
  8. Click CHANGE ADVANCED POWER SETTINGS
  9. Set the PROCESSOR POWER MANAGEMENT > MAXIMUM PROCESSOR STATE > PLUGGED IN and/or ON BATTERY to some lesser number, like 75%


Saturday, September 4, 2021

Essential ESXCLI Commands


ESXi Shell and ESXCLI


If it is not already, the first thing you need to do is enable shell on ESXi, something that is generally disabled for security reasons. To enable Shell, follow the steps provided in KB 2004746. Once you enable it, you can use a tool like putty to access Shell via an SSH session. Alternatively, pressing ALT-F1 while in DCUI is one other way of accessing Shell. To run commands in shell, log in as root or with an account having similar privileges.

ESXCLI commands

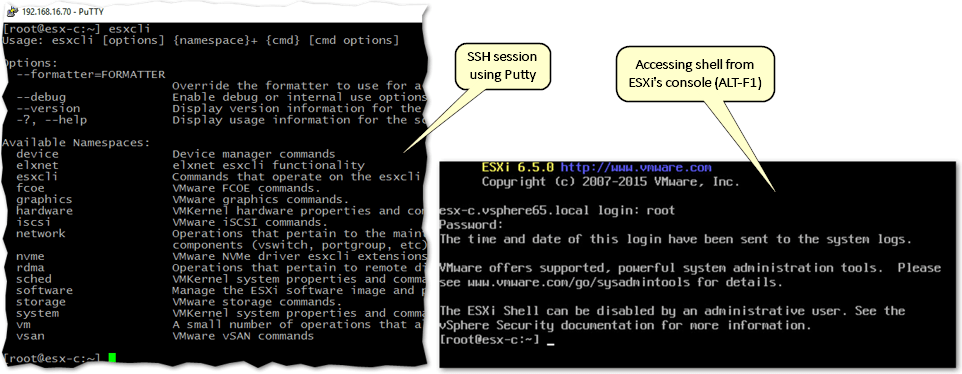
Accessing ESXi shell using an SSH client or directly from console


The esxcli command exposes a number of namespaces against which you can run queries to retrieve information about ESXi as well as configure it. The following table lists the available namespaces on ESXi 6.5 along with a description for each (source: VMware). For earlier ESXi releases, consult the relevant online documentation or run esxcli with no parameters to see which namespaces are available.

CommandDescription
esxcli deviceLists descriptions of device commands.
esxcli elxnetLists descriptions for commands that manage Emulex elxnet drivers.
esxcli esxcliLists descriptions of esxcli commands.
esxcli fcoeFCOE (Fibre Channel over Ethernet) commands
esxcli graphicsGraphics commands
esxcli hardwareHardware namespace. Used primarily for extracting information about the current system setup.
esxcli iscsiiSCSI namespace for monitoring and managing hardware and software iSCSI.
esxcli networkNetwork namespace for managing virtual networking including virtual switches and VMkernel network interfaces.
esxcli nvmeCommands for managing NVMe devices.
esxcli rdmaCommands for monitoring RDMA devices.
esxcli schedManage the shared system-wide swap space.
esxcli softwareSoftware namespace. Includes commands for managing and installing image profiles and VIBs.
esxcli storageIncludes core storage commands and other storage management commands.
esxcli systemSystem monitoring and management command.
esxcli vmNamespace for listing virtual machines and shutting them down forcefully.
esxcli vsanNamespace for Virtual SAN management commands. See the vSphere Storage publication for details.


The Top 20 ESXCLI Commands


The following is a compilation of esxcli commands, sorted by namespace, I tend to use on a regular basis. It is by no means exhaustive as there are too many examples to mention. If you want the whole shebang, have a look at VMware’s documentation site.


System related commands
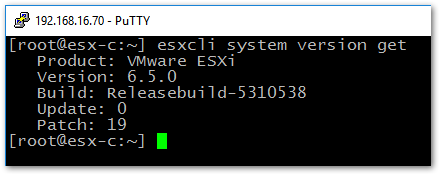

#1esxcli system version get

Description: Returns the ESXi build and version numbers.
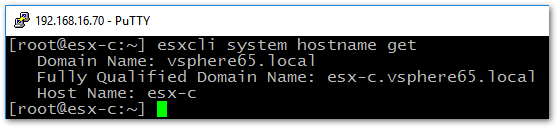
 

#2esxcli system hostname get

Description: Returns the hostname, domain and FQDN for the host.


#3esxcli system stats installtime get

Description: Returns the date and time of when ESXi was installed.
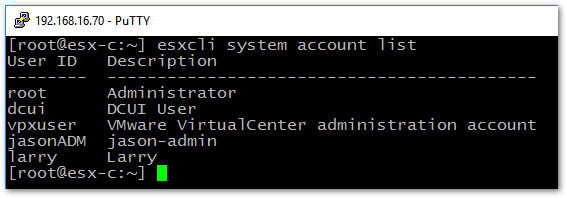
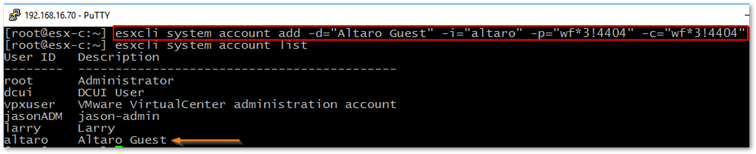
 

#4esxcli system account list

Description: Lists the local users created on the ESXi host.


#5esxcli system account add -d=”Altaro Guest” -i=”altaro” -p=”dsfewfewf*3!4404″ -c=”dsfewfewf*3!4404″

Description: This command allows you to create local ESXi users. All the parameters used in the example are mandatory.


#6esxcli system maintenanceMode set –enable true

Description: Use this command to put ESXi in maintenance mode or take it out.


#7esxcli system shutdown reboot -d 10 -r “Patch Updates”

Description: Use this command to reboot or shutdown ESXi. The -d parameter is a countdown timer; minimum 10 seconds. ESXi must be in maintenance mode before you can use the command.


Network related commands
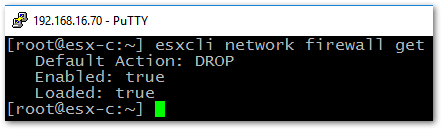

#8esxcli network firewall get

Description: Returns the status of the ESXi firewall. The default action is to drop traffic unless allowed through by a specific firewall rule. The Enabled field indicates whether the firewall is enabled. The Loaded field shows whether the firewall module is active or not (see esxcli firewall load | unload commands).
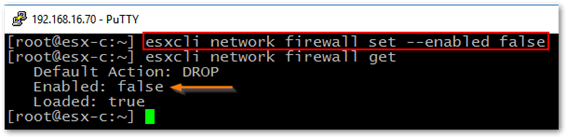
 

#9esxcli network firewall set –enabled true | false

Description: Use this command to disable the ESXi firewall for troubleshooting purposes. Note that disabling the firewall on ESXi is highly discouraged.
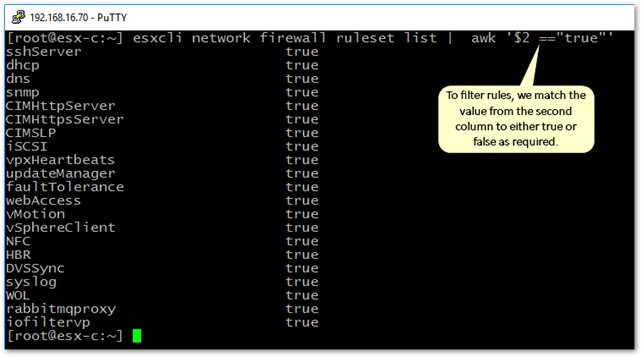
 

#10esxcli network firewall ruleset list | awk ‘$2 ==”true”‘

Description: Generates a list of all enabled firewall rules on ESXi. The command is piped to awk which will matches the value from the second column to “true” so only enabled rules are displayed.


#11esxcli network ip interface ipv4 get

Description: Displays the IPv4 configuration for all the interfaces present on ESXi.


Software related commands
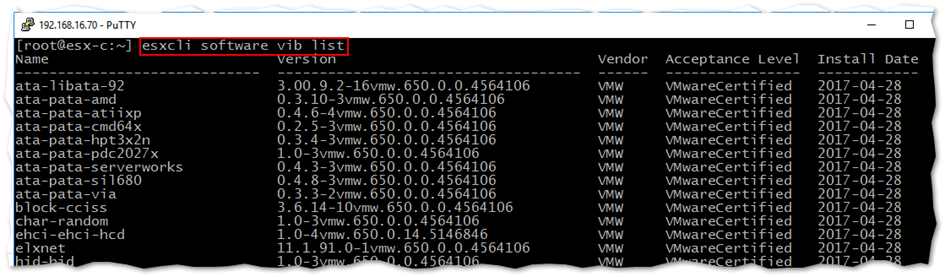

#12esxcli software vib list

Description: Lists all the currently installed VIBs on ESXi. A VIB is a file packaging format used to distribute software on ESXi.


#13esxcli software vib update -d “/tmp/update.zip”

Description: Use this command to update an installed VIB on ESXi. Note that the command does not install any new software. Instead it only updates what’s currently installed. Use esxcli software vib install instead when installing new software. The -d parameter specifies the full path to the package being used for the update. As per the next screenshot, I specified a non-existing patch hence the error message.


Virtual Machine related commands
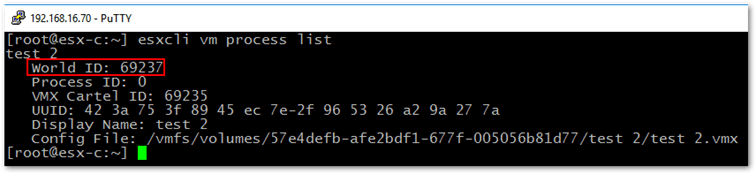

#14esxcli vm process list

Description: Lists all the running VMs on the hosts. The World ID can be used with other commands to carry out various tasks related to VMs.
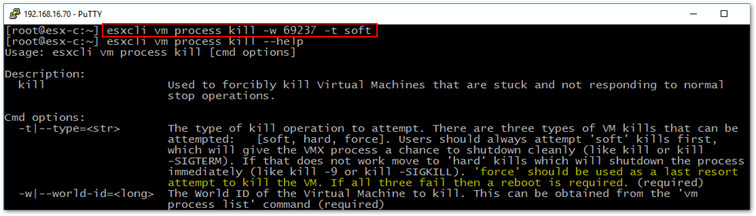
 

#15esxcli vm process kill -w 69237 -t soft

Description: Use this command to kill a running VM such as one that fails to respond to commands. You must first retrieve the VM’s World ID (see command #14) and pass it on using the -w parameter. The -t <soft | hard | force> mandatory parameter sets the type of kill operation. Start with soft so you allow the VM to shut down cleanly. If this does not work, try the hard option which will kill the VM processes immediately as in kill -9. The Force type should only be used as a last resort. If none work, your only option is to reboot ESXi.


Storage related commands


#16esxcli storage vmfs extent list

Description: The command generates a list of extents for each volume as well as the corresponding device name to UUID mapping.


#17esxcli storage filesystem list

Description: The command lists of all the volumes or datastores accessible by the ESXi host. The output includes the file system type, disk info along with the volume name, path and UUID.


iSCSI related commands
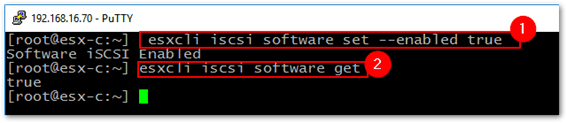

#18esxcli iscsi software set –enabled true && esxcli iscsi software get

Description: The above command actually consists of two concatenated commands, which is what && does. The first command enables the iSCSI software adapter and the second verifies that the iSCSI adapter is enabled.
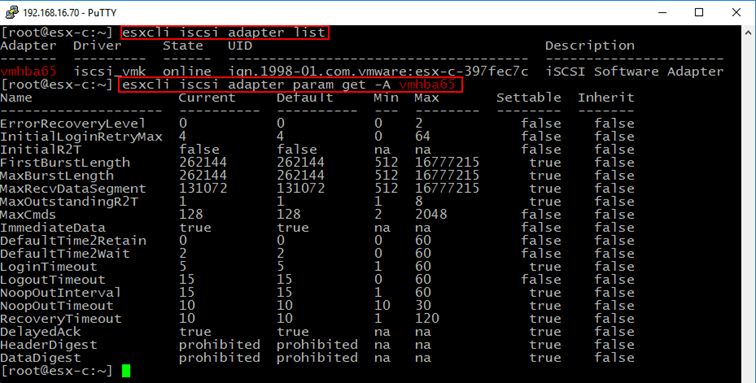
 

#19esxcli iscsi adapter param get -A vmhba65

Description: The command returns metrics for the specified iSCSI adapter. These include the current, minimum and maximum values and whether the listed parameters may be configured or not. The name of the iSCSI adapter you want to be queried is specified via the -A parameter. The adapter name is retrieved using esxcli iscsi adapter list or from the vSphere Web client.


Available ESXCLI commands
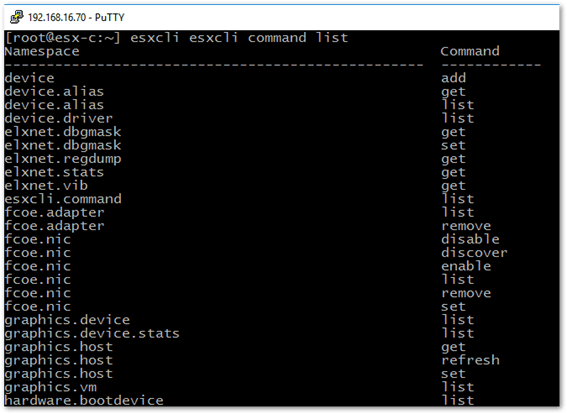

#20esxcli esxcli command list

Description: Lists all the available namespaces and corresponding commands.


Wrap Up


We’ve seen how you can use esxcli to query ESXi as well as it for configuration tasks. It is a great command to master, so make sure you familiarize yourself with it. Hopefully, this post has given you a taste of what it can do and how command line is sometimes better suited at accomplishing a given task such as upgrading ESXi from the command line, something I explain in Patching and Upgrading ESXi using ESXCLI commands.

[the_ad id=”4738″][the_ad id=”4796″]

Tuesday, August 17, 2021

Resetting root password in vCenter Server Appliance 6.5 / 6.7 / 7.x (2147144)

 Symptoms

  • The root account password of VMware vCenter Server Appliance fails
  • The root account of the vCenter Server Appliance 6.5 and above is locked or account is expired
  • The root account password has been lost or forgotten
Note: The above symptoms can also occur on an external Platform Services Controller (PSC) running on vSphere 6.5 and 6.7.
Purpose
This article provides steps to reset a lost, forgotten, or expired root password for a vCenter Server Appliance (or external PSC) 6.5 and later.
 
Important: This article is explicitly for the vCenter Server Appliance (and external PSC 6.5 and 6.7) 6.5 and later.

For previous versions, see: Resetting root account password of vCenter Server Appliance 6.0
Cause
For passwords that have expired, the default vCenter Server Appliance password expires after 90 days. For more information, see Change the Password and Password Expiration Settings of the Root User
Resolution

Process to Reset the Root Password in VCSA:

Note: 6.7U1 and later has a simpler method to reset the password, see How to reset the lost or forgotten root password in vCenter Server Appliance 6.7 U1 and later

To reset the root password for the vCenter Server Appliance:

  1. Take a snapshot or backup of the vCenter Server Appliance before proceeding.
Caution: Do not skip this step

Note: If the vCenter Appliance is on the same ESXi hosts it manages. Connect directly to the ESXi host that it is located on to perform these steps.
  1. Reboot the vCenter Server Appliance.
  2. After the VCSA Photon OS starts, press the e key to enter the GNU GRUB Edit Menu.
  3. Locate the line that begins with the word Linux.
  4. Append these entries to the end of the line:

    rw init=/bin/bash

    The line should look like the following screenshot:

    Reset root password in VCSA - rw init=/bin/bash
     
  5. Press F10 to continue booting.
  6. Run the command  
mount -o remount,rw / 
  1. In the Command prompt, enter the command passwd and provide a new root password (twice for confirmation):
passwd
 
  1. Unmount the filesystem by running this command (yes, the unmount command is umount  -  it's not a spelling error):
umount /
 
  1. Reboot the vCenter Server Appliance by running this command:
reboot -f
 
  1. Confirm that you can access the vCenter Server Appliance using the new root password.
  2. Remove the snapshot taken in Step 1 if applicable.
  3. You could set the Root password to never expire in order to prevent this issue by running command:         # chage -I -1 -m 0 -M 99999 -E -1 root  or at the VAMI  ( https://<vcenter_fqdn>:5480)

Note: If you continue to have issues, see Unable to log in to the vCenter Server Appliance shell using root account even after password reset

How to install the Backup Exec 15 and above Agent for Windows (a.k.a. Remote Agent, AWS. RAWS)


Problem

This article provides instructions for installing the Backup Exec 15 and above Agent for Windows on a remote machine.

The Remote Agent for Windows Servers (RAWS) has been renamed to Agent for Windows (AWS) in Backup Exec 15 and above.

Error Message

UMI Code: V-225-285

Solution

Click on the desired method to see the installation instructions for the Agent for Windows Systems (AWS):

Automated (Push) Installation (to be performed from the Backup Exec 15 or above media server).

Local (manual) installation (to be performed on each remote machine).
In Backup Exec 15 and above, it is possible to install the Agent for Windows locally with a Graphical User Interface (GUI).

Silent (command line) installation (to be performed on each remote machine).
Command line scripts setupaa.cmd (OS 32-bit) and setupaax64.cmd (OS 64-bit) for a command line installation.


Automated (Push) Installation of Backup Exec 15 and above Agent for Windows


There are two methods to perform an Automated (Push) installation of the Agent for Windows:

From the Backup and Restore tab (recommended):

  1. Open the Backup Exec 15 or above console - go to the Backup and Restore tab.
     
  2. Select Add (from the ribbon menu) - select Microsoft Windows computer - click Next.
     
  3. Select 'Allow Backup Exec to establish a trust with the servers.' - click Next.
     
  4. Browse / Add a server name(s) - then click Next.
     
  5. Select/Add a System logon account - click Next.
     
  6. Select "Upgrade the Veritas Backup Exec Agent for windows to the current version automatically" (if Agent for Windows is not installed/up to date).

    Note: 'Restart the remote computer automatically after installing the Veritas Backup Exec Agent for Windows when a restart is required' should only be selected if down time has been planned or is not problematic for the target server(s).
     
  7. Click Install to begin setup.
     
  8. Click Finish to complete the installation..


By clicking on the Backup Exec button:

  1. Open the Backup Exec 15 or above console on the media server.
     
  2. Click on the round Backup Exec button which is located to the left of the Home tab.
     
  3. Go to Installation and Licensing - select Install Agents and Backup Exec Servers on Other Servers.
     
  4. On the Remote Computers section - select Add
    • Choose Add a Single Computer (if remote agent needs to be installed on only one machine).

      OR
       
    • Choose Add Multiple Computers with the Same Settings (to select multiple servers for remote agent installation).

      Note: The box Save the server list for future remote install sessions enables the names of all of the remote computers and their credentials to be added automatically the next time Backup Exec or any of its options need to be installed to these remote computers.
       
  5. On the Select the Remote Product screen - select Agent for Windows and click Next.
     
  6. On the Add Single Computer / Choose Remote Computers screen:
    1. When selecting Add a Single Computer:
      1. Enter the Remote Computer name / select Browse Remote Computers to select a remote machine.
         
      2. Enter the Remote computer credentials (type the user name and password of an account that has administrative rights on the server).
         
      3. Click Next.

      OR
       
    2. When Selecting Add Multiple Computers with the Same Settings
      1. Enter the Remote computer name / Browse to select a remote computer - click on Add to List

        NOTE: Repeat the above steps to select multiple servers for remote agent installation.
         
      2. Enter the Remote Install Credentials (type the user name and password of the account that has administrative rights on the servers).
         
      3. Click Next.
         
  7. The destination location for Remote Agent install files can be changed under the Destination Folder section if required.
     
  8. On the Remote Agent Publishing screen:
    1. Check the box which says 'Enable remote agent to publish the IP address and name of the remote computer and the version of the Remote Agent to media server'.
       
    2. Click Add and enter the Media Server name or IP address (or both) and press OK.
       
    3. Click Next.
       
  9. Click Next when the screen shows Ready to install the Agent for Windows beside the server name(s).
     
  10. Click Install to begin the installation.
     
  11. Wait for the installation to complete and click Finish.
     
  12. An SSL trust relationship will need to be established after a manual installation of the Agent for Windows. This is explained in the following article:

    How to establish trust for remote servers in Backup Exec 15 and above


Local (manual) installation using the GUI method


When automated (push) installation of the AWS fails it may be necessary to perform a local installation.
Listed below are two methods to perform a Local (manual) installation of Agent for Windows:

Using the RAWS32/RAWSX64 folder located on Backup Exec 15 and above media server (recommended):

  1. Copy the Agents folder which includes the "RAWS32 or RAWSX64", DotNetFx, VCRedist, and MSXML (if it exists) folders, from the Media Server to a drive on a remote computer.

    NOTE: The default path for the above mentioned folder is 'X:\Program Files\Symantec\Backup Exec\Agents'  or 'X:\Program Files\Veritas\Backup Exec\Agents" ('X' is the drive letter where Backup Exec is installed.)

    For Remote Agent installation on:
    • 32-bit system: Use the RAWS32 folder.
    • 64-bit system: Use the RAWSX64 folder.
       
  2. Go to the remote computer and open the RAWS32 or RAWSX64 directory which was copied from the media server.
     
  3. Double-click on Setup.exe.

    Note: Turn off User Access Control (UAC) for Windows 2008, Vista or 7.
    It is also recommended to right-click on the Setup.exe file and select 'Run as Administrator' to avoid any access issues during the installation process.
     
  4. Click Next on the Welcome screen.
     
  5. Select Local Install and click Next.
     
  6. Select 'Agent for Windows' - click Next.

    Note: The destination location for the Remote Agent install files can be changed if desired by clicking on the 'Change' button.
     
  7. On the Remote Agent publishing screen:
    1. Check the box which says 'Enable remote agent to publish the IP address and name of the remote computer and the version of the Remote Agent to media server'.
       
    2. Click Add and enter the Media Server name or IP address (or both) and press OK.
       
    3. Click Next.
       
  8. Click Install to begin the installation.
     
  9. Wait for the Installation to complete and click Finish.
     
  10. An SSL trust will need to be established after a manual installation of Agent for Windows. This is explained in the article below:

    How to establish trust for remote servers in Backup Exec 15 and above


Silent (command line) Installation

  1. Copy the Agents folder from the Backup Exec media server's installation folder (by default located in C:\Program Files\Symantec\Backup Exec\Agents on the media server or C:/Program Files/Veritas/Backup Exec/Agents) to the root of the C: drive on the remote server.  Verify it contains the folders "RAWS32 or RAWSX64", DotNetFx, VCRedist, and MSXML (if it exists).  To perform the steps below, you will be using these following folders:
    • RAWS32: For a 32-bit (x86) Windows System.
    • RAWSX64: For a 64-bit Windows System.
  2. On the remote server, go to the command prompt (click Start - Run - cmd):
    1. Browse to the RAWS folder which was copied on the local drive using DOS commands.
       
    2. In the command prompt window type setupaa.cmd (for 32-bit OS) or setupaax64.cmd (for 64-bit OS) and press enter to install Agent for Windows.

      Note: Installation of AOFO is no longer required. If the operating system is Windows Server 2003 or above, it will use the Microsoft VSS provider for the Advanced Open File Option.
    OR
  1. On the remote server, open the RAWS folder which was copied on the local drive:
    1. Double-click on setupaa.cmd (for 32-bit OS) or setupaax64.cmd (for 64-bit OS) to install Agent for Windows.

      Note: On Windows Server 2008, Windows Vista or Windows 7, right-click on Setupaa.cmd and select Run as administrator.

      Installation of AOFO is no longer required. If the operating system is Windows Server 2003 or above, it will use the Microsoft VSS provider for the Advanced Option File Option.
       
    2. The command prompt will appear blank for a period between a few seconds and a couple of minutes while the remote agent installs.
       
    3. Once completed, the command prompt cursor will appear awaiting further input.
      1. To check if the Agent for Windows was installed: Go to the Windows services console (Start - Run - Services.msc), and see if the Backup Exec Remote Agent for Windows service is present and started.
         
      2. An SSL trust will need to be established after a manual installation of the Agent for Windows. This is explained in the article below:

        How to establish trust for remote servers in Backup Exec 15 and above