Monday, July 23, 2018

Deploy Storage Spaces on a stand-alone server

Applies To: Windows Server 2016, Windows Server 2012 R2, Windows Server 2012
This topic describes how to deploy Storage Spaces on a stand-alone Windows Server 2012−based server. For information about how to create a clustered storage space, see Deploy a Storage Spaces cluster on Windows Server 2012 R2.
To create a storage space, you must first create one or more storage pools. A storage pool is a collection of physical disks. A storage pool enables storage aggregation, elastic capacity expansion, and delegated administration.
From a storage pool, you can create one or more virtual disks. These virtual disks are also referred to as storage spaces. A storage space appears to the Windows operating system as a regular disk from which you can create formatted volumes. When you create a virtual disk through the File and Storage Services user interface, you can configure the resiliency type (simple, mirror, or parity), the provisioning type (thin or fixed), and the size. Through Windows PowerShell, you can set additional parameters such as the number of columns, the interleave value, and which physical disks in the pool to use. For information about these additional parameters, see New-VirtualDisk and What are columns and how does Storage Spaces decide how many to use? in Storage Spaces Frequently Asked Questions (FAQ).
Note
You cannot use a storage space to host the Windows operating system.
From a virtual disk, you can create one or more volumes. When you create a volume, you can configure the size, the drive letter or folder, the file system (NTFS file system or Resilient File System (ReFS)), the allocation unit size, and an optional volume label.
The following figure illustrates the Storage Spaces workflow.

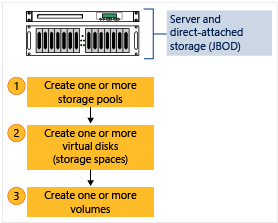
Figure 1: Storage Spaces workflow
In this topic
Note
This topic includes sample Windows PowerShell cmdlets that you can use to automate some of the procedures described. For more information, see Using Cmdlets.

Prerequisites

To use Storage Spaces on a stand-alone Windows Server 2012−based server, make sure that the physical disks that you want to use meet the following prerequisites.
Important
If you want to deploy Storage Spaces on a failover cluster, see the topic Deploy a Storage Spaces cluster on Windows Server 2012 R2. Realize that a failover cluster deployment has different prerequisites, such as the supported disk bus types, the supported resiliency types, and the minimum number of disks that are required.
Area Requirement
Disk bus types Serial Attached SCSI (SAS)

Serial Advanced Technology Attachment (SATA)

 Note: You can also use USB drives. However, we do not recommend that you use USB drives in a server environment.

 Note: Storage Spaces does not support iSCSI and Fibre Channel controllers.
Disk configuration Physical disks must be at least 4 GB.

Disks must be blank and not formatted. Do not create volumes.
HBA considerations We recommend that you use simple host bus adapters (HBAs) that do not support RAID functionality. If RAID capable, HBAs must be in non-RAID mode with all RAID functionality disabled. Adapters must not abstract the physical disks, cache data, or obscure any attached devices. This includes enclosure services that are provided by attached just-a-bunch-of-disks (JBOD) devices. Storage Spaces is compatible only with HBAs where you can completely disable all RAID functionality.
JBOD enclosures A JBOD enclosure is optional. For full Storage Spaces functionality if you are using a JBOD enclosure, verify with your storage vendor that the JBOD enclosure supports Storage Spaces.

To determine whether the JBOD enclosure supports enclosure and slot identification, run the following Windows PowerShell cmdlet:

 Get-PhysicalDisk | ? {$_.BusType –eq “SAS”} | fc

If the EnclosureNumber and SlotNumber fields contain values, this indicates that the enclosure supports these features.
To plan for the number of physical disks and the desired resiliency type for a stand-alone server deployment, use the following guidelines.
Resiliency Type Disk Requirements When To Use
Simple

Stripes data across physical disks.

Maximizes disk capacity and increases throughput.

Does not provide resiliency.
Requires at least one physical disk.

 Warning: A simple space does not protect from disk failure.
Do not use to host irreplaceable data.

Use to host temporary or easily recreated data at a reduced cost.

Suited for high performance workloads where resiliency is not required or is provided by the application.
Mirror

Stores two or three copies of the data across the set of physical disks.

Increases reliability, but reduces capacity. Duplication occurs with every write. A mirror space also stripes the data across multiple physical drives.

Greater data throughput than parity, and lower access latency.

Uses dirty region tracking (DRT) to track modifications to the disks in the pool. When the system resumes from an unplanned shutdown and the spaces are brought back online, DRT makes disks in the pool consistent with each other.
Requires at least two physical disks to protect from single disk failure.

Requires at least five physical disks to protect from two simultaneous disk failures.
Use for most deployments. For example, mirror spaces are suited for a general-purpose file share or a virtual hard disk (VHD) library.
Parity

Stripes data and parity information across physical disks.

Increases reliability when it is compared to a simple space, but somewhat reduces capacity.

Increases resiliency through journaling. This helps prevent data corruption if an unplanned shutdown occurs.
Requires at least three physical disks to protect from single disk failure. Use for workloads that are highly sequential, such as archive or backup.

Step 1: Create a storage pool

You must first group available physical disks into one or more storage pools.

To create a storage pool

  1. In the Server Manager navigation pane, click File and Storage Services.
  2. In the navigation pane, click the Storage Pools page.
    By default, available disks are included in a pool that is named the primordial pool. If no primordial pool is listed under STORAGE POOLS, this indicates that the storage does not meet the requirements for Storage Spaces. Make sure that the disks meet the requirements that are outlined in the Prerequisites section.
    Tip
    If you select the Primordial storage pool, the available physical disks are listed under PHYSICAL DISKS.
  3. Under STORAGE POOLS, click the TASKS list, and then click New Storage Pool.
    The New Storage Pool Wizard opens.
  4. On the Before you begin page, click Next.
  5. On the Specify a storage pool name and subsystem page, enter a name and optional description for the storage pool, select the group of available physical disks that you want to use, and then click Next.
  6. On the Select physical disks for the storage pool page, do the following, and then click Next:
    1. Select the check box next to each physical disk that you want to include in the storage pool.
    2. If you want to designate one or more disks as hot spares, under Allocation, click the drop-down arrow, and then click Hot Spare.
  7. On the Confirm selections page, verify that the settings are correct, and then click Create.
  8. On the View results page, verify that all tasks completed, and then click Close.
    Note
    Optionally, to continue directly to the next step, you can select the Create a virtual disk when this wizard closes check box.
  9. Under STORAGE POOLS, verify that the new storage pool is listed.
  Windows PowerShell equivalent commands
The following Windows PowerShell cmdlet or cmdlets perform the same function as the preceding procedure. Enter each cmdlet on a single line, even though they may appear word-wrapped across several lines here because of formatting constraints.
The following example shows which physical disks are available in the primordial pool.
Get-StoragePool -IsPrimordial $true | Get-PhysicalDisk | Where-Object CanPool -eq $True  
The following example creates a new storage pool that is named StoragePool1. It uses all available disks.
New-StoragePool –FriendlyName StoragePool1 –StorageSubsystemFriendlyName “Storage Spaces*” –PhysicalDisks (Get-PhysicalDisk –CanPool $True)  
The following example creates a new storage pool StoragePool1 that uses four of the available disks.
New-StoragePool –FriendlyName StoragePool1 –StorageSubsystemFriendlyName “Storage Spaces*” –PhysicalDisks (Get-PhysicalDisk PhysicalDisk1, PhysicalDisk2, PhysicalDisk3, PhysicalDisk4)  
The following example sequence of cmdlets shows how to add an available physical disk PhysicalDisk5 as a hot spare to the storage pool StoragePool1.
$PDToAdd = Get-PhysicalDisk –FriendlyName PhysicalDisk5  
Add-PhysicalDisk –StoragePoolFriendlyName StoragePool1 –PhysicalDisks $PDToAdd –Usage HotSpare  

Step 2: Create a virtual disk

Next, you must create one or more virtual disks from the storage pool. When you create a virtual disk, you can select how the data is laid out across the physical disks. This affects both reliability and performance. You can also select whether to create thin- or fixed-provisioned disks.

To create a virtual disk

  1. If the New Virtual Disk Wizard is not already open, on the Storage Pools page in Server Manager, under STORAGE POOLS, make sure that the desired storage pool is selected.
  2. Under VIRTUAL DISKS, click the TASKS list, and then click New Virtual Disk.
    The New Virtual Disk Wizard opens.
  3. On the Before you begin page, click Next.
  4. On the Select the storage pool page, click the desired storage pool, and then click Next.
  5. On the Specify the virtual disk name page, enter a name and optional description, and then click Next.
  6. On the Select the storage layout page, click the desired layout, and then click Next.
    Note
    If you select a layout where you do not have enough physical disks, you will receive an error message when you click Next. For information about which layout to use and the disk requirements, see the Prerequisites section of this topic.
  7. If you selected Mirror as the storage layout, and you have five or more disks in the pool, the Configure the resiliency settings page appears. Select one of the following options:
    • Two-way mirror
    • Three-way mirror
  8. On the Specify the provisioning type page, click one of the following options, and then click Next.
    • Thin
      With thin provisioning, space is allocated on an as-needed basis. This optimizes the usage of available storage. However, because this enables you to over-allocate storage, you must carefully monitor how much disk space is available.
    • Fixed
      With fixed provisioning, the storage capacity is allocated immediately, at the time a virtual disk is created. Therefore, fixed provisioning uses space from the storage pool that is equal to the virtual disk size.
    Tip
    With Storage Spaces, you can create both thin- and fixed-provisioned virtual disks in the same storage pool. For example, you could use a thin-provisioned virtual disk to host a database and a fixed-provisioned virtual disk to host the associated log files.
  9. On the Specify the size of the virtual disk page, do the following:
    If you selected thin provisioning in the previous step, in the Virtual disk size box, enter a virtual disk size, select the units (MB, GB, or TB), and then click Next.
    If you selected fixed provisioning in the previous step, click one of the following:
    • Specify size
      To specify a size, enter a value in the Virtual disk size box, and then select the units (MB, GB, or TB).
      If you use a storage layout other than simple, the virtual disk uses more free space than the size that you specify. To avoid a potential error where the size of the volume exceeds the storage pool free space, you can select the Create the largest virtual disk possible, up to the specified size check box.
    • Maximum size
      Select this option to create a virtual disk that uses the maximum capacity of the storage pool.
  10. On the Confirm selections page, verify that the settings are correct, and then click Create.
  11. On the View results page, verify that all tasks completed, and then click Close.
    Tip
    By default, the Create a volume when this wizard closes check box is selected. This takes you directly to the next step.
  Windows PowerShell equivalent commands
The following Windows PowerShell cmdlet or cmdlets perform the same function as the preceding procedure. Enter each cmdlet on a single line, even though they may appear word-wrapped across several lines here because of formatting constraints.
The following example creates a 50 GB virtual disk that is named VirtualDisk1 on a storage pool that is named StoragePool1.
New-VirtualDisk –StoragePoolFriendlyName StoragePool1 –FriendlyName VirtualDisk1 –Size (50GB)  
The following example creates a mirrored virtual disk that is named VirtualDisk1 on a storage pool that is named StoragePool1. The disk uses the maximum storage capacity of the storage pool.
New-VirtualDisk –StoragePoolFriendlyName StoragePool1 –FriendlyName VirtualDisk1 –ResiliencySettingName Mirror –UseMaximumSize  
The following example creates a 50 GB virtual disk that is named VirtualDisk1 on a storage pool that is named StoragePool1. The disk uses the thin provisioning type.
New-VirtualDisk –StoragePoolFriendlyName StoragePool1 –FriendlyName VirtualDisk1 –Size (50GB) –ProvisioningType Thin  
The following example creates a virtual disk that is named VirtualDisk1 on a storage pool that is named StoragePool1. The virtual disk uses three-way mirroring and is a fixed size of 20 GB.
Note
You must have at least five physical disks in the storage pool for this cmdlet to work. (This does not include any disks that are allocated as hot spares.)
New-VirtualDisk -StoragePoolFriendlyName StoragePool1 -FriendlyName VirtualDisk1 -ResiliencySettingName Mirror -NumberOfDataCopies 3 -Size 20GB -ProvisioningType Fixed  

Step 3: Create a volume

Next, you must create a volume from the virtual disk. You can assign an optional drive letter or folder, and then format the volume with a file system.

To create a volume

  1. If the New Volume Wizard is not already open, on the Storage Pools page in Server Manager, under VIRTUAL DISKS, right-click the desired virtual disk, and then click New Volume.
    The New Volume Wizard opens.
  2. On the Before you begin page, click Next.
  3. On the Select the server and disk page, do the following, and then click Next.
    1. In the Server area, click the server on which you want to provision the volume.
    2. In the Disk area, click the virtual disk on which you want to create the volume.
  4. On the Specify the size of the volume page, enter a volume size, specify the units (MB, GB, or TB), and then click Next.
  5. On the Assign to a drive letter or folder page, configure the desired option, and then click Next.
  6. On the Select file system settings page, do the following, and then click Next.
    1. In the File system list, click NTFS or ReFS.
    2. In the Allocation unit size list, either leave the setting at Default or set the allocation unit size.
      Note
      For more information about allocation unit size, see Default cluster size for NTFS, FAT, and exFAT.
    3. Optionally, in the Volume label box, enter a volume label name, for example HR Data.
  7. On the Confirm selections page, verify that the settings are correct, and then click Create.
  8. On the View results page, verify that all tasks completed, and then click Close.
  9. To verify that the volume was created, in Server Manager, click the Volumes page.
    The volume is listed under the server where it was created. You can also verify that the volume is in Windows Explorer.
  Windows PowerShell equivalent commands
The following Windows PowerShell cmdlet or cmdlets perform the same function as the previous procedure. Enter the command on a single line.
The following example initializes the disks for virtual disk VirtualDisk1, creates a partition with an assigned drive letter, and then formats the volume with the default NTFS file system.


Get-VirtualDisk –FriendlyName VirtualDisk1 | Get-Disk | Initialize-Disk –Passthru | New-Partition –AssignDriveLetter –UseMaximumSize | Format-Volume  

Cluster-Aware Updating requirements and best practices

This section describes the requirements and dependencies that are needed to use Cluster-Aware Updating (CAU) to apply updates to a failover cluster running Windows Server.
Note
You may need to independently validate that your cluster environment is ready to apply updates if you use a plug-in other than Microsoft.WindowsUpdatePlugin. If you are using a non-Microsoft plug-in, contact the publisher for more information. For more information about plug-ins, see How Plug-ins Work.

Install the Failover Clustering feature and the Failover Clustering Tools

CAU requires an installation of the Failover Clustering feature and the Failover Clustering Tools. The Failover Clustering Tools include the CAU tools (clusterawareupdating.dll), the Failover Clustering cmdlets, and other components needed for CAU operations. For steps to install the Failover Clustering feature, see Installing the Failover Clustering Feature and Tools.
The exact installation requirements for the Failover Clustering Tools depend on whether CAU coordinates updates as a clustered role on the failover cluster (by using self-updating mode) or from a remote computer. The self-updating mode of CAU additionally requires the installation of the CAU clustered role on the failover cluster by using the CAU tools.
The following table summarizes the CAU feature installation requirements for the two CAU updating modes.
Installed component Self-updating mode Remote-updating mode
Failover Clustering feature Required on all cluster nodes Required on all cluster nodes
Failover Clustering Tools Required on all cluster nodes - Required on remote-updating computer
- Required on all cluster nodes to run the Save-CauDebugTrace cmdlet
CAU clustered role Required Not required

Obtain an administrator account

The following administrator requirements are necessary to use CAU features.
  • To preview or apply update actions by using the CAU user interface (UI) or the Cluster-Aware Updating cmdlets, you must use a domain account that has local administrator rights and permissions on all the cluster nodes. If the account doesn't have sufficient privileges on every node, you are prompted in the Cluster-Aware Updating window to supply the necessary credentials when you perform these actions. To use the Cluster-Aware Updating cmdlets, you can supply the necessary credentials as a cmdlet parameter.
  • If you use CAU in remote-updating mode when you are signed in with an account that doesn't have local administrator rights and permissions on the cluster nodes, you must run the CAU tools as an administrator by using a local administrator account on the Update Coordinator computer, or by using an account that has the Impersonate a client after authentication user right.
  • To run the CAU Best Practices Analyzer, you must use an account that has administrative privileges on the cluster nodes and local administrative privileges on the computer that is used to run the Test-CauSetup cmdlet or to analyze cluster updating readiness using the Cluster-Aware Updating window. For more information, see Test cluster updating readiness.

Verify the cluster configuration

The following are general requirements for a failover cluster to support updates by using CAU. Additional configuration requirements for remote management on the nodes are listed in Configure the nodes for remote management later in this topic.
  • Sufficient cluster nodes must be online so that the cluster has quorum.
  • All cluster nodes must be in the same Active Directory domain.
  • The cluster name must be resolved on the network using DNS.
  • If CAU is used in remote-updating mode, the Update Coordinator computer must have network connectivity to the failover cluster nodes, and it must be in the same Active Directory domain as the failover cluster.
  • The Cluster service should be running on all cluster nodes. By default this service is installed on all cluster nodes and is configured to start automatically.
  • To use PowerShell pre-update or post-update scripts during a CAU Updating Run, ensure that the scripts are installed on all cluster nodes or that they are accessible to all nodes, for example, on a highly available network file share. If scripts are saved to a network file share, configure the folder for Read permission for the Everyone group.

Configure the nodes for remote management

To use Cluster-Aware Updating, all nodes of the cluster must be configured for remote management. By default, the only task you must perform to configure the nodes for remote management is to Enable a firewall rule to allow automatic restarts.
The following table lists the complete remote managment requirements, in case your environment diverges from the defaults.
These requirements are in addition to the installation requirements for the Install the Failover Clustering feature and the Failover Clustering Tools and the general clustering requirements that are described in previous sections in this topic.
Requirement Default state Self-updating mode Remote-updating mode
Enable a firewall rule to allow automatic restarts Disabled Required on all cluster nodes if a firewall is in use Required on all cluster nodes if a firewall is in use
Enable Windows Management Instrumentation Enabled Required on all cluster nodes Required on all cluster nodes
Enable Windows PowerShell 3.0 or 4.0 and Windows PowerShell remoting Enabled Required on all cluster nodes Required on all cluster nodes to run the following:

- The Save-CauDebugTrace cmdlet
- PowerShell pre-update and post-update scripts during an Updating Run
- Tests of cluster updating readiness using the Cluster-Aware Updating window or the Test-CauSetup Windows PowerShell cmdlet
Install .NET Framework 4.6 or 4.5 Enabled Required on all cluster nodes Required on all cluster nodes to run the following:

- The Save-CauDebugTrace cmdlet
- PowerShell pre-update and post-update scripts during an Updating Run
- Tests of cluster updating readiness using the Cluster-Aware Updating window or the Test-CauSetup Windows PowerShell cmdlet

Enable a firewall rule to allow automatic restarts

To allow automatic restarts after updates are applied (if the installation of an update requires a restart), if Windows Firewall or a non-Microsoft firewall is in use on the cluster nodes, a firewall rule must be enabled on each node that allows the following traffic:
  • Protocol: TCP
  • Direction: inbound
  • Program: wininit.exe
  • Ports: RPC Dynamic Ports
  • Profile: Domain
If Windows Firewall is used on the cluster nodes, you can do this by enabling the Remote Shutdown Windows Firewall rule group on each cluster node. When you use the Cluster-Aware Updating window to apply updates and to configure self-updating options, the Remote Shutdown Windows Firewall rule group is automatically enabled on each cluster node.
Note
The Remote Shutdown Windows Firewall rule group cannot be enabled when it will conflict with Group Policy settings that are configured for Windows Firewall.
The Remote Shutdown firewall rule group is also enabled by specifying the –EnableFirewallRules parameter when running the following CAU cmdlets: Add-CauClusterRole, Invoke-CauRun, and SetCauClusterRole.
The following PowerShell example shows an additional method to enable automatic restarts on a cluster node.
PowerShell
Set-NetFirewallRule -Group "@firewallapi.dll,-36751" -Profile Domain -Enabled true  

Enable Windows Management Instrumentation (WMI)

All cluster nodes must be configured for remote management using Windows Management Instrumentation (WMI). This is enabled by default.
To manually enable remote management, do the following:
  1. In the Services console, start the Windows Remote Management service and set the startup type to Automatic.
  2. Run the Set-WSManQuickConfig cmdlet, or run the following command from an elevated command prompt:
    PowerShell
  1. winrm quickconfig -q  
    
To support WMI remoting, if Windows Firewall is in use on the cluster nodes, the inbound firewall rule for Windows Remote Management (HTTP-In) must be enabled on each node. By default, this rule is enabled.

Enable Windows PowerShell and Windows PowerShell remoting

To enable self-updating mode and certain CAU features in remote-updating mode, PowerShell must be installed and enabled to run remote commands on all cluster nodes. By default, PowerShell is installed and enabled for remoting.
To enable PowerShell remoting, use one of the following methods:
  • Run the Enable-PSRemoting cmdlet.
  • Configure a domain-level Group Policy setting for Windows Remote Management (WinRM).
For more information about enabling PowerShell remoting, see about_Remote_Requirements.

Install .NET Framework 4.6 or 4.5

To enable self-updating mode and certain CAU features in remote-updating mode,.NET Framework 4.6, or .NET Framework 4.5 (on Windows Server 2012 R2) must be installed on all cluster nodes. By default, NET Framework is installed.
To install .NET Framework 4.6 (or 4.5) using PowerShell if it's not already installed, use the following command:
PowerShell
Install-WindowsFeature -Name NET-Framework-45-Core

Best practices recommendations for using Cluster-Aware Updating

Recommendations for applying Microsoft updates

We recommend that when you begin to use CAU to apply updates with the default Microsoft.WindowsUpdatePlugin plug-in on a cluster, you stop using other methods to install software updates from Microsoft on the cluster nodes.
Caution
Combining CAU with methods that update individual nodes automatically (on a fixed time schedule) can cause unpredictable results, including interruptions in service and unplanned downtime.
We recommend that you follow these guidelines:
  • For optimal results, we recommend that you disable settings on the cluster nodes for automatic updating, for example, through the Automatic Updates settings in Control Panel, or in settings that are configured using Group Policy.
    Caution
    Automatic installation of updates on the cluster nodes can interfere with installation of updates by CAU and can cause CAU failures.
    If they are needed, the following Automatic Updates settings are compatible with CAU, because the administrator can control the timing of update installation:
    • Settings to notify before downloading updates and to notify before installation
    • Settings to automatically download updates and to notify before installation
    However, if Automatic Updates is downloading updates at the same time as a CAU Updating Run, the Updating Run might take longer to complete.
  • Do not configure an update system such as Windows Server Update Services (WSUS) to apply updates automatically (on a fixed time schedule) to cluster nodes.
  • All cluster nodes should be uniformly configured to use the same update source, for example, a WSUS server, Windows Update, or Microsoft Update.
  • If you use a configuration management system to apply software updates to computers on the network, exclude cluster nodes from all required or automatic updates. Examples of configuration management systems include Microsoft System Center Configuration Manager 2007 and Microsoft System Center Virtual Machine Manager 2008.
  • If internal software distribution servers (for example, WSUS servers) are used to contain and deploy the updates, ensure that those servers correctly identify the approved updates for the cluster nodes.

Apply Microsoft updates in branch office scenarios

To download Microsoft updates from Microsoft Update or Windows Update to cluster nodes in certain branch office scenarios, you may need to configure proxy settings for the Local System account on each node. For example, you might need to do this if your branch office clusters access Microsoft Update or Windows Update to download updates by using a local proxy server.
If necessary, configure WinHTTP proxy settings on each node to specify a local proxy server and configure local address exceptions (that is, a bypass list for local addresses). To do this, you can run the following command on each cluster node from an elevated command prompt:
netsh winhttp set proxy : ""  
where <ProxyServerFQDN> is the fully qualified domain name for the proxy server and <port> is the port over which to communicate (usually port 443).
For example, to configure WinHTTP proxy settings for the Local System account specifying the proxy server MyProxy.CONTOSO.com, with port 443 and local address exceptions, type the following command:
netsh winhttp set proxy MyProxy.CONTOSO.com:443 ""  

Recommendations for using the Microsoft.HotfixPlugin

  • We recommend that you configure permissions in the hotfix root folder and hotfix configuration file to restrict Write access to only local administrators on the computers that are used to store these files. This helps prevent tampering with these files by unauthorized users that could compromise the functionality of the failover cluster when hotfixes are applied.
  • To help ensure data integrity for the server message block (SMB) connections that are used to access the hotfix root folder, you should configure SMB Encryption in the SMB shared folder, if it is possible to configure it. The Microsoft.HotfixPlugin requires that SMB signing or SMB Encryption is configured to help ensure data integrity for the SMB connections.
    For more information, see Restrict access to the hotfix root folder and hotfix configuration file.

Additional recommendations

  • To avoid interfering with a CAU Updating Run that may be scheduled at the same time, do not schedule password changes for cluster name objects and virtual computer objects during scheduled maintenance windows.
  • You should set appropriate permissions on pre-update and post-update scripts that are saved on network shared folders to prevent potential tampering with these files by unauthorized users.
  • To configure CAU in self-updating mode, a virtual computer object (VCO) for the CAU clustered role must be created in Active Directory. CAU can create this object automatically at the time that the CAU clustered role is added, if the failover cluster has sufficient permissions. However, because of the security policies in certain organizations, it may be necessary to prestage the object in Active Directory. For a procedure to do this, see Steps for prestaging an account for a clustered role.
  • To save and reuse Updating Run settings across failover clusters with similar updating needs in the IT organization, you can create Updating Run Profiles. Additionally, depending on the updating mode, you can save and manage the Updating Run Profiles on a file share that is accessible to all remote Update Coordinator computers or failover clusters. For more information, see Advanced Options and Updating Run Profiles for CAU.

Test cluster updating readiness

You can run the CAU Best Practices Analyzer (BPA) model to test whether a failover cluster and the network environment meet many of the requirements to have software updates applied by CAU. Many of the tests check the environment for readiness to apply Microsoft updates by using the default plug-in, Microsoft.WindowsUpdatePlugin.
Note
You might need to independently validate that your cluster environment is ready to apply software updates by using a plug-in other than Microsoft.WindowsUpdatePlugin. If you are using a non-Microsoft plug-in, such as one provided by your hardware manufacturer, contact the publisher for more information.
You can run the BPA in the following two ways:
  1. Select Analyze cluster updating readiness in the CAU console. After the BPA completes the readiness tests, a test report appears. If issues are detected on cluster nodes, the specific issues and the nodes where the issues appear are identified so that you can take corrective action. The tests can take several minutes to complete.
  2. Run the Test-CauSetup cmdlet. You can run the cmdlet on a local or remote computer on which the Failover Clustering Module for Windows PowerShell (part of the Failover Clustering Tools) is installed. You can also run the cmdlet on a node of the failover cluster.
Note
  • You must use an account that has administrative privileges on the cluster nodes and local administrative privileges on the computer that is used to run the Test-CauSetup cmdlet or to analyze cluster updating readiness using the Cluster-Aware Updating window. To run the tests using the Cluster-Aware Updating window, you must be logged on to the computer with the necessary credentials.
  • The tests assume that the CAU tools that are used to preview and apply software updates run from the same computer and with the same user credentials as are used to test cluster updating readiness.
Important
We highly recommend that you test the cluster for updating readiness in the following situations:
  • Before you use CAU for the first time to apply software updates.
  • After you add a node to the cluster or perform other hardware changes in the cluster that require running the Validate a Cluster Wizard.
  • After you change an update source, or change update settings or configurations (other than CAU) that can affect the application of updates on the nodes.

Tests for cluster updating readiness

The following table lists the cluster updating readiness tests, some common issues, and resolution steps.

Test Possible issues and impacts Resolution steps
The failover cluster must be available Cannot resolve the failover cluster name, or one or more cluster nodes cannot be accessed. The BPA cannot run the cluster readiness tests. - Check the spelling of the name of the cluster specified during the BPA run.
- Ensure that all nodes of the cluster are online and running.
- Check that the Validate a Configuration Wizard can successfully run on the failover cluster.
The failover cluster nodes must be enabled for remote management via WMI One or more failover cluster nodes are not enabled for remote management by using Windows Management Instrumentation (WMI). CAU cannot update the cluster nodes if the nodes are not configured for remote management. Ensure that all failover cluster nodes are enabled for remote management through WMI. For more information, see Configure the nodes for remote management in this topic.
PowerShell remoting should be enabled on each failover cluster node PowerShell isn't installed or isn't enabled for remoting on one or more failover cluster nodes. CAU cannot be configured for self-updating mode or use certain features in remote-updating mode. Ensure that PowerShell is installed on all cluster nodes and is enabled for remoting.

For more information, see Configure the nodes for remote management in this topic.
Failover cluster version One or more nodes in the failover cluster don't run Windows Server 2016, Windows Server 2012 R2, or Windows Server 2012. CAU cannot update the failover cluster. Verify that the failover cluster that is specified during the BPA run is running Windows Server 2016, Windows Server 2012 R2, or Windows Server 2012.

For more information, see Verify the cluster configuration in this topic.
The required versions of .NET Framework and Windows PowerShell must be installed on all failover cluster nodes .NET Framework 4.6, 4.5 or Windows PowerShell isn't installed on one or more cluster nodes. Some CAU features might not work. Ensure that .NET Framework 4.6 or 4.5 and Windows PowerShell are installed on all cluster nodes, if they are required.

For more information, see Configure the nodes for remote management in this topic.
The Cluster service should be running on all cluster nodes The Cluster service is not running on one or more nodes. CAU cannot update the failover cluster. - Ensure that the Cluster service (clussvc) is started on all nodes in the cluster, and it is configured to start automatically.
- Check that the Validate a Configuration Wizard can successfully run on the failover cluster.

For more information, see Verify the cluster configuration in this topic.
Automatic Updates must not be configured to automatically install updates on any failover cluster node On at least one failover cluster node, Automatic Updates is configured to automatically install Microsoft updates on that node. Combining CAU with other update methods can result in unplanned downtime or unpredictable results. If Windows Update functionality is configured for Automatic Updates on one or more cluster nodes, ensure that Automatic Updates is not configured to automatically install updates.

For more information, see Recommendations for applying Microsoft updates.
The failover cluster nodes should use the same update source One or more failover cluster nodes are configured to use an update source for Microsoft updates that is different from the rest of the nodes. Updates might not be applied uniformly on the cluster nodes by CAU. Ensure that every cluster node is configured to use the same update source, for example, a WSUS server, Windows Update, or Microsoft Update.

For more information, see Recommendations for applying Microsoft updates.
A firewall rule that allows remote shutdown should be enabled on each node in the failover cluster One or more failover cluster nodes do not have a firewall rule enabled that allows remote shutdown, or a Group Policy setting prevents this rule from being enabled. An Updating Run that applies updates that require restarting the nodes automatically might not complete properly. If Windows Firewall or a non-Microsoft firewall is in use on the cluster nodes, configure a firewall rule that allows remote shutdown.

For more information, see Enable a firewall rule to allow automatic restarts in this topic.
The proxy server setting on each failover cluster node should be set to a local proxy server One or more failover cluster nodes have an incorrect proxy server configuration.

If a local proxy server is in use, the proxy server setting on each node must be configured properly for the cluster to access Microsoft Update or Windows Update.
Ensure that the WinHTTP proxy settings on each cluster node are set to a local proxy server if it is needed. If a proxy server is not in use in your environment, this warning can be ignored.

For more information, see Apply updates in branch office scenarios in this topic.
The CAU clustered role should be installed on the failover cluster to enable self-updating mode The CAU clustered role is not installed on this failover cluster. This role is required for cluster self-updating. To use CAU in self-updating mode, add the CAU clustered role on the failover cluster in one of the following ways:

- Run the Add-CauClusterRole PowerShell cmdlet.
- Select the Configure cluster self-updating options action in the Cluster-Aware Updating window.
The CAU clustered role should be enabled on the failover cluster to enable self-updating mode The CAU clustered role is disabled. For example, the CAU clustered role is not installed, or it has been disabled by using the Disable-CauClusterRole PowerShell cmdlet. This role is required for cluster self-updating. To use CAU in self-updating mode, enable the CAU clustered role on this failover cluster in one of the following ways:

- Run the Enable-CauClusterRole PowerShell cmdlet.
- Select the Configure cluster self-updating options action in the Cluster-Aware Updating window.
The configured CAU plug-in for self-updating mode must be registered on all failover cluster nodes The CAU clustered role on one or more nodes of this failover cluster cannot access the CAU plug-in module that is configured in the self-updating options. A self-updating run might fail. - Ensure that the configured CAU plug-in is installed on all cluster nodes by following the installation procedure for the product that supplies the CAU plug-in.
- Run the Register-CauPlugin PowerShell cmdlet to register the plug-in on the required cluster nodes.
All failover cluster nodes should have the same set of registered CAU plug-ins A self-updating run might fail if the plug-in that is configured to be used in an Updating Run is changed to one that is not available on all cluster nodes. - Ensure that the configured CAU plug-in is installed on all cluster nodes by following the installation procedure for the product that supplies the CAU plug-in.
- Run the Register-CauPlugin PowerShell cmdlet to register the plug-in on the required cluster nodes.
The configured Updating Run options must be valid The self-updating schedule and Updating Run options that are configured for this failover cluster are incomplete or are not valid. A self-updating run might fail. Configure a valid self-updating schedule and set of Updating Run options. For example, you can use the Set-CauClusterRole PowerShell cmdlet to configure the CAU clustered role.
At least two failover cluster nodes must be owners of the CAU clustered role An Updating Run launched in self-updating mode will fail because the CAU clustered role does not have a possible owner node to move to. Use the Failover Clustering Tools to ensure that all cluster nodes are configured as possible owners of the CAU clustered role. This is the default configuration.
All failover cluster nodes must be able to access Windows PowerShell scripts Not all possible owner nodes of the CAU clustered role can access the configured Windows PowerShell pre-update and post-update scripts. A self-updating run will fail. Ensure that all possible owner nodes of the CAU clustered role have permissions to access the configured PowerShell pre-update and post-update scripts.
All failover cluster nodes should use identical Windows PowerShell scripts Not all possible owner nodes of the CAU clustered role use the same copy of the specified Windows PowerShell pre-update and post-update scripts. A self-updating run might fail or show unexpected behavior. Ensure that all possible owner nodes of the CAU clustered role use the same PowerShell pre-update and post-update scripts.
The WarnAfter setting specified for the Updating Run should be less than the StopAfter setting The specified CAU Updating Run timeout values make the warning timeout ineffective. An Updating Run might be canceled before a warning event log can be generated. In the Updating Run options, configure a WarnAfter option value that is less than the StopAfter option value.

Wednesday, July 11, 2018

Solution for moving a file share and retain permissions / share settings?

This can easily be done. Robocopy.exe \\source\share \\destination\share /mir /r:1 /w:1 /copyall /e

Shares including all permissions can be exported from registry and imported. https://support.microsoft.com/en-us/help/125996/saving-and-restoring-existing-windows-shares

Instead of pointing to new server, point drive mappings to a DFS Namespace instead. It will make it easier to migrate file server in the future as all drive mappings and shortcuts point to the DFS Namespace, and not directly to an old server name.