Showing posts with label Windows 2008 R2. Show all posts

Saturday, February 17, 2018

Migrate DHCP Server to Windows Server 2012 R2

Applies To: Windows Server 2008, Windows Server 2012 R2, Windows Server 2012
DHCP server role migration involves moving the settings for your existing DHCP server to a new DHCP server on the network. The goal of this server migration is to install the DHCP server role on the Windows Server® 2012 R2 operating system so that it provides DHCP leases on a network without any perceptible change to DHCP client computers.

About this guide

This guide describes the steps for migrating existing DHCP server settings to a server that is running Windows Server 2012 R2. Migration documentation and tools ease the migration of server role settings and data from an existing server to a destination server that is running Windows Server 2012 R2. By using the tools that are described in this guide to migrate a DHCP server, you can simplify migration, reduce migration time, increase the accuracy of the migration process, and help eliminate possible conflicts that might otherwise occur during DHCP migration. For more information about the migration tools, see DHCP Server Migration: Appendix A.

Target audience

This guide is intended for information technology (IT) administrators, IT professionals, and other knowledge workers who are responsible for the operation and deployment of DHCP servers in a managed environment.

What this guide does not provide

The following scenarios are not supported or are beyond the scope of this guide.
  • Clustering scenarios are not supported by this migration process. For more information about migrating DHCP Server in a cluster environment, see Migrating DHCP to a Cluster Running Windows Server 2008 R2 Step-by-Step Guide (http://go.microsoft.com/fwlink/?LinkId=140512) on the Windows Server TechCenter.
    Also see Migrate to DHCP Failover. DHCP failover is a new option for DHCP high availability, introduced in Windows Server 2012.
  • Upgrading roles on the same computer is out of scope for this guide.
  • Scenarios in which the new operating system is installed on existing server hardware by using the Upgrade option during setup (in-place upgrades) are not covered in this guide.
  • Migrating more than one server role is not covered in this guide.

Supported migration scenarios

This guide gives you the instructions to migrate an existing DHCP server to a server that is running Windows Server 2012 R2. This guide does not contain instructions for migration when the source server is running multiple roles. If your server is running multiple roles, we recommend that you design a custom migration procedure specific to your server environment based on the information provided in other role migration guides. Migration guides for additional roles are available on the Windows Server 2012 TechCenter (http://technet.microsoft.com/library/jj134039.aspx).
Warning
If the source server is running multiple roles, some migration steps in this guide, such as those for computer name and IP configuration, can cause other roles that are running on the source server to fail.
This guide provides instructions only for migrating DHCP data and settings from a server that is being replaced by an x64-based server running Windows Server 2012 R2.

Supported operating systems

This guide provides instructions for migration of a DHCP server from a server that is running Windows Server 2003 or a later operating system to a server running Windows Server 2012 R2. Supported operating systems are listed in the following table.

Supported operating systems for migration

Source server processorSource server operating systemDestination server operating systemDestination server processor
x86- or x64-basedWindows Server 2003 with Service Pack 2Windows Server 2012 R2, both full and Server Core installation optionsx64-based
x86- or x64-basedWindows Server 2003 R2Windows Server 2012 R2, both full and Server Core installation optionsx64-based
x86- or x64-basedWindows Server 2008Windows Server 2012 R2, both full and Server Core installation optionsx64-based
x64-basedWindows Server 2008 R2Windows Server 2012 R2, both full and Server Core installation optionsx64-based
x64-basedServer Core installation option of Windows Server 2008 R2Windows Server 2012 R2, both full and Server Core installation optionsx64-based
x64-basedWindows Server 2012Windows Server 2012 R2, both full and Server Core installation optionsx64-based
x64-basedServer Core installation option of Windows Server 2012Windows Server 2012 R2, both full and Server Core installation optionsx64-based
x64-basedWindows Server 2012 R2Windows Server 2012 R2, both full and Server Core installation optionsx64-based
x64-basedServer Core installation option of Windows Server 2012 R2Windows Server 2012 R2, both full and Server Core installation optionsx64-based
The versions of operating systems shown in the previous table are the oldest combinations of operating systems and service packs that are supported. Newer service packs, if available, are supported for the migration of DHCP server settings.
Foundation, Standard, Enterprise, and Datacenter editions of Windows Server are supported as either source or destination servers.
Migrations between physical operating systems and virtual operating systems are supported.
Migration from a source server to a destination server that is running an operating system in a different system user interface (UI) language than the source server is not supported. The system UI language is the language of the localized installation package that was used to set up the Windows operating system. For example, you cannot use Windows Server migration tools to migrate roles, operating system settings, data, or shares from a computer that is running Windows Server 2008 R2 in the French system UI language to a computer that is running Windows Server 2012 R2 in the German system UI language.
Both x86-based and x64-based migrations are supported for Windows Server 2003 and Windows Server 2008. All editions of Windows Server 2012 R2 are x64-based.
Roles that are running on Server Core installations of Windows Server 2008 cannot be migrated, because there is no .NET Framework available on Server Core installations of Windows Server 2008.
We recommend migration rather than an upgrade even when the hardware is native x64-based. For example, with a server role split, a scenario in which the source server has more than one server role, because of increased use of this server you might decide to separate the roles onto several additional x64-based servers. In this case, migrating (not upgrading) individual server roles to other servers may be the best solution.
The server administrator can choose which components of an existing installation to migrate; together with the server role, these components usually include configuration, data, system identity, and operating system settings.
Supported role configurations

You can migrate all DHCP Server settings by using this guide, including registry and database settings.
Note
If you are migrating a DHCP server in a cluster configuration, see Migrating DHCP to a Cluster Running Windows Server 2008 R2 Step-by-Step Guide (http://go.microsoft.com/fwlink/?LinkId=140512) on the Windows Server TechCenter. Also see Migrate to DHCP Failover. DHCP failover is a new option for DHCP high availability, introduced in Windows Server 2012.

DHCP Server migration overview

DHCP Server migration is divided into the following major sections:

DHCP Server migration process

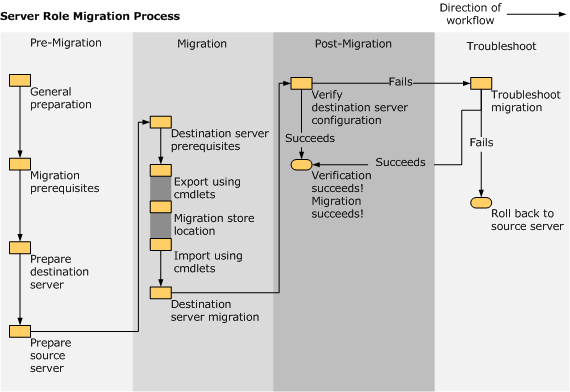
As shown in the following illustration, the pre-migration process involves the manual collection of data, followed by procedures on the destination and source servers. The migration process includes source and destination server procedures that use the Export and Import cmdlets to automatically collect, store, and then migrate server role settings. Post-migration procedures include verifying that the destination server successfully replaced the source server and then retiring or repurposing the source server. If the verification procedure indicates that the migration failed, troubleshooting begins. If troubleshooting fails, rollback instructions are provided to return to the use of the original source server.

Impact of migration on other computers in the enterprise

During migration, the source DHCP server might not be available. Therefore, client computers will not be able to obtain IP addresses from this DHCP server. We recommend that you maintain or create an auxiliary DHCP server so that client computers can obtain IP addresses while you migrate the primary DHCP server.
Be aware that if you choose to perform the migration without any auxiliary DHCP servers, all clients with valid leases must keep using those leases. If a lease for an existing client expires, that client will not be able to obtain an IP address. In addition, any new client that connects to the network will not be able to obtain an IP address when the single-source DHCP server is not available.

Permissions required to complete migration

The following permissions are required on the source server and the destination server:
  • Domain administrative rights that are required to authorize DHCP Server.
  • Local administrative rights are required to install or manage DHCP Server.
  • Write permissions are required to the migration store location. For more information, see DHCP Server Migration: Preparing to Migrate.

Estimated duration

The migration can take two to three hours, including testing.

Wednesday, December 20, 2017

Step-by-Step: Managing Windows 2008 in Windows Server 2012 Server Manager

You can manage Windows Server 2008, 2008 R2 and 2012 in the same 2012 Server Manager Dashboard. Server Manager is a management console in Windows Server 2012 R2 Preview and Windows Server 2012 that helps IT professionals provision and manage both local and remote Windows-based servers from their desktops, without requiring either physical access to servers, or the need to enable Remote Desktop protocol (RDP) connections to each server. Although Server Manager supports remote, multi-server management, and help increase the number of servers an administrator can manage.
The Server Manager console is included with Remote Server Administration Tools for Windows 8.1 Preview and Remote Server Administration Tools for Windows 8. Note that when Remote Server Administration Tools is installed on a client computer, you cannot manage the local computer by using Server Manager; Server Manager cannot be used to manage computers or devices that are running a Windows client operating system. You can use Server Manager to manage only Windows-based servers

In order to prepare 2008 and 2008 R2 servers to be managed by a 2012 server you must first install certain packages and hotfixes.

  1. As a prerequisite, you'll need to install:
    1. .NET Framework 4.5 if you are using a Windows Server 2012 R2 Preview to manage the other servers.
    2. .NET Framework 4 if you are using a Windows Server 2012 to manage the other servers.
  2. Download: Download and Install the Windows Management Framework:
    1. Windows Management Framework 4.0 if you are using a Windows Server 2012 R2 Preview to manage the other servers.
    2. Windows Management Framework 3.0 if you are using a Windows Server 2012 to manage the other servers.
  3. Hotfix: In order to enable server manager to retrieve Performance Counters from Windows Server 2008 SP2 or Windows Server 2008 R2 servers, the following hotfix needs to in installed:
    1. http://support.microsoft.com/kb/2682011

Now that we are done with the prerequisites we need to configure the servers to be managed.

  1. To enable Server Manager remote management on Windows Server 2012 R2 Preview or Windows Server 2012 right-click on the PowerShell icon and select "Run as Administrator" and run the following command
    1. Configure-SMRemoting.exe –Enable
  2. To enable Server Manager and Windows PowerShell remote management on older operating systems (2008 & 2008 R2)
    1. Set-ExecutionPolicy -ExecutionPolicy RemoteSigned
    2. Configure-SMRemoting.ps1 -force –enable
image

Add the target server to the Windows Server 2012 console

Now that the servers are configured you only need to add them to your Windows Server 2012 or 2012 R2 Preview console.
1- Right-Click “All Servers” in the server manager console and select “Add Servers”.
image
2- Follow the prompts and add your target server to the console.
image
Now you can manage most of your servers in one console.

Sunday, October 29, 2017

Step-by-Step: Managing Windows 2008 in Windows Server 2012 Server Manager

In order to prepare 2008 and 2008 R2 servers to be managed by a 2012 server you must first install certain packages and hotfixes.

  1. As a prerequisite, you'll need to install:
    1. .NET Framework 4.5 if you are using a Windows Server 2012 R2 Preview to manage the other servers.
    2. .NET Framework 4 if you are using a Windows Server 2012 to manage the other servers.
  2. Download: Download and Install the Windows Management Framework:
    1. Windows Management Framework 4.0 if you are using a Windows Server 2012 R2 Preview to manage the other servers.
    2. Windows Management Framework 3.0 if you are using a Windows Server 2012 to manage the other servers.
  3. Hotfix: In order to enable server manager to retrieve Performance Counters from Windows Server 2008 SP2 or Windows Server 2008 R2 servers, the following hotfix needs to in installed:
    1. http://support.microsoft.com/kb/2682011

Now that we are done with the prerequisites we need to configure the servers to be managed.

  1. To enable Server Manager remote management on Windows Server 2012 R2 Preview or Windows Server 2012 right-click on the PowerShell icon and select "Run as Administrator" and run the following command
    1. Configure-SMRemoting.exe –Enable
  2. To enable Server Manager and Windows PowerShell remote management on older operating systems (2008 & 2008 R2)
    1. Set-ExecutionPolicy -ExecutionPolicy RemoteSigned
    2. Configure-SMRemoting.ps1 -force –enable
image

Add the target server to the Windows Server 2012 console

Now that the servers are configured you only need to add them to your Windows Server 2012 or 2012 R2 Preview console.
1- Right-Click “All Servers” in the server manager console and select “Add Servers”.
image
2- Follow the prompts and add your target server to the console.
image
Now you can manage most of your servers in one console.

Sunday, July 31, 2016

Disable USB Storage via GPO

The use of USB-devices (flash drives, USB HDD, SD cards and so on) is disabled for safety reasons to prevent security leakage and virus infection. This article will tell how to disable the use of external USB-drives, prevent writing to them or run executable files using group policies (GPO).
USB device policy will work if an infrastructure complies with these requirements:
1.     Active Directory schema version — Windows Server 2008 or higher
Note. The set of policies allowing to control the installation and use of removable drives has been only appeared in this AD version.
2.     Client OSs – Windows Vista, Windows 7 or higher
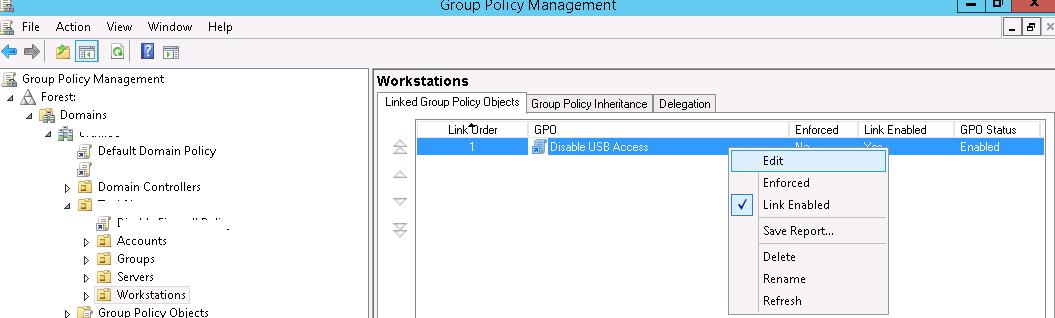
We are going to restrict the use of USB-drives for all computers in a certain container (OU). Let’s assume that we want to apply the policy to OU named Workstations. To do it, open the GPO management console (gpmc.msc), right-click on OU Workstations and create a new policy (Create a GPO in this domain and Link it here.)
Tip. In case of stand-alone computer, the USB-port usage restriction policy can be edited using a Local Group Policy Editor – gpedit.msc.


Name the policy “Disable USB Access”.


After that, edit its parameters (Edit).


The settings of external devices restrictions located in the user and computer sections of the GPO:
1.     User Configuration-> Policies-> Administrative Templates-> System->Removable Storage Access
2.     Computer Configuration-> Policies-> Administrative Templates-> System-> Removable Storage Access
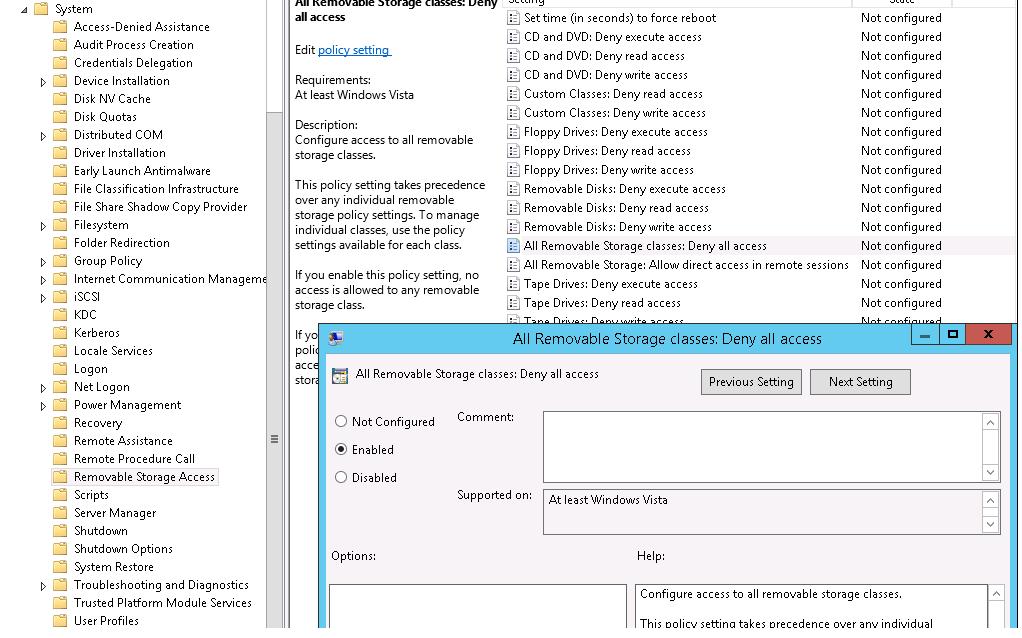
In our case, we want to disable USB-drives on the computer level so we need the second section. Expand it.
In Removable Storage Access section, there are some policies allowing to turn off the use of different types of storage devices — CD/DVDs, FDD, USB-devices, tapes and so on.
The “strongest” lockout policy — All Removable Storage Classes: Deny All Access – allows to deny the access to all types of external storage devices. To turn on the policy, open it and check Enable.


After enabling and updating the policy on customer computers (cmd> gpupdate /force), the system detects the external devices being connected and returns the following error message when trying to open them:

Location is not available
Drive is not accessible. Access is denied


Tip. The same restriction can be set using the registry by creating Deny_All key of Dword-type with the value 00000001 in HKEY_CURRENT_USER\Software\Policies\Microsoft\Windows\RemovableStorageDevices branch
In this policy section, more flexible restriction to use external USB-drives can be configured.
For example, to prevent writing to USB flash drives and disks, you should only enable the policy Removable Disk: Deny write access.


In this case, users will be able to read the data stored on a USB flash drive but if they try to write some information to it the following error message will appear:

Destination Folder Access Denied
You need permission to perform this action


You can deny to run executable and script files stored on USB-drives using Removable Disks: Deny execute access policy.


Friday, December 11, 2015

Verifying Your Basic DNS Configuration

If you use a third-party DNS server to support Active Directory, you must perform configuration tasks manually, and doing so, you might cause common configuration errors that prevent DNS and Active Directory from working properly. The following sections describe tests that you can perform to verify that your DNS server is working properly, that the forward and reverse lookup zones are properly configured, and that DNS can support Active Directory.
If you use either the Configure DNS Server wizard or the Active Directory Installation wizard to install your Windows 2000 DNS server, most configuration tasks are performed automatically and you can avoid many common configuration errors, but you might still want to perform the tests in this section.
Before checking anything else, check the event log for errors. For more information about Event Viewer, see "Troubleshooting Tools" earlier in this chapter.

Verifying That Your DNS Server Can Answer Queries

Use the following process to verify that your DNS server is started and can answer queries.
  • Make sure that your server has basic network connectivity. For more information about verifying basic network connectivity, see "Checking the DNS Server for Problems" later in this chapter.
  • Make sure that the server can answer both simple and recursive queries from the Monitoring tab in the DNS console. For more information about the Monitoring tab, see "Troubleshooting Tools" earlier in this chapter.
  • From a client, use Nslookup to look up a domain name and the name of a host in the domain. For more information about using Nslookup, see "Troubleshooting Tools" earlier in this chapter.
  • On the server, run netdiag to make sure the server is working properly and that the resource records Netlogon needs are registered on a DNS server. For more information about Netdiag, see "Troubleshooting Tools" earlier in this chapter.
  • Make sure that the server can reach a root server by typing the following:
    nslookup
    server < IP address of server >
    set querytype=NS
    .
  • Make sure that there is an A and PTR resource record configured for the server. For information about PTR resource records, see "Testing for Reverse Lookup Zones and PTR Records" later in this chapter.
------------

Verifying That the Forward Lookup Zone Is Properly Configured

After you create a forward lookup zone, you can use Nslookup to make sure it is properly configured and to test its integrity to host Active Directory. To start Nslookup, type the following
Nslookup server < IP address of server on which you created zone > set querytype=any
Nslookup starts. If the resolver cannot locate a PTR resource record for the server, you see an error message, but you are still able to perform the tests in this section.
To verify the zone is responding correctly, simulate a zone transfer by typing the following:
ls -d < domain name >
If the server is configured to restrict zone transfers, you might see an error message in Event Viewer. (For more information about Event Viewer, see "Troubleshooting Tools" earlier in this chapter.) Otherwise, you see a list of all the records in the domain.
Next, query for the SOA record by typing the following and pressing ENTER:
< domain name >
If your server is configured correctly, you see an SOA record. The SOA record includes a "primary name server" field. To verify that the primary name server has registered an NS record, type the following:
set type=ns < domain name >
If your server is configured correctly, you see an NS record for the name server.
Make sure that the authoritative name server listed in the NS record can be contacted to request queries by typing the following:
server
Next, query the server for any name for which it is authoritative.
If these tests are successful, the NS record points to the correct hostname, and the hostname has the correct IP address associated with it.

-------------

Testing for Reverse Lookup Zones and PTR Resource Records

You do not need reverse lookup zones and PTR resource records for Active Directory to function. However, you need them if you want clients to be able to resolve FQDNs from IP addresses. Also, PTR resource records are commonly used by some applications for security purposes, to verify the identity of the client.
You do not need to have the reverse lookup zones and PTR resource records on your own servers; instead, another DNS server can contain these zones.
After you have configured your reverse lookup zones and PTR resource records, manually examine them in the DNS console. A reverse lookup zone must exist for each subnet, and the parent reverse lookup zone must have a delegation to your reverse lookup zone. For example, if you have a private root and the subnets 172.32.16.x and 172.32.17.x, the private root can host all reverse lookup zones, or it can contain the reverse lookup zone 172.32.x and delegate the reverse lookup zones 172.32.16.x and 172.32.17.x to other servers. Also, PTR resource records must exist for all the computers in your network. For more information about adding a reverse lookup zone, see "Adding a Reverse Lookup Zone" earlier in this chapter.
You can also use Nslookup to verify that the reverse lookup zones and PTR resource records are configured correctly.
To make sure your reverse lookup zones and PTR resource records are configured correctly
  1. Start Nslookup by typing Nslookup at the command prompt and then pressing ENTER.
  2. Switch to the server you want to query by typing the following:
    server < Server IP Address >
  3. Enter the IP address of the computer whose PTR resource record you want to verify, and then press ENTER.
    If the reverse lookup zone and PTR resource record are configured correctly, Nslookup returns the name of the computer.
  4. To quit Nslookup, type exit and then press ENTER.
-------------

Verifying Your DNS Configuration After Installing Active Directory

When you use third-party DNS servers to support Active Directory, you can verify the registration of domain controller locator resource records. If the server does not support dynamic update, you need to add these records manually.
The Netlogon service creates a log file that contains all the locator resource records and places the log file in the following location:
% SystemRoot %\System32\Config\Netlogon.dns
You can check this file to find out which locator resource records are created for the domain controller.
The locator resource records are stored in a text file, compliant with RFC specifications. If your server is configured correctly, you see the LDAP SRV record for the domain controller:
_ldap._tcp. IN SRV < priority > < weight > 389 < domain controller name >
For example:
_ldap._tcp.reskit.com. IN SRV 0 0 389 dc1.reskit.com
Next, use the Nslookup command-line tool to verify that the domain controller registered the SRV resource records that were listed in Netlogon.dns.
note-icon Note
During the following test, if you have not configured a reverse lookup zone and PTR resource record for the DNS server you are querying, you might see several time-outs. This is not a problem.
To verify that SRV resource records are registered for the domain controller
  1. At the command prompt, type nslookup and then press ENTER.
  2. To set the DNS query type to filter for SRV records only, type set type=SRV and then press ENTER.
  3. To send a query for the registered SRV record for a domain controller in your Active Directory domain, type _ ldap._tcp. < Active Directory domain name > and then press ENTER.
  4. You should see the SRV records listed in Netlogon.dns. If you do not, SRV resource records might not be registered for the domain controller.
The following example shows a full Nslookup session, used to verify SRV resource records that are registered for locating two domain controllers on a network. In this example, the two domain controllers (DC1 and DC2) are registered for the domain noam.reskit.com.

C:\>nslookup
Default Server: dc1.noam.reskit.com
Address: 10.0.0.14
> set type=SRV
> _ldap._tcp.noam.reskit.com
Server: dc1.noam.reskit.com
Address: 10.0.0.14
_ldap._tcp.noam.reskit.com SRV service location:
priority = 0
weight = 0
port = 389
svr hostname = dc1.noam.reskit.com
_ldap._tcp.noam.reskit.com SRV service location:
priority = 0
weight = 0
port = 389
svr hostname = dc2.noam.reskit.com
dc1.noam.reskit.com internet address = 10.0.0.14

dc2.noam.reskit.com internet address = 10.0.0.15

DHCP: The server should be configured to register DNS records on behalf of DHCPv4 clients

Applies To: Windows Server 2008 R2, Windows Server 2012
This topic is intended to address a specific issue identified by a Best Practices Analyzer scan. You should apply the information in this topic only to computers that have had the Dynamic Host Configuration Protocol Best Practices Analyzer run against them and are experiencing the issue addressed by this topic. For more information about best practices and scans, see Best Practices Analyzer (http://go.microsoft.com/fwlink/?LinkId=122786).


Operating System
Windows Server 2008 R2, Windows Server 2012
Product/Feature
Dynamic Host Configuration Protocol (DHCP)
Severity
Warning
Category
Configuration

Issue

DNS registrations of IPv4 client computers from the DHCP server have been disabled.

Impact

The DHCP server will not register DHCPv4 client names in DNS resulting in the inability to connect to these client computers using hostnames unless the client computers are themselves registering DNS records..

Resolution

Configure client computers to register with DNS or use the DHCP MMC configure dynamic DNS update on the DHCP server for DHCPv4.
Domain Name System (DNS) client computers can use dynamic update to register and dynamically update their resource records with a DNS server whenever changes occur. This reduces the need for manual administration of zone records, especially for clients that frequently move or change locations and use Dynamic Host Configuration Protocol (DHCP) to obtain an IP address.
Membership in Administrators, or equivalent, is the minimum required to complete this procedure

To configure DHCP clients to register with DNS

  1. At the DHCP client computer, Click Start, click Run, in Search programs and files type ncpa.cpl, and then press ENTER.
  2. Right-click the applicable network connection, click Properties, click Internet Protocol Version 4 (TCP/IPv4) and then click Properties.
  3. Click Advanced, click DNS, check Register this connection’s addresses in DNS and then click OK.
Membership in the Administrators or DHCP Administrators group is the minimum required to complete this procedure.

To enable dynamic DNS updates

  1. At the DHCP Server, click Start, point to Administrative Tools and then click DHCP.
  2. In the console tree, expand the applicable DHCP server, expand IPv4, right-click the applicable scope and then click Properties.
  3. Click DNS, check Enable DNS dynamic updates according to the settings below: and then click OK.

Additional references

For updated detailed IT pro information about DHCP, see the Windows Server 2008 R2 documentation on the Microsoft TechNet Web site.

Sunday, November 22, 2015

Installing and Configuring MPIO

This section explains how to install and configure Microsoft Multipath I/O (MPIO) on Windows Server 2008 R2.

Install MPIO on Windows Server 2008 R2

MPIO is an optional feature in Windows Server 2008 R2, and is not installed by default. To install MPIO on your server running Windows Server 2008 R2, perform the following steps.

To add MPIO on a server running Windows Server 2008 R2

  1. Open Server Manager. To open Server Manager, click Start, point to Administrative Tools, and then click Server Manager.
  2. In the Server Manager tree, click Features.
  3. In the Features area, click Add Features.
  4. In the Add Features Wizard, on the Select Features page, select the Multipath I/O check box, and then click Next.
  5. On the Confirm Installation Selections page, click Install.
  6. When the installation has completed, on the Installation Results page, click Close. When prompted to restart the computer, click Yes.
  7. After restarting the computer, the computer finalizes the MPIO installation.
  8. Click Close.

MPIO configuration and DSM installation

When MPIO is installed, the Microsoft device-specific module (DSM) is also installed, as well as an MPIO control panel. The control panel can be used to do the following:
  • Configure MPIO functionality
  • Install additional storage DSMs
  • Create MPIO configuration reports

Open the MPIO control panel

Open the MPIO control panel either by using the Windows Server 2008 R2 Control Panel or by using Administrative Tools.

To open the MPIO control panel by using the Windows Server 2008 R2 Control Panel

  1. On the Windows Server 2008 R2 desktop, click Start, click Control Panel, and then in the Views list, click Large Icons.
  2. Click MPIO.
  3. On the User Account Control page, click Continue.

To open the MPIO control panel by using Administrative Tools

  1. On the Windows Server 2008 R2 desktop, click Start, point to Administrative Tools, and then click MPIO.
  2. On the User Account Control page, click Continue.
The MPIO control panel opens to the Properties dialog box.
noteNote
To access the MPIO control panel on Server Core installations, open a command prompt and type MPIOCPL.EXE.

MPIO Properties dialog box

The MPIO Properties dialog box has four tabs:
  • MPIO Devices   By default, this tab is selected. This tab displays the hardware IDs of the devices that are managed by MPIO whenever they are present. It is based on a hardware ID (for example, a vendor plus product string) that matches an ID that is maintained by MPIO in the MPIOSupportedDeviceList, which every DSM specifies in its Information File (INF) at the time of installation.

    To specify another MPIO device, on the MPIO Devices tab, click Add.

    noteNote
    In the Add MPIO Support dialog box, the vendor ID (VID) and product ID (PID) that are needed are provided by the storage provider, and are specific to each type of hardware. You can list the VID and PID for storage that are already connected to the server by using the mpclaim tool at the command prompt. The hardware ID is an 8-character VID plus a 16-character PID. This combination is sometimes referred to as a VID/PID. For more information about the mpclaim tool, see Referencing MPCLAIM Examples.
  • Discover Multi-Paths   Use this tab to run an algorithm for every device instance that is present on the system and determine if multiple instances actually represent the same Logical Unit Number (LUN) through different paths. For such devices found, their hardware IDs are presented to the administrator for use with MPIO (which includes Microsoft DSM support). You can also use this tab to add Device IDs for Fibre Channel devices that use the Microsoft DSM.

    noteNote
    Devices that are connected by using Microsoft Internet SCSI (iSCSI) are not displayed on the Discover Multi-Paths tab.
  • DSM Install   This tab can be used for installing DSMs that are provided by the storage independent hardware vendor (IHV).

    Many storage arrays that are SPC-3 compliant will work by using the MPIO Microsoft DSM. Some storage array partners also provide their own DSMs to use with the MPIO architecture.

    noteNote
    We recommend using vendor installation software to install the vendor’s DSM. If the vendor does not have a DSM setup tool, you can alternatively install the vendor’s DSM by using the DSM Install tab on the MPIO control panel.
  • Configuration Snapshot   This tab allows you to save the current Microsoft Multipath I/O (MPIO) configuration to a text file that you can review for troubleshooting or comparison purposes at a later time.

    The report includes information on the device-specific module (DSM) that is being used, the number of paths, and the path state.

    You can also save this configuration at a command prompt by using the mpclaim command. For information about how to use mpclaim, in an elevated command prompt, type run mpcliam /?. For more information, see Referencing MPCLAIM Examples.

Claim iSCSI-attached devices for use with MPIO

noteNote
This process causes the Microsoft DSM to claim all iSCSI-attached devices regardless of their vendor ID and product ID settings. For information about how to control this behavior on an individual VID/PID basis, see Referencing MPCLAIM Examples.

To claim an iSCSI-attached device for use with MPIO

  1. Open the MPIO control panel, and then click the Discover Multi-Paths tab.
  2. Select the Add support for iSCSI devices check box, and then click Add. When prompted to restart the computer, click Yes.
  3. When the computer restarts, the MPIO Devices tab lists the additional hardware ID “MSFT2005iSCSIBusType_0x9.” When this hardware ID is listed, all iSCSI bus attached devices will be claimed by the Microsoft DSM.

Configure the load-balancing policy setting for a Logical Unit Number (LUN)

MPIO LUN load balancing is integrated with Disk Management. To configure MPIO LUN load balancing, open the Disk Management graphical user interface.
noteNote
Before you can configure the load-balancing policy setting by using Disk Management, the device must first be claimed by MPIO. If you need to preselect a policy setting for disks that are not yet present, see Referencing MPCLAIM Examples.

To configure the load-balancing policy setting for a LUN

  1. Open Disk Management. To open Disk Management, on the Windows desktop, click Start; in the Start Search field, type diskmgmt.msc; and then, in the Programs list, click diskmgmt.
  2. Right-click the disk for which you want to change the policy setting, and then click Properties.
  3. On the MPIO tab, in the Select the MPIO policy list, click the load-balancing policy setting that you want.
  4. If desired, click Details to view additional information about the currently configured DSM.
    noteNote
    When using a DSM other than a Microsoft DSM, the DSM vendor may use a separate interface to manage these policies.

    noteNote
    For information about DSM timer counters, see Configuring MPIO Timers.

Configure the MPIO Failback policy setting

If you use the Failover Only load-balancing policy setting, MPIO failback allows the configuration of a preferred I/O path to the storage, and allows automatic failback to be the preferred path if desired.
Consider the following scenario:
  • The computer that is running Windows Server 2008 R2 is configured by using MPIO and has two connections to storage, Path A and Path B.
  • Path A is configured as the active/optimized path, and is set as the preferred path.
  • Path B is configured as a standby path.
If Path A fails, Path B is used. If Path A recovers thereafter, Path A becomes the active path again, and Path B is set to standby again.

To configure the preferred path setting

  1. Open Disk Management. To open Disk Management, on the Windows desktop, click Start; in the Start Search field, type diskmgmt.msc; and then, in the Programs list, click diskmgmt.
  2. Right-click the disk for which you want to change the policy setting, and then click Properties.
  3. On the MPIO tab, double-click the path that you want to designate as a preferred path.
    noteNote
    The setting only works with the Failover Only MPIO policy setting.

  4. Select the Preferred check box, and then click OK.

Because the Server Core installation of Windows Server 2008 R2 does not include the Server Manager interface, you must install MPIO by using a command prompt. Until you enable MPIO by using the DISM tool, you cannot use the mpclaim command.
Open a command prompt to run the following commands. After typing a command, press ENTER.


Task Command
Determine which features are currently installed
Dism /online /get-features
Enable MPIO
Dism /online /enable-feature:MultipathIo
ImportantImportant
When using DISM to enable or disable features, the feature name is case-sensitive.

Disable MPIO
Dism /online /disable-feature:MultipathIo
Manage the MPIO configuration after MPIO is enabled
mpclaim
Access the MPIO control panel (new in Windows Server 2008 R2)
MPIOCPL.exe

To enable Windows PowerShell™ on a Server Core installation, you must enable the following features by using these commands at an administrator command prompt:
dism /online /enable-feature:NetFx2-ServerCore
dism /online /enable-feature:NetFx2-W0W64_
dism /online /enable-feature:MicrosoftWindowsPowerShell_
dism /online /enable-feature:MicrosoftWindowsPowerShell-W0W64