Sunday, April 18, 2021

Using PsTools to Control Other PCs from the Command Line

 There are twelve tools in the PsTools set, and while some of them are extremely useful, others have been superseded with tools built into more recent versions of Windows, and there are a few others which aren’t useful for most people. We’ll go through all of them so you understand how they work and why you might want to use each one.

  • PsExec – executes processes on a remote computer
  • PsFile – shows files that are opened on the remote computer through the network
  • PsGetSid – displays the security identifier for a computer or user
  • PsInfo – lists information about a system
  • PsKill – kills processes by name or ID
  • PsList – list information about processes on the command line
  • PsLoggedOn – list accounts that are logged on either on the machine or connecting remotely
  • PsLogList – pull the event log on the command line
  • PsPasswd – change the password for users
  • PsPing – a fairly simple ping utility with some additional features
  • PsService – list and make changes to Windows services
  • PsShutdown – shut down, log off, or suspend a computer
  • PsSuspend – suspend and resume processes (rather than killing them)

It’s worth noting that you can use a tool like PsExec to execute all sorts of command-line utilities on remote computers… including really useful ones like the Autoruns command line tool and many more. The possibilities are endless once you’ve embraced the power of PsTools.

All of these tools can be used on local computers, but they are mostly useful for connecting to remote computers and performing commands on them.

Connecting to Remote Computers ( Syntax for All Utilities)

All of the utilites can be run on either the local or remote computer, so they all have the same first argument for computer name if needed. Note that you could use the IP address if you wanted instead. If you omit this argument, the command will operate on your local computer.

psinfo \\computername

You can also list multiple computers like psinfo \\computer1, computer2, computer3, or you could put all of the names into a file and reference that like psinfo @computerlist.txt. The final syntax is psinfo \\* which operates on all computers in the domain, which probably isn’t something you’ll use every day.

If you need to connect with alternate credentials because your local computer’s account has a different username and password than the other computer, you can use the -u and -p options, though we’d note that you might not want to use -p on the command line with a password in the command for security reasons. Update: as of the latest release of PsExec, no tool passes passwords as clear text anymore, so the only worry is if somebody can read your script files and see the password there.

psinfo \\computername -u “user” -p “Password”

The “user” part of the command would change to “DOMAIN\user” if you are in a domain environment and need to change from the currently running user.

Note: you will generally need to connect to the remote computers with an administrator account.

Configuring Remote Administration Access

If you are in a domain environment, which most people that need to use PsTools will be, you can ignore this section entirely as everything should work just fine. For anybody running Windows 7, 8, or Vista in a home environment or using a couple of computers in an office without a domain, you will need to tweak User Account Control on the remote computer to allow PsTools to properly run.

The problem is described well by Microsoft:

When a user who is a member of the local administrators group on the target remote computer establishes a remote administrative connection by using the net use * \\remotecomputer\Share$ command, for example, they will not connect as a full administrator. The user has no elevation potential on the remote computer, and the user cannot perform administrative tasks.

To explain it in a different way, when you try to connect to another computer and run something that requires administrator access, there is no way to trigger the UAC prompt and accept it from your computer, so it won’t connect as administrator.

And this isn’t a bad thing. You shouldn’t change this setting without fully understanding that you will be allowing an opening for malware to spread from one computer to another — assuming that malware has your local username and password, and that password is the same as the other computer, and the malware is that tricky, which most isn’t. But it still isn’t something to be taken lightly.

And again, if you are in a domain environment, this problem doesn’t exist and doesn’t need to be changed. And if you are just testing with a bunch of virtual machines, you don’t have much to worry about.

To tweak UAC to enable PsTools to run you’ll want to open up the Registry Editor and navigate to the following key:

HKEY_LOCAL_MACHINE\SOFTWARE\Microsoft\
Windows\CurrentVersion\Policies\System

Once you are there, create a new 32-bit DWORD on the right-hand side, give it the name LocalAccountTokenFilterPolicy and the value of 1. You don’t have to restart the computer to make the setting take effect.

Note: just to clarify, this setting needs to happen on the remote computer that you are connecting to.

PsExec

PsExec is probably the most powerful tool in the kit, as you can execute any command in your local command prompt just like executing it on the remote computer. That includes anything that can be run on the command line — you can change registry values, run scripts and utilities, or connect from that PC to another one. The output of the commands will be shown on your local PC, rather than on the remote one.

The syntax is simple:

psexec \\computername <options> apptorun.exe <arguments>

Realistically, though, you would want to also include the username and password on the command line. For example, to connect to another PC and check the network connections list, you would use something like this:

psexec \\computername -u User -p Password ipconfig

That command would produce output similar to the following:


If you want to pass the output of a command into another command, or you wanted to redirect the output into a file, you would normally just do something like command.exe > output.txt, and the same thing happens with PsExec. So a command like the following will save the output of netstat -an into a file on your Local computer’s root directory.

psexec \\computername netstat -an > C:\connections.txt

If you want to pass the > or | character across the PsExec connection to the remote computer, you are going to need to use the ^ character, which is a little-known escape character in the Windows command shell. That, of course, means that we will actually need to use the command shell on the remote computer, and not just run the process, so we can do the redirect or pipe in the first place. So that makes our command like this (changing the path to the home directory where we have write access).

psexec \\computername cmd /c netstat -an ^> C:\users\geek\connections.txt

This example would place the list of open connections generated by netstat into the home directory of the user on the remote computer, in a file named connections.txt.

Copying Programs to the Remote PC

You aren’t limited to just the applications on the remote PC when using PsExec, and in fact, you can run anything that you have locally. For instance, if you wanted to do an Autoruns command-line scan of the remote system, but you only had autorunsc.exe on your local computer, you can use the -c switch to copy the application over. PsExec will remove the tool from the remote system once the command is finished.

This is an important time to mention the -accepteula option of most of the SysInternals tools, which will make sure that the EULA has been accepted on the computer where the command has been run. We’ll need to add this onto the autorunsc.exe command or else it will fail on the remote computer.

psexec \\computername -c autorunsc.exe -accepteula

There are a few other options that specify whether the application is always copied, or if it should be copied if the local application is a higher version than the remote one. You can just run psexec from the prompt to see those options.

Note: If a command is only available in the command prompt, you need to add cmd /c before it. This includes pipes and redirects like | and >.

Interacting with the Logged On User on the Remote PC

You can use the -i switch to make the application launch and allow the remote user to actually interact with the application. You would probably want to combine this with the -d switch, which doesn’t wait for the remote process to end before PsExec returns control to you. For instance, this command would open a Notepad window on a remote computer:

psexec \\computername -d -i notepad

You can also choose to run as the SYSTEM user with the -s option, which can be very dangerous. For example, if you wanted to open the Registry Editor on your own computer, but with SYSTEM user-level permissions, you could run this command.

psexec -i -d -s regedit.exe

In case you are wondering, yes, this will give you access to a lot of things that you normally wouldn’t have access to edit in the registry. And yes, it’s a really bad idea.

Running a Full Command Prompt through PsExec

Yes, we just showed you all of those examples of how to run a single command through PsExec… and it turns out that you can run a full shell on your local computer that is actually running on the remote computer. It’s just like you were on the console of that server (for the most part). And luckily, the syntax for this one is really easy (add the username if you need to).

psexec \\computername cmd.exe

Once you’ve done this, you’ll have a command prompt that is now running on the remote PC.

The command prompt will work almost like normal, except tab completion isn’t going to operate at all, but that’s just fine with us.

It’s worth noting that if you want to run PowerShell commands remotely on another computer, you can do that natively with some tweaks to the configuration. Unfortunately PowerShell doesn’t work very nicely with PsExec unless you use a bunch of weird workarounds that aren’t worthwhile.

Other Options

The psexec command has a ton of other really useful options that you can use — each of these would be used in the space right after \\computername and before any of the other commands. So think psexec \\computername -option <remote command>.

If you just run the psexec command from the prompt without any extra switches, you’ll see all of them.

PsFile

This command shows files that are currently opened over the network on a local PC or a remote PC, and it operates similarly to the Windows “net file” command. The syntax is just like any other command in the kit.

psfile \\computername

Yeah, this one isn’t as fun as the last one.

If you want to close one of the files and disconnect the person from the resource, you can close the connection by using the -c option, though that might result in a loss of data since the file wasn’t closed properly.

psfile \\computername <path> -c

PsGetSid

This displays the security identifier for a computer or user, and takes the standard arguments. This utility is probably only useful in very particular scenarios, of which we haven’t personally encountered any. So try it once and forget about it until you need to use it someday.

PsInfo

This command lists lots of useful information about a system, including the uptime, which is lots of fun. You can run this one locally to test it out by simply typing psinfo at the command prompt, assuming your SysInternals tools are in the path.

If you want to get a lot more information out of PsInfo, and I know you do, then you can use the following switches to add disk information (-d) and hotfixes (-h) and a list of installed applications and their versions (-s).

psinfo -d -h -s

This results in a lot more information, even on a nearly blank virtual machine:

You can also run PsInfo remotely by adding the computer name and possibly the username switches… but there is one big problem: it won’t work unless the Remote Registry service is enabled. Head to the end of the article where we talk about how to enable it on the remote computer.

PsKill

This command is really simple — it kills processes, by either name or ID, and you can use the -t switch to optionally kill the entire process tree.

pskill \\computername <PID or Name>

The problem with PsKill is that the latest versions of Windows have a very powerful task killing utility built right in called Taskkill that has a lot more features.

PsList

This utility is extremely simple, but fairly handy for quickly looking at a computer and seeing if something is using too much CPU or memory. You can specify the name or part of the name on the command line to narrow down the list to just a problem application, and you can see almost all information including threads.

Note: To make this utility work on a remote computer, you’ll need to have the remote registry service enabled. Make sure to read to the end of the lesson, as we explain how to deal with that later on.

PsLoggedOn

This utility lists accounts that are logged on either on the machine or connecting remotely. It’s pretty simple, and largely useful in a system administrator type of environment.

PsLogList

This utility displays a local or remote event log on the command line, and there are a number of options that can be used for filtering the data.

psloglist \\computer System

There are also the -h, -d, and -m options, which let you narrow down the list of events to just the last x hours, days, or minutes. The -n option displays the list x records, while the -r switch reverses the order so the latest records will be at the bottom of the output. The last option, which we set to “System” in this example, is not actually necessary — if you omit it, the System log will always be pulled, but you could change it to Application or Security to pull those logs instead.

It’s worth noting that if you have administrator access to the other computer, you can simply open Event Viewer and choose Connect from the Action menu. Enter the computer name in the list, change the credentials if you need to, and access the event logs that way.

The only scenario where we can really see PsLogList being really useful is if you wanted to script out something to perform an action in case of certain messages in the event log.

PsPasswd

This utility allows you to change the passwords for users, both local and remote. The syntax is the same as everything else:

pspasswd \\computer -u User -p Password <AccountToChange> <NewPassword>

The benefit to this utility over just using NET USER from the regular command prompt is that you can change passwords for multiple computers at once, and it works in a domain environment as well.

PsPing

This utility pings, checks ports, and does latency and bandwidth testing. Pretty simple.

psping <servername>

Or you can check connectivity to a port by adding the port number like this:

psping <servername>:80

There are a ton of advanced options to this command that you will probably want to check out should you ned to do some network troubleshooting.

PsService

This utility allows you to deal with Windows Services from the command prompt. It’s really quite easy to use — the syntax works like this:

psservice \\computername <command> <arguments>

The list of commands can be found by looking at the help /? options, but there are a few options that you’ll find yourself using more than the rest.

  • query – Queries the status of a service
  • config – Queries the configuration
  • setconfig  – Sets the configuration
  • start – Starts a service
  • stop – Stops a service
  • restart – Stops and then restarts a service
  • pause – Pauses a service
  • cont – Continues a paused service
  • depend – Enumerates the services that depend on the one specified
  • find – Searches for an instance of a service on the network
  • security – Reports the security permissions assigned to a service

In particular, the start | stop | pause | restart | cont options are really simple and easy to understand. For instance in the following command you could replace “start” with any of those other commands.

psservice \\computername start <servicename>

The other options can be used to query more information about a service, or change the configuration.

Note: the built-in sc.exe utility has a ton of useful features that overlap with this utility. The main difference is that PsService is a little more user-friendly.

PsShutdown

This utility allows you to shut down, log off, or even put a computer into sleep mode. The problem is that it isn’t better than the built-in shutdown.exe utility, and was actually designed for Windows XP, so it’s recommended to use the built-in utility instead in most cases.

The one option that PsShutdown provides that you can’t get otherwise is the switch (-d) to put the computer into sleep mode, which can be handy.

psshutdown \\computername -d

You can also use the -h option to put the computer into hibernate mode instead.

PsSuspend

This utility is very similar to PsKill, but it does something that the built-in Taskkill utility just can’t — you can suspend processes rather than kill them, which can be very handy if you want to temporarily stop a CPU-intensive process from running while you complete a sysadmin task.

Suspending a process is extremely easy:

pssuspend \\computer <PID or Name>

And resuming that process is just as easy — all you have to do is add the -r switch.

pssuspend \\computer -r <PID or Name>

When the Utilities Won’t Connect Because of Remote Registry

Some of these utilities, including PsInfo, PsList, PsLogList, and PsLoggedOn require the remote registry service to be enabled on the remote computer, and it isn’t enabled by default on modern versions of Windows.

The good news is that this problem is easily fixable, and you don’t have to leave Remote Registry enabled. Just run this command using PsService to start the service:

psservice \\computername start RemoteRegistry

And then when you are done with whatever you are doing with PsInfo or PsList, you can stop the service again using this command:

psservice \\computername stop RemoteRegistry

Tuesday, April 13, 2021

Psexec: The Ultimate Guide


What is PsExec.exe?

If you’re new to IT or perhaps haven’t had the need to run commands and tools on remote computers, you might not know what psexec is.

PsExec or psexec.exe is a command-line utility built for Windows. It allows administrators to run programs on local and more commonly remote computers. It is a free utility part of the Sysinternals pstools suite built by Mark Russinovich many years ago.

It was built to replace tools like telnet that forced you to open up ports and introduce security vulnerabilities. Nowadays, we have other options like PowerShell Remoting and the Invoke-Command PowerShell cmdlet but PsExec still has its place.

PsExec allows full interactivity for console application without having to install any software. As you’ll see through this Ultimate Guide, PsExec can launch interactive command prompts, run as local system on remote computers, run commands on multiple computers at once and more.

It supports all versions of Windows since Windows XP. That means, that yes, PsExec on Windows 10 is a thing too. It’s a simple tool to run that works on nearly everything but don’t confuse its simplicity with its capabilities!

Prerequisites

You simply need to be running a modern Windows operating system for PsExec to run on your local computer. However, you’re going to want to run psexec against remote computers. To do that, you’ll need to ensure a few items are in place

If you don’t have these items in place now or unsure, don’t worry. In the next section, we’ll cover how to write some PowerShell to test your remote computers.

As of this writing, PsExec is at v2.2 and will be the version you’ll be learning about in this article.

Installing PSexec (With Remote Computer Setup)

Technically, you don’t install PsExec since it’s just a command-line utility but close enough. Since no installation is necessary, you simply need to download and extract it from the PsTools zip file. PsExec isn’t available as a standalone utility and is part of the PsTools suite of tools.

Downloading PSExec

You can either extract the ZIP file manually or here’s a handy PowerShell snippet to download and extract PsExec from its pstools ZIP file. Note that this removes all of the other PsTools tools. Many are still handy but we’re not going to cover those in this article.

PS> Invoke-WebRequest -Uri 'https://download.sysinternals.com/files/PSTools.zip' -OutFile 'pstools.zip'
PS> Expand-Archive -Path 'pstools.zip' -DestinationPath "$env:TEMP\pstools"
PS> Move-Item -Path "$env:TEMP\pstools\psexec.exe" .
PS> Remove-Item -Path "$env:TEMP\pstools" -Recurse

Remote Computer Configuration

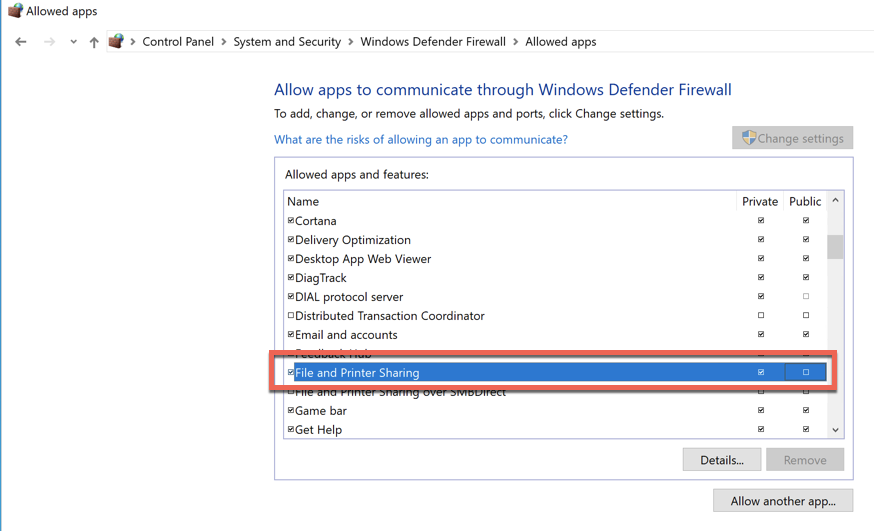
Once you have PsExec downloaded, you’ll then need to ensure any remote computer you’re going to run it on is open. PsExec has simple requirements; File and Printer Sharing enabled and the admin$ administrative share available.

You could go to all of the remote computers, open up the Windows Firewall applet, go to Allowed Apps and enable File and Printer Sharing on all computers as you see below.

Note that File and Printer Sharing is a known security risk so ensure only the Private firewall profile is enabled.

Allowing File and Print Sharing in the Windows Firewall
Or you could visit each computer and run the netsh utility to open it up via:
> netsh advfirewall firewall set rule group="File and Printer Sharing" new enable=Yes

Or you could use PowerShell’s Set-NetFirewallRule cmdlet to do it.

PS51> Set-NetFirewallRule -DisplayGroup "File And Printer Sharing" -Enabled True -Profile Private

If you’d rather not visit each computer, you have PowerShell Remoting available and you’re in an Active Directory domain, you could also open up the firewall on many computers at once using the Invoke-Command cmdlet.

PS51> Invoke-Command -ComputerName PC1, PC2, PC3 -ScriptBlock { Set-NetFirewallRule -DisplayGroup "File And Printer Sharing" -Enabled True -Profile Private }

Using PsExec

Before you can run, you need to walk. If you’ve never used PsExec before, you’re in for a treat! Be sure to read this section first to get your feet wet to learn the basics before jumping in the deep end later in this article.

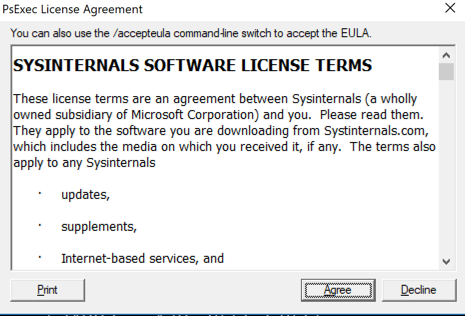
The first time you run PsExec on a new system, you will immediately see the PsExec license agreement come up. You’ll have to click on the Agree button to begin using it.
PSExec license agreement (EULA)

If you’d like to prevent the license agreement from being displayed, you can silently accept it using the /accepteula switch as shown below.

> psexec /accepteula
You’ll learn a few tricks at silencing this EULA popup on local and remote computers later in the article.

Finding Help

When exploring PsExec, you shouldn’t use any switch at all. When you simply run psexec with no switches, it will return all options and a brief explanation of what each does. All of the options are in the below table for your convenience.

SwitchExplanation
-aSeparate processors on which the application can run with commas where 1 is the lowest numbered CPU. For example, to run the application on CPU 2 and CPU 4, enter: “-a 2,4”
-cCopy the specified program to the remote system for execution. If you omit this option the application must be in the system path on the remote system.
-dDon’t wait for process to terminate (non-interactive).
-eDoes not load the specified account’s profile.
-fCopy the specified program even if the file already exists on the remote system.
-iRun the program so that it interacts with the desktop of the specified session on the remote system. If no session is specified the process runs in the console session. Some have reported best results always using the -s switch with -i due to windows being unintelligible.
-hIf the target system is Vista or higher, has the proc
-lRun process as limited user (strips the Administrators group and allows only privileges assigned to the Users group). On Windows Vista the process runs with Low Integrity.
-nSpecifies timeout in seconds connecting to remote computers.
-pSpecifies optional password for user name. If you omit this you will be prompted to enter a hidden password.
-rSpecifies the name of the remote service to create or interact. with.
-sRun the remote process in the System account.
-uSpecifies optional user name for login to computer.
-vCopy the specified file only if it has a higher version number or is newer on than the one on the remote system.
-wSet the working directory of the process (relative
-xDisplay the UI on the Winlogon secure desktop (local system only).
-armSpecifies the remote computer is of ARM architecture.
-prioritySpecifies -low, -belownormal, -abovenormal, -high or
-realtimerun the process at a different priority. Use
-backgroundrun at low memory and I/O priority on Vista.
computerDirect PsExec to run the application on the computer or computers specified. If you omit the computer name PsExec runs the application on the local system, and if you specify a wildcard (\*), PsExec runs
@filePsExec will execute the command on each of the computers listed in the file.
-accepteulaThis flag suppresses the display of the license dialog.
-nobannerDo not display the startup banner and copyright message.
Running a Simple Remote Command

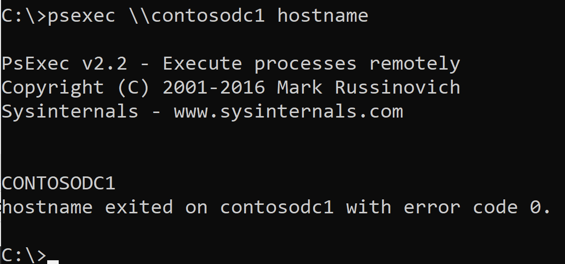
At its most basic, PsExec requires two parameters: a computer name and a command to run. If you have a command to run on the remote computer that doesn’t require any arguments like hostname, you can simply add it after the computer name.

Note that if you don’t specify a full file path, the command to run must be in the user or system path. Also, if you have a program with spaces in the name, you can always enclose the program in spaces such as “my application.exe”.

> psexec \\REMOTECOMPUTER hostname

You can see below that to execute the hostname command on the CONTOSODC1 computer, you define it’s UNC path followed by the command. PSExec will then connect to the remote computer securely, execute the command and return the output. In this case, the hostname command returned the hostname of the computer which is CONTOSODC1.

If the command isn’t cmd or another console, PsExec will quickly exit the remote session and return the exit code the remote process returned.

Note: The error or exit code returned from psexec is not coming from PsExec itself. Instead, it’s coming from the command that psexec executed on the remote computer.

Successful psexec remote command execution

How PsExec Works on Remote Computers

PsExec goes through a few steps to execute programs on remote computers.

  1. Create a PSEXESVC.exe file in C:\Windows.
  2. Create and start a Windows service on the remote computer called PsExec.
  3. Execute the program under a parent process of psexesvc.exe.
  4. When complete, the PsExec Windows service will be stopped and removed.
When the process doesn’t work 100% correctly you may have to manually remove the service using the sc command.

Running a Simple Local Command

Even though PsExec is best known for running commands on remote computers, you can also run commands locally.

You can run commands locally by simply not providing a computer name like below.

> psexec <local command or EXE file>

Why would you do this? One reason would be to execute commands as the local SYSTEM account. You can use the -s switch to run any command as SYSTEM locally or remotely as you’ll learn more about later.

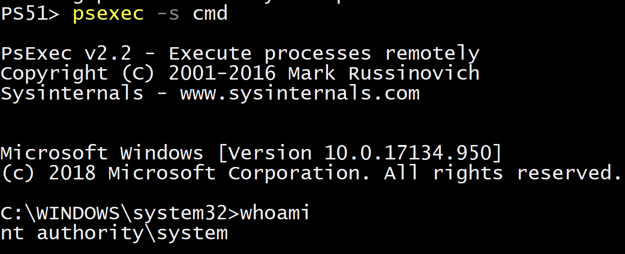
Take a look at the short video below. Notice that you simply need to provide the -s switch along with the command interpreter executable for psexec to launch a new command session as NT AUTHORITY\SYSTEM.

Running Psexec as SYSTEM

PsExec Commands (Getting More Advanced)

Once you’ve got the basics down, you can then start learning more advanced techniques in psexec. PsExec can do a lot more than just run a single command on a single computer.

Running commands on multiple computers

PsExec isn’t just limited to running commands on one remote computer at a time. This tool also has support to copy programs and run commands on multiple computers at once.

You can run PsExec on multiple computers at once a few different ways.

Comma-separated Computer Names

Typically when running a command on a single remote computer, you will specify a single computer name like \\REMOTECOMPUTER. You can also specify multiple computers separated by commas like below.

> psexec \\REMOTECOMPUTER1,REMOTECOMPUTER2,REMOTECOMPUTER3

All Computers in an Active Directory Domain

If you’re running PsExec on an Active Directory domain-joined computer and you’d like to blast out a command execution on all computers in that domain, use a wildcard.

PsExec will search your entire Active Directory domain and attempt to run a command on every computer. Below is example syntax on how PsExec will attempt to connect to every computer on the domain the executing computer is a part of and run the hostname command.

> psexec \\* hostname

PsExec v2.2 - Execute processes remotely
Copyright (C) 2001-2016 Mark Russinovich
Sysinternals - www.sysinternals.com

Enumerating domain...

Note that if you use an asterisk to find all computers in a domain while the local computer is part of a workgroup, you will receive the error A system error has occurred: 6118.

Using a wildcard forces PsExec to essentially run the command net view /all to first find all computers in the domain. This is an outdated way to find computer information due to its dependency on NetBIOS.

Reading from a File

Another way you can run commands on multiple computers at once is to use a text file. Using the syntax @<filename.txt>, PsExec will read every line in the text file as if it were a computer name. It will then process each computer individually.

Below you can see an example of using PowerShell to create a text file of line-delimited computer names and using that as input for psexec.

PS51> (Get-AdComputer -Filter *).Name | Out-File computers.txt
PS51> psexec @computers.txt hostname

Copying local programs to the remote computer

Using the -c switch, psexec will copy any local program to the remote computer prior to execution.

Perhaps you have an EXE on your local computer in a C:\Tools folder and would like to run it on a remote computer. You can do so using the following syntax:

> psexec \\REMOTECOMPUTER -c C:\Tools\program.exe

When you use the -c switch and don’t specify an executable file, PsExec will still copy the file but you’ll receive an error stating system cannot find the file specified. This happens because PsExec will always attempt to run the file you copy.

If you need to copy files to remote computers prior to using PsExec, use the Copy-Item PowerShell cmdlet instead.

Running Remote Processes under Alternate Credentials

Another popular use case of PsExec is to run commands under alternative accounts. By default, PsExec will attempt to connect to the remote computer under your currently-logged-in account. More specifically, it will impersonate your account on the remote computer.

Using the -u and optional -p switch allows you to connect to the remote computer with an alternative user account. PsExec will then encrypt both the username and password and send them to the remote computer for authentication.

For example, if you’re in a workgroup, you’ll always need to specify the username to authenticate to the remote computer as.

> psexec \\REMOTECOMPUTER hostname -u localadmin -p secret-p@$$word

If both computers are a member of Active Directory, be sure to preface the user account with the domain name.

> psexec \\REMOTECOMPUTER hostname -u contoso.local\domainadmin -p secret-p@$$word

Note that when you do not use the -u switch, psexec impersonates your logged-in account on the remote computer. It will not have access to any network resources.

Running Processes as the LOCAL SYSTEM Account

One of the most useful features of running PsExec under an alternative account is using the -s switch. This switch allows PsExec (and your remotely-executed application) to run under the remote (or local) computer’s LOCAL SYSTEM account.

Notice below I didn’t include a remote computer name. PsExec will just as gladly run on the local computer as well. In this instance, I’m using the -s option to tell PsExec to launch a local command prompt as the LOCAL SYSTEM account.

Running psexec as LOCAL SYSTEM

To run a command prompt as LOCAL SYSTEM on a remote computer, add the computer name to the reference like below:

> psexec -s \\REMOTECOMPUTER cmd

Launching GUI Applications Remotely

Another useful PsExec switch is -i. By default, PsExec does not allow the remotely-executed command to bring up any windows on the remote computer. This is helpful because if you’re executing commands remotely, you’re not going to see the screen anyway.

But perhaps you need to bring up programs for your users. You personally won’t be using the application but an end-user will. In that case, use the -i switch.

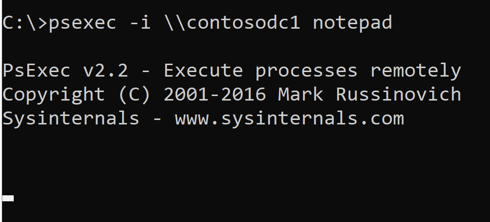
Maybe you need to bring up a notepad window on a remote computer. Not a problem. Run notepad.exe with the -i switch and PsExec will open up Notepad.

> psexec -i \\REMOTECOMPUTER notepad
Running psexec in interactive mode

Be sure to also use the -d switch to disconnect when the interactive window is brought up though. By default, PsExec will wait for the process it executed to complete. If the remote process (Notepad in this case) is kept running, PsExec will never return control.

Using the -d switch with -i will tell PsExec to not wait for the remote process to finish. Instead, it will disconnect and return control to you as soon as the remote process is executed.

Redirecting Output

Psexec will rely any output sent from the remote process to your local session. Typically, this output will go directly to your local console. But if you’d like to redirect it, you can do so using typical redirection operators.

For example, if you’d like to run a command and silence all output, you could redirect output and errors to null using ^> nul ^2^&1.

Note the special characters are escaped with a hat. ( ^).

PsExec Use Cases

Once you’ve learned how to use psexec, you’ll inevitably come across various specific use cases. In this section, you’ll learn some real-world use cases and examples using psexec.

Launching a Remote Command Prompt (psexec cmd)

One of the most common use cases is launching PsExec as an interactive command prompt. PsExec doesn’t just run commands remotely. It can also send command output back to your console. Because of this, it can make a great telnet (if anyone is still using that) or perhaps PowerShell Enter-PSSession replacement.

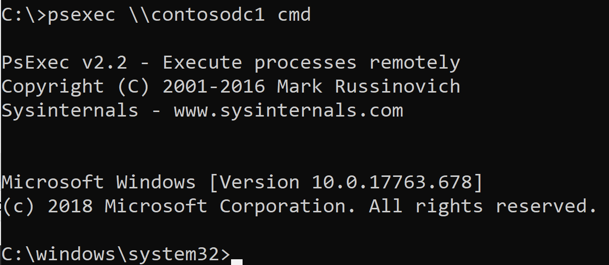
To launch a remote command, specify the remote computer name and run the cmd application. Cmd is the Windows command interpreter. Since PsExec supports interactive use, it will gladly return a flashing cursor and a prompt.

> psexec \\REMOTEPC cmd
Opening a command prompt on a remote computer

At this point, the world is your oyster. You can run commands on your local computer via this “nested” command prompt and they will be executed on the remote computer.

To exit from the command prompt, type exit. PsExec will stop the cmd process on the remote computer and return focus to the local computer.

Do NOT use Ctrl-C to close out of an interactive cmd session. Always use exit. If you use Ctrl-C, the psexec session will remain running on the remote computer.

Installing Software Remotely

You can use PsExec as a poor-man’s software deployment tool. Perhaps you have an MSI installer that you need to run on one or more remote computers called setup.msi. This installer needs to be copied to the remote computers and then executed with the msiexec.exe utility with a few switches.

Below is an example of how you could use PsExec to remotely deploy software. This example copies setup.msi to the remote computer then launches the MSI installer interactively on as the SYSTEM account.

> psexec.exe \\REMOTECOMPUTER –i –s "msiexec.exe /i setup.msi" -c setup.msi

Accepting the EULA without the /accepteula switch

As mentioned earlier, the first time PsExec runs, you’ll have to accept a EULA. You could use the /accepteula switch but you could also “stage” it in the registry.

When launched for the first time, PsExec creates a registry key at HKCU\Software\Sysinternals\PsExec. Instead of that registry key, it creates a registry value called EulaAccepted with a DWORD value of 1.

Using your favorite method to modify the registry on remote computers, you simply need to create this key/value on computers you’d like to run PsExec on. Once created, no need to run /accepteula!

Marrying PowerShell and PsExec

Before PowerShell, all we had was PsExec. Now, we have options. PowerShell can replace PsExec in many situations but complement it in others.

Building Computer Names with PowerShell

Instead of using \\* to find all computers in the domain, you can use PowerShell instead. By using PowerShell, you can not only pick certain computers but you don’t have to use the firewall-prone net view /all behavior.

You can use PowerShell to create a string containing all computer names separated by a comma. You can then pass that string to PsExec which will merrily process each one like you typed each one manually.

You can see below an example of using the Get-AdComputer cmdlet part of the ActiveDirectory PowerShell module.

PS51> psexec "\\$((Get-AdComputer -Filter *).Name -join ',')" hostname

Enabling PowerShell Remoting Remotely

If you have remote computers you’d rather use PowerShell Remoting with instead of PsExec, you can use PsExec to enable them.

By running Enable-PSRemoting or the winrm.cmd batch file on remote computers, you can quickly turn on PowerShell Remoting across many computers at once.

Below you can see an example of calling the winrm.cmd batch file on a remote computer running as the SYSTEM account. Because the output from that command isn’t needed, it’s silenced with 2>&1> $null.

$computerName = 'REMOTECOMPUTER'
psexec "\\$Computername" -s c:\windows\system32\winrm.cmd quickconfig -quiet 2&>&1> $null 

PsExec Error Messages

It’s worth mentioning again upfront that most error codes you see returned from PsExec are from the remote process; not from PsExec. But it’s helpful to have an understanding of these error codes and what they might mean.

If you’d like a reference on all Windows error codes, I recommend checking out this exhaustive list of Windows error codes.

Below is a list of common error codes you may see returned by PsExec.

Error CodeExplanation
-2146232576Typically returned by Windows Update when an error occurs.
0Command executed successfully
1Incorrect function. A problem happened. That’s about it.
1603Fatal error during installation. This typically is returned by msiexec.
2The system cannot find the file specified
4The system cannot open the file.
5Access is denied.
6The handle is invalid.
6118The list of servers for this workgroup is not currently available

Friday, April 9, 2021

Migrating WSUS from one Server to another

 WSUS is running in your infrastructure for many years, and is doing a pretty good job at patching your clients and your servers, but now has come to a point where you need to migrate it to a new box. This usually happens when the OS is at the end of life support (EOL) or the hardware has reached the warranty limit. Another reason why migrate and not start with a new installation is so you don’t have to download from Microsoft the required updates and approve them all over again. I don’t know about you, but approving hundred of updates is not something I will do for a second time. In either case, the service needs to be migrated with minimal downtime and not to much headache.

To simulate this, I installed one WSUS service on a 2003 server, and this one is the WSUS that is patching the infrastructure right from the beginning. I named it WSUS-OLD for the sake of the example and for you to better follow the migration procedure. If your WSUS is not running on a 2003 server, no problem, this works with every OS version you might have. The second WSUS server will run on a 2012 R2 server and this will replace the old WSUS. I’m going to name the new server WSUS-NEW, again, for the sake of the example. Both of them are installed with a local database, but in case yours are configured with a remote SQL, don’t worry, it works either way the same. You can have your old WSUS with a local database and the new WSUS with a remote SQL server or vice versa.

Now, on the new server go ahead and install WSUS and when you get to the configuration wizard set it as a downstream replica server; point it to your working WSUS.

[notice]If there is a firewall between the two WSUS servers you will need to open the proper port (80, 8530 or 443) in order for them to be able to communicate. [/notice]


Start connecting to save and download upstream server information.


At the end of the configuration wizard choose to begin the initial synchronization then click Finish. Be patient, it will take a while.


Once the synchronization is done your two WSUS servers should look almost the same.They should have the same computer groups, approved updates, downloaded updates, etc.


One thing they are not synchronizing are the configuration options, and unfortunately these configurations will need to be done manually. Don’t worry, it’s a two minute job, but before you can do that the new WSUS server needs to be set in an autonomous mode. Go to Options > Update Source and Proxy server and un-check the box This server is a replica of the upstream server then click the radio button Synchronize from Microsoft Update.


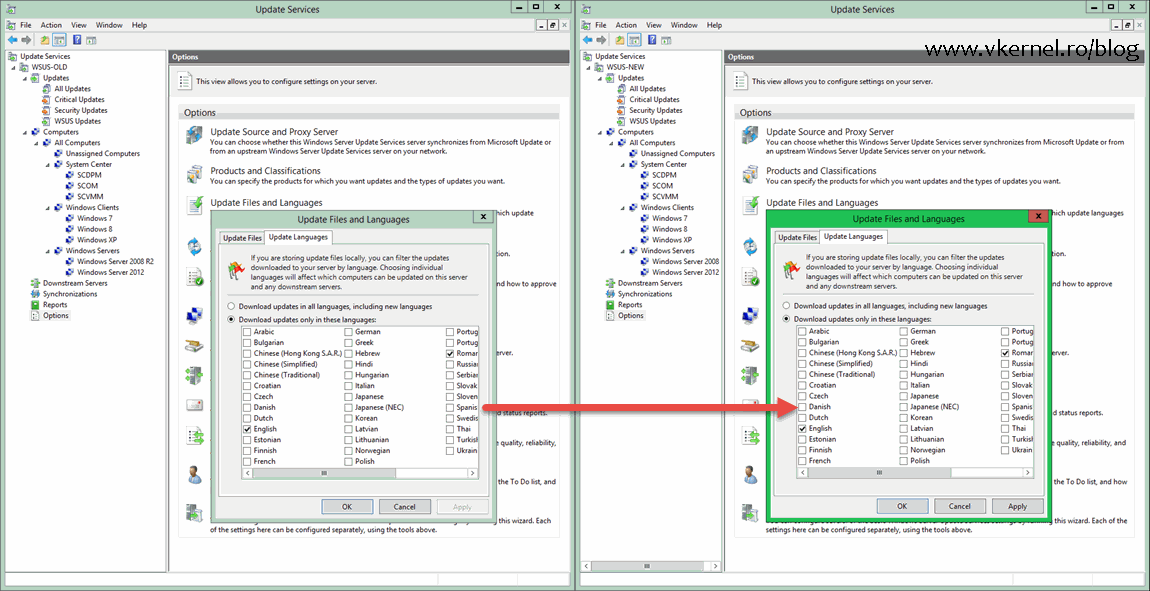
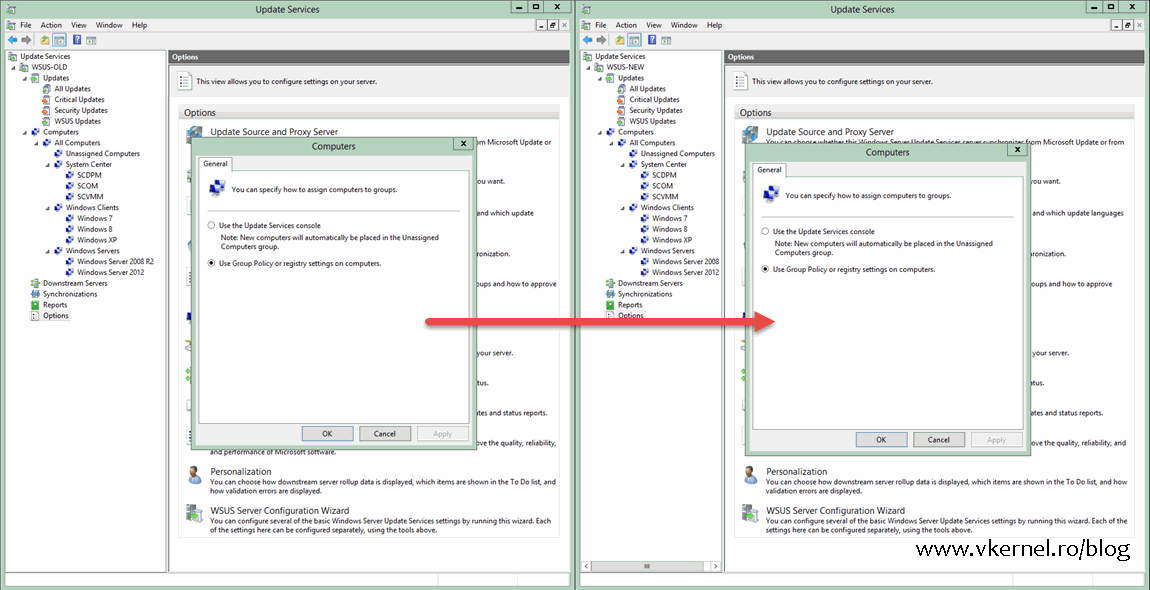
Now you can go ahead and match the rest of the options with the old WSUS server, like Products and Classifications, Update Files and Languages, computers assignment, E-Mail Notifications.

Migrating WSUS Server-07    Migrating WSUS Server-09

Once the options between the two servers match, the last step is to modify your group policy in order to point your clients to the new WSUS server. Open your GPO or GPOs and change the server name from the Specify intranet Microsoft update service location policy.


After a few hours, clients should appear in the WSUS console at the exact same patch level they were on the old WSUS server. If you want to force the process on one or two of the clients just to see if it actually works do a gpupdate /force to get the new policy then type wuauclt /detectnow and wuauclt /reportnow to force checking for updates and to report to WSUS. Wait a few days, and if everything is working fine you can go ahead and decommission the old box. And that’s it !


Migrating WSUS to a new server is not a difficult process and it can be done with minimal downtime. The hard part is to wait for all the clients to get the new policy and register themselves with the new WSUS server. Everything after that is the same as it was before, approve/decline updates and patch the systems in your environment.