For extra security, it’s crucial to back up all your files before restoring your MacBook to factory settings.
How to restore your Mac to factory settings
*note: the following sequence is applicable to both MacBook Air and MacBook Pro.Plug in your power adapter. Then follow our guide once your system is copied, and you’ve logged out of your accounts and services.
1. Restart in Recovery Mode
Before you wipe your Mac and erase any hard drive data, the first thing you need to do is start up from the Recovery Mode. To do this, click on the Apple logo in the top left corner of the screen and choose Restart. When your Mac shuts off and powers back on, press and hold the Command+R keys until you see the Apple logo. Then release the keys and proceed to the next step.
2. Erase Data from Mac Hard Drive
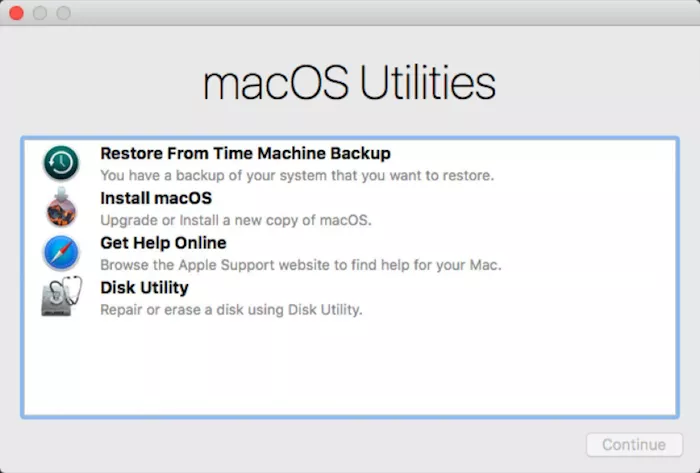
While in Recovery Mode, you won’t see your usual login screen. Instead, you’ll see the macOS Utilities window. Here are your next steps to wipe a MacBook Pro or MacBook Air:a. In the macOS Utilities window, choose Disk Utility and click Continue.
b. Choose your startup disk and click Erase.
c. Choose Mac OS Extended (Journaled) as the format.
d. Click Erase.
e. Wait until the process is finished. When it’s done, go to the Disk Utility menu at the top, then quit Disk Utility.
3. Reinstall macOS (optional)
Now, with your hard drive completely erased and free of any data, you can perform a clean install of macOS. You can do so while your Mac is still in Recovery Mode. From the same macOS Utilities window, choose Reinstall macOS. Consider installing the latest macOS Catalina.-----------------------------------------------------
How to Make a Bootable High Sierra Installer
It’s much faster to use a bootable USB flash drive to install the operating system on several Macs. Creating a bootable drive with High Sierra installer is easy: basically, all you need is 16 GB of available storage space.
Launch the App Store, type High Sierra in the upper right search bar, and download the High Sierra installer. The file named Install macOS High Sierra will appear in the Applications
folder once the download is completed. If you’ve already upgraded to
High Sierra, the installer is automatically removed from that location.
In this case, navigate to Purchased in the App Store and find the installer in the list.
What’s next? Get an external
drive you want to save the installer on. While SSD would be a great
option, a 16GB USB drive is enough when money is tight. The system will
automatically reformat the drive to make it compatible with Mac. Change
the name of your drive to HighSierra.
Note: Advanced steps mentioned below are
intended for system administrators and experienced macOS users who know
how to use the Terminal command line. Find more details on how to make a
bootable copy of macOS here.
Create a Bootable High Sierra Installer in the Terminal
Once you have the external drive and the High Sierra installer, use the Terminal app to create a boot disk. Navigate to the Applications folder and open the Terminal from the list of utilities. You can also type Terminal in the Spotlight search and select the top search result.
-
Connect the HighSierra USB drive to your Mac.
-
Launch the Terminal (navigate to Applications>Utilities and open the Terminal app).
-
Paste the following command into the Terminal window
-
You’ll be prompted to type your login password. Note, the characters you type aren’t displayed in the Terminal window. Enter the password and press Return.
-
You should receive a warning that your drive will be erased. Press Y to confirm.
-
The Terminal will erase your drive. Next, your Mac is most likely to ask you if you want to use the HighSierra USB drive for Time Machine backups. Select Don’t use and the Terminal app will copy the installer to the HighSierra drive.
-
After you see the process is done, quit the Terminal. Now your drive is ready to use.
4 Steps to Boot from the Installer Drive
It’s really easy to boot from the installer drive. Follow these quick step-by-step guide:
-
Plug the HighSierra drive into your Mac.
-
Turn on your Mac and hold down the Option key while your Mac boots.
-
Once you see a Startup Manager window, select the HighSierra drive from the list and press Return.
-
Select Install macOS in the macOS Utilities window.
No comments:
Post a Comment