How to Restore Permanently Deleted Emails in Outlook?
1. Select the Deleted Items Folder

2. Click Folder > click Restore Deleted Items or there is a link below Recover items recently removed from this folder.

3. Select File(s) and then click Ok

How to Restore Permanently Deleted Emails in Outlook?
1. Select the Deleted Items Folder
2. Click Folder > click Restore Deleted Items or there is a link below Recover items recently removed from this folder.
3. Select File(s) and then click Ok
Connecting to SMB Share on MacOS
These days, there are three types of drive you can find in the computer.

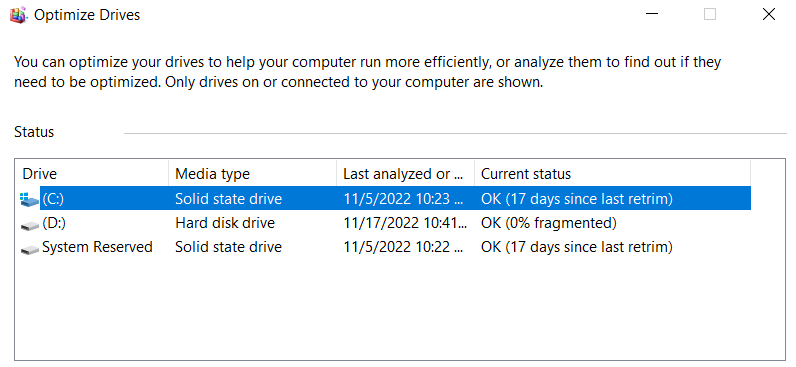
Another method is a PowerShell applet.

Finally, you can use the Task Manager app to learn about your drives.
In Windows 11, Microsoft has updated the Task Manager with advanced capabilities. Besides the updated look, it is able to display extra details about your hardware.
To find the drive type with Task Manager, do the following.

Also, you can try to look on the Internet for technical specification of your drive. There, you will find a lot of information about it, including its type. But first you have to learn its model.
First of all, you need to find the drive model. You can find it either in Device Manager, Task Manager, or System Information tool.


Now, when you know the drive model, do a web search with Google or Bing using the model words as a keyword. On the vendor's website or some reputable hardware resource you will find all the information about the drive, including its type. I.e. it will show if it is SSD, NVMe, or HDD.
Now, when you know how to find if you have SSD or HDD, let's look how to differentiate NVMe for SATA SSD.


You are done!

Note: On some devices, NVMe is reported as 'RAID'. It must be the driver which reports the interface type to the OS. It is also reported as RAID in third-party tools reviewed in the next chapter. Keep this in mind.
For the completeness' sake, let's review a couple of alternative methods you can use for finding out NVMe in Windows 11.

This is the solution that will reset the Administrator password of HPE StorageWorks 1/8 G2.
Here is a short JavaScript program that will let you enter the autoloader's date and time in your browser and calculate the override code for you.
https://jsfiddle.net/0kf8w6n5/1/

There are many ways to enter Safe Mode, but here are the three easiest.
If you're signed in:
1. Click the Windows icon in the bottom-left corner.
2. Holding down the Shift key, click the Power icon and then Restart.

3. Your computer will restart, and then open onto a blue screen titled Choose an option. Select Troubleshoot, and then Advanced options.
4. Click Startup Settings, and then Restart. Your computer will turn off and on again.
5. Once the screen comes back, you'll be given a few options. Press 4 to start your computer in Safe Mode, or 5 to start Safe Mode with internet access.
If you're not signed in, do the same thing, but click the Power icon on the sign-in page.
1. Open the Settings app by pressing the Windows key + I.
2. Click Update & Security, and then Recovery.
3. On this page, underneath Advanced startup, click Restart now.
4. Your computer will restart onto the Choose an option screen. Here, click Troubleshoot, and then Advanced options.
5. Select Startup Settings and then Restart.
6. When your computer boots back up, you'll be given some startup options. Here, press 4 to start your computer in Safe Mode, or 5 to start Safe Mode with internet access.
This is the method to use if you can't boot into Windows normally.
1. Press your PC's power button to turn it on.
2. As soon as you see something appear on the screen — probably the manufacturer's logo — hold down the power button until the PC turns off again.
3. Do this two more times, and then turn on your PC again. As it's starting, the words Preparing Automatic Repair will appear at the bottom of the screen. Let your PC go through this process — it should eventually boot onto the Choose an option screen.
4. On this screen, select Troubleshoot, then Advanced options, and then Startup Settings. When prompted, click Restart.
5. When the computer turns back on, press 4 to start your computer in Safe Mode, or 5 to start Safe Mode with internet access.
There are two ways to exit Safe Mode.
The first — and easiest — is to just restart your computer. You can do this by holding down the power button, or by going through the Start menu.
If you've restarted your computer but it's still in Safe Mode, you should:
1. Press the Windows key + R to open the Run menu.
2. In the text box, type msconfig and press Enter.
3. At the top of the System Configuration menu, click Boot.
4. Underneath Boot options, make sure that Safe boot is unchecked. Once it is, click OK and restart your computer again.
Important notes:
• To upgrade a product to the most current version, please make sure your Support and Subscription contract is current and active when the new product version is released.| Major Upgrade | Minor Upgrade |
| This changes the product version; it is an upgrade from a lower to a higher version of the software. This requires a license key change, where a User is required to upgrade the keys on Customer Connect portal along with their Environment upgrade. Example: vSphere 6.0 >> vSphere 7.0 | This does not change the product version and does not require a license key change in Customer Connect portal. Users are only required to update their Environment and their existing license key would work on the same Patch. This is an upgrade for bug fixes, new features/components and other small improvements. Example: vSphere 7.0 >> vSphere 7.1 |
The ODAC OUI gives you a graphical user interface for installation, but it only provides you with 64-bit version of the drivers. If you need 32-bit drivers, you will have to use the command-line ODAC XCopy.
Using ODAC XCopy you can install 64-bit or 32-bit OLE DB drivers for Oracle. You can also use ODAC XCopy to install the Oracle Instant Client which supports ODBC.
However, installing any of the drivers (32-bit or 64-bit) disables the other driver. How can you make them co-exist?
Here are the full steps:

Oracle ODAC installation
install.bat oledb C:\Oracle\64bit odac
Go to the location of the unzipped files for the 32-bit driver and install from there: install.bat oledb C:\Oracle\32bit odac
    cd C:\Windows\System32
    mklink /d odac C:\Oracle\64bit
    cd C:\Windows\SysWOW64
    mklink /d odac C:\Oracle\32bit

Oracle Odac Path
Now the OLE DB driver will automatically be loaded from C:\Oracle\64bit or C:\Oracle\32bit depending on if in 64- or 32-bit architecture of your application.


