Friday, September 2, 2016

Export or backup email, contacts, and calendar to an Outlook .pst file

Step 1: make sure you're using a desktop version of Outlook: 2007, 2010, 2013, or 2016.
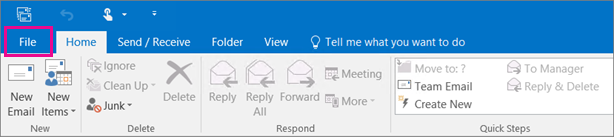
This is what the ribbon looks like in Outlook 2016.
  • If your ribbon has a File option in the top left corner, then you're using a desktop version of Outlook and you're in the right place! See one of the procedures below.
  • If your ribbon doesn't have a File option in the top left corner, see What version of Outlook do I have? to determine your version of Outlook and to get to the right export instructions. Or, see How to get Outlook for your desktop.
Choose from the following list of export instructions. To learn how to import items, see Import email, contacts, and calendar from an Outlook .pst file.

Office 365: Export Outlook items to a .pst file

If you have an Office 365 mailbox, you can use Outlook 2007, 2010, 2013, or 2016 to move all of your email, contacts, and calendar items from one email account into your Office 365 mailbox. How to get Outlook for your desktop
Here's what an Office 365 mailbox looks like in Outlook on the web; Outlook on the web is different from Outlook on your desktop.
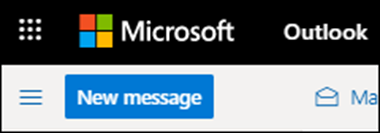
What the ribbon looks like in Outlook on the web.
After you get Outlook for your desktop, do these steps:
  1. Add your "source" email account to Outlook on your desktop. Wait a bit for all of your email and contacts to show up.
  2. After you add your Office 365 email account to Outlook on your desktop, Outlook will automatically sync with your Office 365 account. You'll see the contents of your Office 365 mailbox appear in Outlook on your desktop.
  3. Next, choose from the export instructions in this article (below) to export your email from the source account to a .pst file.
    For example, if you have Outlook 2010 on your desktop, choose "Outlook 2010: Export Outlook items to a .pst file".
  4. Choose from the import instructions to import your email to Office 365.
    For example, if you have Outlook 2016 on your desktop, choose "Outlook 2013 and Outlook 2016: Import Outlook items from a .pst file".
    Because Outlook is syncing with your Office 365 email account, when you import your email using the instructions, the email will go directly into your Office 365 email account.

Outlook 2013 and 2016: Export Outlook items to a .pst file

  1. At the top of your Outlook ribbon, choose File.
    This is what the ribbon looks like in Outlook 2016.
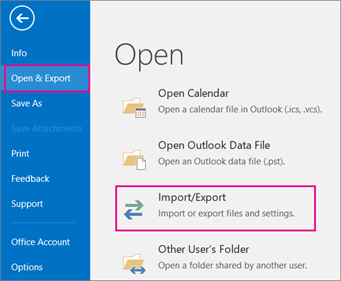
  2. Choose Open & Export > Import/Export.
    Choose Open & Export, and then choose Import/Export.
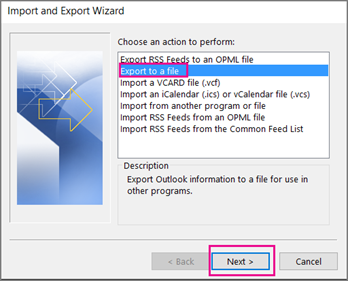
  3. Choose Export to a file.
    Choose Export to a file.
  4. Click Outlook Data File (.pst), and then click Next.
  5. Select the name of the email account to export, as shown in the picture below. Only information for one account can be exported information at a time.
    Make sure that the Include subfolders check box is selected. This way everything in the account will be exported: Calendar, Contacts, and Inbox. Choose Next.
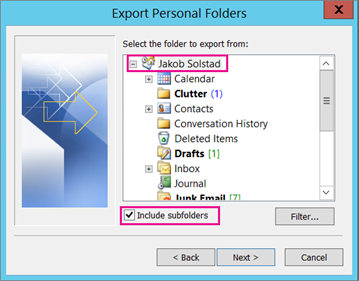
    Choose the email account you want to export.
  6. Click Browse to select where to save the Outlook Data File (.pst). Type a file name, and then click OK to continue.
    Note:  If you’ve used export before, the previous folder location and file name appear. Type a different file name before clicking OK.
  7. If you are exporting to an existing Outlook Data File (.pst), under Options, specify what to do when exporting items that already exist in the file.
  8. Click Finish.
  9. Outlook begins the export immediately unless a new Outlook Data File (.pst) is created or a password-protected file is used.
    • If you’re creating an Outlook Data File (.pst), an optional password can help protect the file. When the Create Outlook Data File dialog box appears, type the password in the Password and Verify Password boxes, and then click OK. In the Outlook Data File Password dialog box, type the password, and then click OK.
    • If you’re exporting to an existing Outlook Data File (.pst) that is password protected, in the Outlook Data File Password dialog box, type the password, and then click OK.
Now that your Outlook data is in a .pst file, it's portable. For example, you can save the .pst file to OneDrive, and then download it to your new computer. Or you can save it to a usb flash drive, plug the drive into your new computer, and then import your email, contacts, and calendar to Outlook.

Outlook 2010: Export Outlook items to a .pst file

  1. At the top of your Outlook ribbon, choose the File tab.
    In Outlook 2010, choose the File tab.
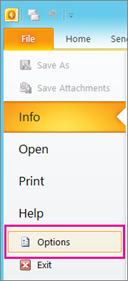
  2. Choose Options.
    Choose Options.
  3. In the Outlook Options box, choose Advanced.
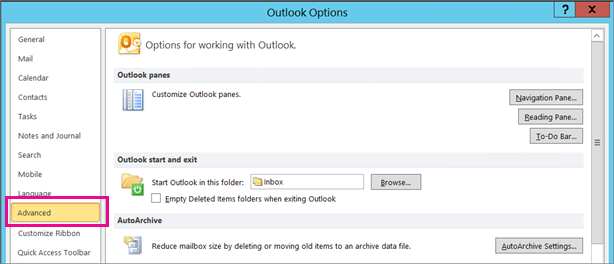
    Choose Advanced.
  4. Under the Export section, choose Export.

    On the Advanced page, choose Export
  5. Click Export to a file, and then click Next.
  6. Click Outlook Data File (.pst), and then click Next.
  7. Select the name of the email account to export, as shown in the picture below. Only information for one account can be exported information at a time.
    Make sure that the Include subfolders check box is selected. This way everything in the account will be exported: Calendar, Contacts, and Inbox. Choose Next.
    Choose the email account you want to export.
  8. Click Browse to select where you want to save the Outlook Data File (.pst) and to enter a file name. Click OK to continue.
    Note:  If you have previously used the export feature, the previous folder location and file name appear. Make sure that you change the file name if you want to create a new file instead of using the existing file.
  9. If you are exporting to an existing Outlook Data File (.pst), under Options, specify what to do when exporting items that already exist in the file.
  10. Click Finish.
  11. The export begins immediately unless a new Outlook Data File (.pst) is created or the export is to an existing file that is password protected.
    • If you are creating a new Outlook Data File (.pst), an optional password can help protect the file. When the Create Outlook Data File dialog box appears, enter the password in the Password and Verify Password boxes, and then click OK. In the Outlook Data File Password dialog box, enter the password, and then click OK.
    • If you are exporting to an existing Outlook Data File (.pst) that is password protected, in the Outlook Data File Password dialog box, enter the password, and then click OK.
Now that your Outlook data is in a .pst file, it's portable. For example, you can save the .pst file to OneDrive, and then download it to your new computer. Or you can save it to a usb flash drive, plug the drive into your new computer, and then import your email, contacts, and calendar to Outlook.

Outlook 2007: Export Outlook items to a .pst file

  1. In Outlook 2007, at the top of your ribbon choose File.
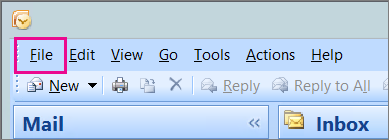
    In Outlook 2007, choose the File tab.
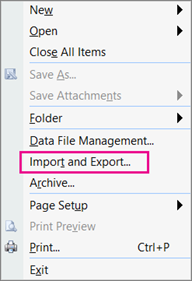
  2. Choose Import and Export.
    Choose Import and Export.
  3. Select Export to a file, and then click Next.
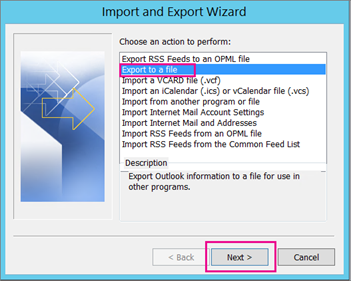
    Choose Export to a file and then choose Next.
  4. Click Personal File Folder (.pst), and then click Next.
  5. Select the name of the email account to export, as shown in the picture below. Only information for one account can be exported information at a time.
    Make sure that the Include subfolders check box is selected. This way everything in the account will be exported: Calendar, Contacts, and Inbox. Choose Next.
    Choose the email account you want to export.
  6. Click Browse to select where you want to save the Outlook Data File (.pst) and to enter a file name. Click OK to continue.
    Note:  If you have previously used the export feature, the previous folder location and file name appear. Make sure that you change the file name if you want to create a new file instead of using the existing file.
  7. If you are exporting to an existing Outlook Data File (.pst), under Options, specify what to do when exporting items that already exist in the file.
  8. Click Finish.
  9. The export begins immediately ... unless you're creating a new Outlook Data File (.pst) or you're exporting is to an existing .pst file that is password protected. In those cases you'll get this dialog box:
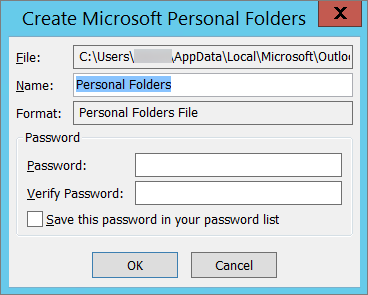
    If you don't want to password protect your .pst file, choose OK.
    Choose OK if you don't want to password protect your file. Otherwise:
    • If you want to password protect your .pst file: enter the password in the Password and Verify Password boxes, and then click OK. In the Outlook Data File Password dialog box, enter the password, and then click OK.
    • If you are exporting to an existing Personal File Folder (.pst) that is password protected, in the Outlook Data File Password dialog box, enter the password, and then click OK.
Now that your Outlook data is in a .pst file, it's portable. For example, you can save the .pst file to OneDrive, and then download it to your new computer. Or you can save it to a usb flash drive, plug the drive into your new computer, and then import your email, contacts, and calendar to Outlook.

Sunday, August 7, 2016

Acrobat Reader 11: Fix “There was an error opening this document ..

An error may appear that says “There was an error opening this document. Access denied.”
  1. From Acrobat Reader, select “Edit” > “Preferences“.
  2. Select “Security (Enhanced)” on the left pane.
  3. Uncheck the “Enable Protected Mode at startup” box.
  4. Select “Yes” to the prompt about being sure about making this change.
  5. Click “OK“.

Saturday, August 6, 2016

Group Policy Error: "The RPC server is unavailable."

RPC uses port 135.
  • Open the Group Policy Object Editor snap-in to edit the Group Policy object (GPO) that is used to manage Windows Firewall settings in your organization
  • Open Computer Configuration, open Administrative Templates, open Network, open Network Connections, open Windows Firewall, and then open Domain Profile.
  • In the details pane, double-click Windows Firewall: Allow remote administration exception.
  • In the Windows Firewall: Allow remote administration exception properties dialog box, on the Settings tab, click Enabled or Disabled

http://technet.microsoft.com/en-us/library/cc738900(v=ws.10).aspx

How to configure GFI Archiver to work with Microsoft Office 365

GFI Archiver can be configured to work with a Microsoft Office 365 environment.

This article lists basic steps required to setup Office 365 and GFI Archiver from a high level point of view. For more detailed steps, please refer to the GFI Archiver and Office 365 Deployment Guide.

Setup 1: Setting up Microsoft Office 365 and GFI Archiver integration

Step 1 - Set up a mailbox
Set up a journaling mailbox in Microsoft Office 365. This mailbox will collect a copy of all emails exchanged between your users.

Step 2 - Create Forwarding rule Create a Forwarding / BCC rule in Microsoft Office 365. By creating this rule, you make sure that a copy of every email sent by your users is copied to the journaling mailbox that was set up in Step 1.

Step 3 - Identify server connection information
In Microsoft Office 365, locate the connection settings and take a note of them. These settings are required by GFI Archiver for Exchange Online setup.

Step 4 - Verify directory service details
Verify that directory service details are set up correctly according to the following article: http://go.gfi.com/?pageid=mar_directoryservicesettings

Step 5 - Configure GFI Archiver
Configure a new Mail server to archive with EWS connection in GFI Archiver. Here you specify the connection settings identified in Step 3.

Step 6 - Test your setup
Test the integration of GFI Archiver with Microsoft Office 365.

Setup 2: Setting up Microsoft Office 365 and GFI Archiver integration using a 3rd Party Journaling Mailbox

Step 1 - Setting up a 3rd Party Journaling Mailbox
Set up a 3rd party email account as a Journaling Mailbox in Microsoft Office 365. All emails exchanged between your users will be forwarded to this mailbox.

Step 2 - Configuring Forwarding Rule for an External Mailbox
Create a journaling rule in Exchange Online that will forward a copy of all emails to the 3rd party journaling mailbox configured in Step 1.

Step 3 - Verify directory service details
Verify that directory service details are set up correctly according to the following article: http://go.gfi.com/?pageid=mar_directoryservicesettings

Step 4 - Configuring a new Mail Server to Archive using an external mailbox Configure a new Mail server to archive in GFI Archiver. Using this connection, GFI Archiver will archive any emails forwarded to the external journal mailbox.

Step 5 - Testing setup
Test the integration of GFI Archiver with Microsoft Office 365.     

Azure AD Connect 1.1: Forcing a Synchronization

When a new Azure Active Directory synchronization tool or a new version of an existing tool is released, there´s also a good chance the synchronization interval scheduling method changes, which again means that the way in which force a synchronization changes as well.

Guess what? This is no different for the recently released version 1.1 of the Azure AD Connect (AAD Connect) tool, which by the way brings several significant changes and improvement with it as you can read in the blog post, I link to.

With AAD Connect 1.1, we no longer have a Windows scheduled task running every 3 hour. Now the tool has a built-in scheduler, which by default performs a delta sync every 30 minutes. You can change this interval schedule, however bear in mind that 30 minutes is the lowest interval supported.

Although a synchronization now runs every 30 minutes, there may be occasions, where you still want to force a sync. To do so, you launch Windows PowerShell on the respective server on which AAD Connect has been installed and type the following to import the AAD Connect PowerShell module:

Import-Module ADSync

You check the current settings for the new scheduler, you can use the new Get-ADSyncScheduler as shown below.


To force a delta sync, you the following PowerShell command:

Start-ADSyncSyncCycle -PolicyType Delta


If you want to force an initial (full) sync, use this command:

Start-ADSyncSyncCycle -PolicyType Initial

Sunday, July 31, 2016

How to set up a multifunction device or application to send email using Office 365

You can use SMTP submission, direct send, or SMTP relay to allow a multifunction device, printer, or application to send email using Office 365 and Exchange Online.
This topic explains how to send email from devices and business applications when all of your mailboxes are in Office 365. For example:
  • You have a scanner, and you want to email scanned documents to yourself or someone else.
  • You have a line-of-business (LOB) application that manages appointments, and you want to email reminders to clients of their appointment time.
Use this article to choose the option that meets your requirements, then configure your device or application to send email:
NoteNote:
This document helps you set up email for multifunction printer devices and business applications only. If you want to set up a mobile device, such as a smart phone, or other email clients to send and receive from an Office 365 mailbox, see Settings for POP and IMAP access for Office 365 for business or Microsoft Exchange accounts.

Use your own email server to send email from multifunction devices and applications

If you have mailboxes in Office 365 and an email server that you manage (also called an on-premises email server), always configure your devices and applications to use your local network and route email through your own email server. For details about setting up your Exchange server to receive email from systems that are not running Exchange (such as a multifunction printer), see Create a Receive connector to receive email from a system not running Exchange.

How can devices and applications send email to recipients?

If all of your mailboxes are in Office 365, here are the options for sending email from an application or device:
NoteNote:
If you have already configured email for printers or devices and want to troubleshoot an issue, see the article Troubleshoot email sent from devices and business applications.
Descriptions of each method and configuration instructions follow.

Option 1 (recommended): Authenticate your device or application directly with an Office 365 mailbox, and send mail using SMTP client submission

If your device or application can authenticate and send email using an Office 365 mailbox account, this is the recommended method. The device or application sends mail using SMTP client submission. In the following diagram, the application or device in your organization’s network uses SMTP client submission and authenticates with a mailbox in Office 365.
Shows how a multifunction printer connects to Office 365 using SMTP client submission. The connection endpoint is smtp.office365.com on port 587, and the printer uses Office 365 mailbox credentials to send email to internal and external recipients.

Using SMTP client submission

To send mail using SMTP client submission, each device or application must be able to authenticate with Office 365. Each device or application can have its own sender address, or all devices can use one address, such as printer@contoso.com. If you want to send email from a third-party hosted application or service, you must use SMTP client submission. In this scenario, the device or application connects directly to Office 365 using the SMTP client submission endpoint smtp.office365.com.

Features of SMTP client submission

  • SMTP client submission allows you to send email to people in your organization as well as outside your company.
  • This method bypasses most spam checks for email sent to people in your organization. This can help protect your company IP addresses from being blocked by a spam list.
  • With this method, you can send email from any location or IP address, including your (on-premises) organization’s network, or a third-party cloud hosting service, like Microsoft Azure.

Requirements for SMTP client submission

  • Authentication: You must be able to configure a user name and password to send email on the device.
  • Mailbox: You must have a licensed Office 365 mailbox to send email from.
  • Transport Layer Security (TLS): Your device must be able to use TLS version 1.0 and above.
  • Port: Port 587 (recommended) or port 25 is required and must be unblocked on your network. Some network firewalls or ISPs block ports—especially port 25.
NoteNote:
For information about TLS, see How Exchange Online uses TLS to secure email connections in Office 365 and for detailed technical information about how Exchange Online uses TLS with cipher suite ordering, see Enhancing mail flow security for Exchange Online.

Limitations of SMTP client submission

You can only send from one email address unless your device can store login credentials for multiple Office 365 mailboxes. Office 365 imposes a limit of 30 messages sent per minute, and a limit of 10,000 recipients per day.
Set up SMTP client submission by following How to configure SMTP client submission.

Option 2: Send mail directly from your printer or application to Office 365 (direct send)

If SMTP client submission is not compatible with your business needs or with your device, consider using direct send. Direct send makes it easy to send messages to recipients in your own organization with mailboxes in Office 365.
In the following diagram, the application or device in your organization’s network uses direct send and your Office 365 mail exchange (MX) endpoint to email recipients in your organization. It's easy to find your MX endpoint in Office 365 if you need to look it up.
Shows how a multifunction printer uses your Office 365 MX endpoint to send email directly to recipients in your organization only.

Using direct send

You can configure your device to send email direct to Office 365. However, in this case, Office 365 does not relay messages for external recipients and will only deliver to your hosted mailboxes. If your device sends an email to Office 365 that is for a recipient outside your organization, the email will be rejected.
NoteNote:
If your device or application has the ability to act as a mail server and deliver to Office 365 as well as other mail providers, consult your device or application instructions; there are no Office 365 settings needed for this scenario.
There are several scenarios where direct send can be the best choice:
  • If the device or application is only sending email to your own Office 365 users and SMTP client submission is not an option, this is the simplest method as there is no Office 365 configuration needed.
  • You want your device or application to send from each user’s email address and do not want each user’s mailbox credentials configured to use SMTP client submission. Direct send allows each user in your organization to send email using their own address. When you use direct send, avoid using a single mailbox with Send As permissions for all your users. This method is not supported because of complexity and potential issues.
  • Your device or application does not meet the requirements of SMTP client submission, such as TLS support.
  • Office 365 does not allow you to send bulk email or newsletters via SMTP client submission. Direct send allows you to send a higher volume of messages. However, there is a risk of your email being marked as spam by Office 365. You might want to enlist the help of a bulk email provider to assist you. There are best practices for bulk email, and bulk email providers can help ensure that your domains and IP addresses are not blocked by others on the Internet.

Features of direct send

Direct send:
  • Uses Office 365 to send emails, but does not require a dedicated Office 365 mailbox.
  • Doesn’t require your device or application to have a static IP address. However, this is recommended if possible.
  • Doesn’t work with a connector; never configure a device to use a connector with direct send, this can cause problems.
  • Doesn’t require your device to support TLS.
Direct send has higher sending limits than SMTP client submission. Senders are not bound by the 30 messages per minute or 10,000 recipients per day limit.

Requirements for direct send

  • Port: Port 25 is required and must be unblocked on your network.
  • Static IP address is recommended: A static IP address is recommended so that an SPF record can be created for your domain. This helps avoid your messages being flagged as spam.

Limitations of direct send

  • Direct send cannot be used to deliver email to external recipients, for example, recipients with Yahoo or Gmail addresses.
  • Your messages will be subject to antispam checks.
  • Sent mail might be disrupted if your IP addresses are blocked by a spam list.
  • Office 365 uses throttling policies to protect the performance of the service.
Set up direct send by following How to configure direct send.

Option 3: Configure a connector to send mail using Office 365 SMTP relay

Office 365 SMTP relay uses a connector to authenticate the mail sent from your device or application. This allows Office 365 to relay those messages to your own mailboxes as well as external recipients. Office 365 SMTP relay is very similar to direct send except that it can send mail to external recipients. Due to the added complexity of configuring a connector, direct send is recommended over Office 365 SMTP relay, unless you must send email to external recipients. To send email using Office 365 SMTP relay, your device or application server must have a static IP address or address range. You can't use SMTP relay to send email directly to Office 365 from a third-party hosted service, such as Microsoft Azure.
In the following diagram, the application or device in your organization’s network uses a connector for SMTP relay to email recipients in your organization.
Shows how a multifunction printer connects to Office 365 using SMTP relay. The printer uses your MX endpoint and requires a connector to authenticate using your IP address. The printer can send email to internal and external recipients.

Using Office 365 SMTP relay

The Office 365 connector that you configure authenticates your device or application with Office 365 using an IP address. Your device or application can send email using any address (including ones that can't receive mail), as long as the address uses one of your Office 365 domains. The email address doesn’t need to be associated with an actual mailbox. For example, if your domain is contoso.com, you could send from an address like do_not_reply@contoso.com.

Features of Office 365 SMTP relay

  • Office 365 SMTP relay does not require the use of a licensed Office 365 mailbox to send emails.
  • Office 365 SMTP relay has higher sending limits than SMTP client submission; senders are not bound by the 30 messages per minute or 10,000 recipients per day limits.

Requirements for Office 365 SMTP relay

  • Static IP address or address range: Most devices or applications are unable to use a certificate for authentication. To authenticate your device or application, use one or more static IP addresses that are not shared with another organization.
  • Connector: You must set up a connector in Exchange Online for email sent from your device or application.
  • Port: Port 25 is required and must not be blocked on your network or by your ISP.
  • Licensing: SMTP relay doesn’t use a specific Office 365 mailbox to send email. This is why it’s important that only licensed users send email from devices or applications configured for SMTP relay. If you have senders using devices or LOB applications who don’t have an Office 365 mailbox license, obtain and assign an Exchange Online Protection license to each unlicensed sender. This is the least expensive license that allows you to send email via Office 365.

Limitations of Office 365 SMTP relay

  • Sent mail can be disrupted if your IP addresses are blocked by a spam list.
  • Reasonable limits are imposed for sending. For more information, see Higher Risk Delivery Pool for Outbound Messages.
  • Requires static unshared IP addresses (unless a certificate is used).
Set up SMTP relay by following How to configure Office 365 SMTP relay

Summary of options for sending email from a device or application

The following table will help you decide which one of these options will meet your needs. Detailed information and setup steps follow each method.


SMTP client submissionDirect sendSMTP relay
Features
Send to recipients in your domain(s)YesYesYes
Relay to Internet via Office 365YesNo. Direct delivery only.Yes
Bypasses antispamYes, if the mail is destined for an Office 365 mailbox. No. Suspicious emails might be filtered. We recommend a custom Sender Policy Framework (SPF) record.No. Suspicious emails might be filtered. We recommend a custom SPF record.
Supports mail sent from applications hosted by a third partyYesNoNo
Requirements
Open network portPort 587 or port 25 Port 25Port 25
Device or application server must support TLSRequiredOptionalOptional
Requires authenticationOffice 365 user name and password requiredNoneOne or more static IP addresses. Your printer or the server running your LOB app must have a static IP address to use for authentication with Office 365.
Limitations
Throttling limits10,000 recipients per day. 30 messages per minute.Standard throttling is in place to protect Office 365.Reasonable limits are imposed. The service can't be used to send spam or bulk mail. For more information about reasonable limits, see Higher Risk Delivery Pool for Outbound Messages.

How to configure SMTP client submission

Devices and applications vary in functionality and terminology use. However, these configuration settings will help you set up SMTP client submission.
Enter the settings directly on the device or in the application as the device guide or manual instructs. As long as your scenario meets the requirements for SMTP client submission, these settings will enable you to send email from your device or application.


Device or Application settingValue
Server/smart hostsmtp.office365.com
PortPort 587 (recommended) or port 25
TLS/ StartTLSEnabled
Username/email address and password Login credentials of hosted mailbox being used

TLS and other encryption options

Determine what version of TLS your device supports by checking the device guide or with the vendor. If your device or application does not support TLS 1.0 or above:
  • Use direct send or Office 365 SMTP relay for sending mail instead (depending on your requirements).
  • If it is essential to use SMTP client submission and your printer only supports SSL 3.0, you can set up an alternative configuration called Indirect SMTP client submission. This uses a local SMTP relay server to connect to Office 365. This is a much more complex setup. Instructions can be found here: How to configure Internet Information Server (IIS) for relay with Office 365.
NoteNote:
If your device recommends or defaults to port 465, it does not support SMTP client submission.

How to configure direct send

Devices and applications vary in functionality and terminology use. To configure direct send, enter the following settings on the device or in the application directly.


Device or application settingValue
Server/smart hostYour MX endpoint, for example, contoso-com.mail.protection.outlook.com
PortPort 25
TLS/StartTLSEnabled
Email addressAny email address for one of your Office 365 accepted domains. This email address does not need to have a mailbox.
We recommend adding an SPF record to avoid having messages flagged as spam. If you are sending from a static IP address, add it to your SPF record in your domain registrar’s DNS settings as follows:


DNS entryValue
SPFv=spf1 ip4: include:spf.protection.outlook.com ~all

Full configuration instructions for direct send

  1. If your device or application can send from a static public IP address, obtain this IP address and make a note of it. You can share your static IP address with other devices and users, but don't share the IP address with anyone outside of your company. Your device or application can send from a dynamic or shared IP address but messages are more prone to antispam filtering.
  2. Log on to the Office 365 Portal.
  3. Make sure your domain, such as contoso.com, is selected. Click Manage DNS, and find the MX record. The MX record will have a POINTS TO ADDRESS value that looks similar to cohowineinc-com.mail.protection.outlook.com, as depicted in the following screenshot. Make a note of the MX record POINTS TO ADDRESS value, which we refer to as your MX endpoint.
    Make a note of the MX record Points to address value.
  4. Check that the domains that the application or device will send to have been verified. If the domain is not verified, emails could be lost, and you won’t be able to track them with the Exchange Online message trace tool.
  5. Go back to the device, and in the settings, under what would normally be called Server or Smart Host, enter the MX record POINTS TO ADDRESS value you recorded in step 3.
  6. Now that you are done configuring your device settings, go to your domain registrar’s website to update your DNS records. Edit your sender policy framework (SPF) record. In the entry, include the IP address that you noted in step 1. The finished string looks similar to this:
    v=spf1 ip4:10.5.3.2 include:spf.protection.outlook.com ~all
    where 10.5.3.2 is your public IP address.
    NoteNote:
    Skipping this step might cause email to be sent to recipients’ junk mail folders.
  7. To test the configuration, send a test email from your device or application, and confirm that the recipient received it.

This method allows Office 365 to relay emails on your behalf by authenticating using your public IP address (or a certificate). This requires a connector to be set up for your Office 365 account. If your device or application supports or requires user name and password authentication, consider the SMTP client submission method instead. Quick configuration details follow. If you prefer full instructions, check the next section.


Device or application settingValue
Server/smart hostYour MX endpoint, e.g. yourcontosodomain-com.mail.protection.outlook.com
PortPort 25
TLS/StartTLSEnabled
Email addressAny email address for one of your Office 365 verified domains. This email address does not need a mailbox.
If you have set up Exchange Hybrid or have a connector configured for mail flow from your email server to Office 365, it is likely that no additional setup will be required for this scenario. Otherwise, create a mail flow connector to support this scenario:


Connector settingValue
FromYour organization's email server
ToOffice 365
Domain restrictions: IP address/rangeYour on-premises IP address or address range that the device or application will use to connect to Office 365.
We recommend adding an SPF record to avoid having messages flagged as spam. If you are sending from a static IP address, add it to your SPF record in your domain registrar’s DNS settings as follows:


DNS entryValue
SPFv=spf1 ip4: include:spf.protection.outlook.com ~all

  1. Obtain the public (static) IP address that the device or application with send from. A dynamic IP address isn’t supported or allowed. You can share your static IP address with other devices and users, but don't share the IP address with anyone outside of your company. Make a note of this IP address for later.
  2. Log on to the Office 365 Portal.
  3. Select Domains. Make sure your domain, such as contoso.com, is selected. Click Manage DNS and find the MX record. The MX record will have a POINTS TO ADDRESS value that looks similar to cohowineinc-com.mail.protection.outlook.com as depicted in the following screenshot. Make a note of the MX record POINTS TO ADDRESS value. You'll need this later.
    Make a note of the MX record Points to address value.
  4. Check that the domains that the application or device will send to have been verified. If the domain is not verified, emails could be lost, and you won’t be able to track them with the Exchange Online message trace tool.
  5. In Office 365, click Admin, and then click Exchange to go to the Exchange admin center.
    NoteNote:
    If you have Microsoft Office 365 Small Business Premium, see the instructions here.
  6. In the Exchange admin center, click mail flow, and click connectors.
  7. Check the list of connectors set up for your organization. If there is no connector listed from your organization's email server to Office 365, create one.
    1. To start the wizard, click the plus symbol +. On the first screen, choose the options that are depicted in the following screenshot:
      Choose from your organization's email server to Office 365
      Click Next, and give the connector a name.
    2. On the next screen, choose the option By verifying that the IP address of the sending server matches one of these IP addresses that belong to your organization, and add the IP address from step 1.
    3. Leave all the other fields with their default values, and select Save.
  8. Now that you are done with configuring your Office 365 settings, go to your domain registrar’s website to update your DNS records. Edit your SPF record. Include the IP address that you noted in step 1. The finished string should look similar to this: v=spf1 ip4:10.5.3.2 include:spf.protection.outlook.com ~all, where 10.5.3.2 is your public IP address. Skipping this step can cause email to be sent to recipients’ junk mail folders.
  9. Now, go back to the device, and in the settings, find the entry for Server or Smart Host, and enter the MX record POINTS TO ADDRESS value that you recorded in step 3.
  10. To test the configuration, send a test email from your device or application, and confirm that it was received by the recipient.

Active Directory restores: How to restore deleted objects

Windows Server 2008 and Windows Server 2008 R2 allow you to restore deleted objects back to the Active Directory. In this article, I will demonstrate an Active Directory restore with a combination of authoritative and non-authoritative techniques.

A non-authoritative restoration is a process in which the domain controller is restored, and then the Active Directory objects are brought up to date by replicating the latest version of those objects from other domain controllers in the domain.

An authoritative restore is an operation in which the data that has been restored takes precedence over the data that exists on other domain controllers in the domain. When you perform an authoritative restore, the current versions of objects in the Active Directory are overwritten by the versions of the objects which were restored.


This process works the same way regardless of how you made the backup or where the data is being restored from. The Active Directory objects that have been restored are assigned a new version number, which ensures that the Active Directory replication process will overwrite the existing Active Directory objects with the objects that have been restored. This process is completely automated and it affects all of the domain controllers in the domain.

Performing the restoration
The restoration process is performed from the command line. To begin, you’ll need to know the name of the object that you plan to restore, as well as that object’s location within the Active Directory.
Because we are restoring an object that has been previously overwritten or deleted, we will have to perform an authoritative restore. That way the item that you have restored will not be overwritten by a newer copy during the Active Directory replication process.

However, we can’t just jump right in to an authoritative restoration, because the entire Active Directory would be rolled back to a previous state and defeat the purpose of performing a granular restoration.

To keep that from happening, we’ll perform a non-authoritative restore of the entire Active Directory. After doing so, we can make the restoration authoritative for the specific object that needs to be restored.

Performing a non-authoritative restoration
There are a variety of methods for performing the initial non-authoritative restore. The easiest way to complete this process is to stop the Active Directory Domain Services and then restore a valid system state. To stop the Active Directory Domain Services you will need to open an elevated command prompt and then enter the following command:

Net Stop NTDS

As you can see in Figure A, shutting down the Active Directory Domain Services causes several other dependency services to stop as well. The dependency services that are affected by this operation include:


Figure A

Kerberos Key Distribution Center
Intersite Messaging
DNS Server
DFS Replication

Once the Active Directory Domain Services have been stopped, you can restore a System State backup. When the restoration process completes, you will likely be prompted to reboot your server. You should avoid rebooting because doing so will cause the Active Directory Domain Services to be restarted, which will cause your restoration to be overwritten.

Performing an authoritative restore
Before the server is rebooted, we need to tell Windows which Active Directory object needs to be restored authoritatively. This can be accomplished by using the NTDSUTIL utility. You can begin the process by entering the following commands:

cmd> Ntdsutil
ntdsutil: Activate Instance NTDS
ntdsutil: Authoritative Restore

Although not technically required, I recommend entering the LIST NC CRs command at this point. This command will list the various Active Directory partitions and their cross references. It allows you to validate that you are about to perform an authoritative restore within the correct Active Directory partition, as shown in Figure B.


Figure B

Now it’s time to specify the object that needs to be restored. You can do so by using the Restore Object command. For example, suppose that you wanted to restore a user account named User1 that existed in the Users container in a domain named Contoso.com. To perform such a restoration, you would use the following command:

Restore Object “CN=User1,CN=Users,DC=Contoso,DC=com”

Wrapping it up
Now that you have marked the object that needs to be restored, the only thing that is left do is to restart the Active Directory Domain Services. This can be accomplished by entering the following command:

Net Start NTDS


When the Active Directory Domain Services start, the object that you restore will be replicated to the other domain controllers in the domain.