Monday, November 30, 2009

Add or remove the Quick Launch toolbar

The Quick Launch toolbar is a section of the taskbar that contains shortcuts to frequently used programs. The Quick Launch toolbar looks like this:

Picture of the Quick Launch toolbarQuick Launch toolbar

  • Right-click an empty area on the taskbar, point to Toolbars, and then click Quick Launch.

    A check mark will appear, indicating that the Quick Launch toolbar is visible on the taskbar.

Tip

Tip

To add a program to the Quick Launch toolbar, locate the program icon for the program you want to add, and click it, and then drag it to the Quick Launch toolbar.

Desktop tips and tricks

The short time it takes you to organize your desktop can save you time and help make your computing experience simpler and more pleasant.

Move program shortcuts to the Quick Launch toolbar

Many people keep program‌ shortcuts on their desktop, but open windows can block your view of the desktop. The Quick Launch toolbar solves this problem because it is on the taskbar, which is visible even when you have windows open. For example, if you’ve added a web browser shortcut to the Quick Launch toolbar and you are working in a document, you don't have to minimize the document window to open the web browser. Instead, you can click the web browser icon on the Quick Launch toolbar.

Picture of the Quick Launch toolbar on the taskbarQuick Launch toolbar

For more information, see Add or remove the Quick Launch toolbar or Taskbar: recommended links.


Organize files and programs on the Start menu

On the Start menu, you can find shortcuts for programs you've used recently. And, if you want to keep a program shortcut in one place so you can always find it, you can pin it to the Start menu.

Picture of the Start menuStart menu

You can find files, documents, folders, and other items you've been working with recently in Recent Items on the Start menu.

To find recent items on the Start menu

  1. Click the Start button Picture of the Start button.

  2. Point to Recent Items. Files you've worked with recently should appear in the list.

For more information, see Add or remove Recent Items on the Start menu and Customize the Start menu.

Don't store files on the desktop

To improve your computer's performance and find files more easily, it's best to store files in the Documents folder rather than on the desktop.

To access files from your desktop, create a desktop shortcut instead. For more information, see Create or delete a shortcut.

Picture of the Windows desktop, without any files or shortcuts on itA clean Windows desktop can help improve your computer's performance

What are printer permissions?

Printer permissions determine which printer properties you can manage, such as renaming or sharing a printer, allowing or removing access to the printer, and determining who can manage documents or properties for the printer. Printer permissions are typically managed by the person who installed the printer or, if the printer is connected to a business or enterprise network, by a system administrator.

Permissions can be assigned to each person who uses the printer or to a group of users who have the same type of user account. Members of the administrators group on the computer, for example, have permission to manage printers by default.

Windows offers four types of printer permissions:

  1. Print. By default, each user can print and cancel, pause, or restart documents or files that they send to a printer.
  2. Manage documents. If you have this permission, you can manage all jobs for a printer that are waiting in the print queue, including documents or files that are being printed by other users. For more information, see View the print queue.
  3. Manage printers. This permission allows you to rename, delete, share, and choose preferences for the printer. It also allows you to choose printer permissions for other users and to manage all jobs for the printer. Members of the administrator group for a computer have permission to manage printers by default.
  4. Special permissions. These permissions, typically used only by system administrators, can be used to change the printer owner, if needed. The printer CREATOR OWNER is given all printer permissions and is, by default, the person who installs the printer.

Change your default printer

If more than one printer is connected to your computer, you can choose one to use by default. Choose the printer you will use most often. That way, when you print using Windows or your programs, you won't have to select a printer each time. You can change the default printer at any time and you can still select other printers for occasional print jobs.

Open Printers by clicking the Start button , clicking Control Panel, clicking Hardware and Sound, and then clicking Printers.

Right-click the printer you want to use, and then click Set as Default Printer. A check mark is displayed on the printer icon to mark it as your default printer.

Tip:
To add a shortcut to Printers on your Start menu, right-click the Start button , click Properties, and then, on the Start Menu tab, click Customize. Select the Printers check box, and then click OK.

Cancel printing

If you no longer want to print something you've already sent to a printer, you can cancel the print job—even if it's in process. If you are unable to cancel a print job using these steps, look for a cancel button or menu option on the printer itself.

To cancel a print job from the computer
You can cancel your own print jobs. To cancel another user's print job, you must have permission to manage documents on the printer. For more information, see What are printer permissions?
Open Printers by clicking the Start button , clicking Control Panel, clicking Hardware and Sound, and then clicking Printers.

Double-click the printer that you are using.
In the print queue, right-click the item that you want to stop printing, and then click Cancel.

To cancel all items in a print queue:
To cancel all print jobs for a printer, you must have permission to manage documents on the printer. For more information, see What are printer permissions?
Open Printers by clicking the Start button , clicking Control Panel, clicking Hardware and Sound, and then clicking Printers.

To open the print queue, double-click the printer you are using.
Click the Printer menu, and then click Cancel All Documents. Depending on the printer, the item currently printing might finish, but the remaining items will be cancelled.

Tips:
To quickly view which print jobs are in process, double-click the Printer icon in the notification area.

To view your printer permissions, right-click the printer that you're using, click Properties, click the Security tab, and then click your user name. If your computer is on a domain, printer permissions might be controlled by your administrator.

View the print queue

The print queue displays information about documents that are waiting to print, such as the printing status, document owner, and number of pages to print. You can use the print queue to view, pause, resume, restart, and cancel print jobs.
Open Printers by clicking the Start button , clicking Control Panel, clicking Hardware and Sound, and then clicking Printers.

To open the print queue, double-click the printer that you're using.


Tip
If your print jobs are currently printing, you can open the print queue by clicking the printer icon in the notification area.

Start a Remote Desktop Session

Start a Session
Once you have enabled your Windows XP Professional computer to allow remote connections, and installed client software on a Windows-based client computer, you are ready to start a Remote Desktop session. You must first establish a virtual private network connection or remote access service connection from your client computer to your office network, or host computer.
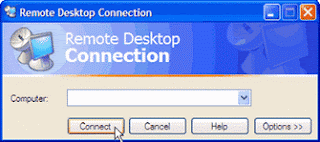
To create a new Remote Desktop Connection
1. Open Remote Desktop Connection. (Click Start, point to Programs or All Programs, point to Accessories, point to Communications, and then click Remote Desktop Connection.)
2. In Computer, type the computer name for your computer running Windows XP Professional that has Remote Desktop enabled and for which you have Remote Desktop permissions.

Tip: To find the computer name, right-click the My Computer icon on your desktop, click Properties, and then click the Computer Name tab.

3. Click Connect.
The Log On to Windows dialog box appears.
4. In the Log On to Windows dialog box, type your user name, password, and domain (if required), and then click OK. The Remote Desktop window will open and you will see the desktop settings, files, and programs that are on your office computer. Your office computer will remain locked. Nobody will be able to work at your office computer without a password, nor will anyone see the work you are doing on your office computer remotely.

Note To change your connection settings, (such as screen size, automatic logon information, and performance options), click Options before you connect.

To open a saved connection
1. In Windows Explorer, open the My Documents\Remote Desktops folder.
2. Click the .Rdp file for the connection you want to open.
Note A Remote Desktop file (.rdp) file contains all of the information for a connection to a remote computer, including the Options settings that were configured when the file was saved. You can customize any number of .rdp files, including files for connecting to the same computer with different settings. For example, you can save a file that connects to MyComputer in full screen mode and another file that connects to the same computer in 800x600 screen size. By default, .rdp files are saved in the My Documents\Remote Desktops folder. To edit an .rdp file and change the connections settings it contains, right-click the file and then click Edit.

To log off and end the session
1. In the Remote Desktop Connection window, click Start, and then click Shut Down.The Shut Down Windows dialog box appears.
2. In the drop-down menu, select Log Off , and then click OK.