Saturday, August 19, 2023

MTBF, MTTF, MTTR and Risk Management


Risk management is the practice of identifying, monitoring, and limiting risks to a manageable level. It doesn’t eliminate risks, but instead identifies methods to limit or mitigate them. The amount of risk that remains after managing risk is residual risk.

Senior management is ultimately responsible for residual risk—the amount of risk that remains after mitigating risk. Management must choose a level of acceptable risk based on the organization’s goals.  They use a variety of tools and metrics to identify the risks, and then decide what resources (such as money, hardware, and time) to dedicate to manage the risk.

Some of the common metrics they use are:

  • Mean time between failures (MTBF)
  • Mean time to failure (MTTF)
  • Mean time to recover (MTTR)

What is Failure?

These metrics are important to understand when evaluating the failure rate of critical business systems. Typically, a critical business system will have multiple redundancies in place to ensure it stays operational even after a fault occurs. In other words, critical systems can tolerate faults without actually failing.

If a server has one hard drive, and the one hard drive fails, the server fails. This is a system failure.

However, if a server has a redundant array of independent disks 6 (RAID- 6), and one drive fails, the server continues to operate. This is not a system failure.

Mean Time Between Failures (MTBF)

The mean time between failures (MTBF) metric provides a measure of a system’s reliability and is usually represented in hours. More specifically, the MTBF identifies the average (the arithmetic mean) time between failures.

Higher MTBF numbers indicate a higher reliability of a product or system. Administrators and security experts attempt to identify the MTBF for critical systems with a goal of predicting potential outages.

Mean Time to Failure (MTTF)

The mean time to failure (MTTF) is the length of time you can expect a device to remain in operation before it fails. It is similar to MTBF, but the primary difference is that “between” in the MTBF metric indicates you can repair the device after it fails.

In contrast, the MTTF metric indicates that you will not be able to repair a device after it fails. It is permanent. For example, the MTTF of a power supply within a server indicates how long the power supply may last before it fails and needs to be replaced.

Mean Time to Recover (MTTR)

The mean time to recover (MTTR) identifies the average (the arithmetic mean) time it takes to restore a failed system. In some cases, people interpret MTTR as the mean time to repair, and both mean essentially the same thing.

Organizations that have maintenance contracts, such as service level agreements (SLEs), often specify the MTTR as a part of the contract. The supplier agrees that it will, on average, restore a failed system within the MTTR time.

The MTTR does not provide a guarantee that the supplier will restore the system within the MTTR every time. Sometimes it may take a little longer and sometimes it may be a little quicker, with the average defined by the MTTR.

MTBF, MTTF, MTTR Summary

As a short summary these metrics are:

  • Mean time between failure (MTBF) –  provides a measure of a system’s reliability and identifies the average time between failures. It is often used to predict potential outages with critical systems.
  • Mean time to failure (MTTF) – the length of time you can expect a device to remain in operation before it fails. It indicates failure is permanent, while MTBF indicates it can be repaired.
  • Mean time to repair (MTTR) – the average time it takes to restore a failed system.

mtbf


Monday, July 24, 2023

High Availability Storage

RAID Concepts


The acronym RAID stands for Redundant Array of Inexpensive Disks and is a technology that provides increased storage functions and reliability through redundancy. It was developed using a large number of low cost hard drives linked together to form a single large capacity storage device that offered superior performance, storage capacity and reliability over older storage systems. This was achieved by combining multiple disk drive components into a logical unit, where data was distributed across the drives in one of several ways called "RAID levels".
This concept of storage virtualization and was first defined as Redundant Arrays of Inexpensive Disks but the term later evolved into Redundant Array of Independent Disks as a means of dissociating a low-cost expectation from RAID technology.
There are two primary reasons that RAID was implemented:
  • Redundancy: This is the most important factor in the development of RAID for server environments. A typical RAID system will assure some level of fault tolerance by providing real time data recovery with uninterrupted access when hard drive fails;

  • Increased Performance: The increased performance is only found when specific versions of the RAID are used. Performance will also be dependent upon the number of drives used in the array and the controller;

Hardware-based RAID


When using hardware RAID controllers, all algorithms are generated on the RAID controller board, thus freeing the server CPU. On a desktop system, a hardware RAID controller may be a PCI or PCIe expansion card or a component integrated into the motherboard. These are more robust and fault tolerant than software RAID but require a dedicated RAID controller to work.

Hardware implementations provide guaranteed performance, add no computational overhead to the host computer, and can support many operating systems; the controller simply presents the RAID array as another logical drive

Software-based RAID


Many operating systems provide functionality for implementing software based RAID systems where the OS generate the RAID algorithms using the server CPU. In fact the burden of RAID processing is borne by a host computer's central processing unit rather than the RAID controller itself which can severely limit the RAID performance.

Although cheap to implement it does not guarantee any kind of fault tolerance; should a server fail the whole RAID system is lost.

Hot spare drive


Both hardware and software RAIDs with redundancy may support the use of hot spare drives, a drive
physically installed in the array which is inactive until an active drive fails. The system then automatically replaces the failed drive with the spare, rebuilding the array with the spare drive included. This reduces the mean time to recovery (MTTR), but does not completely eliminate it. Subsequent additional failure(s) in the same RAID redundancy group before the array is fully rebuilt can result in data loss. Rebuilding can take several hours, especially on busy systems.


Standard RAID Levels


RAID 0


Striped Disk Array without Fault Tolerance: Provides data striping spreading out blocks of each file across multiple disk drives, the data is broken down into blocks and each block is written to a separate disk drive therefore I/O performance is greatly improved by spreading the I/O load across many channels and drives. This is not a true RAID because it doesn't provide any redundancy and it is not fault-tolerant; the failure of just one drive will result in all data in an array being lost.

RAID 0 can only be used for tasks requiring fast access to a large capacity of temporary disk storage (such as video/audio post-production, multimedia imaging, CAD, data logging, etc.) where in case of a disk failure, the data can be easily reloaded without impacting the business.


RAID 0 offers low cost and maximum performance and there are also no cost disadvantages as all available drives are used.

RAID 1


Mirroring and Duplexing: Provides disk mirroring allowing for twice the read transaction rate of single disks and the same write transaction rate as single disks. The transfer rate per block is equal to that of a single disk providing 100% redundancy of data which means no rebuild is necessary in case of a disk failure, just copy to the replacement disk.


RAID 1 provides cost-effective and high fault tolerance however it has the highest disk overhead of all RAID types because the usable capacity is 50% of the available drives in the RAID set.

RAID 2


Error Correcting Coding: Not a typical implementation and rarely used, RAID 2 stripes data at the bit level rather than the block level writing each bit of data word to a data disk drive (4 in this example: 0 to 3).


Each data word has its Hamming Code ECC word recorded on the ECC disks. Upon read, the ECC code verifies correct data or corrects single disk errors. It has  "On the fly" data error correction allowing for extremely high data transfer rates. However it is not used anymore because all modern disks have built in error correction.

RAID 3


Bit-Interleaved Parity (or Parallel Transfer With Parity) : The data block is subdivided ("striped"), providing byte-level striping, and written on the data disks while stripe parity is written on a dedicated parity disk.


This level, which cannot service simultaneous multiple requests, also is rarely used.

RAID 4


Dedicated Parity Drive: Level 4 provides block-level striping (like Level 0) with a parity disk. Each entire block is written onto a data disk. Parity for same rank blocks is generated on Writes, recorded on the parity disk and checked on Reads If a data disk fails, the parity data is used to create a replacement disk.


A disadvantage to Level 4 is that the parity disk can create write bottlenecks because parity has to be systematically updated.

RAID 5


Block Interleaved Distributed Parity: Provides data striping at the byte level and also stripe error correction information. Data is striped across all of the drives in the array, but for each stripe through the array (one stripe unit from each disk) one stripe unit is reserved to hold parity data calculated from the other stripe units in the same stripe. This results in excellent performance and good fault tolerance. Level 5 is one of the most popular implementations of RAID.


The RAID 5 parity requires one disk drive per RAID set, so usable capacity will always be one disk drive less than the number of available disks.

RAID 6


Independent Data Disks with Double Parity: Provides block-level striping with parity data distributed across all disks. To prevent data loss, a second set of parity information is added; using the stripes of parity information already created, the controller can generate another parity set.


RAID 6 provides an extremely high data fault tolerance and can sustain multiple simultaneous drive failures.

Non Standard RAID Levels


There are several non-standard RAID levels but some of them are proprietary systems develop and sold only by a single company. Here are the most common ones:

RAID 0+1


Mirror of Stripes: RAID 0+1 is implemented as a mirrored array whose segments are RAID 0 arrays. Used for both replicating and sharing data among disks.


Can sustain a single drive failure causing the whole array to become, in essence, a single RAID 0 array. It is very expensive with a high overhead.

RAID 10


Stripe of Mirrors: RAID 10 is implemented as a striped array whose segments are RAID 1 mirrors. This level provides the improved performance of striping while still providing the redundancy of mirroring. RAID 10 has the same fault tolerance as RAID level 1; up to one disk of each sub-array may fail without causing loss of data.


This level has the same overhead as mirroring alone so the usable capacity of RAID 10 is 50% of available disk drives making it very expensive.

RAID 50


RAID 50 comprises RAID 0 striping across lower-level RAID 5 arrays. High data transfer rates are achieved thanks to its RAID 5 array segments while the spanned RAID 0 allows the incorporation of many more disks into a single logical drive. RAID 50 is more fault tolerant than RAID 5 but has twice the parity overhead thus making it very expensive to implement.


Most current RAID 50 implementation is illustrated above. Failure of two drives in one of the RAID 5 segments renders the whole array unusable but the whole set can sustain the failure of one disk in each sub set without data loss.


Friday, June 30, 2023

Quick Assist is not in Administrator Mode by Default. Two Methods to enable Administrator Mode.

 Quick Assist is widely used to offer remote assistance to a remote computer. If you have ever encountered Quick Assist black screen admin when trying to run a program as an administrator, keep reading to realize two methods to go into Quick Assist administrator mode.

Method 1. Disable PromptOnSecureDesktop using Registry

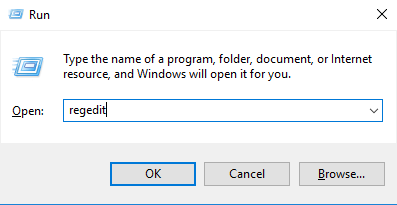
Step 1. Press Win + R to invoke the Run dialog box, then type in “regedit” and press OK to open Registry.

Run Box Regedit

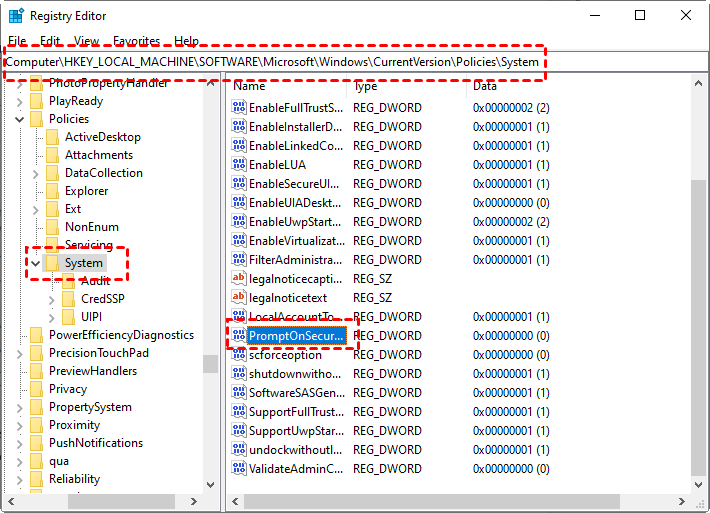
Step 2. Navigate to: Computer > HKEY_LOCAL_MACHINE > SOFTWARE > Microsoft > Windows > CurrentVersion > Policies > System. On the right pane, find and double-click PromptOnSecureDesktop.

Prompt on Secure Desktop

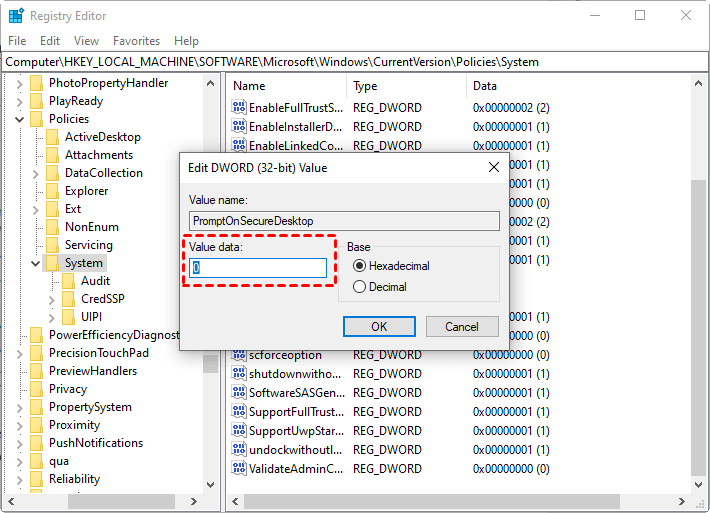
Step 3. Change its value data to 0 to disable it.

Prompt on Secure Desktop Value Data

Method 2. Disable User Account Control in Group Policy

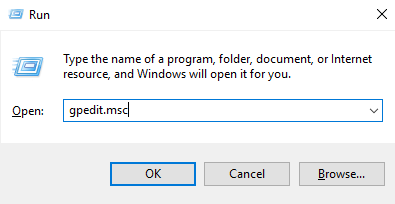
Step 1. Press Win + R to open the run dialog box, and type in “gpedit.msc” to open the Local Group Policy Editor.

Run Box Gpedit.msc

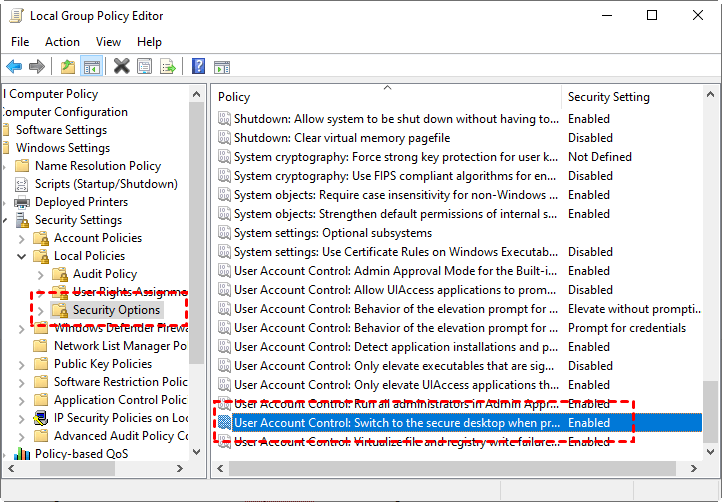
Step 2. Navigate to:  Computer Configuration > Windows Settings > Security Settings > Local Policies > Security Options. Find and double-click User Account Control: Switch to the secure desktop when prompting for elevation.

User Account Control

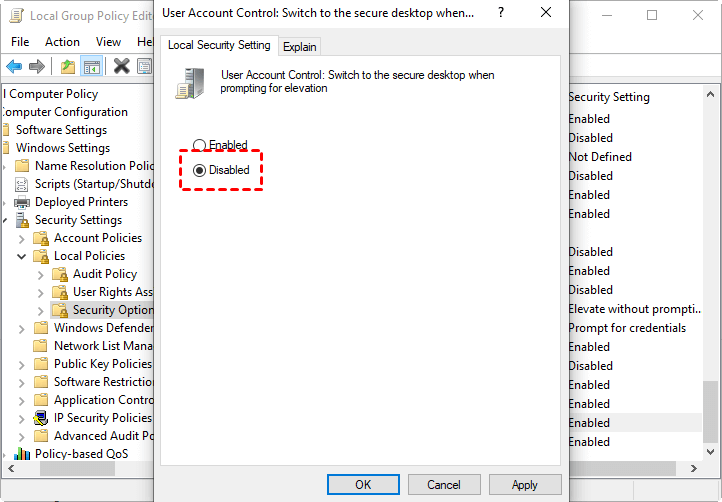
Step 3. Change its status to Disabled.

Disable User Account Control

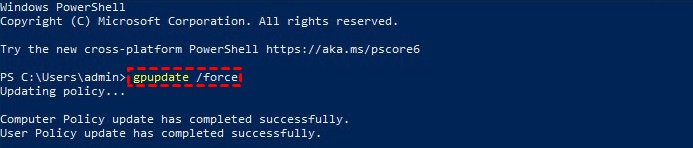
Step 4. Open Windows PowerShell and run gpupdate /force to update your computer to the latest group policy settings.

Gpupdate Force

Suppose you are using Quick Assist to provide others with remote support and can’t run programs as an administrator on their computers. In that case, we provide you with two methods to help you go into Microsoft Quick Assist administrator mode. But pay attention; disabling these two policies would also be a big security risk. So please do it after careful consideration.

Tuesday, June 20, 2023

What is a Proxy Server and How Does it Work?


What is a Proxy Server?

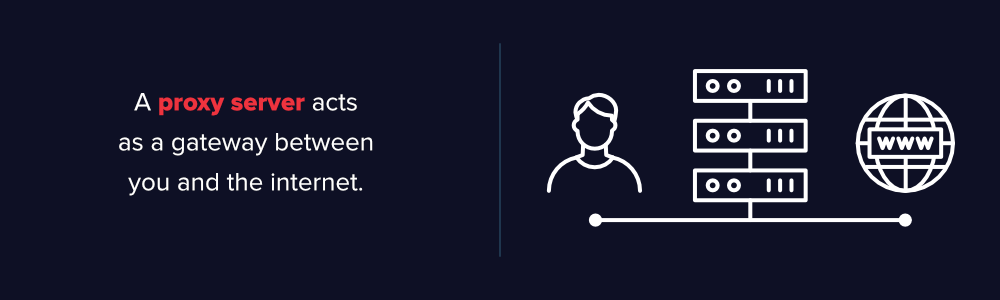
A proxy server acts as a gateway between you and the internet. It’s an intermediary server separating end users from the websites they browse. Proxy servers provide varying levels of functionality, security, and privacy depending on your use case, needs, or company policy.

If you’re using a proxy server, internet traffic flows through the proxy server on its way to the address you requested. The request then comes back through that same proxy server (there are exceptions to this rule), and then the proxy server forwards the data received from the website to you.

what is a proxy server

If that’s all it does, why bother with a proxy server? Why not just go straight from to the website and back?

Modern proxy servers do much more than forwarding web requests, all in the name of data security and network performance. Proxy servers act as a firewall and web filter, provide shared network connections, and cache data to speed up common requests. A good proxy server keeps users and the internal network protected from the bad stuff that lives out in the wild internet. Lastly, proxy servers can provide a high level of privacy.

How Does a Proxy Server Operate?

Every computer on the internet needs to have a unique Internet Protocol (IP) Address. Think of this IP address as your computer’s street address. Just as the post office knows to deliver your mail to your street address, the internet knows how to send the correct data to the correct computer by the IP address.

A proxy server is basically a computer on the internet with its own IP address that your computer knows. When you send a web request, your request goes to the proxy server first. The proxy server then makes your web request on your behalf, collects the response from the web server, and forwards you the web page data so you can see the page in your browser.

When the proxy server forwards your web requests, it can make changes to the data you send and still get you the information that you expect to see. A proxy server can change your IP address, so the web server doesn’t know exactly where you are in the world. It can encrypt your data, so your data is unreadable in transit. And lastly, a proxy server can block access to certain web pages, based on IP address.

Why Should You Use a Proxy Server?

There are several reasons organizations and individuals use a proxy server.

  • To control internet usage of employees and children: Organizations and parents set up proxy servers to control and monitor how their employees or kids use the internet. Most organizations don’t want you looking at specific websites on company time, and they can configure the proxy server to deny access to specific sites, instead of redirecting you with a nice note asking you to refrain from looking at said sites on the company network. They can also monitor and log all web requests, so even though they might not block the site, they know how much time you spend cyberloafing.
  • Bandwidth savings and improved speeds: Organizations can also get better overall network performance with a good proxy server. Proxy servers can cache (save a copy of the website locally) popular websites – so when you ask for www.varonis.com, the proxy server will check to see if it has the most recent copy of the site, and then send you the saved copy. What this means is that when hundreds of people hit www.varonis.com at the same time from the same proxy server, the proxy server only sends one request to varonis.com. This saves bandwidth for the company and improves the network performance.
  • Privacy benefits: Individuals and organizations alike use proxy servers to browse the internet more privately. Some proxy servers will change the IP address and other identifying information the web request contains. This means the destination server doesn’t know who actually made the original request, which helps keeps your personal information and browsing habits more private.
  • Improved security: Proxy servers provide security benefits on top of the privacy benefits. You can configure your proxy server to encrypt your web requests to keep prying eyes from reading your transactions. You can also prevent known malware sites from any access through the proxy server. Additionally, organizations can couple their proxy server with a Virtual Private Network (VPN), so remote users always access the internet through the company proxy. A VPN is a direct connection to the company network that companies provide to external or remote users. By using a VPN, the company can control and verify that their users have access to the resources (email, internal data) they need, while also providing a secure connection for the user to protect the company data.
  • Get access to blocked resources: Proxy servers allow users to circumvent content restrictions imposed by companies or governments. Is the local sportsball team’s game blacked out online? Log into a proxy server on the other side of the country and watch from there. The proxy server makes it look like you are in California, but you actually live in North Carolina. Several governments around the world closely monitor and restrict access to the internet, and proxy servers offer their citizens access to an uncensored internet.


Now that you have an idea about why organizations and individuals use a proxy server, take a look at the risks below.

Proxy Server Risks

You do need to be cautious when you choose a proxy server: a few common risks can negate any of the potential benefits:

  • Free proxy server risks 
    • You know the old saying “you get what you pay for?” Well, using one of the many free proxy server services can be quite risky, even the services using ad-based revenue models.
    • Free usually means they aren’t investing heavily in backend hardware or encryption. You’ll likely see performance issues and potential data security issues. If you ever find a completely “free” proxy server, tread very carefully. Some of those are just looking to steal your credit card numbers.
  • Browsing history log
    • The proxy server has your original IP address and web request information possibly unencrypted saved locally. Make sure to check if your proxy server logs and saves that data – and what kind of retention or law enforcement cooperation policies they follow.
    • If you expect to use a proxy server for privacy, but the vendor is just logging and selling your data you might not be receiving the expected value for the service.
  • No encryption
    • If you use a proxy server without encryption, you might as well not use a proxy server. No encryption means you are sending your requests as plain text. Anyone who is listening will be able to pull usernames and passwords and account information really easily. Make sure whatever proxy server you use provides full encryption capability.

Types of Proxy Servers

Not all proxy servers work the same way. It’s important to understand exactly what functionality you’re getting from the proxy server and ensure that the proxy server meets your use case.

Transparent Proxy

  • A transparent proxy tells websites that it is a proxy server and it will still pass along your IP address, identifying you to the webserver. Businesses, public libraries, and schools often use transparent proxies for content filtering: they’re easy to set up both client and server-side.

Anonymous Proxy

  • An anonymous proxy will identify itself as a proxy, but it won’t pass your IP address to the website – this helps prevent identity theft and keep your browsing habits private. They can also prevent a website from serving you targeted marketing content based on your location. For example, if CNN.com knows you live in Raleigh, NC, they will show you news stories they feel are relevant to Raleigh, NC. Browsing anonymously will prevent a website from using some ad targeting techniques, but is not a 100% guarantee.

Distorting proxy

  • A distorting proxy server passes along a false IP address for you while identifying itself as a proxy. This serves similar purposes as the anonymous proxy, but by passing a false IP address, you can appear to be from a different location to get around content restrictions.

High Anonymity proxy

  • High Anonymity proxy servers periodically change the IP address they present to the web server, making it very difficult to keep track of what traffic belongs to who. High anonymity proxies, like the TOR Network, is the most private and secure way to read the internet.

Proxy servers are a hot item in the news these days with the controversies around Net Neutrality and censorship. By removing net neutrality protections in the United States, Internet Service Providers (ISP) are now able to control your bandwidth and internet traffic. ISPs can potentially tell you what sites you can and cannot see. While there’s a great amount of uncertainty around what is going to happen with Net Neutrality, it’s possible that proxy servers will provide some ability to work around an ISPs restrictions.

Monday, June 12, 2023

Browser Security Settings for Chrome, Firefox and Internet Explorer: Cybersecurity 101


Tips for Secure Browsing with Google Chrome

Chrome Settings for Private and Secure Web BrowsingThese settings can be accessed through Chrome’s “Advanced Settings” menu or by navigating to “chrome://settings/."

  • Enable phishing and malware protection: Make sure that Chrome’s phishing and malware protection feature is enabled under the “Privacy” section. This feature will warn you if a site you’re trying to visit may be phishing or contain malware.
  • Turn off instant search: The Instant search feature should be turned off for optimal security. While it offers some convenience in searching, having this feature enabled means that anything you type in the address bar is instantly sent to Google.
  • Don’t sync: Disconnect your email account from your browser under the “Personal Stuff” tab. Syncing your email account with your Chrome browser means that personal information such as passwords, autofill data, preferences, and more is stored on Google’s servers. If you must use sync, select the “Encrypt all synced data” option and create a unique passphrase for encryption.
  • Configure content settings: Click “Content settings” under the “Privacy” section and do the following:
    • Cookies: Select “Keep local data only until I quit my browser” and “Block third-party cookies and site data.” These options ensure that your cookies will be deleted upon quitting Chrome and that advertisers will not be able to track you using third-party cookies.
    • JavaScript: Select “Do not allow any site to run JavaScript.” It is widely recommended that JavaScript be disabled whenever possible to protect users from its security vulnerabilities.
    • Pop-ups: Select “Do not allow any site to show pop-ups.
    • Location: Select “Do not allow any site to track my physical location.”
  • Configure passwords and forms settings: Disable Autofill and deselect “Offer to save passwords I enter on the web” under the “Passwords and forms” section. Doing so will prevent Chrome from saving your logins, passwords, and other sensitive information that you enter into forms.

Tips for Secure Browsing with Mozilla Firefox

firefox-privacy-settingsThese settings can be accessed through the “Options” menu.

  • Configure privacy settings: Under the “Privacy” tab, complete the following steps. These measures ensure that Firefox is storing only as much of your information as it needs to function normally.
    • Select “Use custom settings for history.”
    • Deselect “Remember my browsing and download history.”
    • Deselect “Remember search and form history.”
    • Deselect “Accept third-party cookies.”
    • Set cookie storage to “Keep until I close Firefox.”
    • Select “Clear history when Firefox closes.”
  • Configure security settings: Under the “Security” tab, choose the following settings. These steps prevent Firefox from saving your passwords and keep you from visiting potentially harmful sites.
    • Verify that “Warn me when sites try to install add-ons,” “Block reported attack sites,” and “Block reported web forgeries” are all selected.
    • Deselect “Remember passwords for sites.”
  • Disable javaScript: Deselect “Enable JavaScript” under the “Content” tab. JavaScript is notorious for containing security vulnerabilities and it is recommended that users only enable it for trusted sites.
  • Enable pop-up blocking: Verify that “Block pop-up windows” is selected under the “Content” tab. This feature should be turned on by default as it protects users from unwarranted advertisements and windows.
  • Don’t sync: Avoid using Firefox Sync. By doing so you prevent Firefox from storing your logins, passwords, and other sensitive information.
  • Turn on automatic updates: Verify that “Automatically install updates” is selected in the “Update” tab under “Advanced.” Doing so will ensure that your browser receives critical security updates. Verify that “Automatically update Search Engines” is selected as well.
  • Use secure protocols: Verify that “Use SSL 3.0” and “Use TLS 1.0” are selected in the “Encryption” tab under “Advanced.”

Tips for Secure Browsing with Microsoft Internet Explorer 10

internet-explorer-privacyThese settings can be accessed through the “Internet Options” menu.

  • Configure security settings: Under the “Security” tab, do the following:
    • Set security zones: IE offers the option to configure different security settings for different “zones,” including the Internet, local intranet, trusted sites, and restricted sites. Set up the zones for Intranet, Trusted Sites, and Restricted sites to your desired security level.
    • Set Internet zone security to “Medium High” or higher. This blocks certain cookie types, enables ActiveX filtering, and implements several other default settings for increased security.
    • Disable javaScript: Click “Custom Level,” locate the “Active Scripting” setting, and select “Disable.” It is recommended that users disable JavaScript because of the high amount of vulnerabilities it contains.
  • Automatically clear history: Select “Delete browsing history on exit” under the “General” tab. Clearing your history at the end of each session helps to limit the amount of information IE saves when you browse.
  • Configure privacy settings: Under the “Privacy” tab, complete the following steps:
    • Privacy setting: Set the Internet zone privacy to “Medium High” or higher. This blocks certain cookie types to prevent sites from tracking or contacting you without your consent.
    • Location: Select “Never allow websites to request your physical location.”
    • Pop-up Blocker: Double check that Pop-up Blocker is enabled.
  • Configure Advanced Security settings: Scroll down to the “Security” section under the “Advanced” tab and do the following:
    • Ensure that all default settings are in place. If you aren’t sure, click “Restore advanced settings” before making any other changes.
    • Select “Do not save encrypted pages to disk.” This will delete files cached from HTTPS pages when the browser is closed.
    • Select “Empty Temporary Internet Files folder when browser is closed.” This prevents IE from storing your personal info (logins, passwords, activity, etc) beyond your browsing session.
    • Turn off autoComplete: The AutoComplete feature should be turned off for forms and usernames/passwords. Keeping AutoComplete turned off ensures that your sensitive information isn’t being stored unnecessarily.
  • Tracking protection: IE’s Tracking Protection feature keeps your browsing private from specified third-party websites. This feature can be accessed through IE’s “Safety” menu. In order to use Tracking Protection you will need to provide a Tracking Protection List that names all of the sites you don’t want your information being sent to. You can create a list yourself or download lists online.

Monday, May 15, 2023

How to Fix Missing UEFI Firmware Settings in Windows 10?


The UEFI BIOS is a special software program that connects your computer’s firmware to its operating system (OS). In fact, the BIOS is the first program that runs when you turn on your PC. It checks to see what hardware components your PC has, wakes the components up, and hands them over to the OS.

But while trying to open the UEFI BIOS menu, you might find that you’re unable to access the UEFI Firmware Settings. This could hinder you from fixing several system issues.

Now, if you can't find the UEFI Firmware Settings on your PC, we’ll show you how to bring them back.

Why Are the UEFI Firmware Settings Missing?

Depending on your PC’s manufacturer, you can access the UEFI BIOS settings in various ways. But if you can't locate them, you're probably wondering, "why are the UEFI Firmware Settings not showing?"

Well, if you can’t find UEFI Firmware Settings in the BIOS menu, here are some common reasons for this issue:

  • Your PC’s motherboard doesn’t support UEFI.
  • The Fast Startup function is preventing you from accessing the UEFI Firmware Settings menu.
  • Windows 10 was installed in Legacy Mode.

Let's now explore some solutions for the "Windows 10 no UEFI Firmware Settings" issue.

1. Verify That Your PC Is Equipped With UEFI

Before attempting any potential fix, you need to verify that your PC’s motherboard is equipped to support UEFI. If your PC is an older model, the chances are that the UEFI Firmware Settings are unavailable.

Here’s how to check your PC’s BIOS Mode:

  1. Press Win + R to open the Run command dialog box.
  2. Type msinfo32 and press Enter to open the System Information screen.
  3. Select System Summary on the left-hand side pane.
  4. Scroll down on the right-hand side pane and locate the BIOS Mode option. The BIOS Mode value should either be "UEFI" or "Legacy." If it's "Legacy," then you don't have UEFI Firmware Settings on your PC.


2. Bypass the Fast Startup Function

The Fast Startup function allows you to boot up your PC quickly. When enabled, the feature could cut off the delay in loading some UEFI BIOS menu options. But then this feature could also prevent you from accessing the UEFI Firmware Settings.

So, bypassing the Fast Startup function could help resolve the "UEFI Firmware Settings missing Windows 10" issue.

Here are the steps for bypassing this function:

  1. Open the Windows Start Menu and select the Power icon.
  2. Hold the Shift key and then select Shut down from the power options. This will bypass Windows 10 Fast Startup and shut down your PC completely.
  3. Finally, power on your computer again and start pressing the dedicated BIOS Setup key.

If this helps, you might consider disabling the Fast Startup feature to make the UEFI Firmware Settings easily accessible. However, bear in mind that this will mean slightly longer boot-up times.

3. Create a "Boot-to-UEFI Firmware Settings" Desktop Shortcut

Alternatively, create a desktop shortcut that forces your PC to boot directly into the UEFI Firmware Settings menu.

Here are the steps you need to follow:

  1. Right-click on a blank space on the desktop, select New, and then select Shortcut.
  2. Type shutdown /r /fw in the "Location" box and click the Next button.
  3. Pick a suitable name for the shortcut and then click Finish.
  4. Right-click on the shortcut, select Properties, and then select the Advanced button.
  5. On the next screen, check the Run as administrator box and hit OK.
  6. Select Apply > OK to apply these changes.

To use the shortcut, simply double-click on it. This should restart your PC directly into the UEFI Firmware Settings menu.

4. Change the BIOS From Legacy to UEFI by Converting MBR Disk to GPT Disk

Your Windows PC either uses a Master Boot Record (MBR) or a GUID Partition Table (GPT) disk. Even if your motherboard is equipped with UEFI capabilities, UEFI Firmware Settings won’t be accessible if your drive is equipped with an MBR disk. To resolve the issue, you’ll need to switch the BIOS from Legacy to UEFI by converting the MBR disk to a GPT disk.

Considering that you are converting a system disk, it’s best to create a system image to back up your system. In fact, it's highly advisable to consider backing up your system first since there's the potential for data loss during this process.

If you know that your partition is the MBR-type and your system can boot from UEFI, then you’re ready. You can go ahead with converting your drive to GPT format.

Otherwise, here’s how you can check whether your PC is equipped with an MBR or GPT disk:

  1. Press Win + R to open the Run command dialog box.
  2. Type diskmgmt.msc and click Enter to open the Disk Management window.
  3. Right-click on Disk 0 (or the disk that contains the Windows installation) and select Properties.


Click the Volumes tab in the Properties screen. Next, look for the Partition style option under Disk Information.


If the partition style is GUID Partition Table (GPT), then there’s no need to continue with the MBR-to-GPT disk conversion.

5. Clear the CMOS Settings to Restore the Default BIOS Settings

But before clearing the CMOS settings, you have to locate the CMOS battery and jumpers through these steps:

  1. Turn off your computer and unplug it from the power source.
  2. Remove the bottom cover of your PC and look for the CMOS battery and jumpers on the motherboard.
  3. To easily locate the CMOS battery, look for a “CLR CMOS” reading on the motherboard. The battery should be somewhere near this reading.
  4. Next, locate the jumpers. Usually, you’d find three pins where the CMOS jumpers are located. The jumpers will be located on only two of the three pins.

Now, let's check out how to clear the CMOS settings:

  1. If the CMOS jumpers are on the first and second pins, temporarily shift them to the second and third pins. If your motherboard has only two pins, the jumpers will likely be plugged into one pin. In this case, temporarily plug the jumpers on both pins.
  2. Next, remove the CMOS battery from its slot. From there, wait for about 15 seconds and then put it back on.
  3. Move the CMOS jumpers back to their original pins.
  4. Put the computer cover back on, plug in your computer, and then power it on. This should resolve the "no UEFI Firmware Settings" error.

On more advanced motherboards, you’ll find a designated button for resetting the CMOS settings. This will be labeled “CMOS,” “CMOS_SW,” or something similar. You can reset the CMOS settings by pressing this button and holding it down for a few seconds.

Wednesday, April 19, 2023

How to disable the creation of .DS_Store files for Mac users’ folders?


On Macs, the .DS_Store (Desktop Services Store) files are created by the Finder for each folder and contain the metadata associated with each folder–namely, the size and orientation of icons, background images, and so on. This helps to retain settings configured for a particular folder, for example, setting the Desktop folder to view the icons sorted by name, while configuring the Downloads folder to display files as a list and sorted by date with the most recent displayed first.

.DS_Store files are hidden by the system, as only the Finder uses this metadata to display your folder settings correctly; however, anyone who has enabled the viewing of hidden files or works within server shares where other users also access data will tell you that each folder an Apple user touches will have one of these special .DS_Store files created for it.

 If you or your server admin become frustrated by the seemingly endless creation of these files, there is a quick and easy way to turn off the creation of .DS_Store files–execute the following command in Terminal:


defaults write com.apple.desktopservices DSDontWriteNetworkStores true

After the command is executed, reboot your Mac, and you’ll be good to go–no more .DS_Store files gunking up your system’s folders. If you need to set certain folders a particular way and want to reenable the creation of these files, the fix is just as simple–enter the command below and reboot your system once it’s executed:


defaults write com.apple.desktopservices DSDontWriteNetworkStores false

Note: The change is considered a per-user modification, so if you’re in a corporate environment with multiple Apple users, this command must be performed from each user’s account when logged on with their profile. This may be scripted out and run by your IT department as a logon script or as part of ongoing maintenance routine tasks through Apple Remote Desktop (ARD) or other third-party management suites.