Press the Windows key and R to open the Run dialog box, enter wsreset.exe, then select OK.
A blank Command Prompt window will open, and
after about ten seconds the window will close. You can close the
Microsoft Store window.
If OneDrive is still not syncing, press the Windows key and R again.
Copy this and paste it into the dialog window, then press OK. %localappdata%\Microsoft\OneDrive\onedrive.exe /reset
If you see a "Windows cannot find..." message, copy and paste this instead, then press OK. C:\Program Files\Microsoft OneDrive\onedrive.exe /reset
If you see a "Windows cannot find..." message, copy and paste this instead, then press OK. C:\Program Files (x86)\Microsoft OneDrive\onedrive.exe /reset
Manually restart OneDrive by going to Start , type OneDrive in the search box, and then click on the OneDrive desktop app.
At the toolbar on the top of the screen, press Go and then “Connect to Server…“.
In the address bar, enter smb://SERVER-IP/SHARE and click Connect. We can also select the plus at the bottom to save this information if we need to reconnect.
Enter the login to connect to the SMB share.
Here we can see our SMB share is connected, and we can create a folder.
These days, there are three types of drive you can find in the computer.
Hard disk drive
(HDD) is a classic device with a magnetic spinning disk inside. These
drives were first introduced in 1956, and are widely used until now.
They perform read and write operations with a magnetic head, and can
also retrive data in random-access order.
Solid-state drive
(SSD) is a modern type of drives which has no rotating parts. It is
like a huge flash drive with a controller that operates the data
transfer. The information will be written into special memory cells.
Obviously, SSD work much faster than HDDs and produce no noise. Classic
SSDs are often interchangable with HDDs.
Non-Volatile Memory Express
(NVMe) is the latest version of solid state drives. They are different
from classic SSDs as they use a special interface. They are not
compatible with HDDs and Sata SSDs, yet they offer incredible data
transfer speeds. Also they are very compact in size.
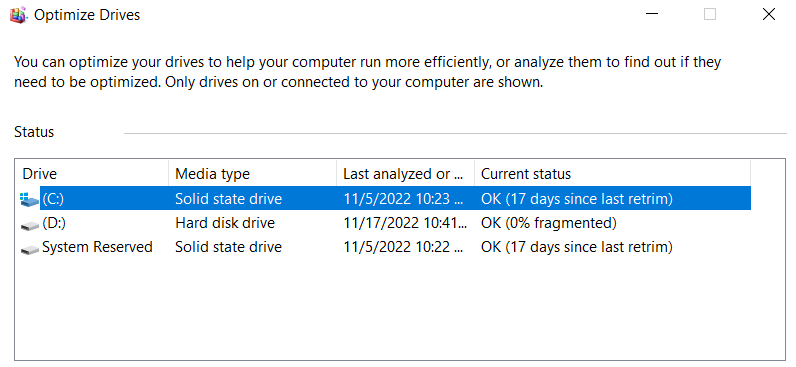
Detect SSD or HDD in the Optimize Disks tool
Right-click the Start button and select Run, or press Win + R.
Type dfrgui in the Run box and hit Enter to open the Optimize Drives tool.
In the drive list, look at the Media type column. For an SSD drive, it will say Solid state drive.
You
are done. While this method is the simplest one, it may be not that
accurate. Because Windows detects the drive type with its own tests,
including the drive speed. If it works slowly or is too new for your
Windows version, the OS may be detect it as HDD.
Another method is a PowerShell applet.
Find SSD or HDD in Windows 11 with PowerShell
Press Win + X and select Terminal (Admin) from the menu.
Ensure it opens with a PowerShell tab, and type the following command: Get-PhysicalDisk.
In the output, check out the MediaType column. It will say SSD or HDD depending on the drive type.
Finally, you can use the Task Manager app to learn about your drives.
Using Task Manager
In
Windows 11, Microsoft has updated the Task Manager with advanced
capabilities. Besides the updated look, it is able to display extra
details about your hardware.
To find the drive type with Task Manager, do the following.
Open the Task Manager app with the Ctrl + Shift + Esc shortcut.
In the app, click on the hamburger icon to see the text labels, and then click on the Performance tab.
Finally, on the Performance tab, select the disk. You will see if it is SSD or HDD in a note below the partition names.
Also,
you can try to look on the Internet for technical specification of your
drive. There, you will find a lot of information about it, including
its type. But first you have to learn its model.
Find drive type by its model
First
of all, you need to find the drive model. You can find it either in
Device Manager, Task Manager, or System Information tool.
Task Manager
In Task Manager (Ctrl + Shift + Esc), the Disks tab on the Performance page shows the drive model.
Device Manager
Right-click the Start button in the taskbar and select Device Manager from the menu.
Expand the storage section.
Write down the drive model.
Using System Information tool
Press Win + R and enter msinfo32 in the Run dialog.
In the left pane, expand the tree to Components > Storage > Disks.
Look for the drive model in the right and select it.
Press Ctrl + C to copy the drive model to the clipboard.
Now,
when you know the drive model, do a web search with Google or Bing
using the model words as a keyword. On the vendor's website or some
reputable hardware resource you will find all the information about the
drive, including its type. I.e. it will show if it is SSD, NVMe, or HDD.
Now, when you know how to find if you have SSD or HDD, let's look how to differentiate NVMe for SATA SSD.
Find out NVMe in Windows 11
Press Win + I to open Settings.
Go to the System > Storage page and click on the Disks and Volumes option under Advanced storage settings.
3. On the next page, click on the Properties button next to the drive name.
4. The properties page will show the NVMe line for the Bus type. Otherwise, you will see SATA.
You are done!
Note:
On some devices, NVMe is reported as 'RAID'. It must be the driver
which reports the interface type to the OS. It is also reported as RAID
in third-party tools reviewed in the next chapter. Keep this in mind.
For the completeness' sake, let's review a couple of alternative methods you can use for finding out NVMe in Windows 11.
Find if you have NVMe in Disk Properties
Right-click the Start button and select Device Manager.
2. In Device Manager, expand the Disk drives category on the left.
3. Double-click the drive to open its properties.
4. In the Properties window, switch to the Details tab.
5. In the Property drop-down list, select Hardware Ids.
6. In the Value list, check out the list entries. It should include "NMVe" for NVMe drives.
There are many ways to enter Safe Mode, but here are the three easiest.
Using the Power icon
If you're signed in:
1. Click the Windows icon in the bottom-left corner.
2. Holding down the Shift key, click the Power icon and then Restart.
Hold down the Shift button as you click "Restart."
3. Your computer will restart, and then open onto a blue screen titled Choose an option. Select Troubleshoot, and then Advanced options.
Choose "Troubleshoot" on the Choose an option screen.
Dave Johnson/Business Insider
4. Click Startup Settings, and then Restart. Your computer will turn off and on again.
Choose "Startup Settings" and then click
Restart to get to the final selection menu for Safe Mode.
5. Once the screen comes back, you'll be given a few options. Press 4 to start your computer in Safe Mode, or 5 to start Safe Mode with internet access.
Enable Safe Mode with or without internet access.
If you're not signed in, do the same thing, but click the Power icon on the sign-in page.
Using the Settings app
1. Open the Settings app by pressing the Windows key + I.
2. Click Update & Security, and then Recovery.
3. On this page, underneath Advanced startup, click Restart now.
Click "Restart now" to get to Safe Mode.
4. Your computer will restart onto the Choose an option screen. Here, click Troubleshoot, and then Advanced options.
5. Select Startup Settings and then Restart.
6. When your computer boots back up, you'll be given some startup options. Here, press 4 to start your computer in Safe Mode, or 5 to start Safe Mode with internet access.
Holding down the power button
This is the method to use if you can't boot into Windows normally.
1. Press your PC's power button to turn it on.
2. As
soon as you see something appear on the screen — probably the
manufacturer's logo — hold down the power button until the PC turns off
again.
3. Do this two more times, and then turn on your PC again. As it's starting, the words Preparing Automatic Repair will appear at the bottom of the screen. Let your PC go through this process — it should eventually boot onto the Choose an option screen.
Force-restarting your computer three times will put you into automatic repair mode.
4. On this screen, select Troubleshoot, then Advanced options, and then Startup Settings. When prompted, click Restart.
5. When the computer turns back on, press 4 to start your computer in Safe Mode, or 5 to start Safe Mode with internet access.
How to exit Safe Mode
There are two ways to exit Safe Mode.
The first — and easiest — is to just restart your computer. You can do this by holding down the power button, or by going through the Start menu.
If you've restarted your computer but it's still in Safe Mode, you should:
1. Press the Windows key + R to open the Run menu.
2. In the text box, type msconfig and press Enter.
Run should still be a usable tool in Safe Mode.
3. At the top of the System Configuration menu, click Boot.
4. Underneath Boot options, make sure that Safe boot is unchecked. Once it is, click OK and restart your computer again.
The menu you're looking for should look
like this. The button you're looking to uncheck is in the bottom left.