Microsoft Deployment Toolkit (MDT) is a powerful tool to manage Windows deployment. Although intended for corporate use, it can also make administrating a small home network easy. If you have few computers to take care off, or if you are an enthusiastic virtual machine user, MDT for sure is for you.
According to Microsoft, “Microsoft Deployment Toolkit provides a unified collection of tools, processes, and guidance for automating desktop and server deployments“.
In this tutorial, I will show how to set up MDT and use its Lite-Touch Installation (LTI) feature in workgroup or domain environments to deploy, repair, update and upgrade Windows 10. For advanced users, it might occasionally look like something for beginners only, my intention being to make instructions as clear and easy to follow as possible. However, I think that there might be a tip or two also for you advanced geeks.
I will use following terms about different computers:
| MDT Workbench | The PC on which the MDT is installed |
| Reference | The PC used to capture a custom image |
| Target | The PC on which Windows will be deployed |
All computers can be either physical devices or virtual machines, and they must be connected to network. Notice that reference device is only needed if you want to capture and deploy a custom image. if you will only deploy basic Windows directly from a Microsoft Windows image without customizations, reference device will not be needed
1.1) The Windows Assessment and Deployment Kit (ADK) and Windows PE add-on for the ADK must be installed before you can use MDT. Download and install both, installing ADK first:
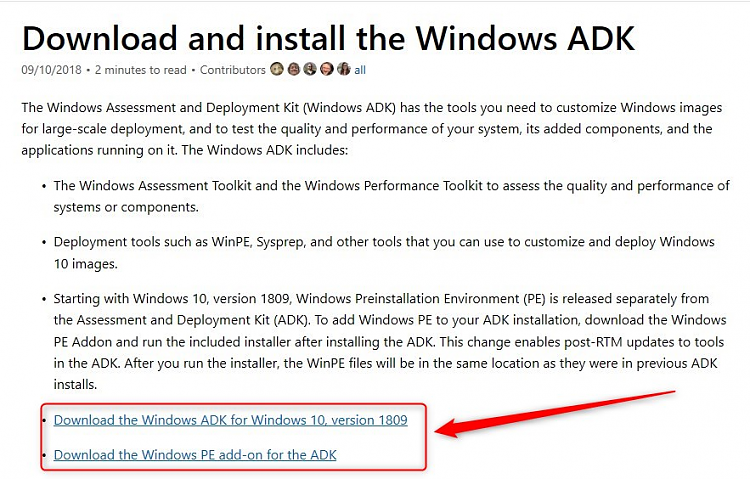
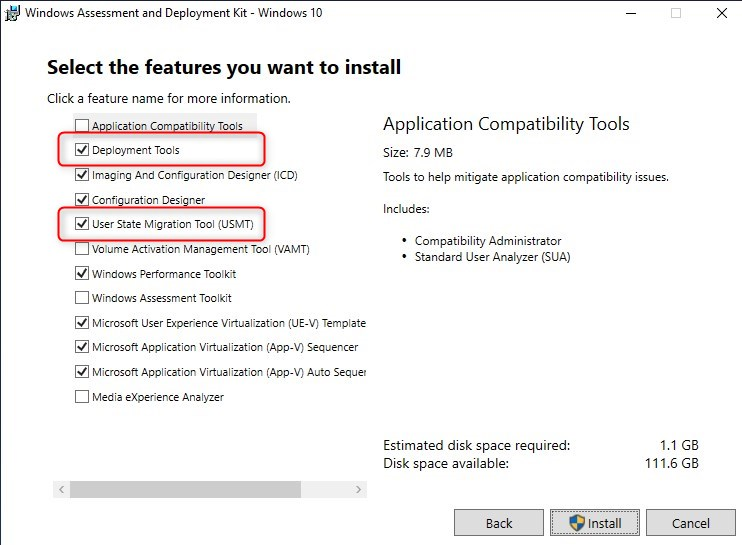
1.2) I recommend that you accept all defaults when installing ADK, although for MDT, we only need Deployment Tools and User State Migration Tool:
Windows PE addon does not let to choose what to install, you must accept all 5+ GB of it.
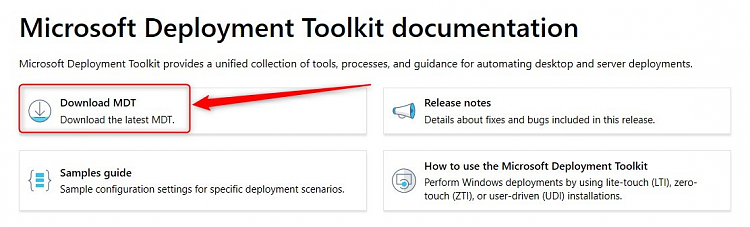
1.3) Download and install MDT:
1.4) Run MDT Deployment Workbench, you can find it in Start > M > Microsoft Deployment Toolkit.

1.2) I recommend that you accept all defaults when installing ADK, although for MDT, we only need Deployment Tools and User State Migration Tool:
Windows PE addon does not let to choose what to install, you must accept all 5+ GB of it.
1.3) Download and install MDT:

1.4) Run MDT Deployment Workbench, you can find it in Start > M > Microsoft Deployment Toolkit.
 Note
NoteA Deployment Share is a folder on MDT
Workbench machine, containing everything needed to deploy Windows
(imported operating systems, scripts, boot images for target devices).
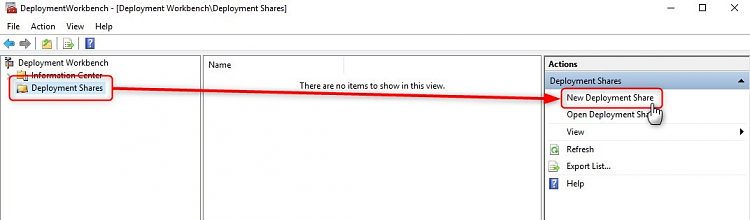
2.1) Select Deployment Shares > New Deployment Share:
2.2) Select the location and name for the deployment share folder:
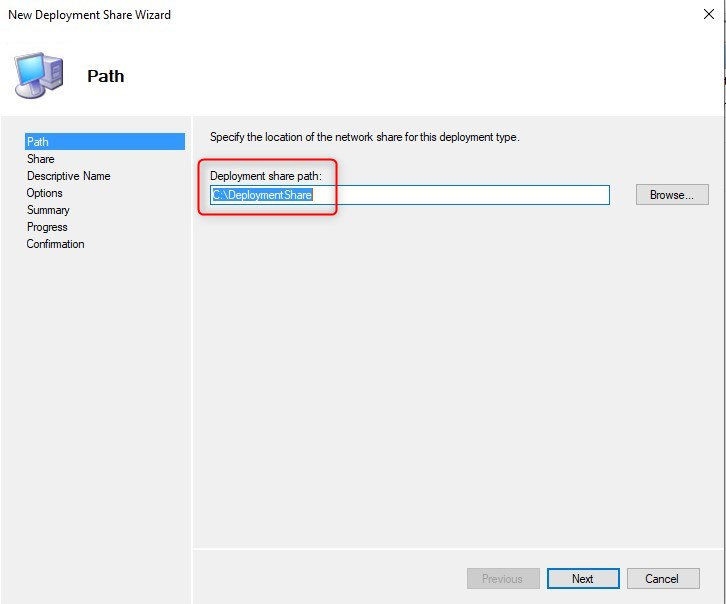
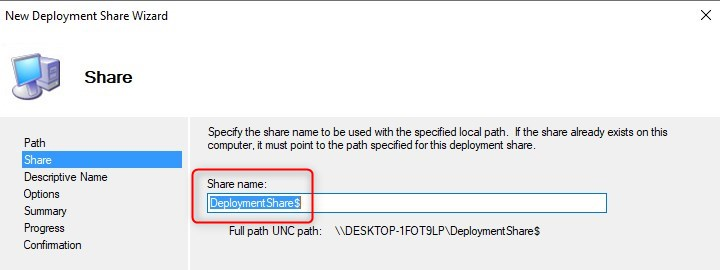
2.3) Name the share. A share name is the name the shared folder can be found on network:
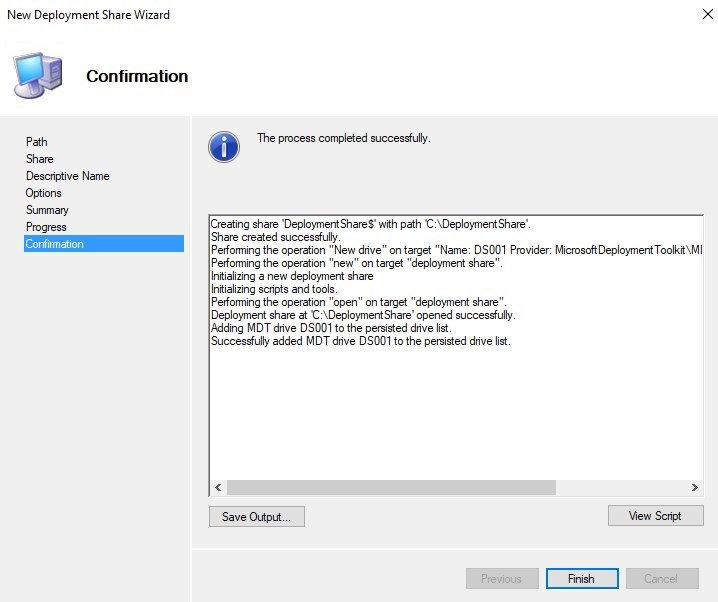
2.4) A Deployment Share will be created:

2.2) Select the location and name for the deployment share folder:
2.3) Name the share. A share name is the name the shared folder can be found on network:
2.4) A Deployment Share will be created:
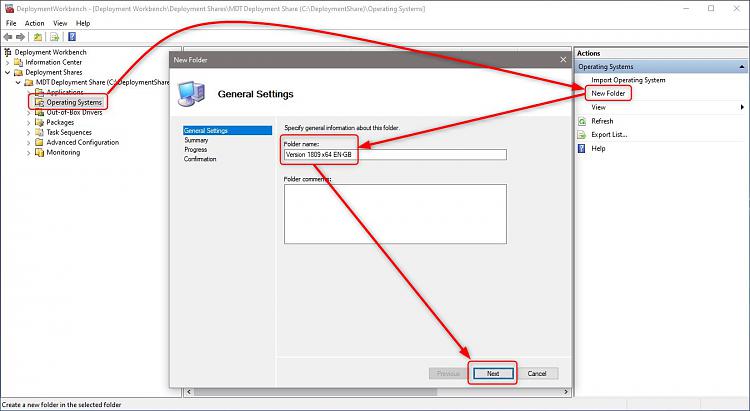
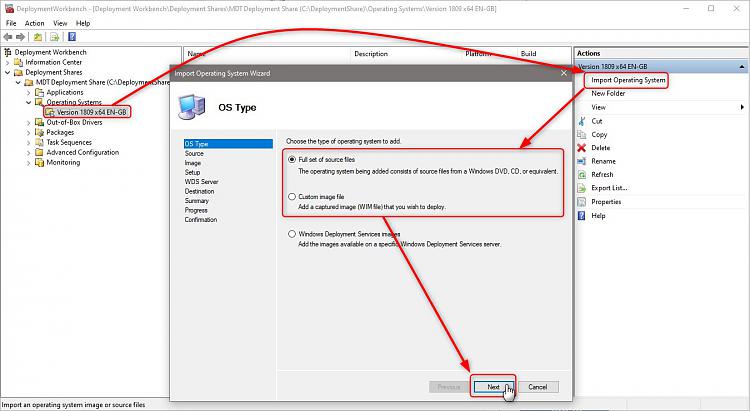
3.1) To import an operating system for deployment, mount a Windows ISO file (right click, select Mount). In Deployment Workbench, select your new Deployment Share in navigation pane, expand it and select Operating Systems. In Action pane, select New Folder. Name the folder as you wish. As I will import UK English Windows 10 x64 version 1809 ISO, I name the folder as Version 1809 x64 EN-GB:
3.2) MDT requires Windows image in a WIM file. An ISO created with Windows Media Creation Tool contains Windows image in install.esd file instead of install.wim, and therefore it cannot be used with MDT.
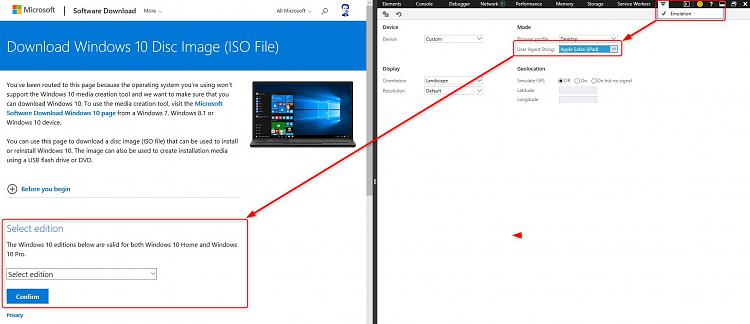
3.3) To download a WIM-based ISO, open Windows Media Creation Tool page in browser, press F12 to open developer tools, select Emulation tab, and change user agent string to Apple Safari. Wait the page to refresh. You can now download a WIM-based ISO:
3.3) Still in Operating Systems, select the new folder you created. In Action pane, select Import Operating System.
3.4) Select your source. Operating systems can be imported from a mounted ISO, DVD, USB flash drive or a folder containing Windows install files. To do this, select Full set of source files and click Next, in following page browse and select the source (mounted ISO, DVD, USB flash drive or a folder).
OS can also be imported from a WIM file, in which case select Custom image file, click Next and select your install.wim (or custom WIM) file:
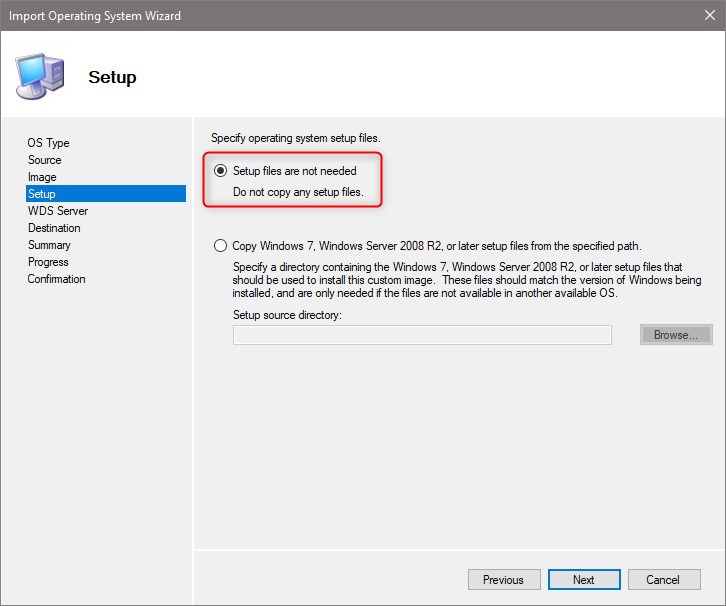
If importing OS from a WIM file, in next page select Setup files are not required (install.wim already contains everything required to setup and install Windows):
3.5) When importing an OS from a complete ISO, MDT defaults the directory name to the first edition found in that ISO. In this case, because I imported a full consumer ISO which contains all editions except Enterprise, its first edition (INDEX:1) is Windows 10 Home. You can accept this default directory name, or change it to whatever you’d prefer:
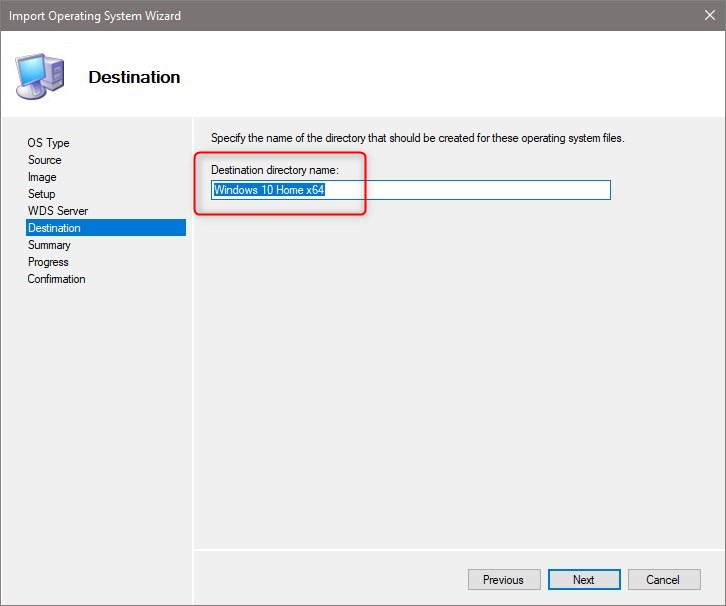
In my case now, I changed directory name to Version 1809 x64 EN-GB.
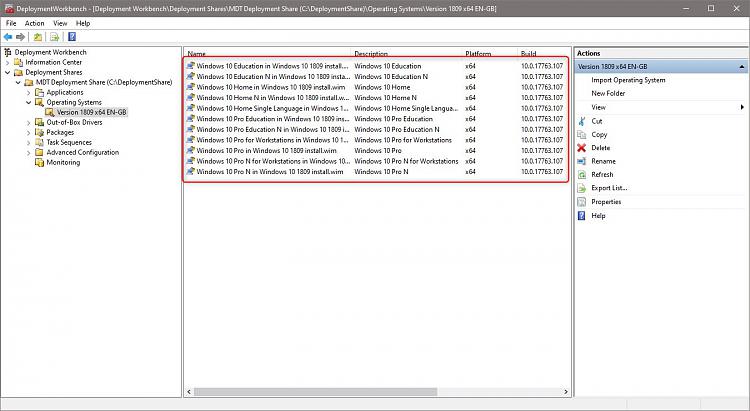
When importing an OS from a WIM file, the default directory name is INSTALL.WIM. Again, you can accept the default name or change it. When imported, the operating systems found in ISO or WIM file are listed in MDT:

3.2) MDT requires Windows image in a WIM file. An ISO created with Windows Media Creation Tool contains Windows image in install.esd file instead of install.wim, and therefore it cannot be used with MDT.
3.3) To download a WIM-based ISO, open Windows Media Creation Tool page in browser, press F12 to open developer tools, select Emulation tab, and change user agent string to Apple Safari. Wait the page to refresh. You can now download a WIM-based ISO:

3.3) Still in Operating Systems, select the new folder you created. In Action pane, select Import Operating System.
3.4) Select your source. Operating systems can be imported from a mounted ISO, DVD, USB flash drive or a folder containing Windows install files. To do this, select Full set of source files and click Next, in following page browse and select the source (mounted ISO, DVD, USB flash drive or a folder).
OS can also be imported from a WIM file, in which case select Custom image file, click Next and select your install.wim (or custom WIM) file:

If importing OS from a WIM file, in next page select Setup files are not required (install.wim already contains everything required to setup and install Windows):
3.5) When importing an OS from a complete ISO, MDT defaults the directory name to the first edition found in that ISO. In this case, because I imported a full consumer ISO which contains all editions except Enterprise, its first edition (INDEX:1) is Windows 10 Home. You can accept this default directory name, or change it to whatever you’d prefer:
In my case now, I changed directory name to Version 1809 x64 EN-GB.
When importing an OS from a WIM file, the default directory name is INSTALL.WIM. Again, you can accept the default name or change it. When imported, the operating systems found in ISO or WIM file are listed in MDT:
 Note
NoteTo deploy Windows from an imported operating system, we need to create a Task Sequence. A Task Sequence contains all required information to deploy (install) Windows on target machine.
For each unique deployment scenario, we will need a unique Task Sequence. Deploying W10 PRO edition, x64 bit architecture in UK English needs its own Task Sequence, and deploying W10 Education edition from the same imported operating system in MDT, we’ll need to create another unique Task Sequence for that.
For each unique deployment scenario, we will need a unique Task Sequence. Deploying W10 PRO edition, x64 bit architecture in UK English needs its own Task Sequence, and deploying W10 Education edition from the same imported operating system in MDT, we’ll need to create another unique Task Sequence for that.
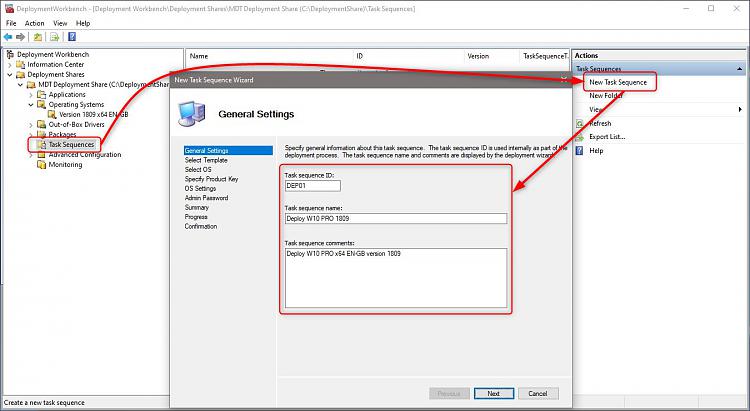
4.1) Expand your deployment share, select Task Sequences, select New Task Sequence. Give it a unique ID (required), name (required) and description (optional), click Next:
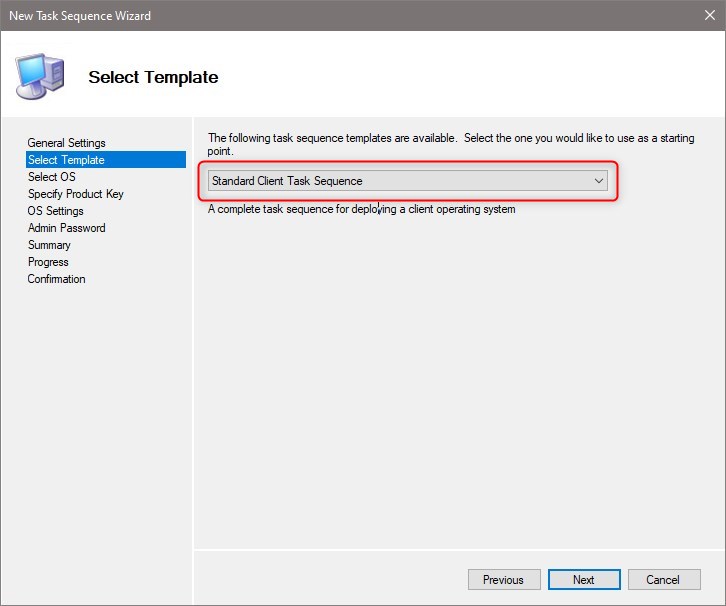
4.2) Select Standard Client Task Sequence and click Next:
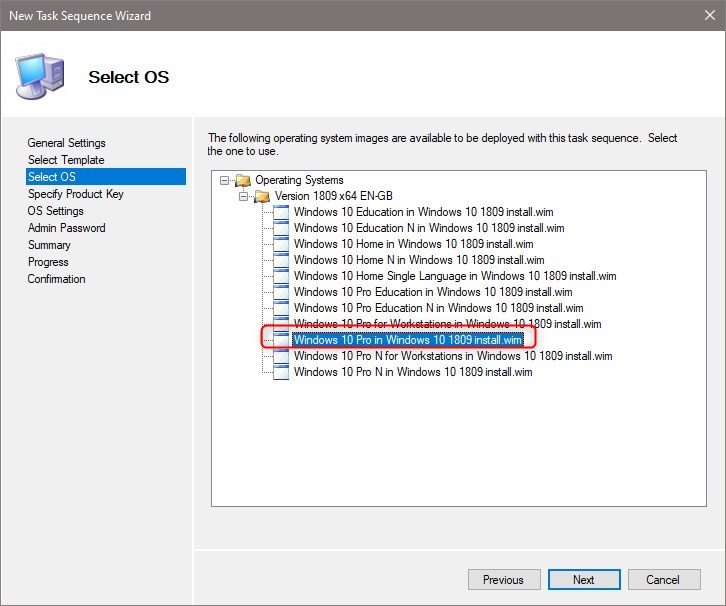
4.3) Select OS (Windows edition) to deploy with this Task Sequence and click Next:
4.4) Select Do not specify a product key, and click Next. Alternatively, on enterprise networks, you can enter your MAK key here instead:
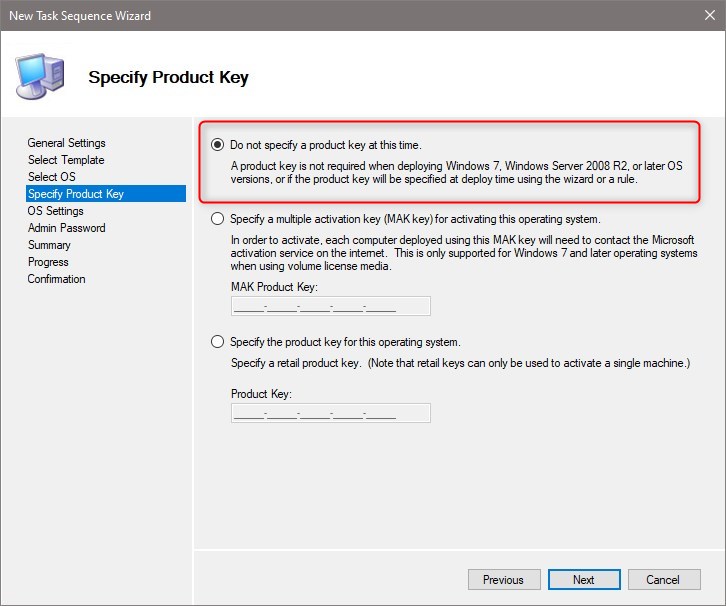
For private use, you could enter a product key here, but it is unnecessary. You can always activate Windows later, or Windows will be automatically activated if deploying to a target device with existing digital license for that edition.
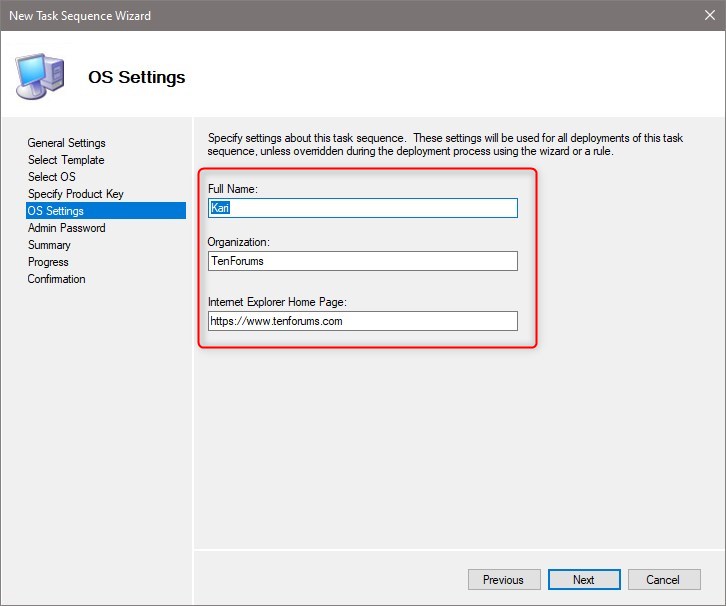
4.5) Enter name, organization and IE home page (optional). The name and organization will be shown on the target computer as the owner of that device:
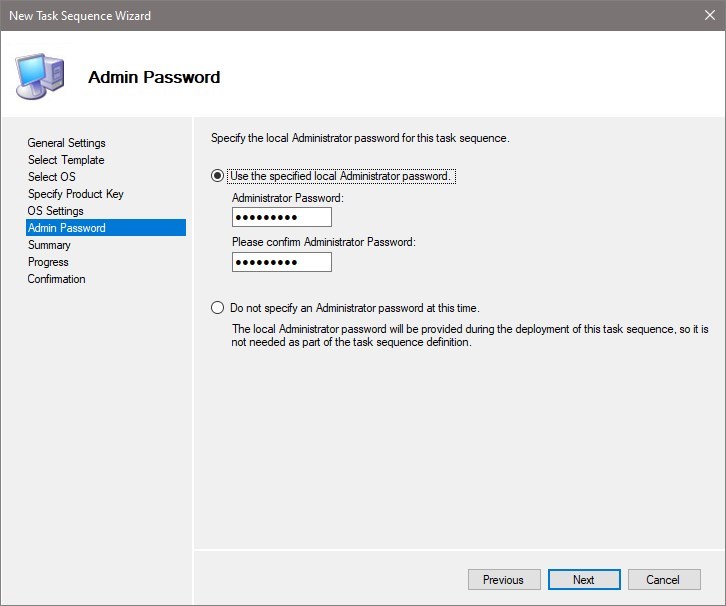
4.6) Now an important decision to make: built-in administrator account password for the target device. Personally, I would never leave that account without a password, but the decision is yours. Set the password, or select Do not specify an Administrator password at this time:
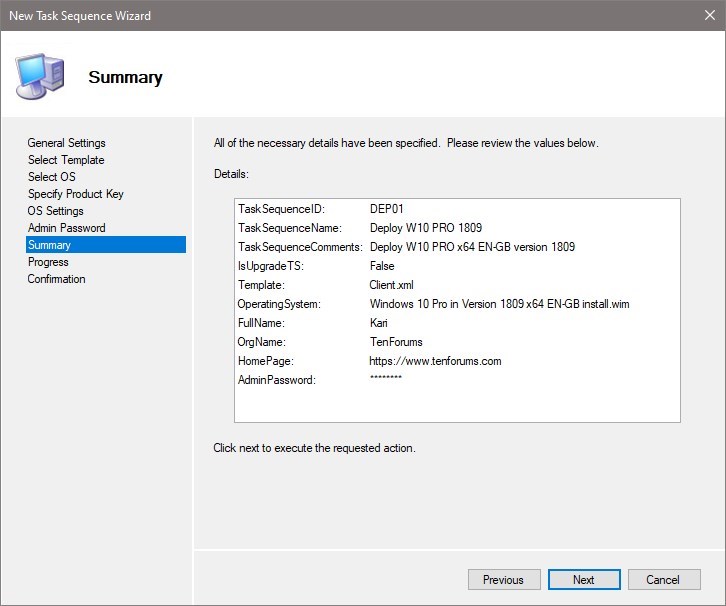
4.7) On Summary page, check that everything is as you'd prefer and click Next:
4.8) Your Task Sequence will be created:
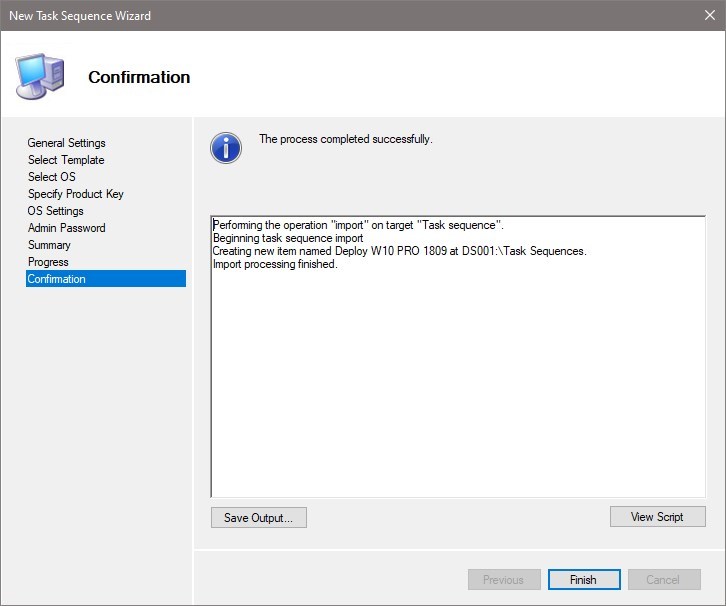
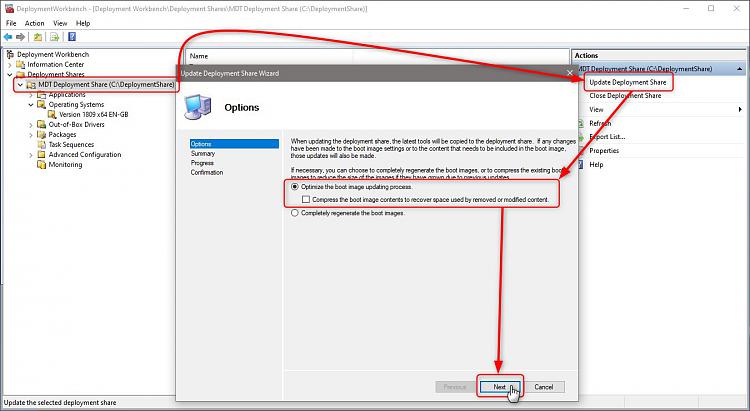
4.9) The Deployment Share needs to be updated after creating the first Task Sequence. Select the share on left pane, select Update Deployment Share on Actions pane, accept default selection Optimize the boot image updating process, and click Next:
4.10) The deployment share will be updated, and all necessary scripts and ISO files to use for deployment will be created. You will find Lite-Touch Installation ISO files needed to boot target devices in %DeploymentShare%\Boot folder on your MDT Workbench machine:
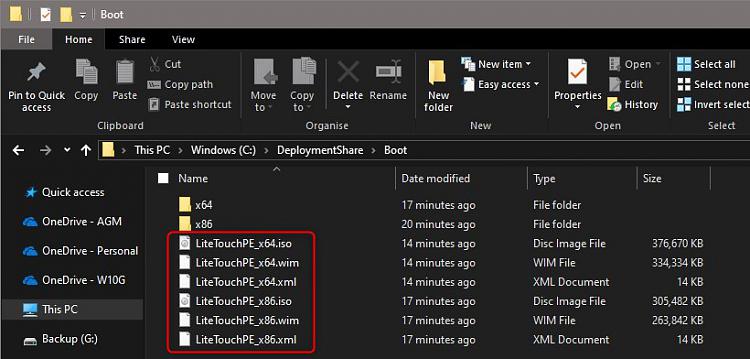
4.11) Depending on your target device’s bit architecture, create a bootable USB flash drive from either LiteTouchPEx_64.iso orLiteTouchPE_x86.iso. If the target devices are virtual machines, no USB media is required.
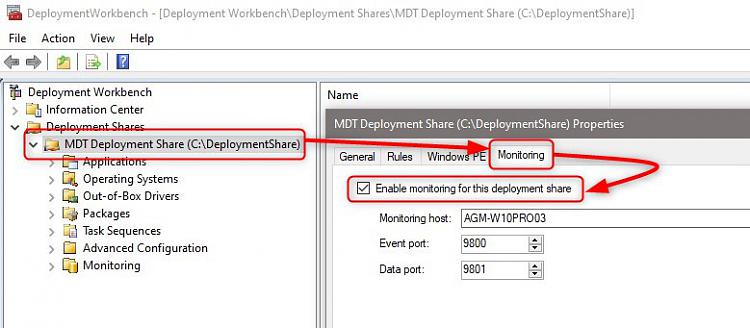
4.12) To monitor deployment status (optional), right click the Deployment Share on left pane, select Properties, and enable monitoring:

4.2) Select Standard Client Task Sequence and click Next:
4.3) Select OS (Windows edition) to deploy with this Task Sequence and click Next:
4.4) Select Do not specify a product key, and click Next. Alternatively, on enterprise networks, you can enter your MAK key here instead:
For private use, you could enter a product key here, but it is unnecessary. You can always activate Windows later, or Windows will be automatically activated if deploying to a target device with existing digital license for that edition.
4.5) Enter name, organization and IE home page (optional). The name and organization will be shown on the target computer as the owner of that device:
4.6) Now an important decision to make: built-in administrator account password for the target device. Personally, I would never leave that account without a password, but the decision is yours. Set the password, or select Do not specify an Administrator password at this time:
4.7) On Summary page, check that everything is as you'd prefer and click Next:
4.8) Your Task Sequence will be created:
4.9) The Deployment Share needs to be updated after creating the first Task Sequence. Select the share on left pane, select Update Deployment Share on Actions pane, accept default selection Optimize the boot image updating process, and click Next:

4.10) The deployment share will be updated, and all necessary scripts and ISO files to use for deployment will be created. You will find Lite-Touch Installation ISO files needed to boot target devices in %DeploymentShare%\Boot folder on your MDT Workbench machine:

4.11) Depending on your target device’s bit architecture, create a bootable USB flash drive from either LiteTouchPEx_64.iso orLiteTouchPE_x86.iso. If the target devices are virtual machines, no USB media is required.
4.12) To monitor deployment status (optional), right click the Deployment Share on left pane, select Properties, and enable monitoring:

5.1) By default, an MDT Deployment Share is shared to user group administrators.
You should have access to it from target machines using any local admin
account on MDT Workbench machine. However, depending on local
networking and sharing settings, you might only be able to use the built-in administrator
account to access Deployment Share folder, if you have not given
permissions (full control) for everyone or a specific local admin
account.
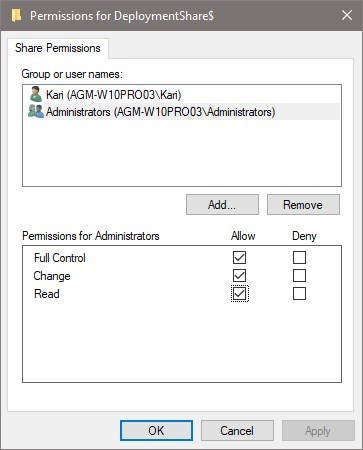
I strongly recommend that you will set a password for built-in administrator account on MDT Workbench device, and that you enable it if it is currently disabled. Using that account in deployment will bypass all possible sharing issues.
5.2) Boot the target device from LiteTouchPEx_64 or LiteTouchPE_x86 USB install media, or if target device is a virtual machine, from LiteTouchPEx_64.iso orLiteTouchPE_x86.iso file (steps 4.10 & 4.11).
Select keyboard layout and run the Deployment Wizard:
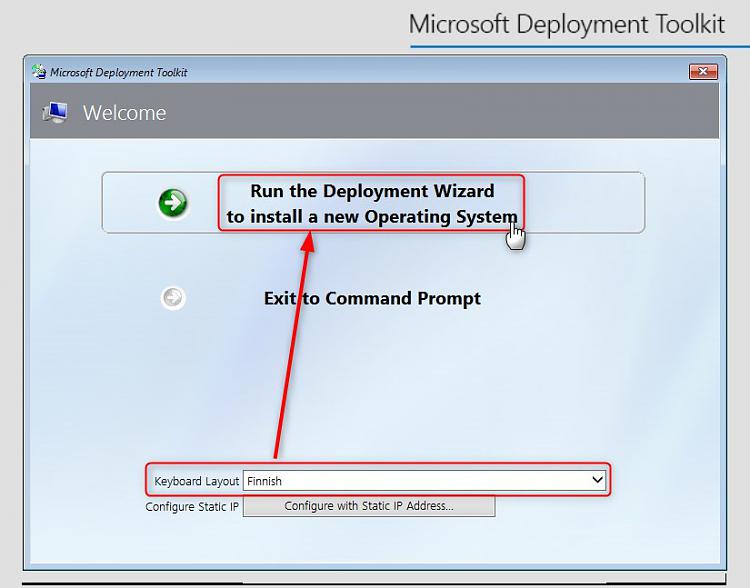
5.3) Enter credentials for MDT Workbench to access your Deployment Share:
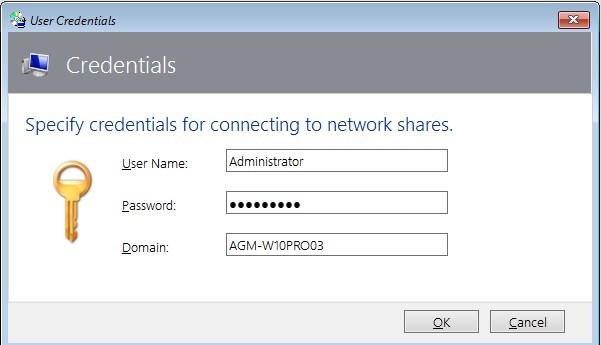
Note
5.4) All Task Sequences on share will be listed. Select the Task Sequence you want to use for deployment on this target machine. As we only have one Task Sequence at this point, select it and click Next:
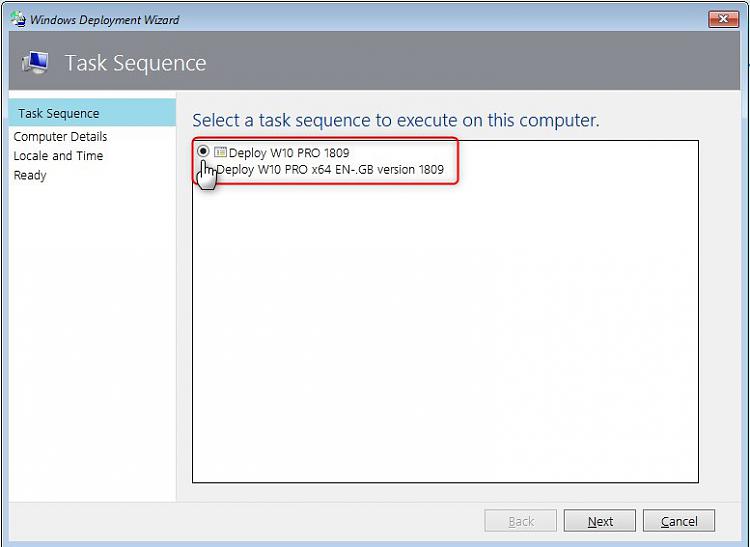
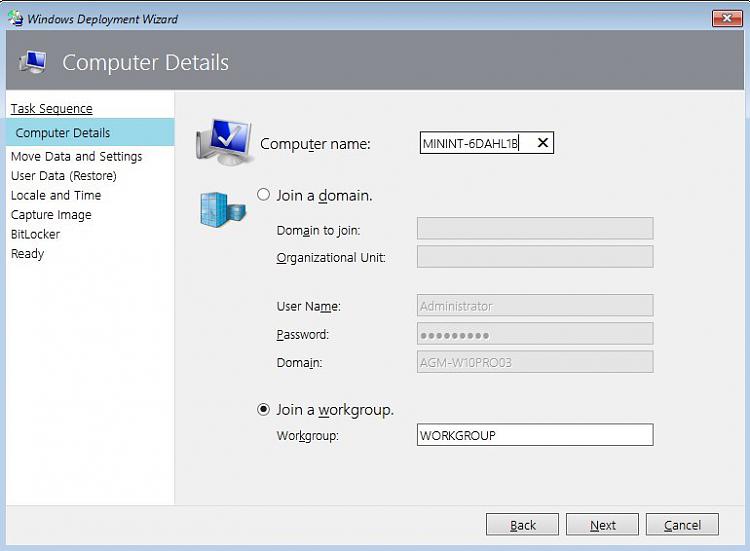
5.5) Name the target device, or accept default name. Select if this is a workgroup computer or belongs to a domain:
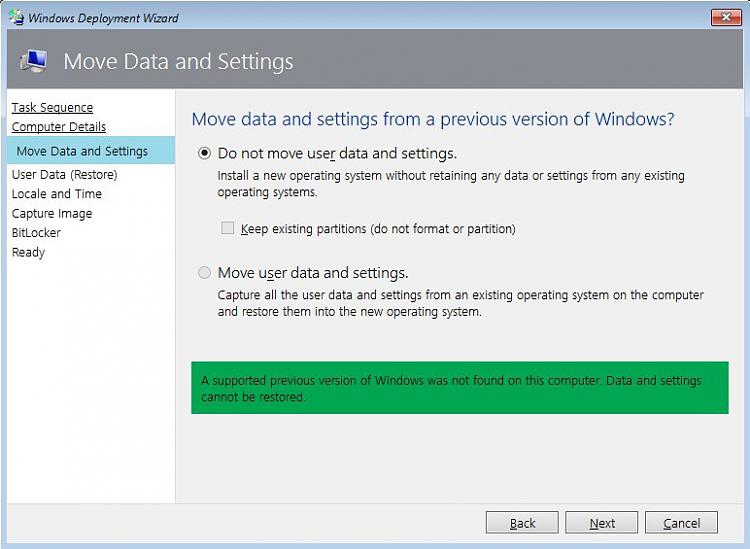
5.6) As this is a clean install on a device without any previous operating system, there is no data to be moved. If deploying to a device which already contains an existing Windows 7 or later installation, you can select to move existing user accounts, user data and settings to a temporary folder on MDT Workbench machine. User data and settings will then be restored to target device during the final phase of deployment. Software will not be moved over to new installation, and must be re-installed:
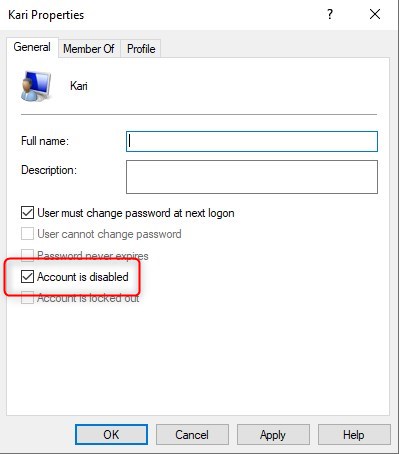
Notice that if you select to move user data to new installation, all moved user accounts are by default disabled after deployment is done, and must be manually enabled before accounts can be used:
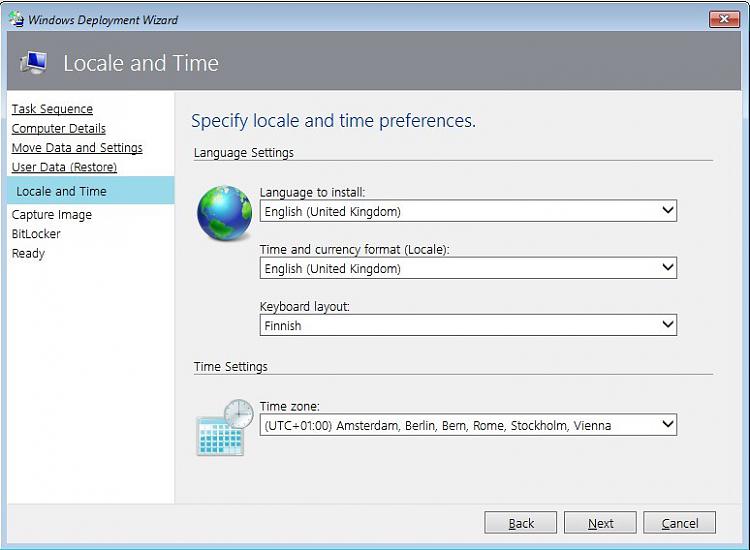
5.7) In Locale and time page, select keyboard layout and time zone for target device:
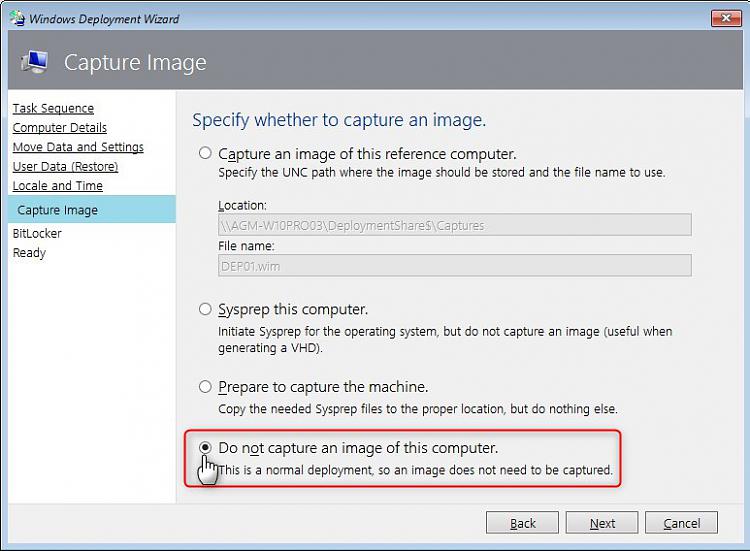
5.8) Select Do not capture image of this computer to do a normal deployment (clean install):
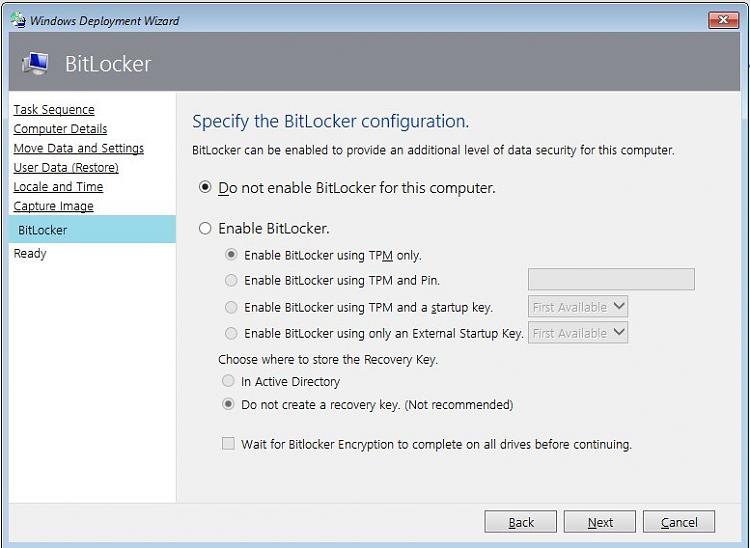
5.9) Select if BitLocker should be enabled on target device:
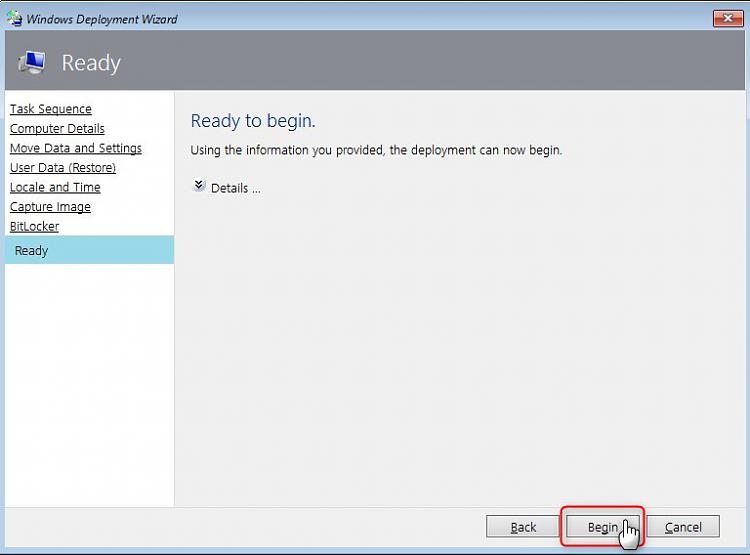
5.10) Finally, start the deployment:
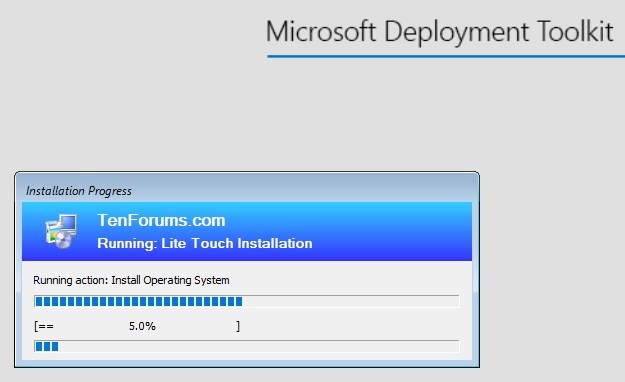
5.11) You can follow the progress on target device:
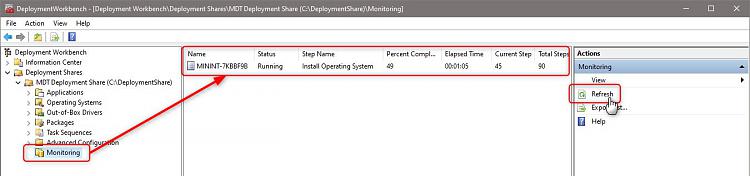
If you enabled Monitoring in step 4.12, you can also monitor the progress in Deployment Workbench. Notice that monitoring in Deployment Workbench does not auto refresh. To refresh, click Refresh in Action pane:
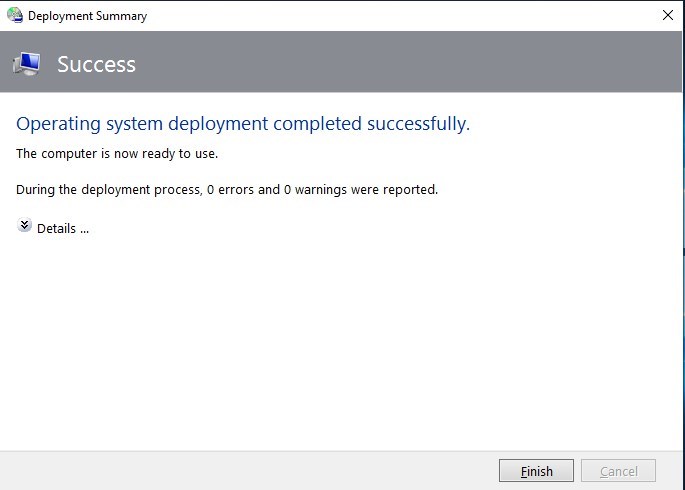
5.12) Deployment completely bypasses OOBE. When ready, target device boots to desktop using built-in admin credentials. Do not touch anything, do not start anything until Deployment Wizard tells deployment has been finished:
5.13) At this point, only existing user account on target device is the built-in admin account. To start using the computer, create at least one local admin account, sign out from built-in admin, sign in to local admin and disable built-in admin.
I strongly recommend that you will set a password for built-in administrator account on MDT Workbench device, and that you enable it if it is currently disabled. Using that account in deployment will bypass all possible sharing issues.
5.2) Boot the target device from LiteTouchPEx_64 or LiteTouchPE_x86 USB install media, or if target device is a virtual machine, from LiteTouchPEx_64.iso orLiteTouchPE_x86.iso file (steps 4.10 & 4.11).
Select keyboard layout and run the Deployment Wizard:

5.3) Enter credentials for MDT Workbench to access your Deployment Share:
NoteIf target device is joining a local workgroup
instead of domain, enter MDT Workbench computer name as domain. In this
example I have MDT installed on computer AGM-W10PRO03. As target
computer joins a workgroup instead of domain, I use that computer name
as domain.
5.4) All Task Sequences on share will be listed. Select the Task Sequence you want to use for deployment on this target machine. As we only have one Task Sequence at this point, select it and click Next:

5.5) Name the target device, or accept default name. Select if this is a workgroup computer or belongs to a domain:

5.6) As this is a clean install on a device without any previous operating system, there is no data to be moved. If deploying to a device which already contains an existing Windows 7 or later installation, you can select to move existing user accounts, user data and settings to a temporary folder on MDT Workbench machine. User data and settings will then be restored to target device during the final phase of deployment. Software will not be moved over to new installation, and must be re-installed:

Notice that if you select to move user data to new installation, all moved user accounts are by default disabled after deployment is done, and must be manually enabled before accounts can be used:
5.7) In Locale and time page, select keyboard layout and time zone for target device:

5.8) Select Do not capture image of this computer to do a normal deployment (clean install):

5.9) Select if BitLocker should be enabled on target device:

5.10) Finally, start the deployment:

5.11) You can follow the progress on target device:
If you enabled Monitoring in step 4.12, you can also monitor the progress in Deployment Workbench. Notice that monitoring in Deployment Workbench does not auto refresh. To refresh, click Refresh in Action pane:

5.12) Deployment completely bypasses OOBE. When ready, target device boots to desktop using built-in admin credentials. Do not touch anything, do not start anything until Deployment Wizard tells deployment has been finished:
5.13) At this point, only existing user account on target device is the built-in admin account. To start using the computer, create at least one local admin account, sign out from built-in admin, sign in to local admin and disable built-in admin.
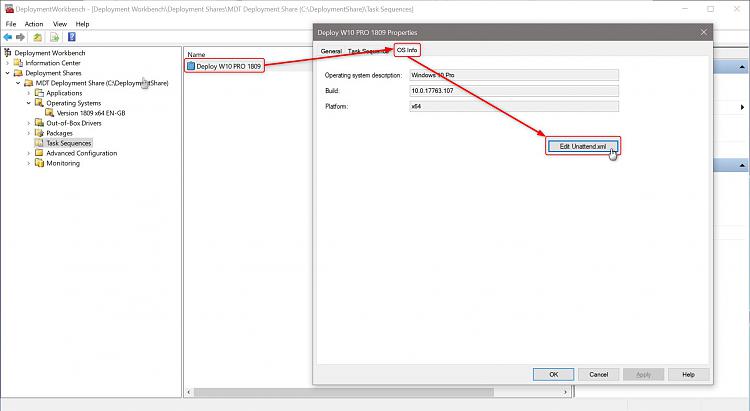
6.1)To customize deployment task and image, we can edit its answer file Unattend.xml. Right click the deployment task sequence, select Properties, select OS Info tab, and click Edit Unattend.xml to open it in Windows System Image Manager (WSIM), part of Windows ADK you installed in steps 1.1 & 1.2:
6.2) When answer file is edited first time, MDT creates a catalog file. Be patient, this can take a while; on this mid-level i7 laptop of mine, it can take up to 15 minutes. If you, like me, do not want to wait, you can stop the catalog creation process:
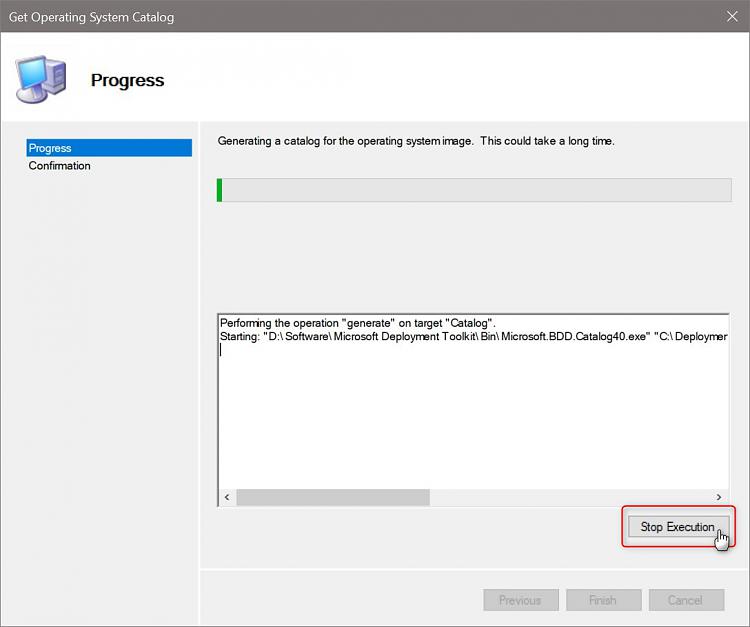
Wait process to stop, and repeat step 6.1, and the answer file will now open in WSIM immediately:
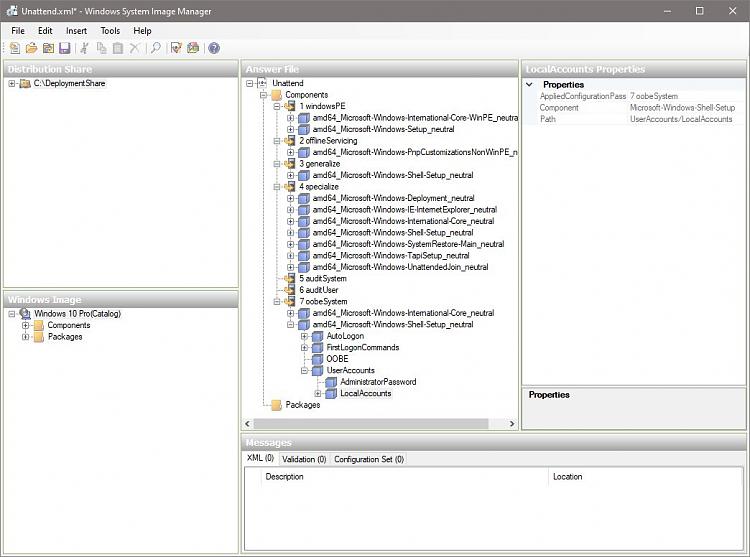
6.2) For what can be done with answer file and complete reference, see this support article on Microsoft Docs: Components | Microsoft Docs
Some quick tips can be found in Step Four of this tutorial: Create media for automated unattended install of Windows 10 | Tutorials
Note
6.3) Here's my modified Unattend.xml used in this sample deployment. Only changes I have made to default answer file is to change locale and user interface language settings from MDT default US English to UK English, changed default keyboard layout to Finnish (040b:0000040b), added myself as owner and TenForums as organization on target device, and make it to join workgroup TenForums:
This answer file will completely automate OOBE.
6.4) To automate Deployment Wizard, steps 5.4 through 5.10 in this tutorial, we need to edit CustomSettings.ini file located in %DeploymentShare%\Control folder. Right click your Deployment Share on left pane and select Properties, then select Rules tab to open CustomSettings.ini:
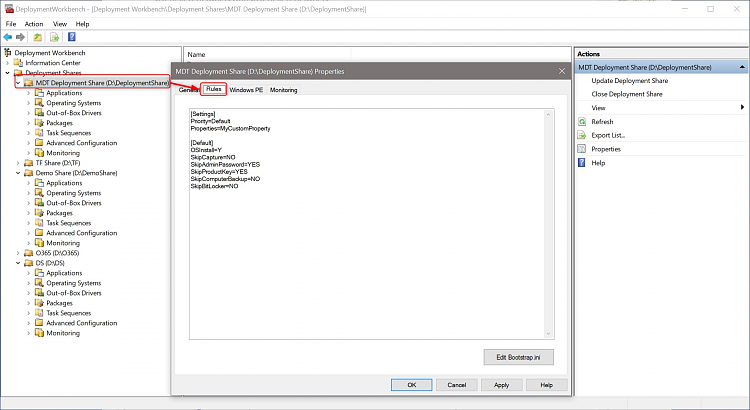
Screenshot shows the default MDT CustomSettings.ini file.
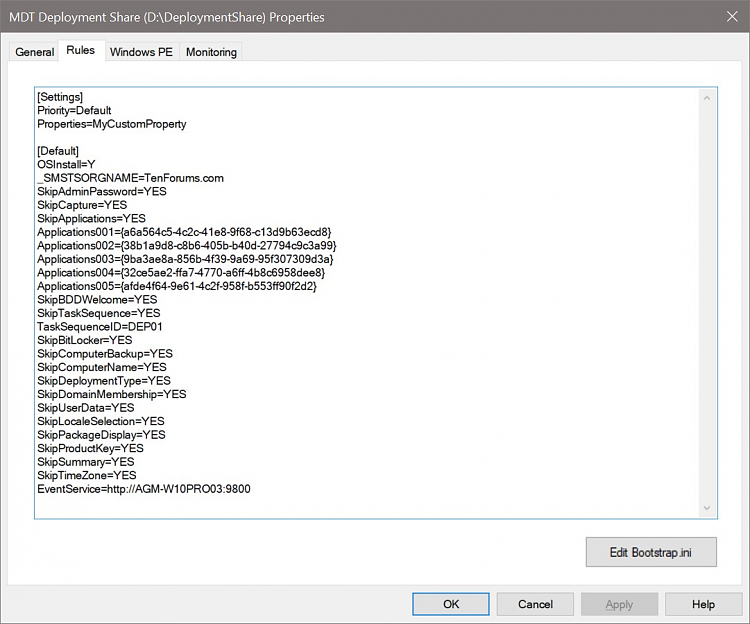
6.5) CustomSettings.ini can be edited in directly in Properties window. Here's mine used in this sample deployment:
Full Properties refence: Toolkit reference - Microsoft Deployment Toolkit | Microsoft Docs
This sample CustomeSettings.ini will tell system to install OS, skip all possible Deployment Wizard prompts without asking user interaction, selects the Task Sequence to be run, and tells which applications should be silently installed on target machine, which are then told in following lines. The five lines Applications001 to Applications005 tell system which applications I chose to install silently in background on target machine (Chrome, Firefox, Opera, VLC Player and Office 365). See Part Seven for how to add applications to deployment.
You can use this sample CustomSettings.ini, editing it to match your needs (organization, Task Sequence name, apps to install etc.):
 Warning
6.6) The CustomSettings.ini file shown in previous step 6.6 completely bypasses all steps in Deployment Wizard, requiring no user interaction, and adds some applications to be silently installed (see Part Seven). However, you still need to select the keyboard layout and run Deployment Wizard manually on target machine (step 5.2), and enter network credentials to access Deployment share on MDT Workbench machine (step5.3).
To automate those two steps, in Properties window and its Rules tab for your deployment share, select Edit Bootstrap.ini:
6.7) Bootstrap.ini opens in Notepad. Here first the default Bootstrap.ini, then my modified one:
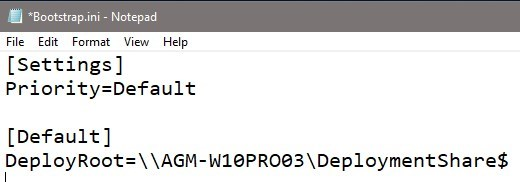
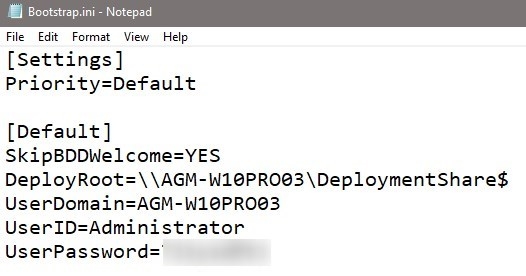
6.8) Change / add properties as follows:

6.2) When answer file is edited first time, MDT creates a catalog file. Be patient, this can take a while; on this mid-level i7 laptop of mine, it can take up to 15 minutes. If you, like me, do not want to wait, you can stop the catalog creation process:

Wait process to stop, and repeat step 6.1, and the answer file will now open in WSIM immediately:

6.2) For what can be done with answer file and complete reference, see this support article on Microsoft Docs: Components | Microsoft Docs
Some quick tips can be found in Step Four of this tutorial: Create media for automated unattended install of Windows 10 | Tutorials
NoteMDT generated answer file Unattend.xml is,
as so often with Microsoft products and services, made only for American
users in USA. All language and region settings are US English. For us
users in rest of the world, it might cause deployment to fail when used
as it is.
When editing answer file, be sure to change International-Core settings in Pass 1 WindowsPE, Pass 4 Specialize and Pass 7 OobeSystem:
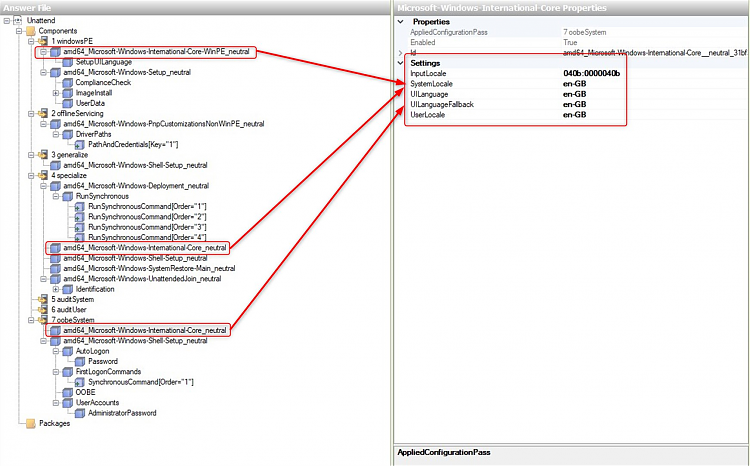
In my case now, I changed InputLocale (keyboard layout) to 040b:0000040b (Finnish), OS language and rest of the locales to EN-GB (UK English).
Change the SetupUILanguage setting in Pass 1 WindowsPE under International-Core, too, to match the language of your install / deployment media:

See complete list of language and region values: Default Input Profiles (Input Locales) in Windows | Microsoft Docs
When editing answer file, be sure to change International-Core settings in Pass 1 WindowsPE, Pass 4 Specialize and Pass 7 OobeSystem:

In my case now, I changed InputLocale (keyboard layout) to 040b:0000040b (Finnish), OS language and rest of the locales to EN-GB (UK English).
Change the SetupUILanguage setting in Pass 1 WindowsPE under International-Core, too, to match the language of your install / deployment media:

See complete list of language and region values: Default Input Profiles (Input Locales) in Windows | Microsoft Docs
6.3) Here's my modified Unattend.xml used in this sample deployment. Only changes I have made to default answer file is to change locale and user interface language settings from MDT default US English to UK English, changed default keyboard layout to Finnish (040b:0000040b), added myself as owner and TenForums as organization on target device, and make it to join workgroup TenForums:
Code:
<?xml version="1.0" encoding="utf-8"?>
<unattend xmlns="urn:schemas-microsoft-com:unattend">
    <settings pass="windowsPE">
        <component name="Microsoft-Windows-Setup" processorArchitecture="amd64" publicKeyToken="31bf3856ad364e35" language="neutral" versionScope="nonSxS" xmlns:wcm="http://schemas.microsoft.com/WMIConfig/2002/State">
            <ImageInstall>
                <OSImage>
                    <WillShowUI>OnError</WillShowUI>
                    <InstallTo>
                        <DiskID>0</DiskID>
                        <PartitionID>1</PartitionID>
                    </InstallTo>
                    <InstallFrom>
                        <Path>.\Operating Systems\W10 1809 EN-GB\Sources\install.wim</Path>
                        <MetaData>
                            <Key>/IMAGE/INDEX</Key>
                            <Value>1</Value>
                        </MetaData>
                    </InstallFrom>
                </OSImage>
            </ImageInstall>
            <ComplianceCheck>
                <DisplayReport>OnError</DisplayReport>
            </ComplianceCheck>
            <UserData>
                <AcceptEula>true</AcceptEula>
            </UserData>
        </component>
        <component name="Microsoft-Windows-International-Core-WinPE" processorArchitecture="amd64" publicKeyToken="31bf3856ad364e35" language="neutral" versionScope="nonSxS" xmlns:wcm="http://schemas.microsoft.com/WMIConfig/2002/State" xmlns:xsi="http://www.w3.org/2001/XMLSchema-instance">
            <SetupUILanguage>
                <UILanguage>en-GB</UILanguage>
            </SetupUILanguage>
            <InputLocale>040b:00000409b</InputLocale>
            <SystemLocale>en-GB</SystemLocale>
            <UILanguage>en-GB</UILanguage>
            <UserLocale>en-GB</UserLocale>
            <UILanguageFallback>en-GB</UILanguageFallback>
        </component>
    </settings>
    <settings pass="generalize">
        <component name="Microsoft-Windows-Shell-Setup" processorArchitecture="amd64" publicKeyToken="31bf3856ad364e35" language="neutral" versionScope="nonSxS" xmlns:wcm="http://schemas.microsoft.com/WMIConfig/2002/State" xmlns:xsi="http://www.w3.org/2001/XMLSchema-instance">
            <DoNotCleanTaskBar>true</DoNotCleanTaskBar>
        </component>
    </settings>
    <settings pass="specialize">
        <component name="Microsoft-Windows-UnattendedJoin" processorArchitecture="amd64" publicKeyToken="31bf3856ad364e35" language="neutral" versionScope="nonSxS" xmlns:wcm="http://schemas.microsoft.com/WMIConfig/2002/State">
            <Identification>
                <Credentials>
                    <Username></Username>
                    <Domain></Domain>
                    <Password></Password>
                </Credentials>
                <JoinDomain></JoinDomain>
                <JoinWorkgroup>TenForums</JoinWorkgroup>
                <MachineObjectOU></MachineObjectOU>
            </Identification>
        </component>
        <component name="Microsoft-Windows-Shell-Setup" processorArchitecture="amd64" publicKeyToken="31bf3856ad364e35" language="neutral" versionScope="nonSxS" xmlns:wcm="http://schemas.microsoft.com/WMIConfig/2002/State">
            <ComputerName></ComputerName>
            <ProductKey></ProductKey>
            <RegisteredOrganization>TenForums</RegisteredOrganization>
            <RegisteredOwner>Kari</RegisteredOwner>
            <DoNotCleanTaskBar>true</DoNotCleanTaskBar>
            <TimeZone>W. Europe Standard Time</TimeZone>
        </component>
        <component name="Microsoft-Windows-Deployment" processorArchitecture="amd64" publicKeyToken="31bf3856ad364e35" language="neutral" versionScope="nonSxS" xmlns:wcm="http://schemas.microsoft.com/WMIConfig/2002/State" xmlns:xsi="http://www.w3.org/2001/XMLSchema-instance">
            <RunSynchronous>
                <RunSynchronousCommand wcm:action="add">
                    <Description>EnableAdmin</Description>
                    <Order>1</Order>
                    <Path>cmd /c net user Administrator /active:yes</Path>
                </RunSynchronousCommand>
                <RunSynchronousCommand wcm:action="add">
                    <Description>UnfilterAdministratorToken</Description>
                    <Order>2</Order>
                    <Path>cmd /c reg add HKLM\SOFTWARE\Microsoft\Windows\CurrentVersion\Policies\System /v FilterAdministratorToken /t REG_DWORD /d 0 /f</Path>
                </RunSynchronousCommand>
                <RunSynchronousCommand wcm:action="add">
                    <Description>disable user account page</Description>
                    <Order>3</Order>
                    <Path>reg add HKLM\Software\Microsoft\Windows\CurrentVersion\Setup\OOBE /v UnattendCreatedUser /t REG_DWORD /d 1 /f</Path>
                </RunSynchronousCommand>
                <RunSynchronousCommand wcm:action="add">
                    <Description>disable async RunOnce</Description>
                    <Order>4</Order>
                    <Path>reg add HKLM\Software\Microsoft\Windows\CurrentVersion\Explorer /v AsyncRunOnce /t REG_DWORD /d 0 /f</Path>
                </RunSynchronousCommand>
            </RunSynchronous>
        </component>
        <component name="Microsoft-Windows-International-Core" processorArchitecture="amd64" publicKeyToken="31bf3856ad364e35" language="neutral" versionScope="nonSxS" xmlns:wcm="http://schemas.microsoft.com/WMIConfig/2002/State" xmlns:xsi="http://www.w3.org/2001/XMLSchema-instance">
            <InputLocale>040b:0000040b</InputLocale>
            <SystemLocale>en-GB</SystemLocale>
            <UILanguage>en-GB</UILanguage>
            <UserLocale>en-GB</UserLocale>
            <UILanguageFallback>en-GB</UILanguageFallback>
        </component>
        <component name="Microsoft-Windows-SystemRestore-Main" processorArchitecture="amd64" publicKeyToken="31bf3856ad364e35" language="neutral" versionScope="nonSxS" xmlns:wcm="http://schemas.microsoft.com/WMIConfig/2002/State" xmlns:xsi="http://www.w3.org/2001/XMLSchema-instance">
            <DisableSR>1</DisableSR>
        </component>
    </settings>
    <settings pass="oobeSystem">
        <component name="Microsoft-Windows-Shell-Setup" processorArchitecture="amd64" publicKeyToken="31bf3856ad364e35" language="neutral" versionScope="nonSxS" xmlns:wcm="http://schemas.microsoft.com/WMIConfig/2002/State">
            <UserAccounts>
                <AdministratorPassword>
                    <Value>VABpAHQAeQBzAG8AZgB0ADEAQQBkAG0AaQBuAGkAcwB0AHIAYQB0AG8AcgBQAGEAcwBzAHcAbwByAGQA</Value>
                    <PlainText>false</PlainText>
                </AdministratorPassword>
            </UserAccounts>
            <AutoLogon>
                <Enabled>true</Enabled>
                <Username>Administrator</Username>
                <Domain>.</Domain>
                <Password>
                    <Value>VABpAHQAeQBzAG8AZgB0ADEAUABhAHMAcwB3AG8AcgBkAA==</Value>
                    <PlainText>false</PlainText>
                </Password>
                <LogonCount>999</LogonCount>
            </AutoLogon>
            <FirstLogonCommands>
                <SynchronousCommand wcm:action="add">
                    <CommandLine>wscript.exe %SystemDrive%\LTIBootstrap.vbs</CommandLine>
                    <Description>Lite Touch new OS</Description>
                    <Order>1</Order>
                </SynchronousCommand>
            </FirstLogonCommands>
            <OOBE>
                <HideEULAPage>true</HideEULAPage>
                <ProtectYourPC>1</ProtectYourPC>
                <HideLocalAccountScreen>true</HideLocalAccountScreen>
                <HideOnlineAccountScreens>true</HideOnlineAccountScreens>
                <HideWirelessSetupInOOBE>true</HideWirelessSetupInOOBE>
            </OOBE>
            <RegisteredOrganization>TenForums</RegisteredOrganization>
            <RegisteredOwner>Kari</RegisteredOwner>
            <TimeZone>W. Europe Standard Time</TimeZone>
        </component>
        <component name="Microsoft-Windows-International-Core" processorArchitecture="amd64" publicKeyToken="31bf3856ad364e35" language="neutral" versionScope="nonSxS" xmlns:wcm="http://schemas.microsoft.com/WMIConfig/2002/State" xmlns:xsi="http://www.w3.org/2001/XMLSchema-instance">
            <InputLocale>040b:0000040b</InputLocale>
            <SystemLocale>en-GB</SystemLocale>
            <UILanguage>en-GB</UILanguage>
            <UserLocale>en-GB</UserLocale>
            <UILanguageFallback>en-GB</UILanguageFallback>
        </component>
    </settings>
    <settings pass="offlineServicing">
        <component name="Microsoft-Windows-PnpCustomizationsNonWinPE" processorArchitecture="amd64" publicKeyToken="31bf3856ad364e35" language="neutral" versionScope="nonSxS" xmlns:wcm="http://schemas.microsoft.com/WMIConfig/2002/State" xmlns:xsi="http://www.w3.org/2001/XMLSchema-instance">
            <DriverPaths>
                <PathAndCredentials wcm:keyValue="1" wcm:action="add">
                    <Path>\Drivers</Path>
                </PathAndCredentials>
            </DriverPaths>
        </component>
    </settings>
    <cpi:offlineImage cpi:source="catalog://agm-w10pro03/deploymentshare$/operating systems/w10 1809 en-gb/sources/install_windows 10 pro.clg" xmlns:cpi="urn:schemas-microsoft-com:cpi" />
</unattend>
This answer file will completely automate OOBE.
6.4) To automate Deployment Wizard, steps 5.4 through 5.10 in this tutorial, we need to edit CustomSettings.ini file located in %DeploymentShare%\Control folder. Right click your Deployment Share on left pane and select Properties, then select Rules tab to open CustomSettings.ini:

Screenshot shows the default MDT CustomSettings.ini file.
6.5) CustomSettings.ini can be edited in directly in Properties window. Here's mine used in this sample deployment:

Full Properties refence: Toolkit reference - Microsoft Deployment Toolkit | Microsoft Docs
This sample CustomeSettings.ini will tell system to install OS, skip all possible Deployment Wizard prompts without asking user interaction, selects the Task Sequence to be run, and tells which applications should be silently installed on target machine, which are then told in following lines. The five lines Applications001 to Applications005 tell system which applications I chose to install silently in background on target machine (Chrome, Firefox, Opera, VLC Player and Office 365). See Part Seven for how to add applications to deployment.
You can use this sample CustomSettings.ini, editing it to match your needs (organization, Task Sequence name, apps to install etc.):
Code:
[Settings]
Priority=Default
Properties=MyCustomProperty

[Default]
OSInstall=Y
_SMSTSORGNAME=TenForums
SkipAdminPassword=YES
SkipCapture=YES
SkipApplications=YES
Applications001={a6a564c5-4c2c-41e8-9f68-c13d9b63ecd8}
Applications002={38b1a9d8-c8b6-405b-b40d-27794c9c3a99}
Applications003={9ba3ae8a-856b-4f39-9a69-95f307309d3a}
Applications004={32ce5ae2-ffa7-4770-a6ff-4b8c6958dee8}
Applications005={afde4f64-9e61-4c2f-958f-b553ff90f2d2}
SkipBDDWelcome=YES
SkipTaskSequence=YES
TaskSequenceID=DEMO
SkipBitLocker=YES
SkipComputerBackup=YES
SkipComputerName=YES
SkipDeploymentType=YES
SkipDomainMembership=YES
SkipUserData=YES
SkipLocaleSelection=YES
SkipProductKey=YES
SkipSummary=YES
SkipTimeZone=YES
EventService=http://AGM-W10PRO03:9800
WarningWhen SkipTaskSequence=YES is used, MDT LiteTouch installation runs the task told in TaskSequenceID=ID.
If that task sequence is for instance for clean installing Windows 10, but you actually wanted to upgrade existing Windows 8.1 installation on target device to Windows 10, you must edit CustomSettings.ini and change the TaskSequenceID to your upgrade task sequence ID.
If you forget this, your Windows 8.1 will be wiped clean, and Windows 10 clean installed instead.
If that task sequence is for instance for clean installing Windows 10, but you actually wanted to upgrade existing Windows 8.1 installation on target device to Windows 10, you must edit CustomSettings.ini and change the TaskSequenceID to your upgrade task sequence ID.
If you forget this, your Windows 8.1 will be wiped clean, and Windows 10 clean installed instead.
6.6) The CustomSettings.ini file shown in previous step 6.6 completely bypasses all steps in Deployment Wizard, requiring no user interaction, and adds some applications to be silently installed (see Part Seven). However, you still need to select the keyboard layout and run Deployment Wizard manually on target machine (step 5.2), and enter network credentials to access Deployment share on MDT Workbench machine (step5.3).
To automate those two steps, in Properties window and its Rules tab for your deployment share, select Edit Bootstrap.ini:
6.7) Bootstrap.ini opens in Notepad. Here first the default Bootstrap.ini, then my modified one:
6.8) Change / add properties as follows:
DeployRoot |
Deployment Share on MDT Workbench machine, given as \\PC_Name\ShareName |
UserDomain |
MDT Workbench PC name, in domain environment domain |
UserID |
Admin account to access share on MDT Workbench from target device. Account must have permission to access the share |
UserPassword |
The password for above admin account |
6.9) When Bootstrap.ini has been modified, you must regenerate the LTI boot files which you created in steps 4.9 & 4.10:
 Note
NoteAll three files shown in this part (Unattend.xml,
CustomSettings.ini, Bootstrap.ini) can be edited in Notepad or any other
text editor. See Part Seven for how to add application installers in CustomSettings.ini to silently and automatically installed on target machine.
Unattend.xml can be found in your %DeploymentShare%\Control\TaskSequnceID folder. Both INI files can be found in %DeploymentShare%\Control.
Unattend.xml can in addition be edited in Windows System Image Manager, outside MDT.
Unattend.xml can be found in your %DeploymentShare%\Control\TaskSequnceID folder. Both INI files can be found in %DeploymentShare%\Control.
Unattend.xml can in addition be edited in Windows System Image Manager, outside MDT.
7.1)
You can add any application installer to MDT deployment task. Download
the installer as an EXE file, and save it in a separate folder. For
instance, for this sample I downloaded Chrome installer and instead of
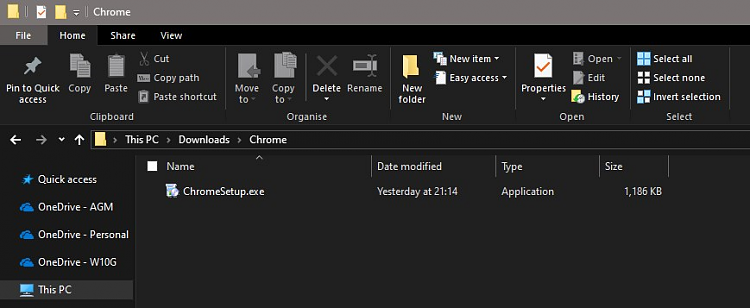
running it, I saved it in folder %userprofile%\Downloads\Chrome. The installer must be in its own folder, one application installer in one folder!
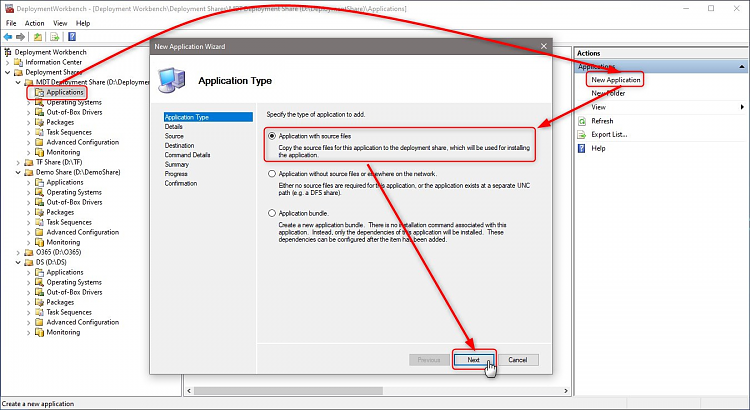
7.2) To add application, in this sample Chrome, to deployment, in MDT Deployment Workbench select your deployment share, select Applications, select New application, and select Application with source files:
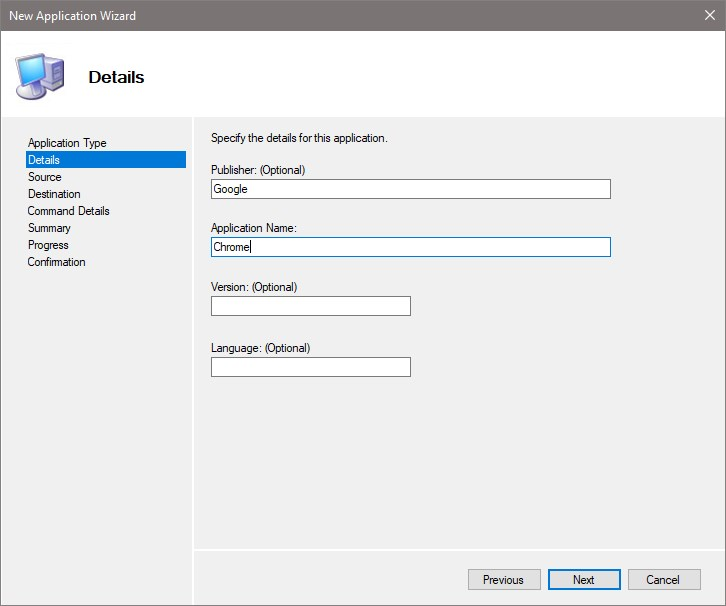
7.3) Add Publisher (optional), Application name (required), Version (optional) and Language (optional):
7.4) In Source page of New Application Wizard, browse to and select the folder where you saved the application installer and click Next. Accept defaults in Destination page.
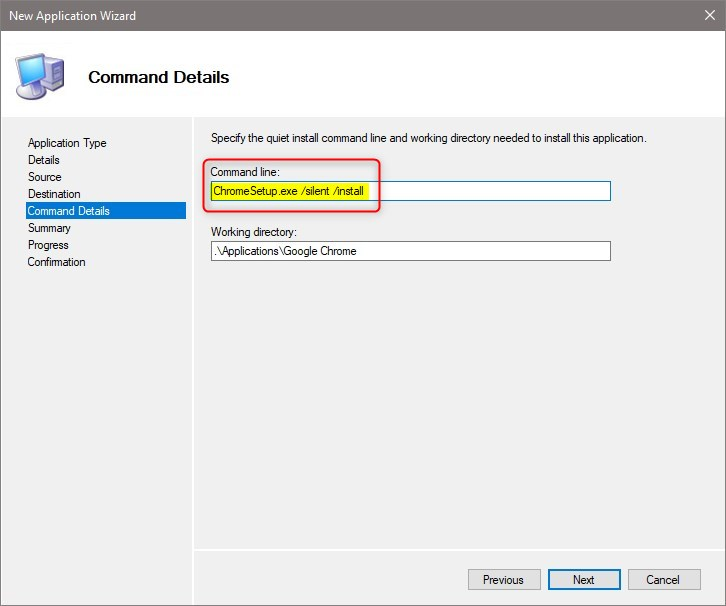
7.5) In Command Details page, enter the command for silent install. If not using silent install, the deployment would stop to ask user interaction.
In this example, as I am adding Chrome, the command for silent install is as follows:
7.6) Chrome is now added to deployment. For this example, I also added Firefox, Opera and VLC Player. Silent install command lines for these are as follows:
Firefox:
(Firefox installer name contains its version number. Change it according to version you downloaded.)
Opera:
VLC Player:
(Like Firefox, installer name contains version number, change it according to version you downloaded. L switch is language, 1033 is English.)
Unfortunately, it would be impossible for me to list silent installation commands for every available application, above only a few samples. Bing is your friend in this task, just search for APPNAME Silent Install
7.7) I also added Microsoft Office to deployment image. I downloaded the Office Deployment Tool (ODT) and created an XLM script with Office Customization Tool (OCT) to download Office from Microsoft cloud (CDN, Content Delivery Network) as told in this tutorial: Custom install or change Microsoft Office with Office Deployment Tool | Tutorials
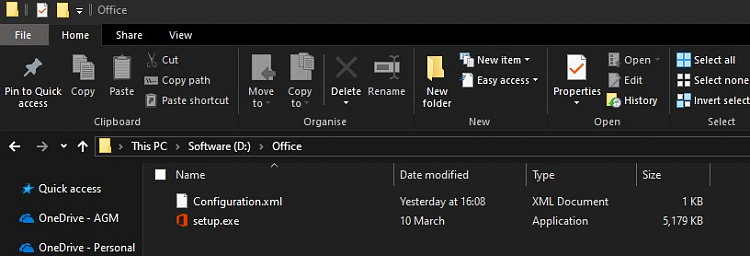
I saved both ODT setup file Setup.exe and OCT configuration file Configuration.xml to folder Office:
The Office configuration file Configuration.xml used in this example:
It downloads and installs Office Pro Plus, latest version, in US English, and adds Office language packs for Finnish, Swedish and German.
7.8) To add Office as New Application to MDT Deployment Workbench, follow the steps 7.2 through 7.5. The install command to add in step 7.5 is as follows:
Whereas Chrome, Firefox, Opera and VLC Player where added as silent installers in this example deployment, Office will be first downloaded from Microsoft CDN on target device using the configuration file provided. This adds a few minutes to deployment because target device must download almost 4 GB of data, but it is a very easy and convenient way to install Office
If you have an Office ISO, you can use it as a source when adding new application. Mount the ISO and use it as source. In that case, the install command would be simply
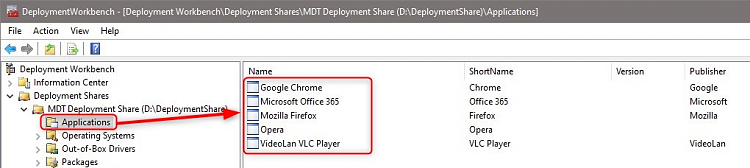
7.9) All applications added:
7.10) When deployment task is now run on target device, you can choose which applications will be installed:
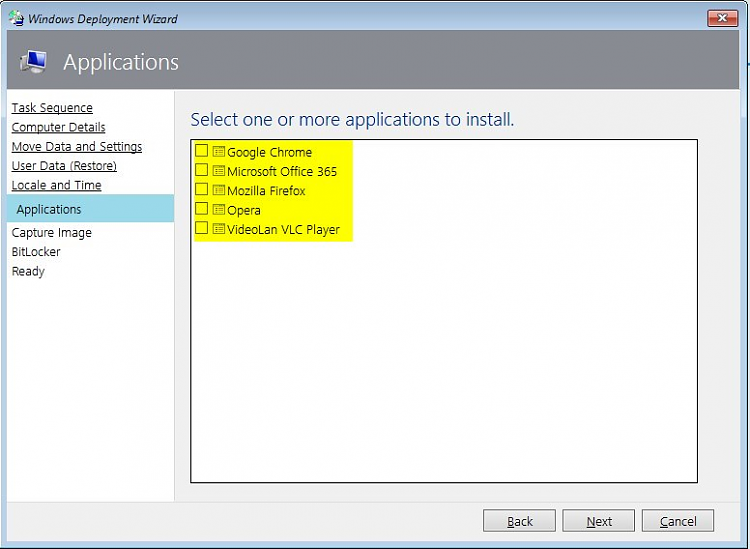
7.11) If you want to do an automated deployment as told in Part Six, you can modify the CustomSettings.ini (step 6.6). Add following lines to INI file:
SkipApplication=YES means that Deployment Wizard when run
on target device does not ask which applications to install. In
following lines we will then add applications with their GUID, first application being Applications001=GUID, next one Applications002=GUID and so on.
The application GUID can be found in its properties. Select Applications in your deployment share, right click an application on middle pane, select Properties. The GUID can be seen in General tab:
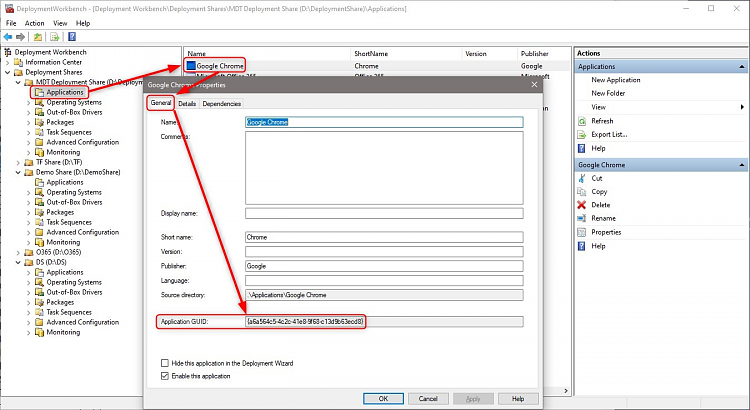
In my example case, adding Chrome, Firefox, Opera, VLC and Office to be installed automatically, that section of CustomSettings.ini looks like this:

7.2) To add application, in this sample Chrome, to deployment, in MDT Deployment Workbench select your deployment share, select Applications, select New application, and select Application with source files:

7.3) Add Publisher (optional), Application name (required), Version (optional) and Language (optional):
7.4) In Source page of New Application Wizard, browse to and select the folder where you saved the application installer and click Next. Accept defaults in Destination page.
7.5) In Command Details page, enter the command for silent install. If not using silent install, the deployment would stop to ask user interaction.
In this example, as I am adding Chrome, the command for silent install is as follows:
ChromeSetup.exe /silent /install7.6) Chrome is now added to deployment. For this example, I also added Firefox, Opera and VLC Player. Silent install command lines for these are as follows:
Firefox:
Firefox Setup 66.0.2.exe -ms(Firefox installer name contains its version number. Change it according to version you downloaded.)
Opera:
OperaSetup.exe /SILENT /allusers=yes /launchopera=no /setdefaultbrowser=noVLC Player:
vlc-3.0.6-win64.exe /L=1033 /S /NCRC(Like Firefox, installer name contains version number, change it according to version you downloaded. L switch is language, 1033 is English.)
Unfortunately, it would be impossible for me to list silent installation commands for every available application, above only a few samples. Bing is your friend in this task, just search for APPNAME Silent Install
7.7) I also added Microsoft Office to deployment image. I downloaded the Office Deployment Tool (ODT) and created an XLM script with Office Customization Tool (OCT) to download Office from Microsoft cloud (CDN, Content Delivery Network) as told in this tutorial: Custom install or change Microsoft Office with Office Deployment Tool | Tutorials
I saved both ODT setup file Setup.exe and OCT configuration file Configuration.xml to folder Office:

The Office configuration file Configuration.xml used in this example:
Code:
<Configuration ID="1e03e53a-9a5d-41d4-91eb-1353c6790ff4">
  <Add OfficeClientEdition="32" Channel="Insiders" ForceUpgrade="TRUE">
    <Product ID="O365ProPlusRetail">
      <Language ID="en-us" />
      <Language ID="fi-fi" />
      <Language ID="sv-se" />
      <Language ID="de-de" />
    </Product>
  </Add>
  <Property Name="SharedComputerLicensing" Value="0" />
  <Property Name="PinIconsToTaskbar" Value="FALSE" />
  <Property Name="SCLCacheOverride" Value="0" />
  <Updates Enabled="TRUE" />
  <Display Level="Full" AcceptEULA="TRUE" />
  <Logging Level="Off" />
</Configuration>
It downloads and installs Office Pro Plus, latest version, in US English, and adds Office language packs for Finnish, Swedish and German.
7.8) To add Office as New Application to MDT Deployment Workbench, follow the steps 7.2 through 7.5. The install command to add in step 7.5 is as follows:
setup.exe /configure Configuration.xmlWhereas Chrome, Firefox, Opera and VLC Player where added as silent installers in this example deployment, Office will be first downloaded from Microsoft CDN on target device using the configuration file provided. This adds a few minutes to deployment because target device must download almost 4 GB of data, but it is a very easy and convenient way to install Office
If you have an Office ISO, you can use it as a source when adding new application. Mount the ISO and use it as source. In that case, the install command would be simply
setup.exe7.9) All applications added:
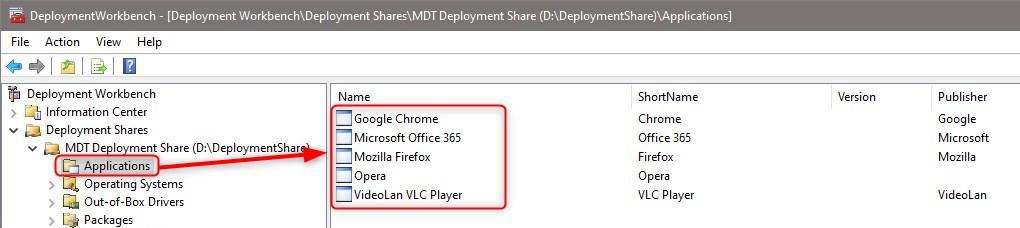
7.10) When deployment task is now run on target device, you can choose which applications will be installed:

7.11) If you want to do an automated deployment as told in Part Six, you can modify the CustomSettings.ini (step 6.6). Add following lines to INI file:
Code:
SkipApplications=YES
Applications001={a6a564c5-4c2c-41e8-9f68-c13d9b63ecd8}
The application GUID can be found in its properties. Select Applications in your deployment share, right click an application on middle pane, select Properties. The GUID can be seen in General tab:

In my example case, adding Chrome, Firefox, Opera, VLC and Office to be installed automatically, that section of CustomSettings.ini looks like this:
Code:
SkipApplications=YES
Applications001={a6a564c5-4c2c-41e8-9f68-c13d9b63ecd8}
Applications002={38b1a9d8-c8b6-405b-b40d-27794c9c3a99}
Applications003={9ba3ae8a-856b-4f39-9a69-95f307309d3a}
Applications004={32ce5ae2-ffa7-4770-a6ff-4b8c6958dee8}
Applications005={afde4f64-9e61-4c2f-958f-b553ff90f2d2}
8.1)
To add hardware drivers, select your deployment share, select
Out-of-Box Drivers, select Import Drivers, browse to and select the
folder containing drivers you'd like to add:
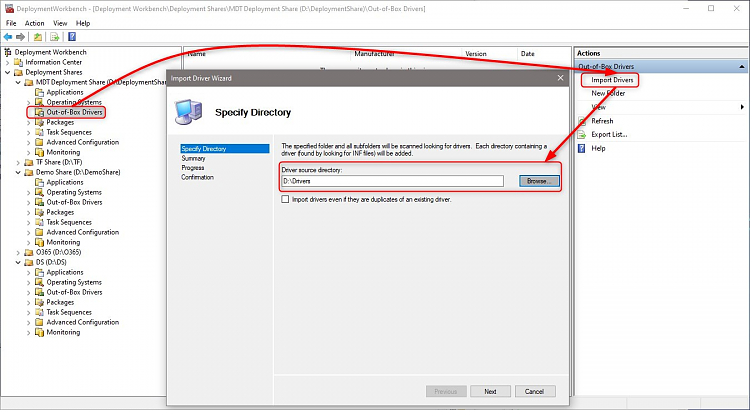
8.2) As I want to wipe the hard disk on an HP laptop and deploy a new custom image, I first exported its current, working drivers as told in this tutorial: DISM - Add or Remove Drivers on an Offline Image | Tutorials (Part Two).
I then imported them to my deployment share:
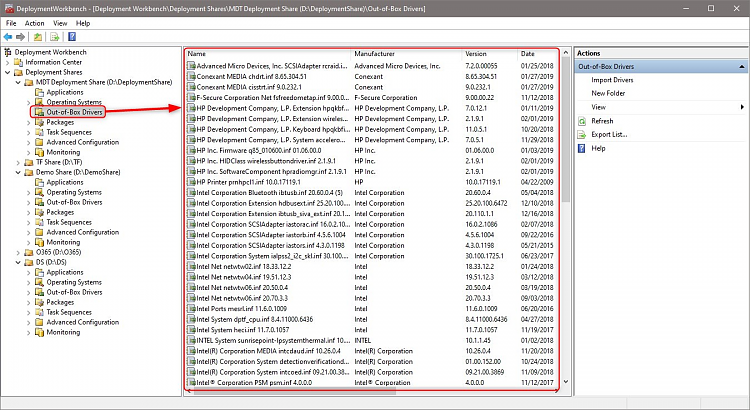
8.3) When deploying to that laptop with MDT, it will be somewhat faster because instead of Windows Setup searching and downloading drivers, they already exist.
In my opinion, adding drivers to deployment image is mostly unnecessary. Windows 10 is extremely good in finding and installing correct drivers, and it does really not take too much time. I recommend adding drivers to MDT only if you have a very specific device which needs a specific driver.

8.2) As I want to wipe the hard disk on an HP laptop and deploy a new custom image, I first exported its current, working drivers as told in this tutorial: DISM - Add or Remove Drivers on an Offline Image | Tutorials (Part Two).
I then imported them to my deployment share:

8.3) When deploying to that laptop with MDT, it will be somewhat faster because instead of Windows Setup searching and downloading drivers, they already exist.
In my opinion, adding drivers to deployment image is mostly unnecessary. Windows 10 is extremely good in finding and installing correct drivers, and it does really not take too much time. I recommend adding drivers to MDT only if you have a very specific device which needs a specific driver.
NoteIn Part 6 we automated the deployment task by editing the CustomSettings.ini
file. If left as-is, when we run the MDT script on our target device,
it will automatically start a new OS deployment. Instead of capturing a
custom image or upgrading target device on the reference machine, its OS
would be completely wiped and replaced with a clean install.
We must edit the CustomSettings.ini every time before Capture task as shown in this Part Nine and Upgrade task shown in Part Ten are run on target devices.
The following code shows all the edits I made just now to CustomSettings.ini we edited in Part Six. I changed two YES values to NO in two lines (blue highlight). Also, I added a semicolon followed by a space to the beginning of the TaskSequence line (red), and to every Applications00X line to avoid unnecessary reinstall of applications.
A Semicolon flags its line as a remark or comment, which is then ignored when the task is run:
With these changes, automatic deployment is not run, letting me to choose Upgrade or Capture task.
We must edit the CustomSettings.ini every time before Capture task as shown in this Part Nine and Upgrade task shown in Part Ten are run on target devices.
The following code shows all the edits I made just now to CustomSettings.ini we edited in Part Six. I changed two YES values to NO in two lines (blue highlight). Also, I added a semicolon followed by a space to the beginning of the TaskSequence line (red), and to every Applications00X line to avoid unnecessary reinstall of applications.
A Semicolon flags its line as a remark or comment, which is then ignored when the task is run:
Code:
[Default]
OSInstall=Y
_SMSTSORGNAME=TenForums
SkipAdminPassword=YES
SkipCapture=NO
SkipApplications=YES
; Applications001={a6a564c5-4c2c-41e8-9f68-c13d9b63ecd8}
; Applications002={38b1a9d8-c8b6-405b-b40d-27794c9c3a99}
; Applications003={9ba3ae8a-856b-4f39-9a69-95f307309d3a}
; Applications004={32ce5ae2-ffa7-4770-a6ff-4b8c6958dee8}
; Applications005={afde4f64-9e61-4c2f-958f-b553ff90f2d2}
SkipBDDWelcome=YES
SkipTaskSequence=NO
; TaskSequenceID=DEP01
SkipBitLocker=YES
SkipComputerBackup=YES
SkipComputerName=YES
SkipDeploymentType=YES
SkipDomainMembership=YES
SkipUserData=YES
SkipLocaleSelection=YES
SkipProductKey=YES
SkipSummary=YES
SkipTimeZone=YES
EventService=http://AGM-W10PRO03:9800
With these changes, automatic deployment is not run, letting me to choose Upgrade or Capture task.
9.1)
In Parts Six & Seven, we customized the deployment image by
modifying answer file, INI files and adding software. Personally, I
prefer to capture a custom image, and then import the captured custom
WIM file to MDT as OS as told in Part Three
Start by installing Windows 10 on a reference machine. I always use Hyper-V virtual machines as reference machines, temporary virtual machines to build a custom image.
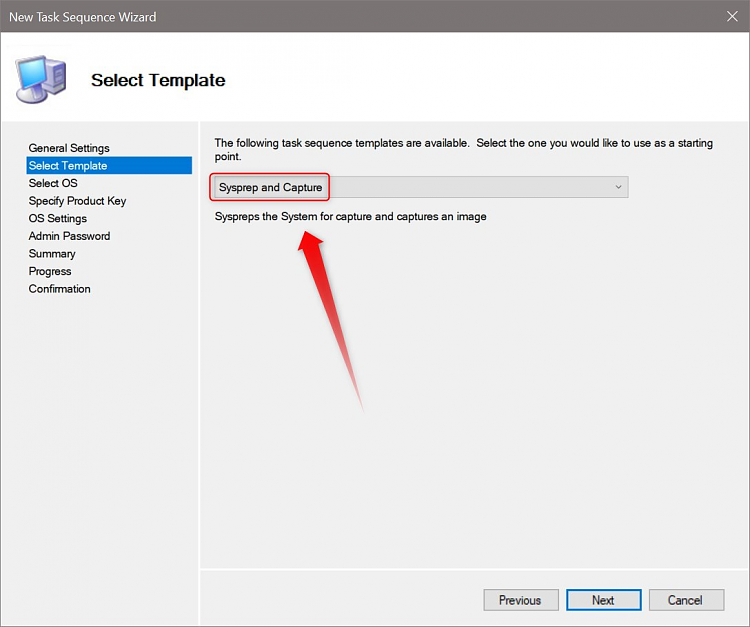
9.2) While Windows ins installing on reference machine, create a new Task Sequence as in steps 4.1 through 4.8, this time selecting Sysprep and Capture from dropdown list in Select Template page of New Task Sequence Wizard:
9.3) When reference machine has finished Windows Setup and boots to OOBE showing region and language selection screen, press CTRL + SHIFT + F3 to restart in Audit Mode:
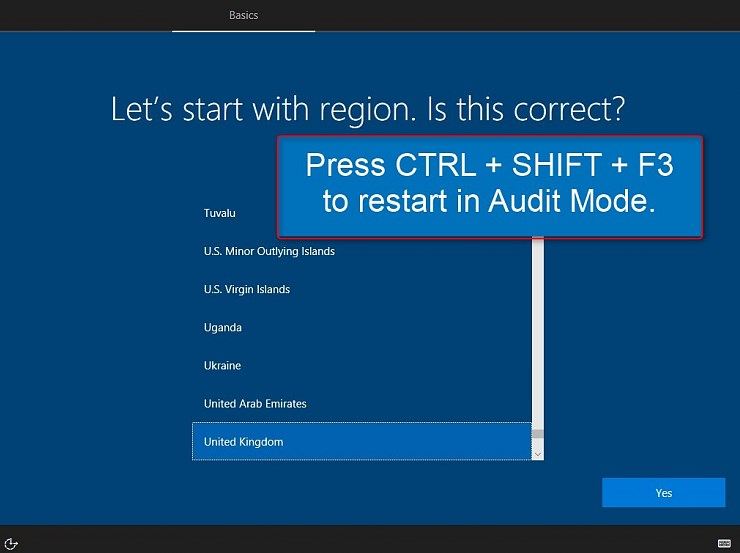
Windows boots to Audit Mode using default built-in admin credentials.
9.4) Customize Windows as you'd prefer, install software, change settings. Notice that as reference machine is at this point not activated, personalization settings cannot be changed. Workaround: to change theme and colors, copy an earlier exported Windows Theme file to reference machine and apply theme.
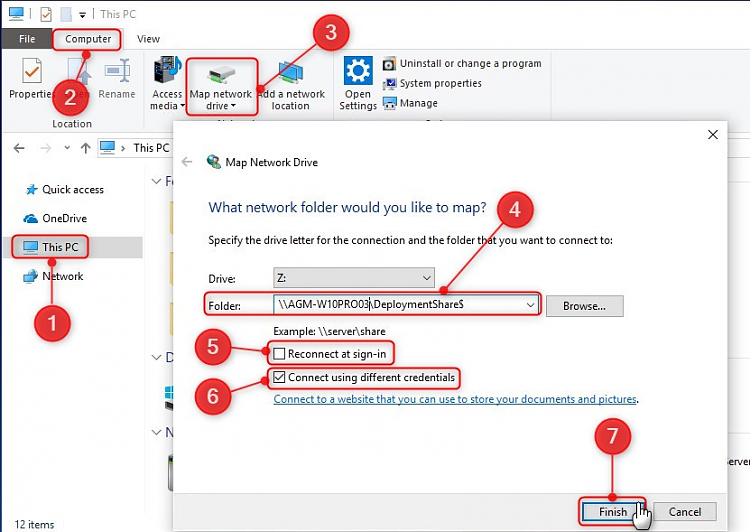
9.5) When ready, do not sign out / restart / shut down. Still in Audit Mode, signed in as built-in admin, open File Explorer on reference machine, select This PC (#1 in screenshot), select Computer tab (#2), and select Map network drive (#3). Enter the network path to your deployment share (\\server\share, #4), unselect Reconnect at sign-in (#5), select Connect using different credentials (#6), and finally click Finish (#7):
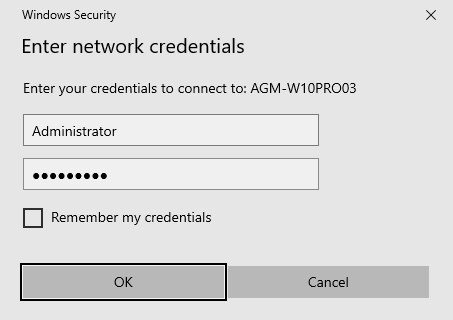
9.6) Enter network credentials to access your deployment share on MDT Workbench machine:
9.7) Open mapped deployment share in File Explorer, browse to Scripts folder and run script LiteTouch.vbs:
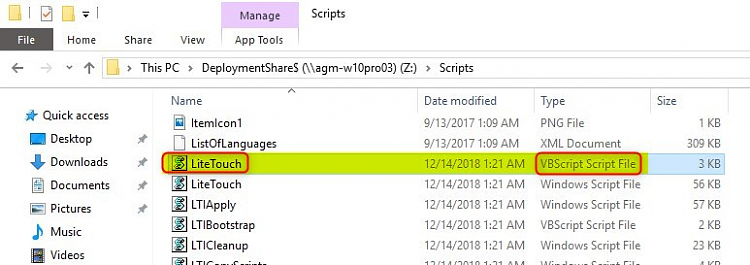
Be sure to run the VBScript file (.vbs), not the Windows Script File (.wsf)! Small but important difference.
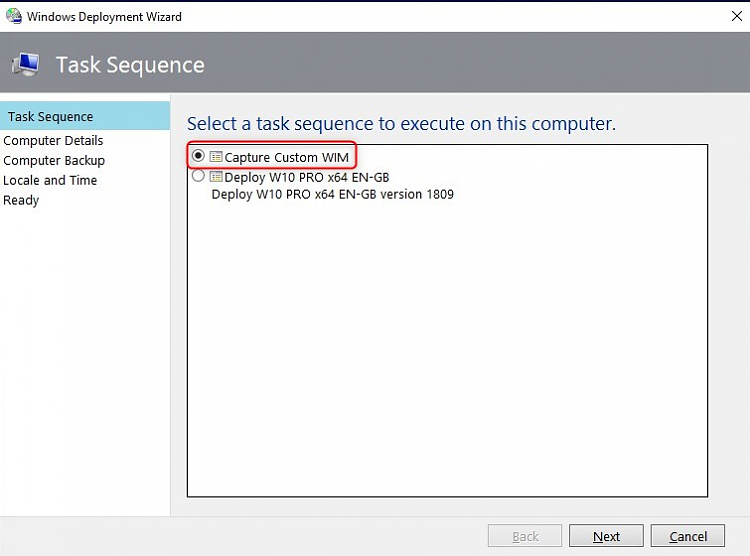
9.8) The script runs Deployment Wizard on reference machine. Sign in to deployment share on MDT Workbench machine as in step 5.3, and when prompted, select your new capture Task Sequence:
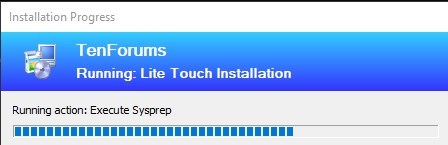
9.9) Click Next and start capture process. Reference machine will run Sysprep:
9.10) After Sysprep, reference machine restarts to WinPE to capture the WIM image:
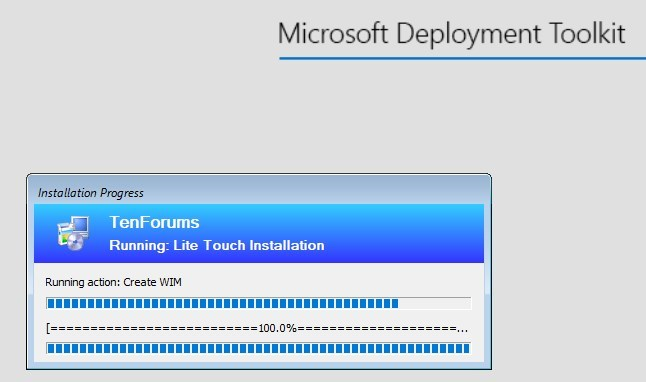
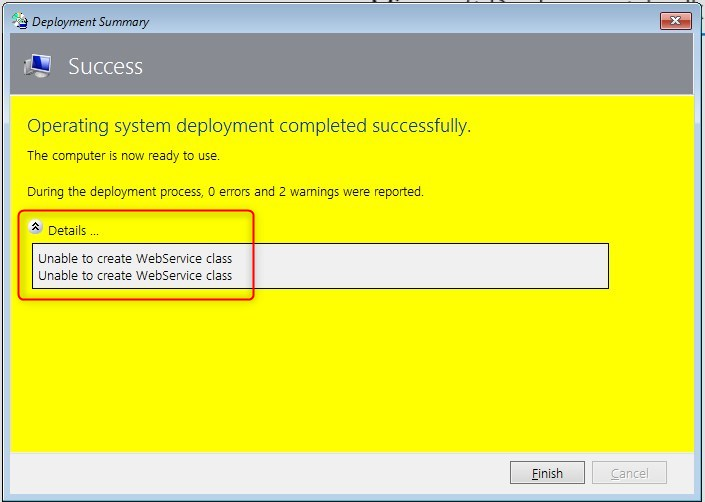
9.11) If capture process has errors or warnings, check details to see if there's reason to be concerned. Warnings are usually not serious, like these two warning I got now, Image will be OK:
9.12) By default, you'll find captured images in Captures folder in your deployment share. You can now import it as OS to deployment share, selecting Custom Image File as told in step 3.4, and deploy it to other machines.
Start by installing Windows 10 on a reference machine. I always use Hyper-V virtual machines as reference machines, temporary virtual machines to build a custom image.
9.2) While Windows ins installing on reference machine, create a new Task Sequence as in steps 4.1 through 4.8, this time selecting Sysprep and Capture from dropdown list in Select Template page of New Task Sequence Wizard:

9.3) When reference machine has finished Windows Setup and boots to OOBE showing region and language selection screen, press CTRL + SHIFT + F3 to restart in Audit Mode:
Windows boots to Audit Mode using default built-in admin credentials.
9.4) Customize Windows as you'd prefer, install software, change settings. Notice that as reference machine is at this point not activated, personalization settings cannot be changed. Workaround: to change theme and colors, copy an earlier exported Windows Theme file to reference machine and apply theme.
9.5) When ready, do not sign out / restart / shut down. Still in Audit Mode, signed in as built-in admin, open File Explorer on reference machine, select This PC (#1 in screenshot), select Computer tab (#2), and select Map network drive (#3). Enter the network path to your deployment share (\\server\share, #4), unselect Reconnect at sign-in (#5), select Connect using different credentials (#6), and finally click Finish (#7):

9.6) Enter network credentials to access your deployment share on MDT Workbench machine:
9.7) Open mapped deployment share in File Explorer, browse to Scripts folder and run script LiteTouch.vbs:

Be sure to run the VBScript file (.vbs), not the Windows Script File (.wsf)! Small but important difference.
9.8) The script runs Deployment Wizard on reference machine. Sign in to deployment share on MDT Workbench machine as in step 5.3, and when prompted, select your new capture Task Sequence:

9.9) Click Next and start capture process. Reference machine will run Sysprep:
9.10) After Sysprep, reference machine restarts to WinPE to capture the WIM image:
9.11) If capture process has errors or warnings, check details to see if there's reason to be concerned. Warnings are usually not serious, like these two warning I got now, Image will be OK:
9.12) By default, you'll find captured images in Captures folder in your deployment share. You can now import it as OS to deployment share, selecting Custom Image File as told in step 3.4, and deploy it to other machines.
10.1) I want to upgrade some physical and virtual machines to latest Windows Insider Skip Ahead build, build 18865 when writing this. To do that, I must first mount the build 18865 ISO and import it to deployment share as told in Part Three.
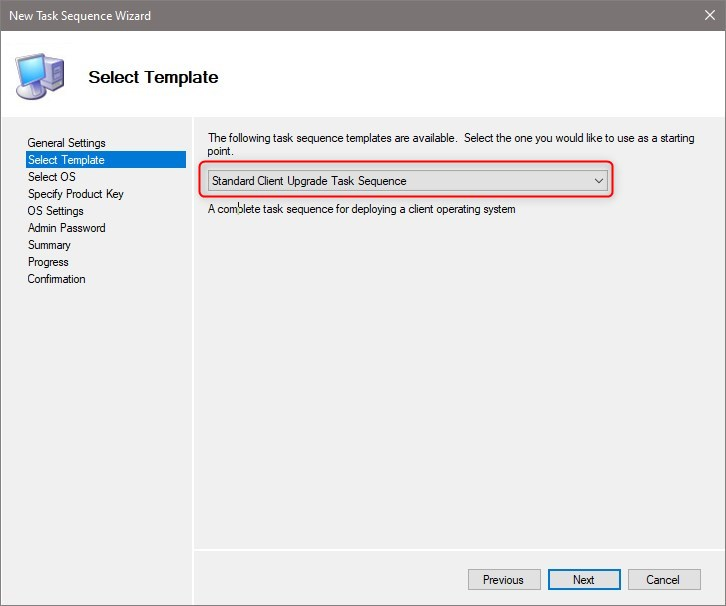
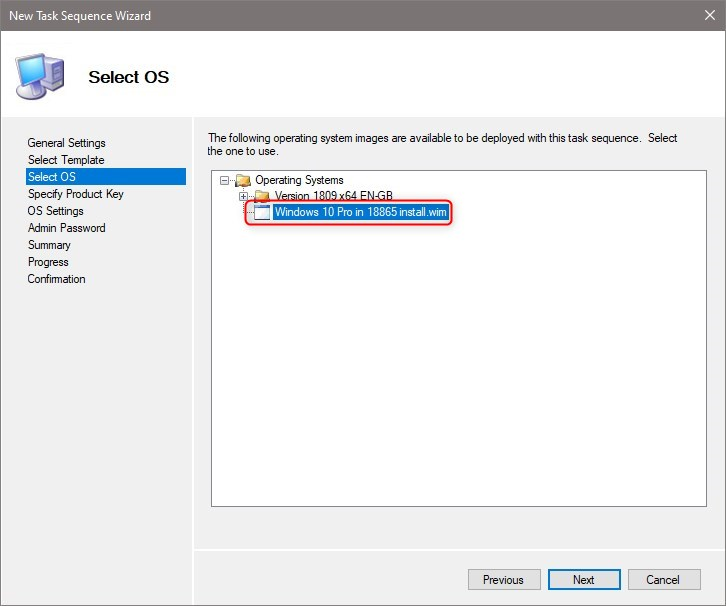
10.2) Next step is to create a new Upgrade Task Sequence as told in Part Four, this time selecting Standard Client Upgrade Task Sequence in Select Template page, thereafter select the Insider build 18865:
10.3) On target machine, sign out from your current account and sign in to built-in admin account. Map the deployment share on MDT Workbench machine as told in steps 9.5 and 9.6.
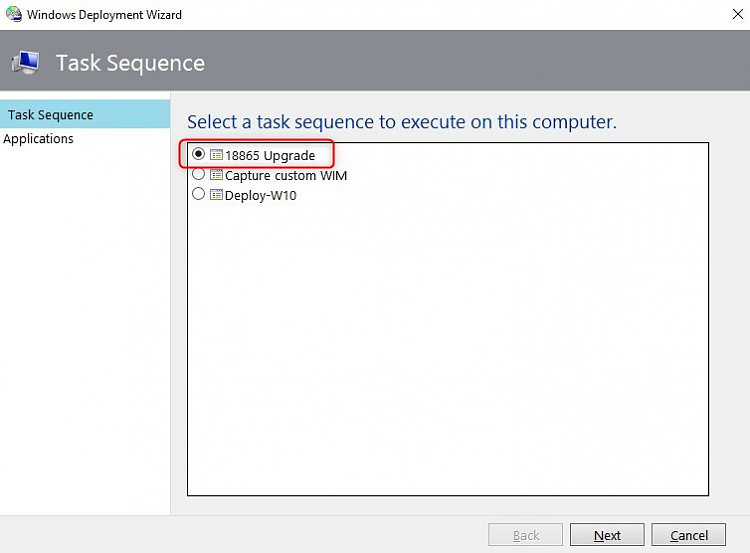
10.4) Run LiteTouch.vbs script as told in step 9.7, selecting the upgrade task:
10.5) The upgrade starts:
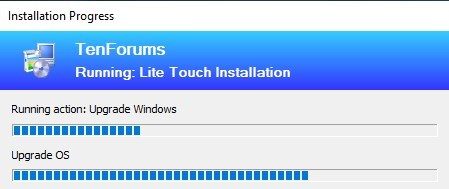
Be patient, the progress bar remains still quite long, upgrade can take anything from 15 minutes to over an hour, depending on your hardware.
10.2) Next step is to create a new Upgrade Task Sequence as told in Part Four, this time selecting Standard Client Upgrade Task Sequence in Select Template page, thereafter select the Insider build 18865:
10.3) On target machine, sign out from your current account and sign in to built-in admin account. Map the deployment share on MDT Workbench machine as told in steps 9.5 and 9.6.
10.4) Run LiteTouch.vbs script as told in step 9.7, selecting the upgrade task:

10.5) The upgrade starts:
Be patient, the progress bar remains still quite long, upgrade can take anything from 15 minutes to over an hour, depending on your hardware.

