Tuesday, December 18, 2018

How to permanently disable Windows Defender on Windows 10 / Windows Server 2016

How to disable Windows Defender using Local Group Policy

If you're running Windows 10 Pro, Enterprise, or Education, you can use the Local Group Policy Editor to disable Windows Defender Antivirus on your computer permanently using these steps:
  1. Use the Windows key + R keyboard shortcut to open the Run command.
  2. Type gpedit.msc and click OK to open the Local Group Policy Editor.
  3. Browse the following path:
    Computer Configuration > Administrative Templates > Windows Components > Windows Defender Antivirus
  4. On the right, double-click the Turn off Windows Defender Antivirus policy.

  5. Select the Enabled option to disable Windows Defender.

  6. Click Apply.
  7. Click OK.
Once you've completed the steps, restart your computer to apply the changes.
You'll notice that the shield icon will remain in the taskbar notification area, but that's because the icon is part of the Windows Defender Security Center and not part of the antivirus.
At any time, you can enable the Windows Defender Antivirus again using the steps, but on step No. 5, make sure to select the Not Configured option. Then reboot your device to apply the changes.

How to disable Windows Defender using the Registry

Alternatively, if you're running Windows 10 Home, you won't have access to the Local Group Policy Editor. However, you can modify the registry to permanently disable the default antivirus using these steps:
Warning: This is a friendly reminder that editing the Registry is risky, and it can cause irreversible damage to your installation if you don't do it correctly. It's recommended to make a full backup of your PC before proceeding.
  1. Use the Windows key + R keyboard shortcut to open the Run command.
  2. Type regedit, and click OK to open the Registry.
  3. Browse the following path:
    HKEY_LOCAL_MACHINE\SOFTWARE\Policies\Microsoft\Windows Defender
    Quick Tip: You can now copy and paste the path in the new Registry's address bar to quickly jump to the key destination.
  4. If you don't see the DisableAntiSpyware DWORD, right-click the Windows Defender (folder) key, select New, and click on DWORD (32-bit) Value.

  5. Name the key DisableAntiSpyware and press Enter.
  6. Double-click the newly created DWORD and set the value from 0 to 1.

  7. Click OK.
After completing the steps, restart your device to apply the settings, and then the Windows Defender Antivirus should now be disabled.
If you no longer want to keep the security feature disabled, you can enable it again using the same steps, but on step No. 6, make sure to right-click the DisableAntiSpyware DWORD and select the Delete option.


How to disable Windows Defender using the Security Center app

In the case that you're simply looking to disable the Windows Defender Antivirus temporarily, then you can use these steps instead:
  1. Open Windows Defender Security Center.
  2. Click on Virus & threat protection.
  3. Click the Virus & threat protection settings option.

  4. Turn off the Real-time protection toggle switch.

Once you've completed the steps, the Windows 10 antivirus will disable its real-time protection temporarily, which is more than enough time to install applications or performing a task that was getting blocked by the feature.

However, because this is a temporary solution, the next time you restart your computer Windows Defender Antivirus will re-enable automatically on your machine.

Tuesday, December 11, 2018

MAPI 1.0 [000004c2] Error in Microsoft Outlook

Outlook on my computer it displays the error as follows: “The limit for logging reached while waiting for system resources. Try again. MAPI 1.0 [000004C2]”. I tried to set up Outlook by going through Control Panel’s Mail option. I tried many times but I am getting the same error every time.

I have set up Outlook 2013 (but not perfectly) on my new PC. The problem is that, when I open Outlook and immediately start working on it then there is no problem and no error is displayed. However, when I open Outlook and wait for some time to start working on it then the client displays the following message:

and it works only after exiting & restarting Outlook.


Elements That Cause This Error in Outlook

  • When compatibility mode is turned on.
  • If in case the PST file turns corrupted.
  • When incorrect Registry key is configured.

Manual Process to Remove Outlook MAPI Error

Check if the Compatibility Mode Is turned on

  • Compatibility mode is a mechanism in which any software application is run using an old processor and Operating system. To check whether the compatibility mode is enabled or disabled, follow steps as shown as below.
          Use the following path to locate Outlook.exe:

  • For Outlook 2016: Local disk (C:) >> Program Files >> Microsoft Office >> Office16 >> Outlook.exe
  • For Outlook 2013: Local disk (C:) >> Program Files >> Microsoft Office >> Office15 >> Outlook.exe
  • For Outlook 2010: Local disk (C:) >> Program Files >> Microsoft Office >> Office14 >> Outlook.exe
  • Right click on Outlook.exe and click to select Properties.
  • Go to Compatibility tab >> uncheck the box to disable the option Run this program in compatibility mode for:.
  • Click the parameter Change settings for all users. From here, uncheck all the checkboxes to disable the compatibility for all users and click on Apply/OK.

    Create a New Profile and Set Them as Default Profiles

    To create a new Outlook Profile…

    • Click on Start button and in the search box, type Control Panel and Enter.
    • On the Control Panel, click on Mail >> In the Mail Setup window, click on Show Profiles.
    • Click on Add >> provide a name for new Outlook profile and click on OK to save the changes.
    To make Outlook Profile as default...

    • Select the newly created profile >> check the box to select the option Always use this profile and click on OK.
    Modify the Registry Key of Outlook Profile and Create a Fresh One

    • First, open Registry Editor. To open it click on Start button from your Windows screen and then in the search box, type Run and Enter. In the search box, type regedit and hit Enter key to open the Registry Editor.
    • Under the Registry Editor, navigate to the following key according to the version of Outlook
    • Key for Outlook 2013: HKEY_CURRENT_USER\Software\Microsoft\Office\15.0\Outlook\Profiles.
    • Key for Outlook 2010: HKEY_CURRENT_USER\Software\Microsoft\Windows NT\CurrentVersion\Windows Messaging Subsystems.
    • Now right click on variable of key according to your Outlook version and then click on Rename.
    • To arrange the word, type OLD at the end of the name.
    • After you did this now try to open the Mail applet and create a new profile.

    Other Workarounds That You May Try If the Problem Persist

    Repair MS Office

    • Open your Control Panel >> click on Programs >> now click on Programs and Features.
    • Right click to select the Office Programs that you want to repair >> click Change.
    • In the How would you like repair your office program section, select online repair >> click on Repair.
    Despite following the steps given above if you are still seeing the discussed error in Outlook then try to do the follow the given steps:

    Try installing and uninstalling MS Office

    Delete MAPI32.dll File

    • To delete msmapi32.dll navigate to this path in your Windows Explorer: C:\Program Files\Common Files\System\Msmapi\1033
    • Now right click on MSMapi32.dll and click on Rename.
    • In the Rename box, change the filename to MSMapi32.old and start your Outlook.

    Thursday, December 6, 2018

    Use PowerShell and DSAMAIN.exe to Mount a Backup of NTDS.dit

    First, take stock of your existing disk setup:
    Get-Partition

    Now, mount the VHDX disk contained in the remote backup:
    Mount-DiskImage –ImagePath "\\NINJALDS01\TEMP\Backup\1502021020\WindowsImageBackup\NINJADC02\Backup 2015-02-02 102022\dcafa9ee-79ef-426b-ba58-806e81f09963.vhdx"

    Time to check your disk configuration again:
    Get-Partition

    Note the disk number (2) and partition (2) where the backup of NTDS.dit resides. Use this information to assign a drive letter in the operating system:
    Set-Partition –DiskNumber 2 -PartitionNumber 2 -NewDriveLetter Z

    Finally, use DSAMAIN.exe to mount the backup of Active Directory:
    Dsamain –dbpath "Z:\Windows\NTDS\NTDS.dit" -ldapport 5000

    Sweet! Now we can point our existing admin tools at this mounted copy by using the : notation. For example:
    Get-ADUser -Identity IanFarr -Properties * -Server NINJADC02:5000
    Or...


    The deleted information (or the absence of corruption) can now be easily and safely corroborated.

    Wednesday, November 21, 2018

    Step-By-Step: Enabling Active Directory Recycle Bin in Windows Server 2012 R2

    Active Directory Recycle Bin was created to adhere to that very problem and this Step-By-Step will showcase how easy it is to enable.  This procedure does not negate the need to have a proper system state backup which is always recommended and one must be aware that enabling this feature is one time and cannot be reversed under any circumstances.

    Enabling Active Directory Recycle Bin
    1. In the management console, go to ToolsActive Directory Administrative Center
    2. Select Local Domain and in the Tasks Pane
    3. Select Enable Recycle Bin.
    4. Click OK
      NOTE: Be aware this feature cannot be disabled.
    5. Click OK.  Once enabled, wait for AD replication to complete as this is a change made on the configuration partition. This process may take a while should your organization have a large active directory infrastructure.
    A very simple enablement of a process that could save you hours of restore time.  Again this process cannot be reversed once invoked.

    Be sure to test Active Directory Recycle Bin in your lab by downloading Windows Server 2012 R2. Also, be sure to take advantage of Microsoft Virtual Academy to learn about additional features made available in Windows Server 2012 R2 to further your IT career.

    Tuesday, November 6, 2018

    If you can't update or restore your iPhone, iPad, or iPod touch

    You can put your iOS device in recovery mode, then restore it with iTunes.
    In these situations, you might need to use recovery mode to restore your device:
    • iTunes doesn't recognize your device or says it's in recovery mode.
    • If your screen is stuck on the Apple logo for several minutes with no progress bar.
    • You see the connect to iTunes screen.
    Learn what to do if you see the progress bar on your screen for several minutes.

    Put your device in recovery mode and set it up again

    1. Make sure that you're using the latest version of iTunes
    2. If iTunes is already open, close it. Connect your device to your computer and open iTunes. If you don't have a computer, borrow one from a friend or go to an Apple Retail Store or Apple Authorized Service Provider for help.
    3. While your device is connected, force restart it with these steps, but don't release the buttons when you see the Apple logo, wait until the connect to iTunes screen appears: 
      • On iPhone 8 and later: Press and quickly release the Volume Up button. Press and quickly release the Volume Down button. Then, press and hold the Side button until you see the connect to iTunes screen.
      • On an iPhone 7 or iPhone 7 Plus: Press and hold the Side and Volume Down buttons at the same time. Keep holding them until you see connect to iTunes screen.
      • On an iPhone 6s and earlier, iPad, or iPod touch: Press and hold both the Home and the Top (or Side) buttons at the same time. Keep holding them until you see the connect to iTunes screen.
        connect to iTunes screen
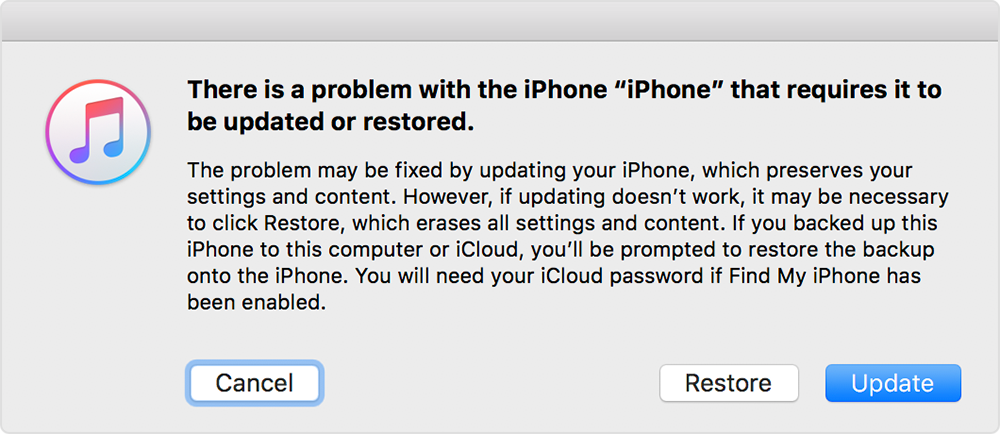
    4. When you see the option to Restore or Update, choose Update. iTunes will try to reinstall iOS without erasing your data. Wait while iTunes downloads the software for your device. If the download takes more than 15 minutes and your device exits the connect to iTunes screen, let the download finish, then repeat step 3.
      there is a problem with the iPhone screen
    5. After the Update or Restore completes, set up your device.

    Note: Use the original cable

    How to Use the Netstat Command


    The netstat command is a Command Prompt command used to display very detailed information about how your computer is communicating with other computers or network devices.
    Specifically, the netstat command can show details about individual network connections, overall and protocol-specific networking statistics, and much more, all of which could help troubleshoot certain kinds of networking issues.

    Netstat Command Availability

    The netstat command is available from within the Command Prompt in most versions of Windows including Windows 10, Windows 8, Windows 7, Windows Vista, Windows XP, Windows Server operating systems, and some older versions of Windows, too.

    The availability of certain netstat command switches and other netstat command syntax may differ from operating system to operating system.

    Netstat Command Syntax

    netstat [-a] [-b] [-e] [-f] [-n] [-o] [-p protocol] [-r] [-s] [-t] [-x] [-y] [time_interval] [/?]

    How to Read Command Syntax 
    Execute the netstat command alone to show a relatively simple list of all active TCP connections which, for each one, will show the local IP address (your computer), the foreign IP address (the other computer or network device), along with their respective port numbers, as well as the TCP state.

    -a = This switch displays active TCP connections, TCP connections with the listening state, as well as UDP ports that are being listened to.

    -b = This netstat switch is very similar to the -o switch listed below, but instead of displaying the PID, will display the process's actual file name. Using -b over -o might seem like it's saving you a step or two but using it can sometimes greatly extend the time it takes netstat to fully execute.

    -e = Use this switch with the netstat command to show statistics about your network connection. This data includes bytes, unicast packets, non-unicast packets, discards, errors, and unknown protocols received and sent since the connection was established.

    -f = The -f switch will force the netstat command to display the Fully Qualified Domain Name (FQDN) for each foreign IP addresses when possible.

    -n = Use the -n switch to prevent netstat from attempting to determine host names for foreign IP addresses. Depending on your current network connections, using this switch could considerably reduce the time it takes for netstat to fully execute.

    -o = A handy option for many troubleshooting tasks, the -o switch displays the process identifier (PID) associated with each displayed connection. See the example below for more about using netstat -o.

    -p = Use the -p switch to show connections or statistics only for a particular protocol. You can not define more than one protocol at once, nor can you execute netstat with -p without defining a protocol.
    protocol = When specifying a protocol with the -p option, you can use tcp, udp, tcpv6, or udpv6. If you use -s with -p to view statistics by protocol, you can use icmp, ip, icmpv6, or ipv6 in addition to the first four I mentioned.

    -r = Execute netstat with -r to show the IP routing table. This is the same as using the route command to execute route print.

    -s = The -s option can be used with the netstat command to show detailed statistics by protocol. You can limit the statistics shown to a particular protocol by using the -s option and specifying that protocol, but be sure to use -s before -p protocol when using the switches together.

    -t = Use the -t switch to show the current TCP chimney offload state in place of the typically displayed TCP state.

    -x = Use the -x option to show all NetworkDirect listeners, connections, and shared endpoints.

    -y = The -y switch can be used to show the TCP connection template for all connection. You cannot use -y with any other netstat option.

    time_interval = This is the time, in seconds, that you'd like the netstat command to re-execute automatically, stopping only when you use Ctrl-C to end the loop.

    /? = Use the help switch to show details about the netstat command's several options.
    Make all that netstat information in the command line easier to work with by outputting what you see on the screen to a text file using a redirection operator. 

    Netstat Command Examples

    netstat -f

    In this first example, I execute netstat to show all active TCP connections. However, I do want to see the computers I'm connected to in FQDN format [-f] instead of a simple IP address.


    Here's an example of what you might see:

    Active Connections
    
     Proto Local Address Foreign Address State
    
     TCP 127.0.0.1:5357 VM-Windows-7:49229 TIME_WAIT
    
     TCP 127.0.0.1:49225 VM-Windows-7:12080 TIME_WAIT
    
     TCP 192.168.1.14:49194 75.125.212.75:http CLOSE_WAIT
    
     TCP 192.168.1.14:49196 a795sm.avast.com:http CLOSE_WAIT
    
     TCP 192.168.1.14:49197 a795sm.avast.com:http CLOSE_WAIT
    
     TCP 192.168.1.14:49230 TIM-PC:wsd TIME_WAIT
    
     TCP 192.168.1.14:49231 TIM-PC:icslap ESTABLISHED
    
     TCP 192.168.1.14:49232 TIM-PC:netbios-ssn TIME_WAIT
    
     TCP 192.168.1.14:49233 TIM-PC:netbios-ssn TIME_WAIT
    
     TCP [::1]:2869 VM-Windows-7:49226 ESTABLISHED
    
     TCP [::1]:49226 VM-Windows-7:icslap ESTABLISHED

    As you can see, there were 11 active TCP connections at the time netstat was executed in this example. The only protocol (in the Proto column) listed is TCP, which was expected because I did not use -a.

    You can also see three sets of IP addresses in the Local Address column—my actual IP address of 192.168.1.14 and both IPv4 and IPv6 versions of my loopback addresses, along with the port each connection is using. The Foreign Address column lists the FQDN (75.125.212.75 didn't resolve for some reason) along with that port as well.

    Finally, the State column lists the TCP state of that particular connection.

    netstat -o

    In this example, netstat will be run normally so it only shows active TCP connections, but we also want to see the corresponding process identifier [-o] for each connection so we can determine which program on the computer initiated each one.

    Here's what the computer displayed:
    
    
    Active Connections
    
     Proto Local Address Foreign Address State PID
    
     TCP 192.168.1.14:49194 75.125.212.75:http CLOSE_WAIT 2948
    
     TCP 192.168.1.14:49196 a795sm:http CLOSE_WAIT 2948
    
     TCP 192.168.1.14:49197 a795sm:http CLOSE_WAIT 2948

    You probably noticed the new PID column. In this case, the PIDs are all the same, meaning that the same program on my computer opened these connections.

    To determine what program is represented by the PID of 2948 on the computer, all you have to do is open Task Manager, click on the Processes tab, and note the Image Name listed next to the PID I'm looking for in the PID column.1

    Using the netstat command with the -o option can be very helpful when tracking down which program is using too big a share of your bandwidth. It can also help locate the destination where some kind of malware, or even an otherwise legitimate piece of software, might be sending information without your permission.

    While this and the previous example were both run on the same computer, and within just a minute of each other, you can see that the list of active TCP connections is considerably different. This is because your computer is constantly connecting to, and disconnecting from, various other devices on your network and over the internet.

    netstat -s -p tcp -f

    In this third example, we want to see protocol specific statistics [-s] but not all of them, just TCP stats [-p tcp]. We also want the foreign addresses displayed in FQDN format [-f].

    This is what the netstat command, as shown above, produced on the example computer:
    
    
    TCP Statistics for IPv4
    
     Active Opens = 77
    
     Passive Opens = 21
    
     Failed Connection Attempts = 2
    
     Reset Connections = 25
    
     Current Connections = 5
    
     Segments Received = 7313
    
     Segments Sent = 4824
    
     Segments Retransmitted = 5
    
    Active Connections
    
     Proto Local Address Foreign Address State
    
     TCP 127.0.0.1:2869 VM-Windows-7:49235 TIME_WAIT
    
     TCP 127.0.0.1:2869 VM-Windows-7:49238 ESTABLISHED
    
     TCP 127.0.0.1:49238 VM-Windows-7:icslap ESTABLISHED
    
     TCP 192.168.1.14:49194 75.125.212.75:http CLOSE_WAIT
    
     TCP 192.168.1.14:49196 a795sm.avast.com:http CLOSE_WAIT
    
     TCP 192.168.1.14:49197 a795sm.avast.com:http CLOSE_WAIT

    As you can see, various statistics for the TCP protocol are displayed, as are all active TCP connections at the time.

    netstat -e -t 5

    In this final example, netstat command is executed to show some basic network interface statistics [-e] and so that these statistics continually updated in the command window every five seconds [-t 5].
    Here's what's produced on screen:
    Interface Statistics
    
     Received Sent
    
     Bytes 22132338 1846834
    
     Unicast packets 19113 9869
    
     Non-unicast packets 0 0
    
     Discards 0 0
    
     Errors 0 0
    
     Unknown protocols 0
    
    Interface Statistics
    
     Received Sent
    
     Bytes 22134630 1846834
    
     Unicast packets 19128 9869
    
     Non-unicast packets 0 0
    
     Discards 0 0
    
     Errors 0 0
    
     Unknown protocols 0
    
    ^C
    Various pieces of information, which you can see here and that I listed in the -e syntax above, are displayed.
    The netstat command only automatically executed one extra time, as you can see by the two tables in the result. Note the ^C at the bottom, indicating that the Ctrl-C abort command was used to stop the re-running of the command.

    Netstat Related Commands

    The netstat command is often used with other networking related Command Prompt commands like nslookup, ping, tracert, ipconfig, and others.

    [1] You may have to manually add the PID column to Task Manager. You can do this by selecting the "PID (Process Identifier)" checkbox from View -> Select Columns in Task Manager. You may also have to click the "Show processes from all users" button on the Processes tab if the PID you're looking for isn't listed.

    Active Directory FSMO Roles

    Flexible single-master operations (FSMO) operations performed by the Active Directory domain controllers, which require a mandatory server uniqueness for each operation. Various FSMO types can be performed on the same or on multiple domain controllers. Server operating FSMO roles known as Operations Master DC.

    Most operations in AD can be made on any domain controller. AD Replication service copies the changes to other domain controllers, ensuring the AD database identity on all the controllers of the same domain. Conflict resolution is as follows: if the two DC trying to change attributes of one AD object at the same time, automatic conflict resolution sуstem keep track of which change was made last.


    However, there are several actions (such as changing the AD schema), in which conflicts are unacceptable. The task of a servers with FSMO roles is to avoid such conflicts. Thus, each FSMO role can be performed only simultaneously on one server. And if necessary, it can be transferred to another domain controller at any time.

    FSMO roles

    There are 5 FSMO roles: 2 unique roles for AD forest and 3 for every domain.
    • Schema Master responsible for changes to the Active Directory schema. There can be only one for the entire domain forest.
    • Domain Naming Master responsible for the unique name for a domain and application partitions in the forest. There can be only one for the entire domain forest.
    • Infrastructure Master stores data about users from other domains, that are part of your domain local groups. There can be one for each domain in the forest.
    • RID pool manager responsible for assigning unique relative ID (RID), required when creating domain accounts. There can be one for each domain in the forest.
    • PDC (Primary Domain Controller) Emulator responsible for compatibility with NT4 domain and pre-Windows 2000 clients, for the domain time synchronization in the forest, for changing passwords and tracks locks when users enter the wrong password.

    Recommended Best Practice for placement of FSMO roles

    When you install a new AD domain, all FSMO roles are placed on a single server. According to Microsoft recommendation, the Best Practice is to spread the FSMO roles between the different domain controllers.


    The forest FSMO roles should be placed on one DC, and the domain role to another. In that case, if you have only one domain controller, it is recommended to deploy 1 additional DC. Thus, in an AD domain with a minimum configuration (2 DC), you need to place FSMO role as follows:

    Place the following domain roles on a DC1:
    • RID Master
    • Infrastructure Master
    • PDC Emulator
    Place the forest roles on a DC2:
    • Schema Master
    • Domain Master
    To determine current FSMO Roles holders, perform the following command:

    netdom query fsmo


    In this case, the FSMO roles are distributed between the two DC.

    However, you should be note, that there is no FSMO role which failure would lead to a significant loss of functionality of AD. Even in case of failure of all FSMO roles, infrastructure can operate normally within a few days, weeks or even months. Therefore, if you are going to bring DC, that contains some or all of the roles to a maintenance for some time, there is no need to transfer available FSMO roles on the other DC, your AD some time will work normally.
    Failure of a DCs with FSMO roles does not lead malfunction of a domain. However, it makes it impossible for many operations, actually shifting the domain to the “read-only” mode. In case of failure of a domain controller with the FSMO roles, you can resort to the procedure of seizing FSMO roles from a failed DC.

    Tools to admin FSMO roles

    To manage and transfer FSMO roles in Active Directory domain use a command line utility NTDSUTIL or GUI MMC snap-ins:
    • Active Directory Domains and Trusts Domain Naming Master role
    • Active Directory Users and Computers Relative ID Master,  Infrastructure Master and Primary Domain Controller Emulator roles
    • Active Directory Schema Schema Master role


    That’s all. Hope that we were able to clarify the situation with the FSMO role a bit. In future articles, we will take a closer look at each FSMO role and their features.