Monday, June 19, 2017

Manually enabling network file and printer browsing for unmanaged Symantec Endpoint Protection 11.0 clients.

Situation

Cause

Solution

Thursday, June 15, 2017

Using WSUS with Windows 10 1607?

Note:  Consider this post obsolete and replaced by https://blogs.technet.microsoft.com/mniehaus/2016/08/16/windows-10-delivery-optimization-and-wsus-take-2/, which offers more detail and clarity around the behavior of Delivery Optimization in both Windows 10 1511 and 1607.
For those of you who have started deploying Windows 10 1607 (edit: and Windows 10 1511), you might notice a change in the behavior of the Windows Update agent for PCs that are configured to pull updates from WSUS.  Instead of pulling the updates from WSUS, PCs may start grabbing them from peers on your network, leveraging the Delivery Optimization service for referrals to other PCs that have already obtained the content.  This change should generally help reduce the amount of network traffic being generated for both quality (monthly) updates and feature updates, offloading that traffic from the WSUS server.  It will add some additional traffic between each client PC and the Delivery Optimization service on the internet, as it has to talk to this internet-only service in order to get a list of peers.
If the Windows Update agent can’t talk to the Delivery Optimization service (due to firewall or proxy configurations), or if there are no peers able to provide the content, it will then go ahead and grab the content from the WSUS server.
There is a new Group Policy setting available if you want to disable this behavior, e.g. because you are already using BranchCache for peer-to-peer sharing.  To do this, you need to set the “Download Mode” policy under “Computer Configuration –> Administrative Templates –> Windows Components –> Delivery Optimization” to specify “Bypass” mode, which will result in the client always using BITS to transfer the content from WSUS (with BranchCache jumping in to provide the peer-to-peer capabilities through its integration with BITS):
image
Of course to set this policy, you need the latest ADMX files, which can be downloaded from https://www.microsoft.com/en-us/download/details.aspx?id=53430 and are also included in Windows 10 1607 and Windows Server 2016.  (The “Bypass” setting wasn’t available in previous versions.)  See https://support.microsoft.com/en-us/kb/3087759 for details on how to update the Group Policy central store with these latest ADMX files, if you are using a central store.

PIN and Fingerprint Sign-in options unavailable (greyed out) in Windows 10 1607 Enterprise

See this post for the resolution to the issue. This fixed it on my Dell E5470.
https://social.technet.microsoft.com/Forums/en-US/b975932a-b50b-4759-b43a-c94854c6da83/cant-enable-windows-hello-with-fresh-install-of-anniversity-upgrade-on-domain-account?forum=win10itprosetup
Apparently 1607 requires this registry key setting to enable PIN login on domain joined machines:
[HKEY_LOCAL_MACHINE\SOFTWARE\Policies\Microsoft\Windows\System]
"AllowDomainPINLogon"=dword:00000001

Saturday, June 3, 2017

Deploy Access-Denied Assistance (Demonstration Steps)

Step 1: Configure access-denied assistance

You can configure access-denied assistance within a domain by using Group Policy, or you can configure the assistance individually on each file server by using the File Server Resource Manager console. You can also change the access-denied message for a specific shared folder on a file server. +
You can configure access-denied assistance for the domain by using Group Policy as follows: +

To configure access-denied assistance by using Group Policy

  1. Open Group Policy Management. In Server Manager, click Tools, and then click Group Policy Management.
  2. Right-click the appropriate Group Policy, and then click Edit.
  3. Click Computer Configuration, click Policies, click Administrative Templates, click System, and then click Access-Denied Assistance.
  4. Right-click Customize message for Access Denied errors, and then click Edit.
  5. Select the Enabled option.
  6. Configure the following options:
    1. In the Display the following message to users who are denied access box, type a message that users will see when they are denied access to a file or folder.
      You can add macros to the message that will insert customized text. The macros include:
      • [Original File Path] The original file path that was accessed by the user.
      • [Original File Path Folder] The parent folder of the original file path that was accessed by the user.
      • [Admin Email] The administrator email recipient list.
      • [Data Owner Email] The data owner email recipient list.
    2. Select the Enable users to request assistance check box.
    3. Leave the remaining default settings.
  7. +
solution guides*Windows PowerShell equivalent commands* +
The following Windows PowerShell cmdlet or cmdlets perform the same function as the preceding procedure. Enter each cmdlet on a single line, even though they may appear word-wrapped across several lines here because of formatting constraints. +
Set-GPRegistryValue -Name "Name of GPO" -key "HKLM\Software\Policies\Microsoft\Windows\ADR\AccessDenied" -ValueName AllowEmailRequests -Type DWORD -value 1  
Set-GPRegistryValue -Name "Name of GPO" -key "HKLM\Software\Policies\Microsoft\Windows\ADR\AccessDenied" -ValueName GenerateLog -Type DWORD -value 1  
Set-GPRegistryValue -Name "Name of GPO" -key "HKLM\Software\Policies\Microsoft\Windows\ADR\AccessDenied" -ValueName IncludeDeviceClaims -Type DWORD -value 1  
Set-GPRegistryValue -Name "Name of GPO" -key "HKLM\Software\Policies\Microsoft\Windows\ADR\AccessDenied" -ValueName IncludeUserClaims -Type DWORD -value 1  
Set-GPRegistryValue -Name "Name of GPO" -key "HKLM\Software\Policies\Microsoft\Windows\ADR\AccessDenied" -ValueName PutAdminOnTo -Type DWORD -value 1  
Set-GPRegistryValue -Name "Name of GPO" -key "HKLM\Software\Policies\Microsoft\Windows\ADR\AccessDenied" -ValueName PutDataOwnerOnTo -Type DWORD -value 1  
Set-GPRegistryValue -Name "Name of GPO" -key "HKLM\Software\Policies\Microsoft\Windows\ADR\AccessDenied" -ValueName ErrorMessage -Type MultiString -value "Type the text that the user will see in the error message dialog box."  
Set-GPRegistryValue -Name "Name of GPO" -key "HKLM\Software\Policies\Microsoft\Windows\ADR\AccessDenied" -ValueName Enabled -Type DWORD -value 1 
Alternatively, you can configure access-denied assistance individually on each file server by using the File Server Resource Manager console. +

To configure access-denied assistance by using File Server Resource Manager

  1. Open File Server Resource Manager. In Server Manager, click Tools, and then click File Server Resource Manager.
  2. Right-click File Server Resource Manager (Local), and then click Configure Options.
  3. Click the Access-Denied Assistance tab.
  4. Select the Enable access-denied assistance check box.
  5. In the Display the following message to users who are denied access to a folder or file box, type a message that users will see when they are denied access to a file or folder.
    You can add macros to the message that will insert customized text. The macros include:
    • [Original File Path] The original file path that was accessed by the user.
    • [Original File Path Folder] The parent folder of the original file path that was accessed by the user.
    • [Admin Email] The administrator email recipient list.
    • [Data Owner Email] The data owner email recipient list.
  6. Click Configure email requests, select the Enable users to request assistance check box, and then click OK.
  7. Click Preview if you want to see how the error message will look to the user.
  8. Click OK.
  9. +
solution guides*Windows PowerShell equivalent commands* +
The following Windows PowerShell cmdlet or cmdlets perform the same function as the preceding procedure. Enter each cmdlet on a single line, even though they may appear word-wrapped across several lines here because of formatting constraints.+
Set-FSRMAdrSetting -Event "AccessDenied" -DisplayMessage "Type the text that the user will see in the error message dialog box." -Enabled:$true -AllowRequests:$true  
After you configure the access-denied assistance, you must enable it for all file types by using Group Policy. +

To configure access-denied assistance for all file types by using Group Policy

  1. Open Group Policy Management. In Server Manager, click Tools, and then click Group Policy Management.
  2. Right-click the appropriate Group Policy, and then click Edit.
  3. Click Computer Configuration, click Policies, click Administrative Templates, click System, and then click Access-Denied Assistance.
  4. Right-click Enable access-denied assistance on client for all file types, and then click Edit.
  5. Click Enabled, and then click OK.
  6. +
solution guides*Windows PowerShell equivalent commands* +
The following Windows PowerShell cmdlet or cmdlets perform the same function as the preceding procedure. Enter each cmdlet on a single line, even though they may appear word-wrapped across several lines here because of formatting constraints. +
Set-GPRegistryValue -Name "Name of GPO" -key "HKLM\SOFTWARE\Policies\Microsoft\Windows\Explore" -ValueName EnableShellExecuteFileStreamCheck -Type DWORD -value 1  
You can also specify a separate access-denied message for each shared folder on a file server by using the File Server Resource Manager console. +

To specify a separate access-denied message for a shared folder by using File Server Resource Manager

  1. Open File Server Resource Manager. In Server Manager, click Tools, and then click File Server Resource Manager.
  2. Expand File Server Resource Manager (Local), and then click Classification Management.
  3. Right-click Classification Properties, and then click Set Folder Management Properties.
  4. In the Property box, click Access-Denied Assistance Message, and then click Add.
  5. Click Browse, and then choose the folder that should have the custom access-denied message.
  6. In the Value box, type the message that should be presented to the users when they cannot access a resource within that folder.
    You can add macros to the message that will insert customized text. The macros include:
    • [Original File Path] The original file path that was accessed by the user.
    • [Original File Path Folder] The parent folder of the original file path that was accessed by the user.
    • [Admin Email] The administrator email recipient list.
    • [Data Owner Email] The data owner email recipient list.
  7. Click OK, and then click Close.
  8. +
solution guides*Windows PowerShell equivalent commands* +
The following Windows PowerShell cmdlet or cmdlets perform the same function as the preceding procedure. Enter each cmdlet on a single line, even though they may appear word-wrapped across several lines here because of formatting constraints. +
Set-FSRMMgmtProperty -Namespace "folder path" -Name "AccessDeniedMessage_MS" -Value "Type the text that the user will see in the error message dialog box."  

Step 2: Configure the email notification settings

You must configure the email notification settings on each file server that will send the access-denied assistance messages. +
  1. Open File Server Resource Manager. In Server Manager, click Tools, and then click File Server Resource Manager.
  2. Right-click File Server Resource Manager (Local), and then click Configure Options.
  3. Click the Email Notifications tab.
  4. Configure the following settings:
    • In the SMTP server name or IP address box, type the name of IP address of the SMTP server in your organization.
    • In the Default administrator recipients and Default 'From' e-mail address boxes, type the email address of the file server administrator.
  5. Click Send Test E-mail to ensure that the email notifications are configured correctly.
  6. Click OK.
  7. +
solution guides*Windows PowerShell equivalent commands* +
The following Windows PowerShell cmdlet or cmdlets perform the same function as the preceding procedure. Enter each cmdlet on a single line, even though they may appear word-wrapped across several lines here because of formatting constraints.+
set-FSRMSetting -SMTPServer "server1" -AdminEmailAddress "fileadmin@contoso.com" -FromEmailAddress "fileadmin@contoso.com"  

Step 3: Verify that access-denied assistance is configured correctly

You can verify that the access-denied assistance is configured correctly by having a user who is running Windows 8 try to access a share or a file in that share that they do not have access to. When the access-denied message appears, the user should see a Request Assistance button. After clicking the Request Assistance button, the user can specify a reason for access and then send an email to the folder owner or file server administrator. The folder owner or file server administrator can verify for you that the email arrived and contains the appropriate details. +
Important
If you want to verify access-denied assistance by having a user who is running Windows Server 2012 , you must install the Desktop Experience before connecting to the file share. +

See also

How to force an authoritative and non-authoritative synchronization for DFSR-replicated SYSVOL (like "D4/D2" for FRS)

Summary

Consider the following scenario:
You want to force the non-authoritative synchronization of SYSVOL on a domain controller. In the File Replication Service (FRS), this was controlled through the D2 and D4 data values for the Burflags registry values, but these values do not exist for the Distributed File System Replication (DFSR) service. You cannot use the DFS Management snap-in (Dfsmgmt.msc) or the Dfsradmin.exe command-line tool to achieve this. Unlike custom DFSR replicated folders, SYSVOL is intentionally protected from any editing through its management interfaces to prevent accidents.
How to perform a non-authoritative synchronization of DFSR-replicated SYSVOL (like "D2" for FRS)
  1. In the ADSIEDIT.MSC tool modify the following distinguished name (DN) value and attribute on each of the domain controllers that you want to make non-authoritative:

    CN=SYSVOL Subscription,CN=Domain System Volume,CN=DFSR-LocalSettings,CN=,OU=Domain Controllers,DC=
    msDFSR-Enabled=FALSE
  2. Force Active Directory replication throughout the domain.
  3. Run the following command from an elevated command prompt on the same servers that you set as non-authoritative:

    DFSRDIAG POLLAD
  4. You will see Event ID 4114 in the DFSR event log indicating SYSVOL is no longer being replicated.
  5. On the same DN from Step 1, set:

    msDFSR-Enabled=TRUE
  6. Force Active Directory replication throughout the domain.
  7. Run the following command from an elevated command prompt on the same servers that you set as non-authoritative:

    DFSRDIAG POLLAD
  8. You will see Event ID 4614 and 4604 in the DFSR event log indicating SYSVOL has been initialized. That domain controller has now done a “D2” of SYSVOL.
How to perform an authoritative synchronization of DFSR-replicated SYSVOL (like "D4" for FRS)

  1. In the ADSIEDIT.MSC tool, modify the following DN and two attributes on the domain controller you want to make authoritative (preferrably the PDC Emulator, which is usually the most up to date for SYSVOL contents):

    CN=SYSVOL Subscription,CN=Domain System Volume,CN=DFSR-LocalSettings,CN=,OU=Domain Controllers,DC=
    msDFSR-Enabled=FALSEmsDFSR-options=1
  2. Modify the following DN and single attribute on all other domain controllers in that domain:

    CN=SYSVOL Subscription,CN=Domain System Volume,CN=DFSR-LocalSettings,CN=,OU=Domain Controllers,DC=
    msDFSR-Enabled=FALSE
  3. Force Active Directory replication throughout the domain and validate its success on all DCs.
  4. Start the DFSR service set as authoritative:
  5. You will see Event ID 4114 in the DFSR event log indicating SYSVOL is no longer being replicated.
  6. On the same DN from Step 1, set:

    msDFSR-Enabled=TRUE
  7. Force Active Directory replication throughout the domain and validate its success on all DCs.
  8. Run the following command from an elevated command prompt on the same server that you set as authoritative:

    DFSRDIAG POLLAD
  9. You will see Event ID 4602 in the DFSR event log indicating SYSVOL has been initialized. That domain controller has now done a “D4” of SYSVOL.
  10. Start the DFSR service on the other non-authoritative DCs. You will see Event ID 4114 in the DFSR event log indicating SYSVOL is no longer being replicated on each of them.
  11. Modify the following DN and single attribute on all other domain controllers in that domain:

    CN=SYSVOL Subscription,CN=Domain System Volume,CN=DFSR-LocalSettings,CN=,OU=Domain Controllers,DC=
    msDFSR-Enabled=TRUE
  12. Run the following command from an elevated command prompt on all non-authoritative DCs (i.e. all but the formerly authoritative one):

    DFSRDIAG POLLAD

More Information

If setting the authoritative flag on one DC, you must non-authoritatively synchronizeall other DCs in the domain. Otherwise you will see conflicts on DCs, originating from any DCs where you did not set auth/non-auth and restarted the DFSR service.For example, if all logon scripts were accidentally deleted and a manual copy of them was placed back on the PDC Emulator role holder, making that server authoritative and all other servers non-authoritative would guarantee success and prevent conflicts.
If making any DC authoritative, the PDC Emulator as authoritative is preferable, since its SYSVOL contents are usually most up to date.
The use of the authoritative flag is only necessary if you need to force synchronization of all DCs. If only repairing one DC, simply make it non-authoritative and do not touch other servers.
This article is designed with a 2-DC environment in mind, for simplicity of description. If you had more than one affected DC, expand the steps to includeALL of those as well. It also assumes you have the ability to restore data that was deleted, overwritten, damaged, etc. previously if this is a disaster recovery scenario on all DCs in the domain.

Sunday, May 28, 2017

Print Spooler Keeps Stopping on Windows 7 & 10


Print Spooler manages all the print jobs and print queues on your printer. If it doesn’t run properly, your printer cannot work then. Many users reported that their Print Spooler Keeps Stopping as they received message the service is not running.

If you also encounter such problem, calm down please. We are going to tell you how to fix it on Windows 7 &10. Read on and follow the easy-doing steps with images below.

Note: The images are shown in Windows 7, but all the fixes also suit for Windows 10.
Fix One. Restart Print Spooler service

The simplest fix to it is to restart Print Spooler service.

1)
Open Run dialog box by pressing Windows key + R key together. 
Then type services.msc in the box and hit Enter to open Services window.


2)
Scroll down on services window, find and highlight Print Spooler.
Then click Restart on the left pane.


3)
Now check if the problem is fixed.


Fix Two. Check if Print Spooler service is set to Automatic


Sometimes your Print Spooler service if is not set to automatic, it may cause it keep stopping. In this case, make sure it is set to automatic.

1)
Start > search then type Services.msc then press enter.

2)
Scroll down on services window, find and right-click on Print Spooler.
Then choose Properties.


3)
Check if the Startup type is Automatic under General pane.
If not, set it to be Automatic from the drop down menu.
Then click OK.


Fix Three. Change Print Spooler Recovery options


As some users reported, change Print Spooler recovery options can also fix the issue. Thus make sure to try it.

1)
Right click to open Properties of Print Spooler.

2)
Click Recovery on Print Spooler Properties window.
Change First failure, Second failure and Subsequent failures all to be Restart the Services from the drop down menu.
Then click OK to save the change.


3)
Now check if the problem is fixed.


Fix Four. Delete Print Spooler files


Print Spooler files can also cause it stop, thus remove those files can fix the error.

1)
Open Services window again.

2)
Scroll down on services window, find and highlight Print Spooler.
Then click Stop on the left pane.


3)
Minimize Services window.
Then head to C:\Windows\System32\spool\PRINTERS.

Note: When open PRINTERS folder, you may be asked to get access to it, click Continue then.


Delete all the files in PRINTERS folder.
After it, you can see This folder is empty message.


4)
Disconnect the printer from your PC.
How to:
a)
Type devices and printers in the search bar from Start menu.
Then click Devices and Printers on the top.


b)
Find and right-click on your printer and choose Remove device.


5)
Again back on Services window, find and right-click on Print Spooler.
Then click Start on the left pane.


5)
Reconnect your printer to PC. 
How to:
Again on Device and Printers window, right-click on the blank area to choose Add a printer.
Then go on to follow the on-screen instructions.


6)
Now check if the problem is fixed.


Fix Five. Update your printer driver


Sometimes update the printer driver can also solve the problem. Another hand, updated driver can make your PC perform better. Thus make sure to update your printer driver.

To update printer driver, you can choose to download the latest one from your printer manufacturer’s website manually. Then install it on your PC. But download drivers manually is really annoying. Luckily, you have another choice to update it —  Driver Easy. It’s a 100% safe and extremely helpful driver tool, and designed for you to update drivers automatically.

All the driver it offered is trustworthy and the correct one for your Windows. It can scan out all the driver problems on your Windows with the click — Scan Now.


After scanning, its Free version will find the correct drivers for you to install. Then you can update them one by one. But if upgrade to Pro version, it will update all your outdated or missing drivers with just one click — Update All. Of cause including the drivers for your printer.


No worry to try it as you can enjoy 30-day money back and professional tech support anytime guarantee. Why don’t give yourself a chance to  to try on such a charming driver tool? ☞☞ TRY NOW !
After update your printer driver, restart your PC to make new driver take effect. Then check if the problem still exists.

Monday, May 22, 2017

Reset Azure AD password

Reset or unlock my password for a work or school account

To get into your work or school account, follow the steps below to access Azure AD self-service password reset, or SSPR as we like to call it.
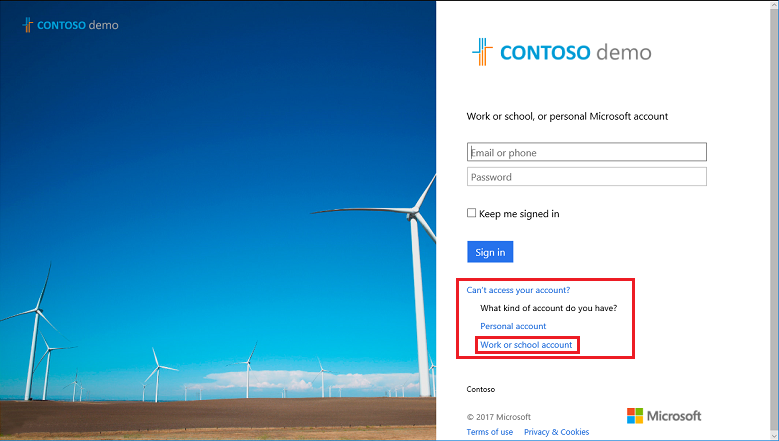
  1. From any work or school sign-in page, click the Can't access your account? link then click Work or school account or go directly to the password reset page.
    Note
    If you are trying to get back into a Personal account like hotmail.com or outlook.com try the suggestions found in this article
    Can't access your account?
  2. Enter your work or school User ID, prove you aren't a robot by entering the characters you see on the screen, then click Next.
    Note
    If your IT staff has not enabled this functionality, a "contact your administrator" link appears so your IT staff can help, via email or a web portal of their own.
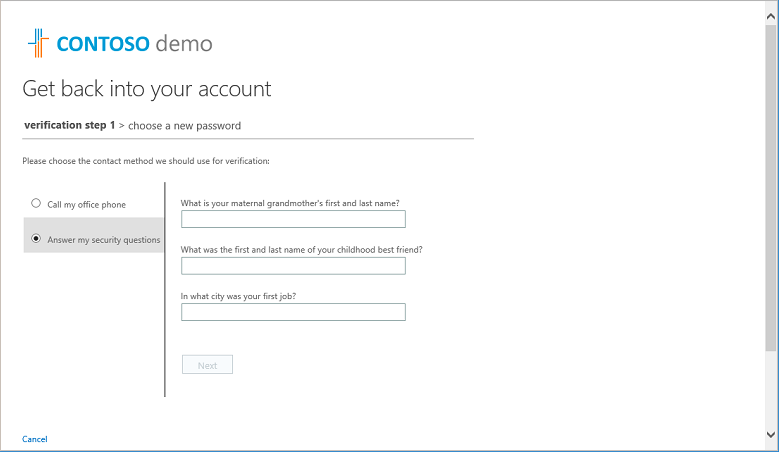
  3. Depending on how your IT staff has configured SSPR you see one or more of the following. Either you or your IT staff have populated some of this information before using the article Register for self-service password reset.
    • Email my alternate email
    • Text my mobile phone
    • Call my mobile phone
    • Call my office phone
    • Answer my security questions
    Choose an option, provide the correct responses, and click Next.
    Verify your authentication data
  4. Your IT staff may need more verification and you may have to repeat step 3 again with a different choice.
  5. On the Choose a new password page, enter a new password, confirm your password, and then click Finish. We suggest your password be 8-16 characters with uppercase and lowercase characters, numbers, and special characters.
    Note
    If you needed to unlock your account, at this point choose the option to unlock only, or change your password and unlock.
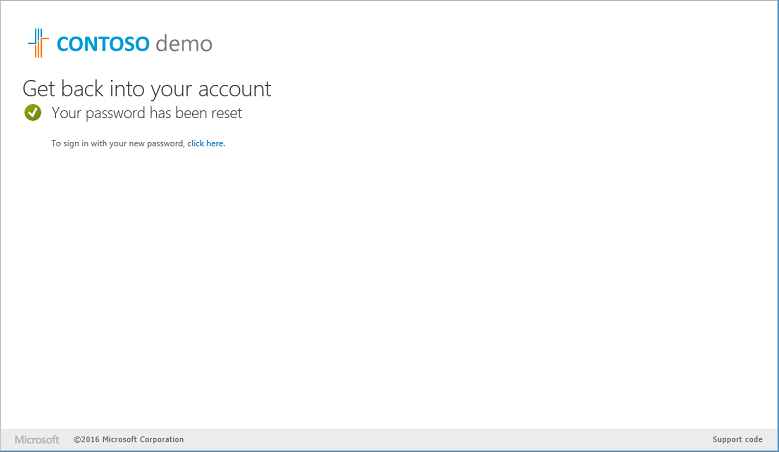
  6. When you see, Your password has been reset, you can sign in with your new password.
    Your password has been reset
You should now be able to access your account, if not you should contact your organization's IT staff for further help.
You may receive a confirmation email that comes from an account like "Microsoft on behalf of ". If you get an email like this, and you did not use self-service password reset to regain access to your account, contact your organization's IT staff.

Change my password

If you know your password already and want to change it, use the steps that follow to change your password.

Change your password from the Office 365 portal

Use this method if you normally access your applications using the Office portal
  1. Sign into your Office 365 account using your existing password
  2. Click on your profile on the upper right side, and click View account
  3. Click Security & privacy > Password
  4. Enter your old password, set and confirm your new password, and then click Submit

Change your password from the Azure Access Panel

Use this method if you normally access your applications from the Azure Access Portal
  1. Sign in to the Azure Access Portal using your existing password
  2. Click on your profile on the upper right side, then click Profile
  3. Click Change password
  4. Enter your old password, set and confirm your new password, and then click Submit