Friday, July 19, 2019

How to Use Keyboard Interactive Authentication with PuTTY

PuTTY is a free, open-source terminal emulator program for Windows. PuTTY supports connecting to SSH, Telnet and other text servers over a network. PuTTY supports a variety of authentication for connecting to SSH servers, including basic password authentication and public key authentication. One of the authentication methods supported by PuTTY is keyboard interactive authentication, which allows the SSH server to ask an arbitrary question and the user to input an arbitrary response. To use keyboard interactive authentication in PuTTY, though, you must enable the method.

Step 1

Launch PuTTY on the computer.

Step 2

Click the plus sign to the left of "SSH" under the "Connection" header at the left side of the PuTTY window.

Step 3

Click "Auth" under "SSH."

Step 4

Deselect the "Bypass Authentication Entirely," "Attempt Authentication Using Pageant" and "Attempt TLS or CryptoCard Auth" check boxes by clicking them if they're enabled.

Step 5

Verify the "Attempt Keyboard-Interactive Auth" check box is enabled. Click it if it isn't enabled.

Step 6

Click "Session" at the left side of the PuTTY window.

Step 7

Type the IP address or host name of the SSH server into the "Host Name" box.

Step 8

Type the port of the SSH server into the "Port" box.

Step 9

Click "SSH" under "Connection Type."

Step 10

Save the session and authentication settings by typing a name for the session in the "Saved Sessions" box and clicking "Save." You can use these settings again by clicking the name of the session and clicking "Load."

Step 11

Connect to the SSH server by clicking "Open."

Step 12

Type your user name into the terminal when prompted and press "Enter."

Step 13

Provide the answer for the keyboard-interactive authentication prompt by typing it and pressing "Enter."

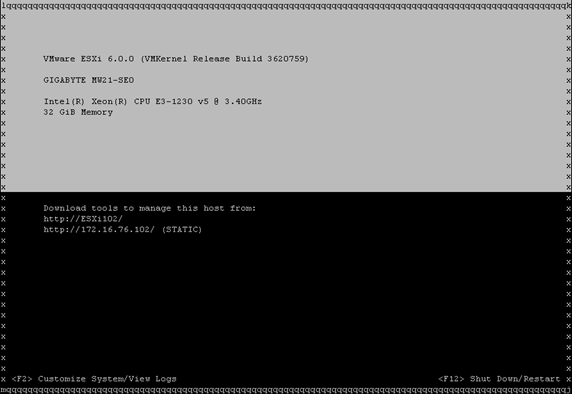
DCUI from ssh for vSphere 6

This is one of those great command line items to put in your toolkit that will impress your co-workers. I think this command is one of the least known commands but could have a huge impact on an admins ability to manage their environment. The vSphere command is simply ‘dcui’ and it is a very simple way to access the DCUI without having to go into your remote IPMI tools (ilo, iDRAC, KVM over IP, etc). The only down side compared to IPMI tools is it doesn’t work when you reboot your system as you’ll lose your ssh session.

How to use it:
  • After your server is fully booted, start an ssh session to your target server and logon
  • From the command prompt type in dcui and press enter

  • From there you can use the dcui remotely.
  • Press CTRL + C to exit

Tips:

  • Have your ssh screen size where you want it prior to going into the dcui. If you resize after connecting it will exit out of the DCUI
  • The DCUI command worked great in putty but it did not work with the MAC Terminal program. Not sure why, but if you got this working on a MAC then post up!

SQL Server: Database stuck in “Restoring” state


I backed up a database:

BACKUP DATABASE MyDatabase
TO DISK = 'MyDatabase.bak'
WITH INIT --overwrite existing

And then tried to restore it:

RESTORE DATABASE MyDatabase
   FROM DISK = 'MyDatabase.bak'
   WITH REPLACE --force restore over specified database

And now the database is stuck in the restoring state.
Some people have theorized that it's because there was no log file in the backup, and it needed to be rolled forward using:

RESTORE DATABASE MyDatabase
WITH RECOVERY 

Except that, of course, fails:

Msg 4333, Level 16, State 1, Line 1
The database cannot be recovered because the log was not restored.
Msg 3013, Level 16, State 1, Line 1
RESTORE DATABASE is terminating abnormally.

And exactly what you want in a catastrophic situation is a restore that won't work.

The backup contains both a data and log file:

RESTORE FILELISTONLY 
FROM DISK = 'MyDatabase.bak'

Logical Name    PhysicalName
=============   ===============
MyDatabase    C:\Program Files\Microsoft SQL Server\MSSQL.1\MSSQL\DATA\MyDatabase.mdf
MyDatabase_log  C:\Program Files\Microsoft SQL Server\MSSQL.1\MSSQL\DATA\MyDatabase_log.LDF

Friday, July 12, 2019

How To Configure Outlook 2013 Font Using Group Policy

Using this method you can configure the following settings:
  • Default new email font color and size
  • Default reply and forward color and size
  • Email Comments
  • New Theme
The only requirement is Outlook 2013 Installed on a machine.
Note: To complete this you will need to Install Office 2013 Administrative Templates or Office 2016 as minimum requirements

To get started, Open Outlook 2013 and configure the font settings from the options menu.
font1
Step two, Open Registry editor from run menu, go to the path below and export the mail settings folder:

HKEY_CURRENT_USER\Software\Microsoft\Office\14.0\Common\MailSettings

font2

Export by right click on the MailSettings folder

font3


Next, we need to convert the .Reg file to .XML using the website below:
http://www.runecasters.com.au/reg2gpp

When converting the file make sure you select Create, when done save the file.
font4


Next right click on the .XML file and Click Copy

font45


Last step open Group Policy editor and go to:
User configuration\Preferences\Windows Settings\Registry

Right Click on Registry and Paste


font5

Then the settings will be applied to the group policy.

Wednesday, July 10, 2019

How To Configure Managed Service Accounts Windows Server 2016


Managed Service Account (MSA) Is a new type of Active Directory Account type where AD responsible for changing the account password every 30 days.

With MSA no one needs to set up the account password or even know it, the entire password management process Is managed by Active Directory.
In my example, I’ll use the Managed Service Account to run my IIS Application Pool.
Requirements
To use MSA, Active Directory forest level will have to be set to Windows Server 2012 at a minimum.
You will need Active Directory Management Tools to run the cmdlets In this post
Before we start
I have to say that before I wrote this article I visited a few blogs and most of them overcomplicated the process, This post will show you how to deploy MSA In 10 minutes.
Just make sure to test it in the lab before deploying Into production.
Master Root key
The first step In the MSA deployment process Is to create a Master root Key using the cmdlet below.

Add-KdsRootKey -EffectiveTime ((get-date).addhours(-10)) -Verbose


Create Service Account
To create and configure the service. I’ll use 4 cmdlets.
The first cmdlet will create the account and also create a DNS name for the account.

New-ADServiceAccount sms -DisplayName "WDS Service" -DNSHostName sms.test.local

Once the account has been created, I will grant the Server (WDS) 
access to it, which mean the Server (WDS) will have permission to 
request a password reset every 30 days from Active Directory.

I could add multiple server names If needed.

Set-ADServiceAccount sms -PrincipalsAllowedToRetrieveManagedPassword wds$

With the cmdlet below, I can test the account (return result should be true).

Test-ADServiceAccount sms |fl

And the final cmdlet will Install the Service Account on the WDS Server.

install-ADServiceAccount sms


Set Windows Service
To setup Windows Server service to use the managed Service account, I’ll open the service and use the format below

Test\sms$ without typing the password.


If the account needs the log in as a service right you will see the prompt below.


Once configured, I can start the service


Just remember that If the service account needs to be part of the Domain Admins group or any other group you will need to add the service to the group as well.
SET IIS Application Pool
Next, I’ll configure IIS Application Pool to use the Service Account.

Using the Application Pools menu and right click on the DefaultAppPool


Select Advanced Settings


In the Advanced Setting -> Process Model -> Identity I’ll change the account


No need to type the password


As you can see below, The Application Pool started and Is using the Service Account.


Get-ADServiceAccount -Filter *

Rollback
To remove the Service Account from Active Directory, I’ll use the cmdlet below:

Remove-adservcieaccount sms

To remove the account from a Windows service, I’ll run the line below (from command line) with the service name


sc config audiosvr obj= test\Admin password=Password123

How to Start A Manual Active Directory Sync to Office 365

In this blog post, I’ll show you how to start a manual Azure Active Directory synchronization from the on-premises Active Directory environment to Office 365.


By Default, Active directory synchronization happens every 30 minutes and it runs on the Server you Installed Azure AD on.

To start a manual sync, Log In to the Server you’ve Installed Azure AD Sync and open PowerShell.
Run cmdlet
In the PowerShell windows type the cmdlet below:

Start-ADSyncSyncCycle -PolicyType Delta


The cmdlet lets will start a delta synchronization which will sync all the changes that were made In Active Directory since the last sync.

It Important to note that a manual sync doesn’t sync password.
Password sync will run every 30 minutes as well.

How To Enable Cisco SDM On Cisco 2800 Router

Since Cisco released Cisco IOS version 14 we can now apply and manage the router configuration using a GUI.

By defualt the Cisco SDM GUI is disable, In order to unable the GUI we need to apply a few commands to the router.

To enable the SDM GUI:
Log into the router and type:

Router# configure terminal
Enter configuration commands, one per line. End with CNTL/Z.
Router(config)# ip http server
Router(config)# ip http secure-server
Router(config)# ip http authentication local end
Router(config)# ip http timeout-policy idle 600 life 86400 requests 10000


The last command will change the defualt user name and password which is cisco for username and cisco for password.

Router(config)# username username privilege 15 secret 0 password

Example:
Router(config)# username admin privilege 15 secret 0 newpassword

The last step is to access the router using the web browser:

http://ip_address

With Cisco 2800 series pre configured routers we also need to remove the defualt ACL which block access to the router.

How To Restart A Cisco Router

To restart a Cisco Router or Switch we need to use the following command:

Router# reload

To restart the router in a certain number of minutes type:

Router# reload in 5

To see router up-time type:

router# sh version