If you have a small business with a few employees, one of the best ways to set up file sharing and online collaboration is to use OneDrive for Business and an Office 365 team site together. Then, customize your Office 365 team site so you can take advantage of more storage and collaboration features.
In this tutorial, we provide step-by-step instructions to help you customize your Office 365 team site and share files with people outside of your business. You can do all of the steps, or choose only those steps that interest you.
- Step 1: Customize file storage on your Office 365 team site (15–20 minutes): Add more document libraries (aka file storage containers) and lists.
- Step 2: Customize your Office 365 team site Home page (30–40 minutes): Rearrange your Home page, and add links to employee OneDrive for Business folders.
- Step 3: Add links to important pages of your team site (30–60 minutes): Add colorful tiles or icons that link to other pages in your site or to external sites.
- Step 4: Set up a subsite for sharing files externally (15–20 minutes): Share and collaborate on files with people external to your business, such as customers and partners.
- Step 5: Set up a team subsite for storing private files (15–20 minutes): Create a private subsite so you can store that files you want to restrict access to, such as personnel or financial documents.
- Step 6: Promote your team site for quick access (10–15 minutes): Add links to your Office 365 team site on the Office 365 app launcher and the Office 365 header.
If you do all of the steps in order, you will start with a basic Office 365 team site Home page that looks like this:
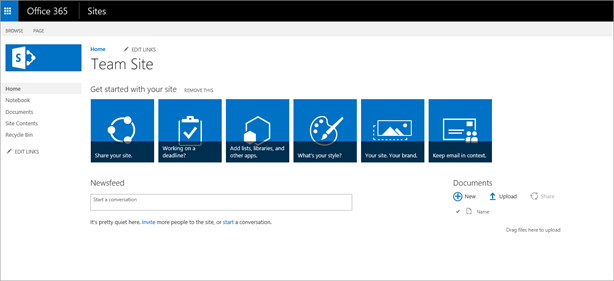
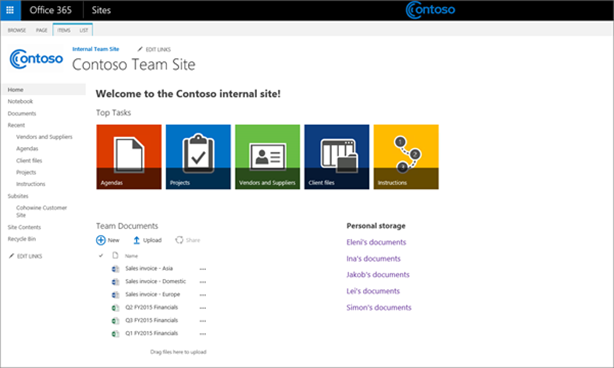
You can also customize it so it looks like something like this, with links to shared OneDrive for Business folders and a subsite:
Step 1: Customize file storage on your Office 365 team site
Estimated time to complete: 15–20 minutes
In this step, we show you how to add more document libraries to your Office 365 team site so you can organize your files. Then we show you how to add a list of contacts that you can connect with your contacts list in Outlook. Both of these are popular features for team sites!
Add more document libraries to your team site
Your Office 365 team site already includes a Documents library that you can start using now. If you outgrow the default Documents library, it's easy to add more storage containers to your team site. First, spend some time thinking about how you want to group files on your Office 365 team site and what you want to name the storage containers so the files are easy to find. If you have a lot of information to organize, see Plan your content for your Team site for some pointers.
Here's how you can create more document libraries with names specific to your business.
- Go to your Office 365 team site. On the Office 365Home page, choose Sites > Team Site.
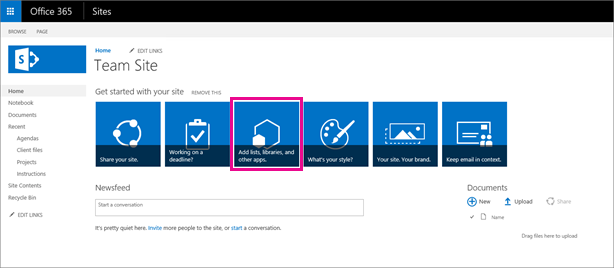
- On your team site Home page, choose the Add lists, libraries, and other apps tile.
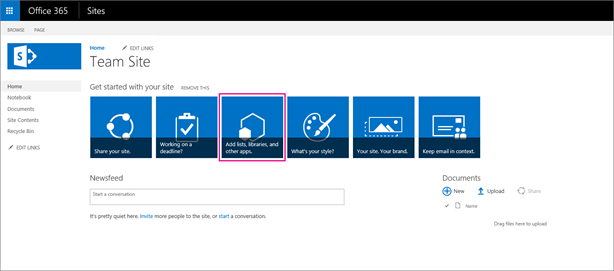
- On the Your Apps page, choose Document Library.
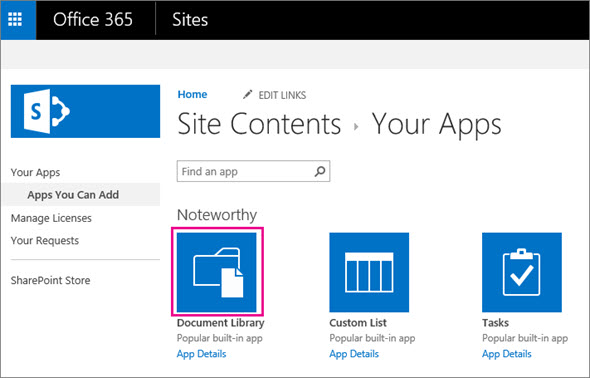
- Type a name for your new document library, and then choose Create.
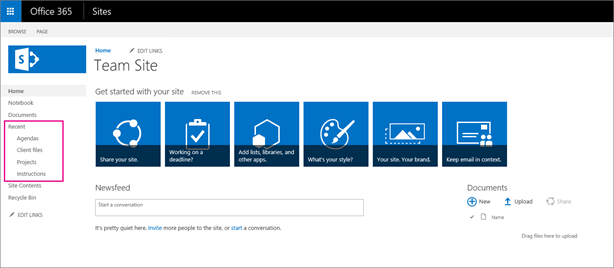
 Your new document library appears in the left-side navigation menu under Recent.
- To add more document storage containers, choose add an app > Document Library again.
- To delete a document library, hover over the tile for the library, choose the More button(. . .), and then choose Remove.
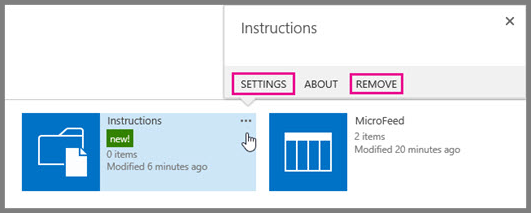
- To rename a document library, choose Settings, then choose List name, description, and navigation. In the Name box, type a new name, and choose Save. Choose Site Contents so you can continue adding more document libraries.
- When you're done adding more document libraries, choose the Home hyperlink at the top of the page to go back your Home page.The home page of your team site will look something like the one below, with links to your new document libraries in the left-side navigation. In our example, we added containers for Agendas, Client files, Projects, and Instructions.
Add lists to organize data (contacts, tasks, calendar events)
Your team site comes with a set of default apps to help you create new pages for your internal website. The apps work a lot like Word doc templates. When you add an app to your team site, it creates a page for you to enter information in a specific format.
In this step, we use the Contacts app to create a page for a list of contact information, for example, contact info for vendors, suppliers, clients, and so on. Then, we connect the list with Outlook so the contacts appear when your team uses their Office 365 email accounts in Outlook.
Let's get started with the Contacts app.
- On your team site Home page, choose the Add lists, libraries, and other apps tile.
- On the Your Apps page, choose Contacts.
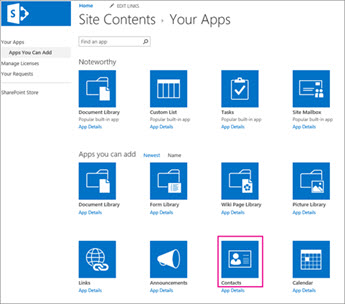
- Type a name for your list of contacts, for example, Vendors and Suppliers, and then choose Create. This name will appear at the top of the page of contacts and in the left-side navigation.
- On the Site Contents page, choose your new page. In this example it's named Vendors and Suppliers.
- Choose + new item to add a contact.
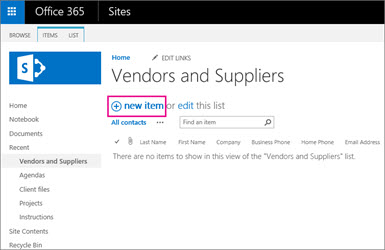
- Enter the information for your first contact. You can enter information in some or all of the boxes. Choose Save when you're done.
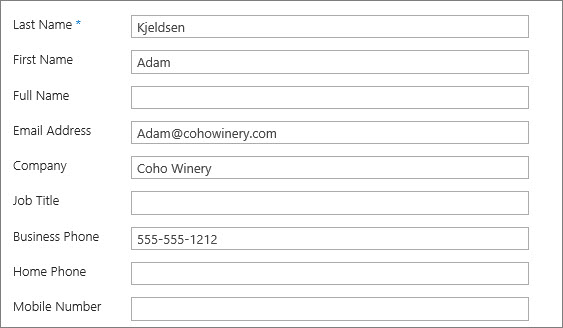 By default, Last Name, First Name, Company, Business Phone, Home Phone, and Email address appear on your contacts page. Here's what it looks like with a few contacts added.
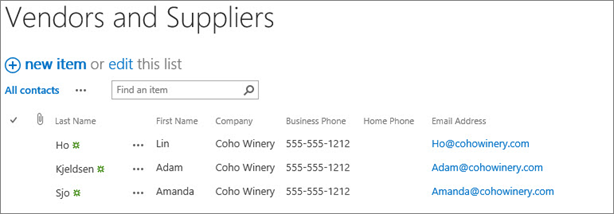
- To see this list of contacts with your Office 365 email accounts in Outlook, at the top of the page, choose List > Connect to Outlook.
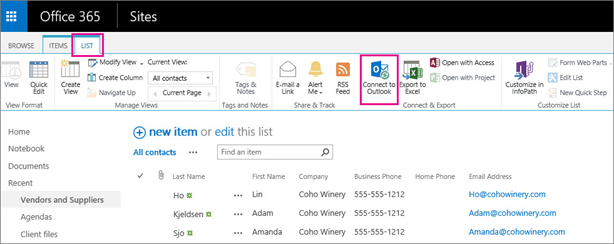
- At the security dialog boxes, choose Allow twice, and then Yes. You might receive additional security prompts to enter your Office 365 sign in information for your email account. If so, enter your Office 365 email address and password.
- It takes 5–10 minutes for the contacts info from your team site to appear under Other Contacts in Outlook. In Outlook, choose Send and Receive to refresh. Then, you'll see the contacts info in Outlook.
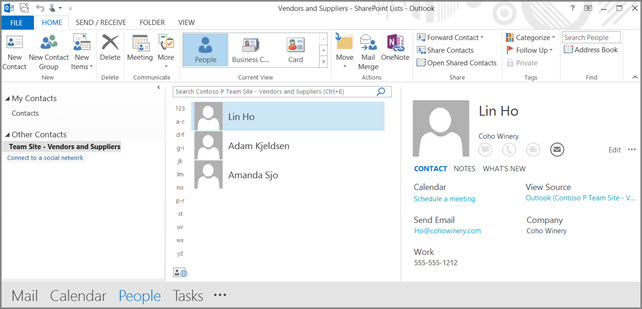 Note that any contacts you enter in Outlook won't appear in your contacts list on your team site.After you set up your team site to connect with Outlook, every time you make an update to the contacts on your team site, it will automatically appear in Outlook too.
Check out the other apps that come with your team site. For example, you can use the Calendar app to create a page with a calendar on it to track important events. Or you can use the Tasks app to track and manage tasks for a project on a timeline. However, these apps don't connect with Outlook.
Step 2: Customize your Office 365 team site Home page
Estimated time to complete: 30–40 minutes
You can customize your team site Home page to help you and your employees get to the information you need quickly. For example, you might have a links to employee OneDrive for Business folders, and links to Documents, Contacts, Tasks, Calendars, and a OneNote notebook where you store meeting agendas and notes.
In this step, we'll show you how to create links to important pages and rearrange the info on your site for easy access.
- Move the Documents storage container to the left side of the page (5 minutes). It's helpful to do this because most people look at the left side of a page first.
Let's get started!
Remove the Getting Started tiles and the Newsfeed (3 minutes)
Now that we’re done using the Get Started links, we’re going to remove them from the Home page. This doesn’t mean we can’t keep customizing the site. All team site customization is still available from the Editmenu and Site Settings area of the site.
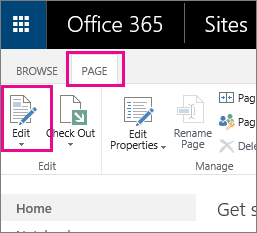
- At the top of your team sites Home page, choose Page > Edit.
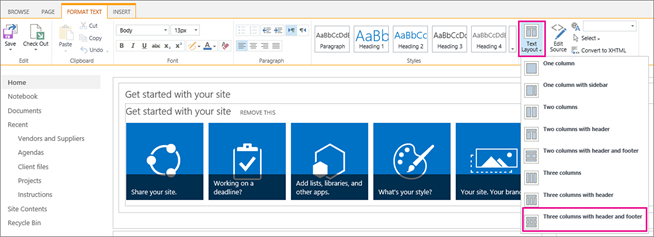
- Choose Text Layout > Three columns with header and footer. This will give you the most options for your page layout.
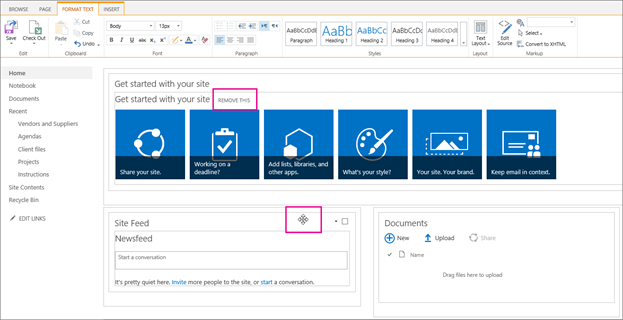
- Hover over the Site Feed box, and press Delete to remove it. Choose Remove this to get the Getting Started tiles out of the way.
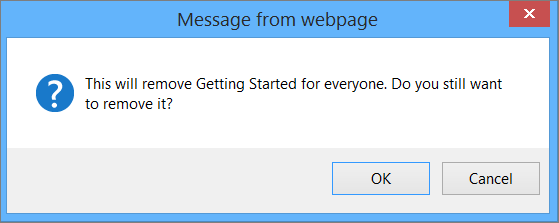
- At the Message from webpage, choose OK.
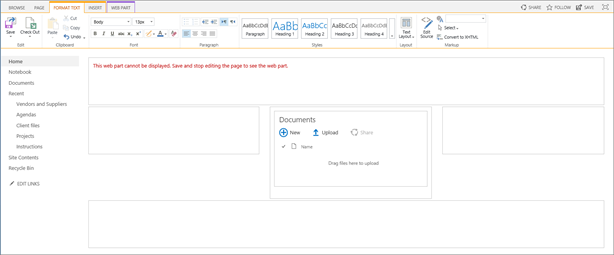
 Now you have a clean Home page to organize and customize.
Add a welcome message to your Home page (10 minutes)
- If you left edit mode, go back to it. At the top of your team site Home page, choose Page > Edit.
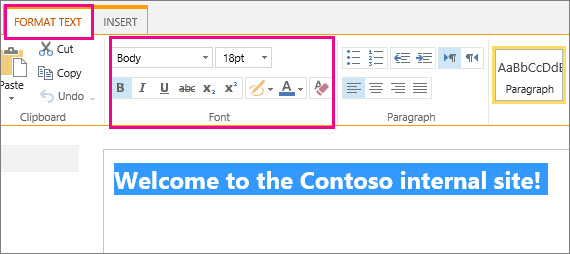
- In the top box, type a welcome message, for example, Welcome to the Contoso internal site! Choose the Format Text tab, and then use the font controls to format the text. (If you see a message about not being able to display the web part, ignore it.)
- Choose Save when you're done.
Move the Documents storage container to the left side of the page (5 minutes)
- Go back to edit mode. At the top of your team site Home page, choose Page > Edit.
- Drag and drop the Documents box to the left side of the page. The box might be tricky to grab, and moving it might take you a few times. (If you see a message about not being able to display the web part, ignore it.)
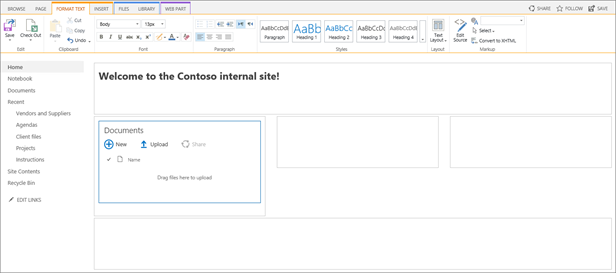
- Change the title of the Documents library. Choose Edit Web Part.
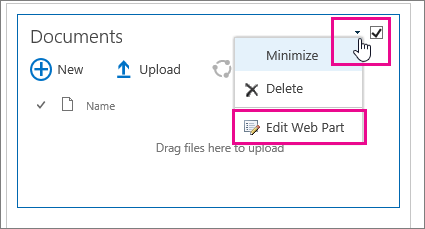
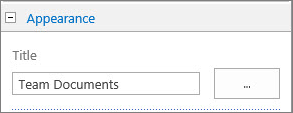
- In the box on the right side of the screen, expand the Appearance section. In the Title box, type Team Documents. Scroll down, and choose OK to save.
Add links to your employee OneDrive for Business folders (10 minutes)
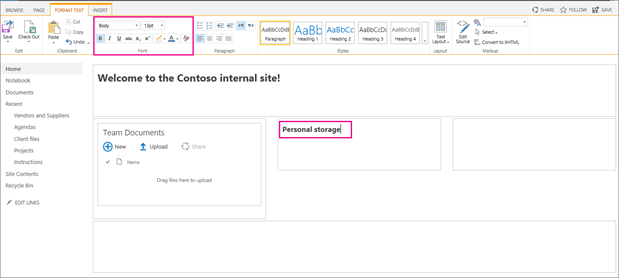
- While still in edit mode, in the empty box in the middle of the Home page, add a heading for the links to your employee OneDrive for Business folders, such as Personal storage. Use the menu at the top of the page to format your text.
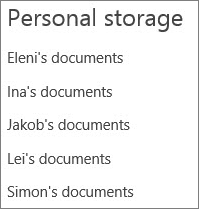
- Under the heading you just added (such as Personal storage), list the names of your employee OneDrive for Business folders, naming them so they are easy to identify. In the next step, you'll make them links.
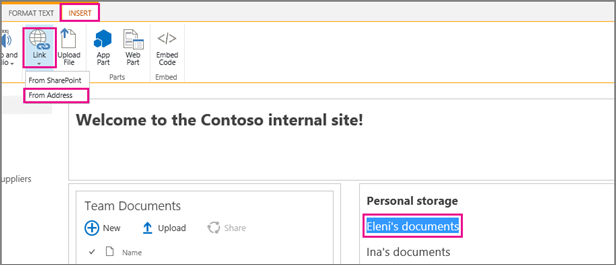
- Highlight the name of an employee's OneDrive for Business folder, and then choose Insert > Link > From Address.
- Enter the URL for an employee's OneDrive for Business folder, and choose OK. You can create the URL using this format: https://<company>-my.sharepoint.com/personal/<user>_<company>_com.For example, if your company name is Contoso, and the employee's Office 365 user ID is Eleni, the URL for his OneDrive for Business folder is https://contoso-my.sharepoint.com/personal/eleni_contoso_com.
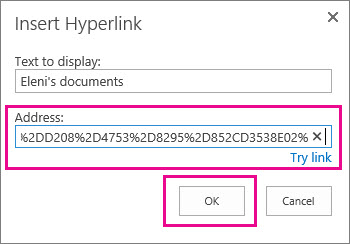
- When you've added links for all of your employees, choose Page > Save.
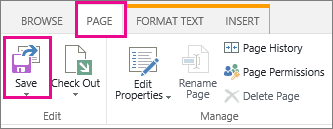
After doing this, your team site Home page will look something like this one with shared documents one on side of the page and links to employee OneDrive_for_Business folders in the middle. In this example, we've added some more documents to the Team Documents container so you can see what your Home page might look when you add documents.
Change the title of your team site (10 minutes)
- On the team site Home page, choose Settings
 > Site Settings.
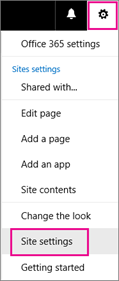
- On the Site Settings page, under Look and Feel, choose Title, description, and logo.

- Change the title for your team site, for example, to clearly indicate that it's for internal use. If you want, add a logo and description too. (The description appears in internal search results, which is useful only if you create a lot of team sites.) Choose OK.
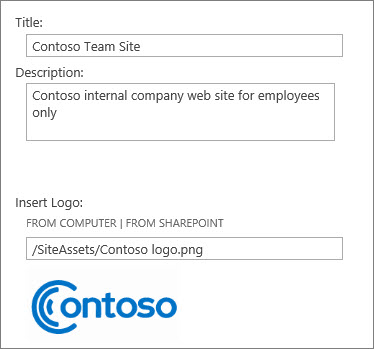
- Back on your team site Home page, if you want the name of the hyperlink at the top of your Home page to be different from the title of your team site, in the text box at the top of the page, choose Edit Links, and type a new name for the hyperlink, such as Internal Team site.

- Choose Save, even if it looks dimmed. It will save your change.
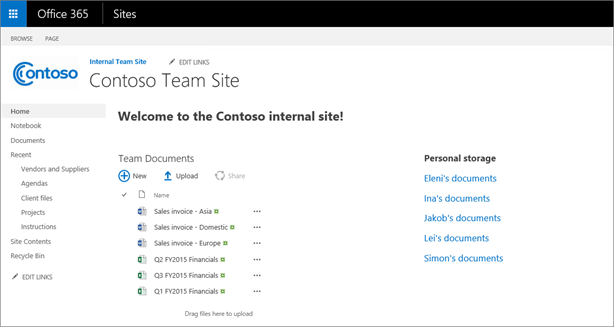
Now your team site Home page looks something like this one, with a custom title (Contoso Team Site) and a custom hyperlink at the top (Internal team site).
Step 3: Add links to important pages of your team site
Estimated time to complete: 30–60 minutes
You can make your team site look professional and easy to navigate by adding colorful tiles or icons that link to important pages on your site. If you want, you can link to other external websites too. These links are called promoted links because the icons or tiles draw attention to them.
Here's how to add promoted links to your team site.
Add images to your site (10–15 minutes)
For this step, we've provided you with a set of five images that you can use as tiles.

- On your team site, in the left navigation, choose Site Contents. Then choose Site Assets.
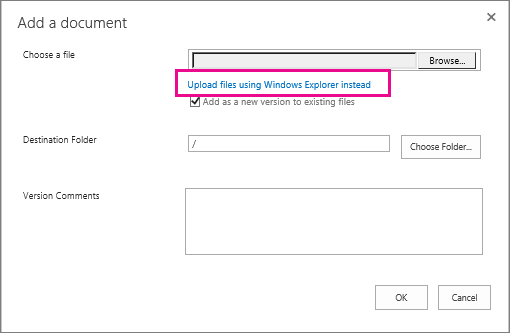
- Next, let's use Windows Explorer to upload the images to the Site Assets library. Choose Upload > Upload files using Windows Explorer instead.
- In the security dialog box, choose Allow.
- In Windows Explorer, navigate to the folder where you stored the images. Choose all five images, and drag them to your Site Assets library.
Now you have some images you can add to your site.
Create a list of URLs for the images and links (10–15 minutes)
To associate the images and links together, you need to compile a list of the locations (URLs) of both. An easy way to do this is to copy the locations into Word or Notepad. That way, when you're prompted later for the locations, you'll have them handy.
- Open Word or Notepad.
- Go to the Site Assets library. Hover over the image, choose the ellipses (...) next to each image, and right-click to copy it.
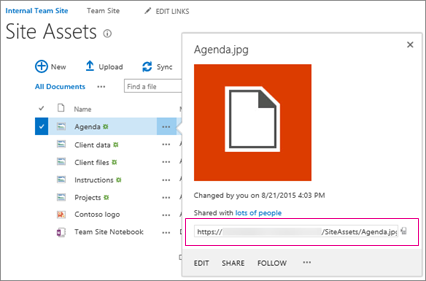
- Paste the URL into Word or Notepad. Do this for all of the images.
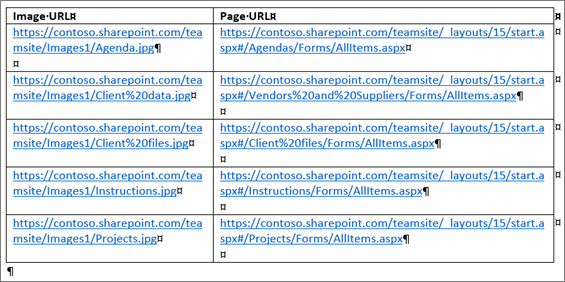
- Next, in the same Word or Notepad file, copy and paste all of the URLs for the pages on your team site that you want to link to. For example, go to your Vendors and Suppliers page, and copy that URL. In the end, you should have a list of the image URLs and the corresponding pages that you want to connect.
Map the images and links together (10–15 minutes)
At the end of this step, you will have created a single set of images and links that together are one group of promoted links.
- On your team site Home page, choose Site Contents > add an app. Scroll down, and choose Promoted links.
- For the purpose of this example, name your links Top Tasks, and choose Create. When you're finished with this tutorial, the title of your promoted links app (Top Tasks) will appear on your Home page, where we put the promoted links.
- Choose the Top Tasks library. The page will be empty. Choose All Promoted Links.
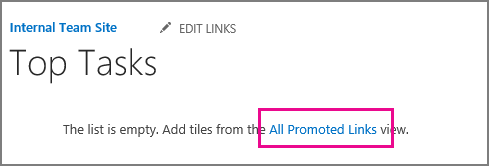
- Choose + new item to add an image and link. Here's where your list of images and links in Word or Notepad is needed.
- In Title, type a name that will appear on the tile. For example, type Vendors and Suppliers.
- Go to your Word or Notepad file, and copy the URL for the image that you want to use for Vendors and Suppliers. Paste it into the Background Image Location box.
- Copy the URL for the page you want to link to, and paste it into the Link Location dialog box.
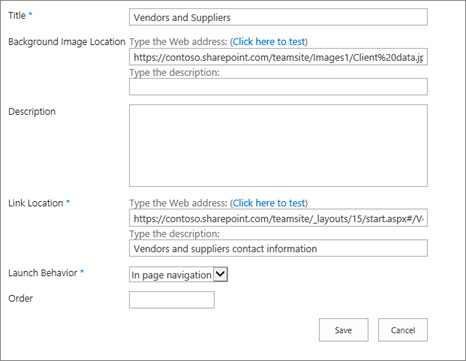
- In the Launch Behavior box, choose whether you want to launch a new tab when the icon is clicked (recommended for links that go to external websites) or stay in the current instance of the browser, which is in-page navigation. Choose Save when you're done.
- Repeat steps until you have linked all of the images and pages.

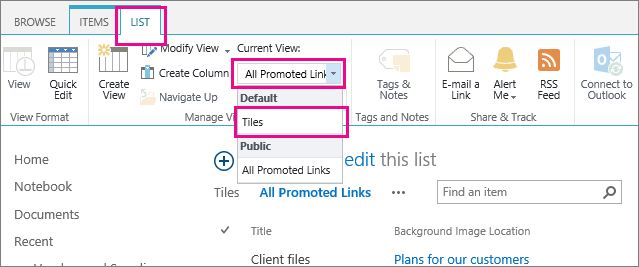
- To see what your tiles look like, choose List > Current View > Tiles.
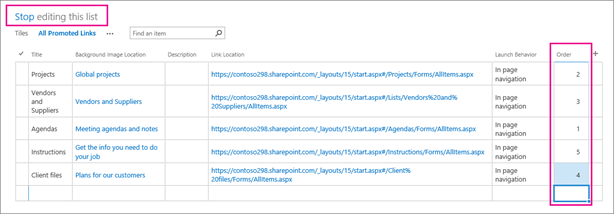
- To change the order of your tiles at any time, or make other changes, choose List > Current View > All Promoted Links > edit. Use the Order column to specify the order of your tiles. Choose Stop to save your changes.
Add the promoted links to your Home page (3 minutes)
- On the Home page of your team site, choose Edit.
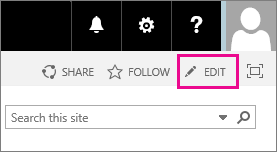
- Place your cursor at the end of your Welcome message, and press Enter. Your cursor should still be in the same box.
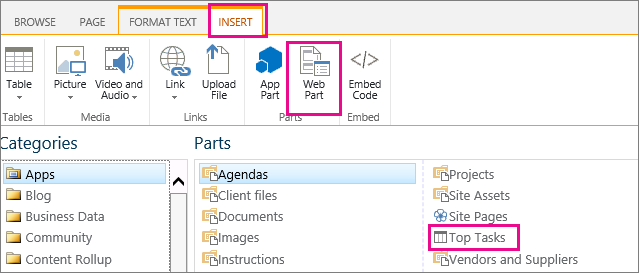
- Choose Insert > Web Part > Top Tasks > Add.
- Choose Save at the top of the page. You're done!Your team site will look something like this one.
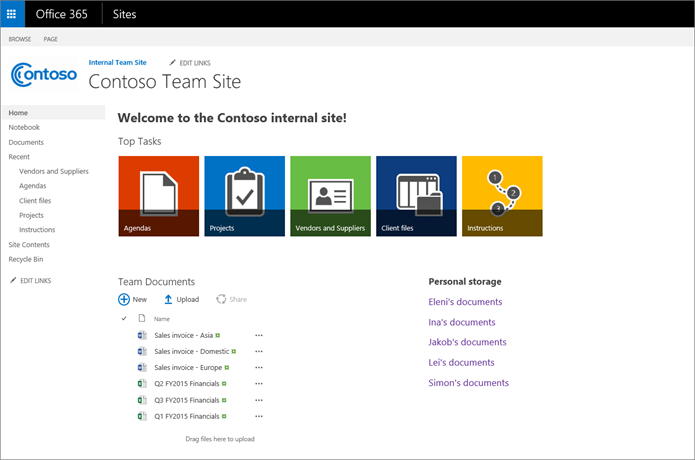
Congratulations! Now you know how to add colorful promoted links to other parts of your team site, too.
Step 4: Set up a subsite for sharing files with customers and partners
Estimated time to complete: 15–20 minutes
You can set up a team subsite, which is like a private website, for file sharing and collaboration with customers or clients external to your organization. By setting up subsites with unique permissions, you control who gets an invitation to access the subsite, reducing the risk that you might accidentally share files intended for one customer with another.
For example, let's say you are a realtor. You can create a subsite for a customer and put photos of properties on it for that customer to review. No other customers will be able to see that subsite.
Here's how to create the subsites for storing customer files.
- At your team site, choose Site Contents > + new subsite.
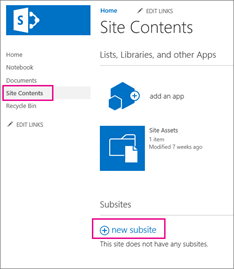
- At the Site Contents > New SharePoint Site page, in the Title box type a name for the subsite. The customer will see this title.
- For Web Site Address, in the URL name box, specify a name to appear in the URL for the subsite, such as the name of the customer's business. The customer will see this, too.
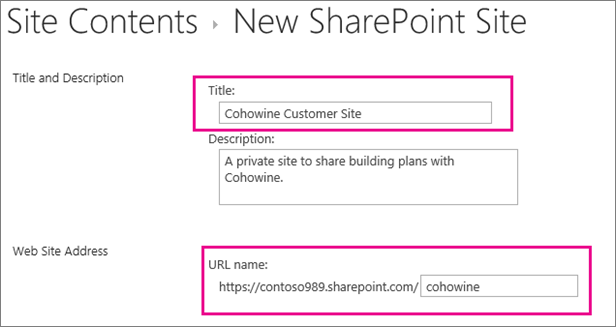
- In Template Selection, accept the defaults.
- For User Permissions, choose Use Unique permissions.Note: This is the easiest option to use.
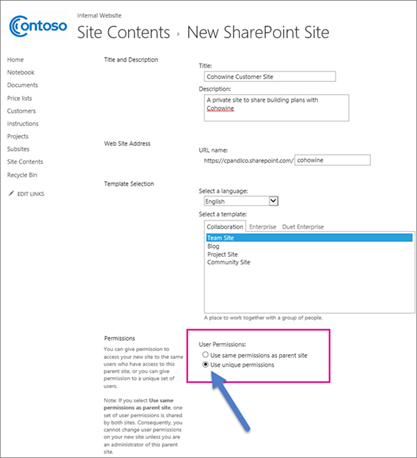
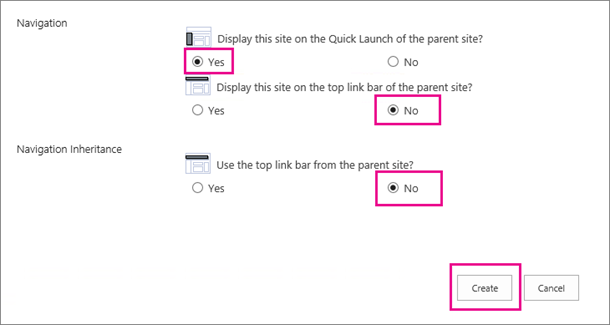
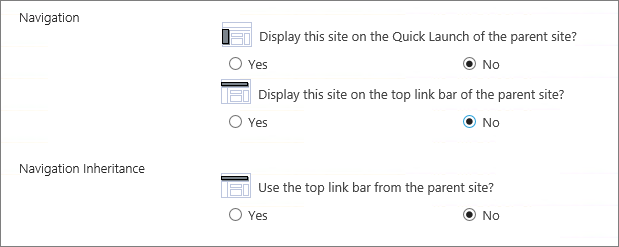
- For Navigation, do the following:
- For Display this site on the Quick Launch of the parent site, choose Yes. The Quick Launch is the left-side navigation.
- For Display this site on the top link bar, choose No. If you have a lot of subsites, it's better for the links to appear in the left-side navigation so they won't crowd the top of your page.
- For Navigation Inheritance, choose No. This way, the subsite doesn't inherit navigation from your team site. Then choose Create.
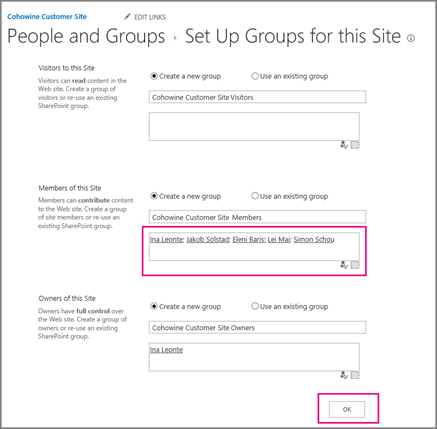
- At the Set up Groups for this Site page, add the names of the team members you want to contribute to this subsite, and click OK. (In the example screenshot, Ina Leonte is the site owner. Your name will appear on this page instead.)
 Your initial subsite will look something like the one below.
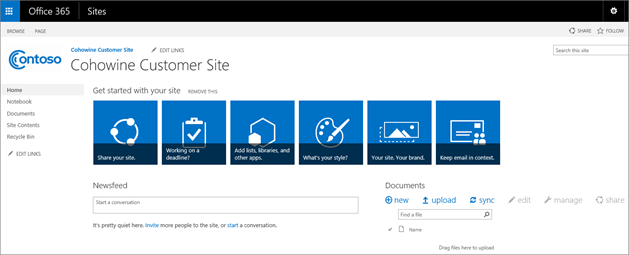
- Choose Remove this to remove the Getting Started tiles. If you share the subsite with customers and the Getting Started tiles are there, it will confuse them.
- Now, customize the customer's subsite as needed. For example, choose Edit at the top of the page to add a welcome message, and move the Documents library as you did for your team site.
- An easy way to make the customer's subsite look different from your internal site is to change the theme. Choose Settings
 > Change the look to try out different themes for the customer's subsite.
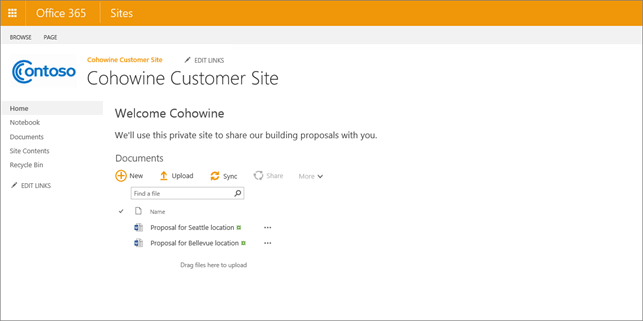
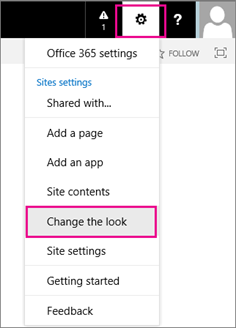 If you create a lot of customer subsites, can it be useful to have each one be a different theme. Here's an example of a customer subsite with a theme, welcome message, and a few documents.
- To get back to your team site Home page, choose Sites at the top of the subsite page, then choose Team Site. In Step 6: Promote your team site for quick access, we show you how to add links so it's easy for you to get back to your team site, but your customers won't be able to get to it.Tip: At any time, you can delete a subsite and start over.
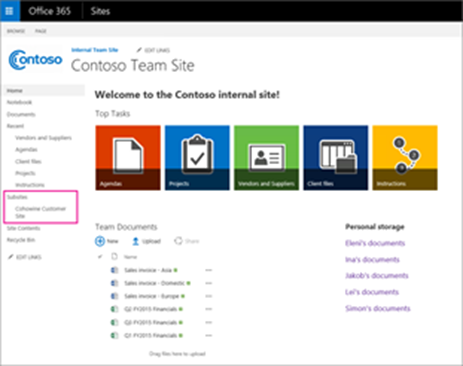
Now your team site Home page might look something like the one below, with a hyperlink to the customer subsite on the left side. This way, it's easy for your internal team members to navigate to it.
Share files on the subsite with a customer (5 minutes)
One way to share a file on a subsite is to create a guest link to the file, and then send the link to the customer. Only one person can access the file using the guest link, and guest links could potentially be forwarded or shared with other people.
- Choose the ellipsis ... next to the file you want to share, and then choose Share.

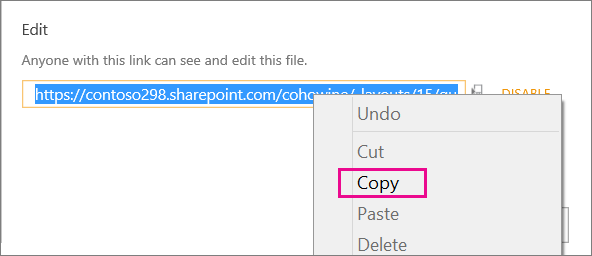
- Choose Get a link. To allow the customer to edit the file, under Edit choose Create a link.
- Right-click to copy the guest link, and then paste it into an email or other media for your customer.
You're done!
If your customers have Microsoft accounts, you can share the entire subsite with them. Here's how:
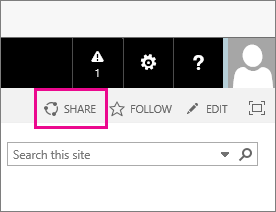
- On the customer subsite you want to share, choose Share at the top of the page.
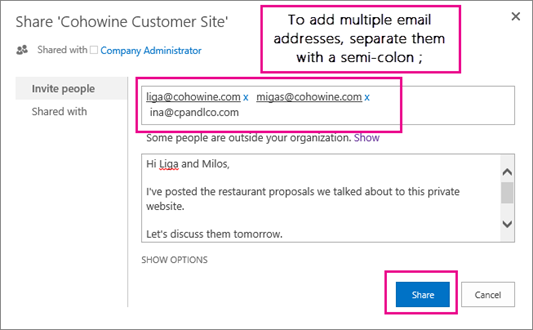
- Type the email addresses for the people you want to access the subsite. Include your address, too, so you get a copy of the email for your records. Click Share to send the mail.
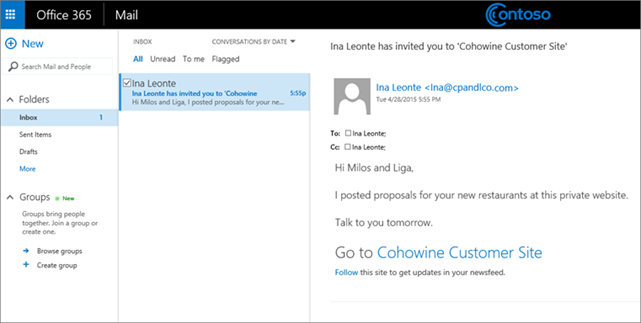
- You can go to your email to view a copy of the mail you sent to the customers. It will look something like this, with a link to the customer subsite at the bottom of the email.
Congratulations! You're done setting up file sharing for your customers.
Step 5: Set up a team subsite for storing private files
To set up a subsite that only you can access but not the rest of your team, create the site using the steps in Step 4: Set up a subsite for sharing files externally. But, at the Set up Groups for this Site page, don't add any team members. Your name, the site owner, should be the only one listed.
When you get to the part about setting up navigation, choose No for all the questions. This way your team members won't see a link to the subsite on your team Home page. To get to this subsite in the future, from the app launcher, choose Sites > your team subsite.
If you want to add a link to your subsite from the team Home page so it's easier for you to get to, choose Yes for one of the navigation options. Your team members won't be able to get to the subsite, but you'll need to tell them why the link doesn't work for them when they choose it.
Step 6: Promote your team site for quick access
Estimated time to complete: 10–15 minutes
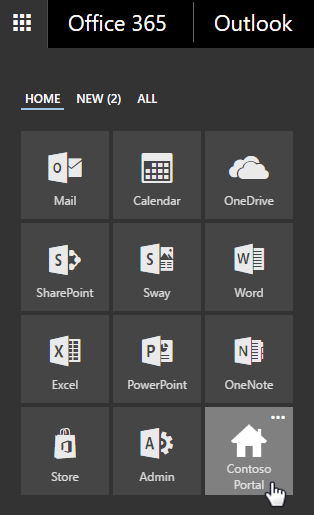
To make it easy for you and your employees to get to the team site from anywhere in Office 365, you can add it to the app launcher as a custom tile.
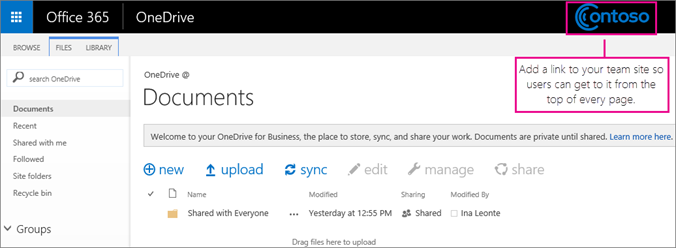
You can also add a link to it on the Office 365 header, which we describe how to do next. But both of these locations are really useful for times when you're in OneDrive for Business or in another Office 365 app, and you want to go to your team site.
Add a link to your team site to the Office 365 header
Your link can be a logo or other picture. It just needs to be 200 x 50 pixels, no bigger than 10 KB. To create your logo, consider using Microsoft Paint to take a snapshot of your logo that you can crop, resize to 200 x 50, and save as a JPEG file. (This will compress the file to make it smaller than 10 KB.)
- At your team site, copy your URL. (The format for the URL is https://<your company name>.sharepoint.com.)

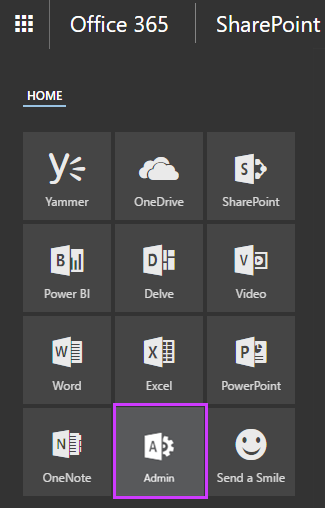
- At the top of the page, select the app launcher
 , and then choose Admin.
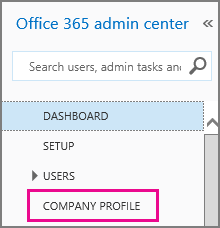
- In the Office 365 admin center, on the left-side of the page, choose Company Profile.
- Choose Custom Theming.
- In Custom logo, navigate to the logo or other image saved on your computer that you want to use.
- In URL for a clickable logo, paste the URL for your team site, and then choose Save.
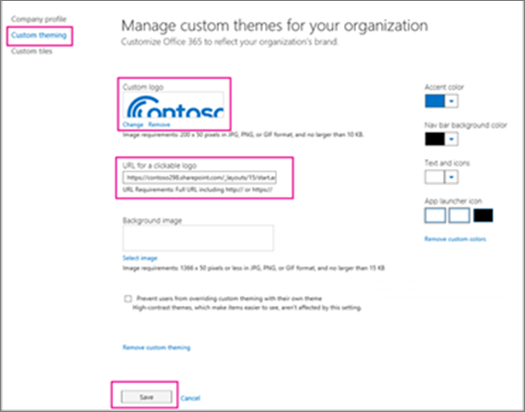 Now your logo or picture will appear at the top of every page, even in Mail, and other team members in your business can click it to get to your team site.
 Congratulations! You've completed this step-by-step tutorial to customize your team site. Was this article helpful? In the feedback box at the bottom of this page, please leave us a comment. We'll use your feedback to double-check our steps.
ok
ReplyDeleteOneSimCard’s clear API lets you bring all our platform’s usefulness to the rest of your tech stack. Control your IoT network from any framework and streamline your workflows. Do not have to switch applications to restrain information utilization, square a supplier, or troubleshoot a device.
ReplyDeleteA global SIM card is a SIM card that is valid in a number of different countries. This is great for tourists who want to stay connected while traveling. It also makes it easier for people who use multiple devices. For example, you can use your global SIM card with your phone and your laptop.
ReplyDelete