Saturday, November 26, 2022

Connecting to SMB Share on MacOS

 Connecting to SMB Share on MacOS

  • At the toolbar on the top of the screen, press Go and then “Connect to Server….

  • In the address bar, enter smb://SERVER-IP/SHARE and click Connect. We can also select the plus at the bottom to save this information if we need to reconnect.

  • Enter the login to connect to the SMB share.

  • Here we can see our SMB share is connected, and we can create a folder.


Tuesday, November 22, 2022

How to find out SSD, NVMe or HDD in a Windows 10/11 computer

 These days, there are three types of drive you can find in the computer.

  • Hard disk drive (HDD) is a classic device with a magnetic spinning disk inside. These drives were first introduced in 1956, and are widely used until now. They perform read and write operations with a magnetic head, and can also retrive data in random-access order.
  • Solid-state drive (SSD) is a modern type of drives which has no rotating parts. It is like a huge flash drive with a controller that operates the data transfer. The information will be written into special memory cells. Obviously, SSD work much faster than HDDs and produce no noise. Classic SSDs are often interchangable with HDDs.
  • Non-Volatile Memory Express (NVMe) is the latest version of solid state drives. They are different from classic SSDs as they use a special interface. They are not compatible with HDDs and Sata SSDs, yet they offer incredible data transfer speeds. Also they are very compact in size.

Detect SSD or HDD in the Optimize Disks tool

  1. Right-click the Start button and select Run, or press Win + R.
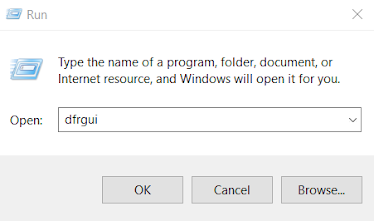
  2. Type dfrgui in the Run box and hit Enter to open the Optimize Drives tool.


  1. In the drive list, look at the Media type column. For an SSD drive, it will say Solid state drive.

You are done. While this method is the simplest one, it may be not that accurate. Because Windows detects the drive type with its own tests, including the drive speed. If it works slowly or is too new for your Windows version, the OS may be detect it as HDD.

Another method is a PowerShell applet.

Find SSD or HDD in Windows 11 with PowerShell

  1. Press Win + X and select Terminal (Admin) from the menu.
  2. Ensure it opens with a PowerShell tab, and type the following command: Get-PhysicalDisk.
  3. In the output, check out the MediaType column. It will say SSD or HDD depending on the drive type.


Finally, you can use the Task Manager app to learn about your drives.

Using Task Manager

In Windows 11, Microsoft has updated the Task Manager with advanced capabilities. Besides the updated look, it is able to display extra details about your hardware.

To find the drive type with Task Manager, do the following.

  1. Open the Task Manager app with the Ctrl + Shift + Esc shortcut.
  2. In the app, click on the hamburger icon to see the text labels, and then click on the Performance tab.


  1. Finally, on the Performance tab, select the disk. You will see if it is SSD or HDD in a note below the partition names.

Also, you can try to look on the Internet for technical specification of your drive. There, you will find a lot of information about it, including its type. But first you have to learn its model.

Find drive type by its model

First of all, you need to find the drive model. You can find it either in Device Manager,  Task Manager, or System Information tool.

Task Manager

  • In Task Manager (Ctrl + Shift + Esc), the Disks tab on the Performance page shows the drive model.

Device Manager

  • Right-click the Start button in the taskbar and select Device Manager from the menu.
  • Expand the storage section.
  • Write down the drive model.

Using System Information tool
  1. Press Win + R and enter msinfo32 in the Run dialog.


  1. In the left pane, expand the tree to Components > Storage > Disks.
  2. Look for the drive model in the right and select it.
  3. Press Ctrl + C to copy the drive model to the clipboard.


Now, when you know the drive model, do a web search with Google or Bing using the model words as a keyword. On the vendor's website or some reputable hardware resource you will find all the information about the drive, including its type. I.e. it will show if it is SSD, NVMe, or HDD.

Now, when you know how to find if you have SSD or HDD, let's look how to differentiate NVMe for SATA SSD.

Find out NVMe in Windows 11

  1. Press Win + I to open Settings.
  2. Go to the System > Storage page and click on the Disks and Volumes option under Advanced storage settings.
3. On the next page, click on the Properties button next to the drive name. 
4. The properties page will show the NVMe line for the Bus type. Otherwise, you will see SATA.

You are done!

💡 

Note: On some devices, NVMe is reported as 'RAID'. It must be the driver which reports the interface type to the OS. It is also reported as RAID in third-party tools reviewed in the next chapter. Keep this in mind.

For the completeness' sake, let's review a couple of alternative methods you can use for finding out NVMe in Windows 11.

Find if you have NVMe in Disk Properties

  1. Right-click the Start button and select Device Manager.
2. In Device Manager, expand the Disk drives category on the left.
3. Double-click the drive to open its properties. 
4. In the Properties window, switch to the Details tab. 
5. In the Property drop-down list, select Hardware Ids
6. In the Value list, check out the list entries. It should include "NMVe" for NVMe drives.


Monday, October 17, 2022

Password reset for HPE Storage Works 1/8 G2

 This is the solution that will reset the Administrator password of HPE StorageWorks 1/8 G2.

Here is a short JavaScript program that will let you enter the autoloader's date and time in your browser and calculate the override code for you.

https://jsfiddle.net/0kf8w6n5/1/ 


Tuesday, October 4, 2022

How to boot in Safe Mode in Windows 10?

 There are many ways to enter Safe Mode, but here are the three easiest.

Using the Power icon

If you're signed in: 

1. Click the Windows icon in the bottom-left corner.

2. Holding down the Shift key, click the Power icon and then Restart.

Hold down the Shift button as you click "Restart."

3. Your computer will restart, and then open onto a blue screen titled Choose an option. Select Troubleshoot, and then Advanced options.safe 3

Choose "Troubleshoot" on the Choose an option screen.
Dave Johnson/Business Insider

4. Click Startup Settings, and then Restart. Your computer will turn off and on again.safe 4

Choose "Startup Settings" and then click Restart to get to the final selection menu for Safe Mode.

5. Once the screen comes back, you'll be given a few options. Press 4 to start your computer in Safe Mode, or 5 to start Safe Mode with internet access.A PC screen asking how the user would like to start the computer. Two "Enable Safe Mode" options are highlighted.

Enable Safe Mode with or without internet access.

If you're not signed in, do the same thing, but click the Power icon on the sign-in page.

Using the Settings app

1. Open the Settings app by pressing the Windows key + I.

2. Click Update & Security, and then Recovery.

3. On this page, underneath Advanced startup, click Restart now.safe 2

Click "Restart now" to get to Safe Mode.

4. Your computer will restart onto the Choose an option screen. Here, click Troubleshoot, and then Advanced options.

5. Select Startup Settings and then Restart.

6. When your computer boots back up, you'll be given some startup options. Here, press 4 to start your computer in Safe Mode, or 5 to start Safe Mode with internet access.

Holding down the power button

This is the method to use if you can't boot into Windows normally.

1. Press your PC's power button to turn it on.

2. As soon as you see something appear on the screen — probably the manufacturer's logo — hold down the power button until the PC turns off again.

3. Do this two more times, and then turn on your PC again. As it's starting, the words Preparing Automatic Repair will appear at the bottom of the screen. Let your PC go through this process — it should eventually boot onto the Choose an option screen.A black screen with a Windows logo and the words "Preparing Automatic Repair."

Force-restarting your computer three times will put you into automatic repair mode.

4. On this screen, select Troubleshoot, then Advanced options, and then Startup Settings. When prompted, click Restart.

5. When the computer turns back on, press 4 to start your computer in Safe Mode, or 5 to start Safe Mode with internet access.

How to exit Safe Mode

There are two ways to exit Safe Mode.

The first — and easiest — is to just restart your computer. You can do this by holding down the power button, or by going through the Start menu.

If you've restarted your computer but it's still in Safe Mode, you should:

1. Press the Windows key + R to open the Run menu.

2. In the text box, type msconfig and press Enter.Screenshot_01

Run should still be a usable tool in Safe Mode.

3. At the top of the System Configuration menu, click Boot.

4. Underneath Boot options, make sure that Safe boot is unchecked. Once it is, click OK and restart your computer again.Screenshot_02

The menu you're looking for should look like this. The button you're looking to uncheck is in the bottom left.                                              

Friday, September 30, 2022

How to Upgrade or Downgrade VMWare vSphere/vCenter License Keys in Customer Connect?

 Important notes:

• To upgrade a product to the most current version, please make sure your Support and Subscription contract is current and active when the new product version is released.
• When a new version of a product becomes available, you will receive an alert that you are entitled to the new version of your current product. If you do not receive an alert, your Support and Subscription contract may have expired or you may not have the permissions to upgrade that license key. If your contract has expired, you can request a support contract renewal quote.
• Only Super Users with Upgrade and Downgrade License Keys permissions can upgrade/downgrade a license key.

Major upgrade Vs Minor Upgrade
 
Major UpgradeMinor Upgrade
This changes the product version; it is an upgrade from a lower to a higher version of the software.
This requires a license key change, where a User is required to upgrade the keys on Customer Connect portal along with their Environment upgrade.

Example: vSphere 6.0 >> vSphere 7.0
 
This does not change the product version and does not require a license key change in Customer Connect portal.
Users are only required to update their Environment and their existing license key would work on the same Patch. This is an upgrade for bug fixes, new features/components and other small improvements.

Example: vSphere 7.0 >> vSphere 7.1


How to Upgrade License Keys:
1. Log in to Customer Connect.
2. 
Select either Products and Accounts >Account > Manage Licenses from the top of the homepage or Manage Licenses Quick Link icon when you login.
image.png

3. Alternatively, when you receive an alert for subscription upgrade, click Upgrade Licenses in the alert. This takes you to the License Keys page.

4. Select one or more license key folders.

5. Highlight the checkbox next to the key to be upgraded and change the Dropdown to Upgradable Products. All products that are eligible for upgrade are displayed.
image.png

6. Click Upgrade
image.png
7. After clicking Upgrade, a screen will be displayed to confirm the product version that you are going to receive after the upgrade.
Note: If there is more than one upgrade option, you need to select the upgrade option you wish to upgrade to.

8. Select the quantity of licenses you want to upgrade.
Note: The quantity you are upgrading must be equal to or less than the available quantity.

9. Click Continue.
image.png

10. Indicate that you have read and understood the warning, then click Confirm.
image.png
11. The upgraded license key is displayed in a dialogue box. If any quantities of the current key remain not upgraded, new licenses keys are generated for the remaining portion of the current product and are displayed in the confirmation process.

12. Click Done to return to the License Key page. 
Note: The old/upgraded license key no longer displays in Customer Connect. 


How to Downgrade License Keys:
1. Log in to Customer Connect
2. Select either Products and Accounts >Account > Manage Licenses from the top of the homepage or Manage Licenses Quick Link icon when you login.

image.png

3. Select one or more license key folders.

4. Highlight the checkbox next to the key to be downgraded. Alternatively, you can select Downgradable Licenses from the dropdown. All products that are eligible for downgrade are displayed.
image.png
 
5. Click Downgrade. 
  image.png

6. After clicking Downgrade, you’ll receive a screen that confirm the product version that you are going to receive after the downgrade and the quantity, and review.
Note: If there is more than one downgrade option, you need to select the option you wish to downgrade to.

7. Select the quantity of licenses you want to downgrade.
Note: The quantity you downgrade must be equal to or less than the available quantity.

8. Indicate that you have read and understand the warning, then click Confirm
image.png

9. The downgraded license key is displayed in the dialogue box. Click Done to return to the License Key page. You can select Send a copy to my email if you wish to.
image.png


Important: 
• NFR (Not for Resale) licenses shall only be used for Partner test, demo, and development purposes, as specifically authorized by your partner agreement. Partners are not permitted to perform license operations (combine/divide/upgrade/downgrade) on NFRs with non-NFR licenses obtained from VMware. Use of NFRs in any production and end user environment is strictly prohibited.
• The downgrade option is not available for ESXi 4 Single Server to ESXi 3.x.
• The downgrade option is not available for vSphere Essentials to VI3.
• If license keys are downgraded from vSphere Enterprise version 5 to ESX version 3, the vSphere Enterprise 5 key will still remain in the license portal and a new license key will be available in the VI3 license portal. You will not be able to upgrade this new VI3 key. To remain in compliance, use either the vSphere Enterprise 5 key or the downgraded VI3 key. 
• Site Recovery Manager 5 has two different editions: Standard and Enterprise. You can downgrade the Site Recovery Manager 5 Enterprise licenses to previous version, but you cannot downgrade Site Recovery Manager 5 Standard licenses.
• There is no option for an edition downgrade.
• The downgrade view portal may vary depending on Browsers.
• After downgrading a license key, the original key should not be used in order to remain in compliance.   


Troubleshooting Steps:
1. If you are associated with multiple accounts, ensure that you are working within the correct account. You can switch between accounts in the dropdown at the top of the License Keys page and the Users and Permissions page of Customer Connect portal.
2. Ensure that the key is associated with an active support contract. If your contract has expired, you can request a support contract renewal quote. 
3. Ensure that you have Upgrade & Downgrade License Keys permissions.  
4. Ensure that the total number you are upgrading/downgrading is equal to or less than the number of total licenses available.
5. Ensure that the license key is eligible to be upgraded/downgraded. VMware Fusion 1 and 2, VMware Workstation 1, 2, 3, 4, and 5, and Enterprise products released before May 2009 cannot be upgraded or downgraded.  
Monday, September 5, 2022

Installing Oracle OLE DB 32-bit and 64-bit drivers side-by-side - ODAC 19c


  • ODAC XCopy
  • 64-bit ODAC OUI

The ODAC OUI gives you a graphical user interface for installation, but it only provides you with 64-bit version of the drivers. If you need 32-bit drivers, you will have to use the command-line ODAC XCopy.

Using ODAC XCopy you can install 64-bit or 32-bit OLE DB drivers for Oracle. You can also use ODAC XCopy to install the Oracle Instant Client which supports ODBC.

However, installing any of the drivers (32-bit or 64-bit) disables the other driver. How can you make them co-exist?

  • C:\Windows\System32 for 64-bit applications
  • C:\Windows\SysWOW64 for 32-bit applications

Here are the full steps:

  1. Download ODAC XCopy 64-bit and 32-bit from Oracle's website
  2. Unzip the files and open a command prompt as administrator. Go to the location of the unzipped files.

    Oracle ODAC installation

  3. Run install.bat for the 64-bit driver:
    install.bat oledb C:\Oracle\64bit odac
Go to the location of the unzipped files for the 32-bit driver and install from there:
    install.bat oledb C:\Oracle\32bit odac
  1. Now create symbolic links to your driver folders:
    cd C:\Windows\System32
    mklink /d odac C:\Oracle\64bit
    cd C:\Windows\SysWOW64
    mklink /d odac C:\Oracle\32bit
  1. Edit your environment variables and add C:\Windows\System32\odac and C:\Windows\System32\odac\bin to your path:

    Oracle Odac Path

    Now the OLE DB driver will automatically be loaded from C:\Oracle\64bit or C:\Oracle\32bit depending on if in 64- or 32-bit architecture of your application.

Tuesday, August 30, 2022

Migrate Jump List Contents from one Computer to Another

 Base on my research, all the Jump Lists items are saved in the following locations:


%APPDATA%\Microsoft\Windows\Recent\AutomaticDestinations

%APPDATA%\Microsoft\Windows\Recent\CustomDestinations


You can try to copy the jump lists items on the old machine and paste on the same location of the new machine.


Figure 1. Sample of Jump List Items


Sunday, August 28, 2022

How to upgrade vCenter Server Appliance 6.7 to 7.0?

 Getting Started

Before beginning, I HIGHLY recommended you first check the VMware Interoperability Matrix before performing any upgrade to check compatibility of other VMware products.

Then go download the VCSA 7.0 ISO if you haven’t already and lets get started with the upgrade!

How to Upgrade VMware vCenter Server Appliance (VCSA) 6.7 to VCSA 7.0

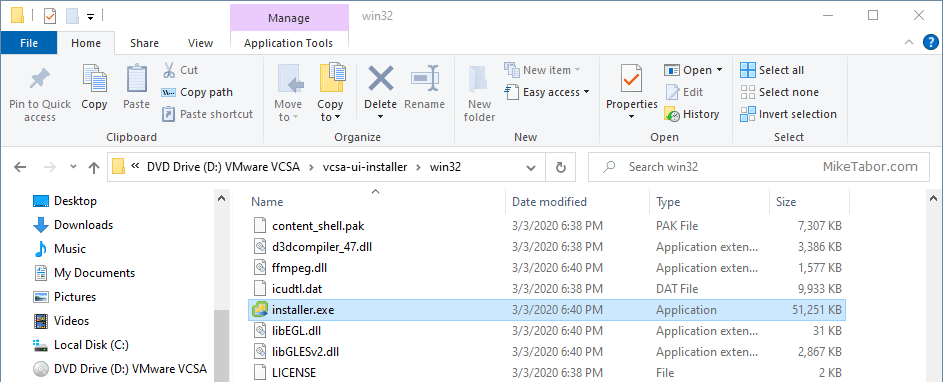
  1. Mount the vCenter 7.0 ISO to your computer and start the vCenter Server 7.0 installer located at /vcsa-ui-installer/win32/installer.exe
    Run installer.exe from ISO
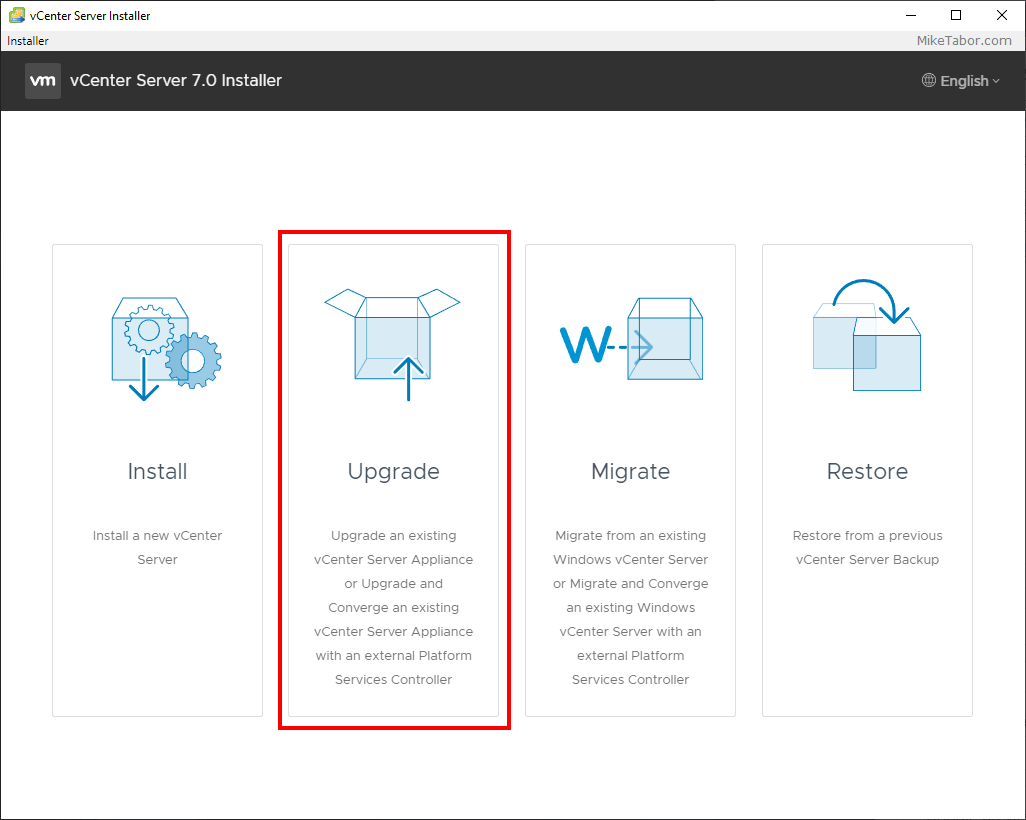
  2. When the vCenter Server 7.0 installer starts, click on Upgrade.
    vcenter 7.0 installer upgrade
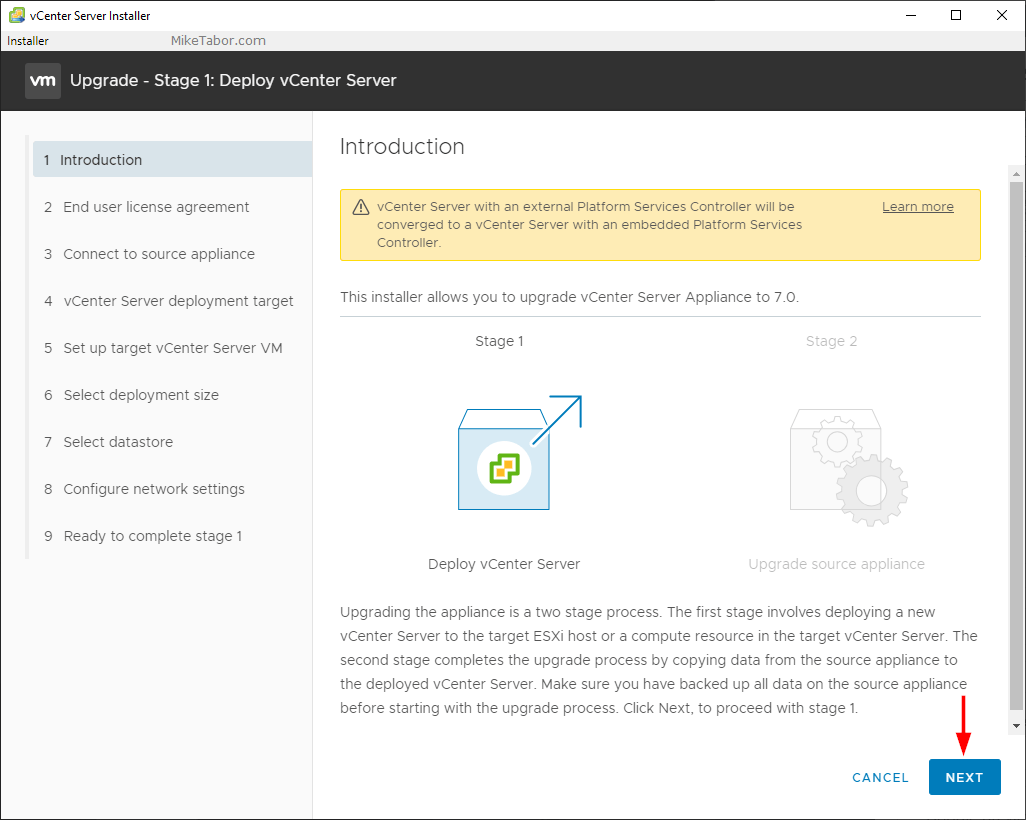
  3. Click Next through the Introduction.
    vcenter 7.0 installer introduction
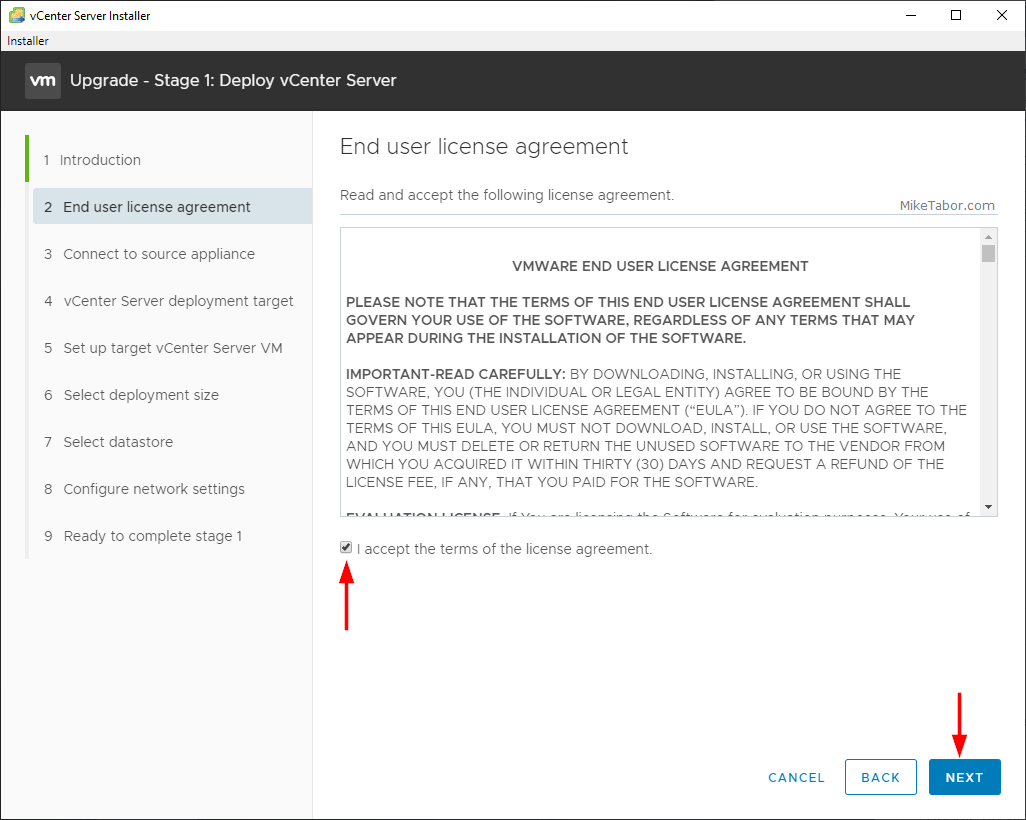
  4. Agree to the End User License Agreement and click Next.
    vcenter 7.0 installer eula
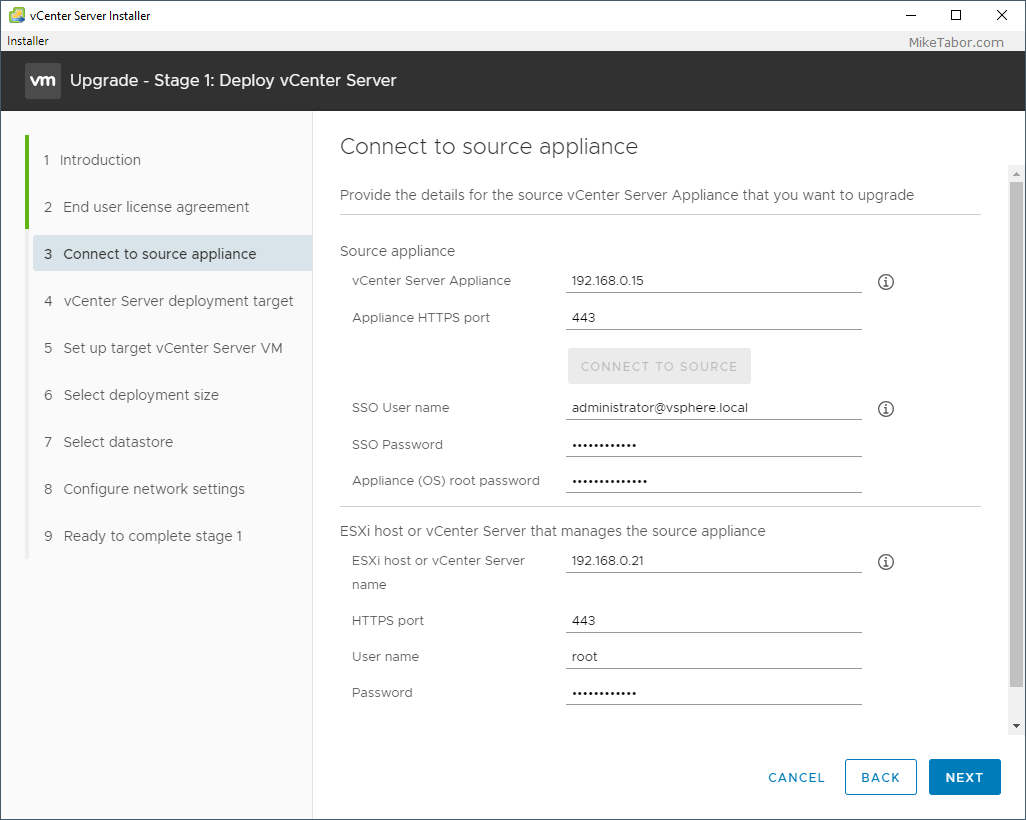
  5. Next enter the EXISTING VCSA FQDN or IP address as well what ESXi host the existing VCSA is running on, along with all of the login credentials for the existing VCSA and ESXi host.
    vcenter 7.0 installer source-appliance
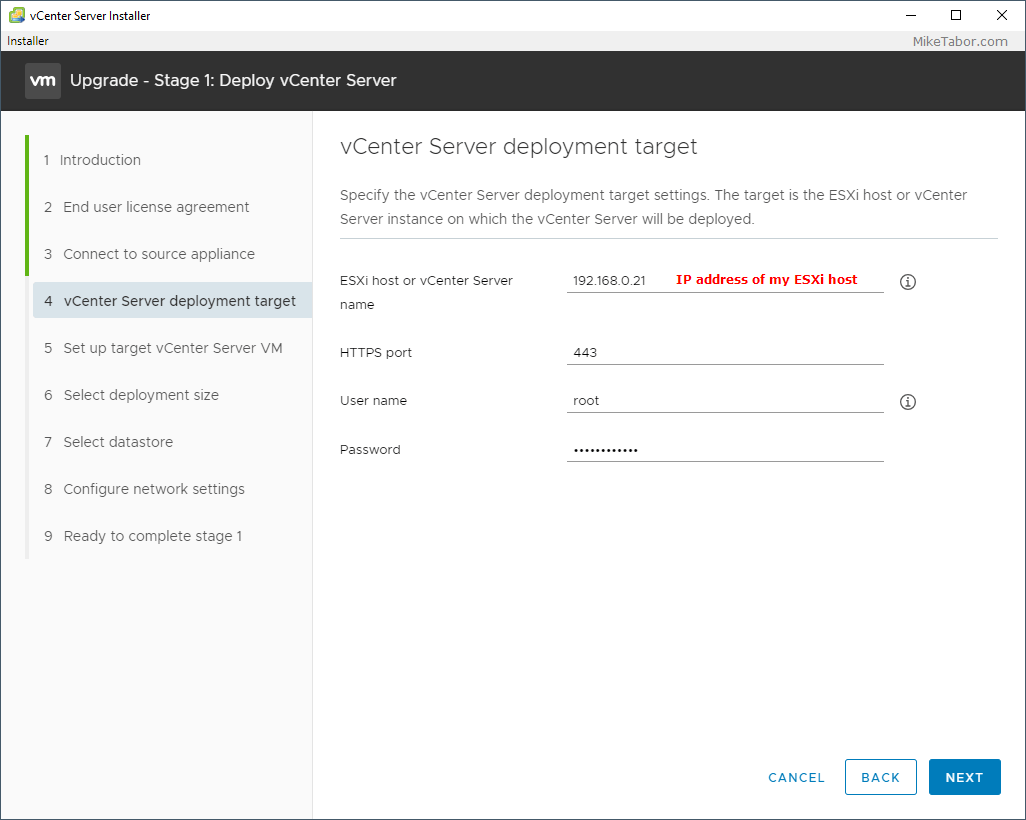
  6. Now enter the ESXi host or vCenter server where you would like the new VMware vCenter Server 7.0 appliance to be deployed.
    vcenter 7.0 installer target
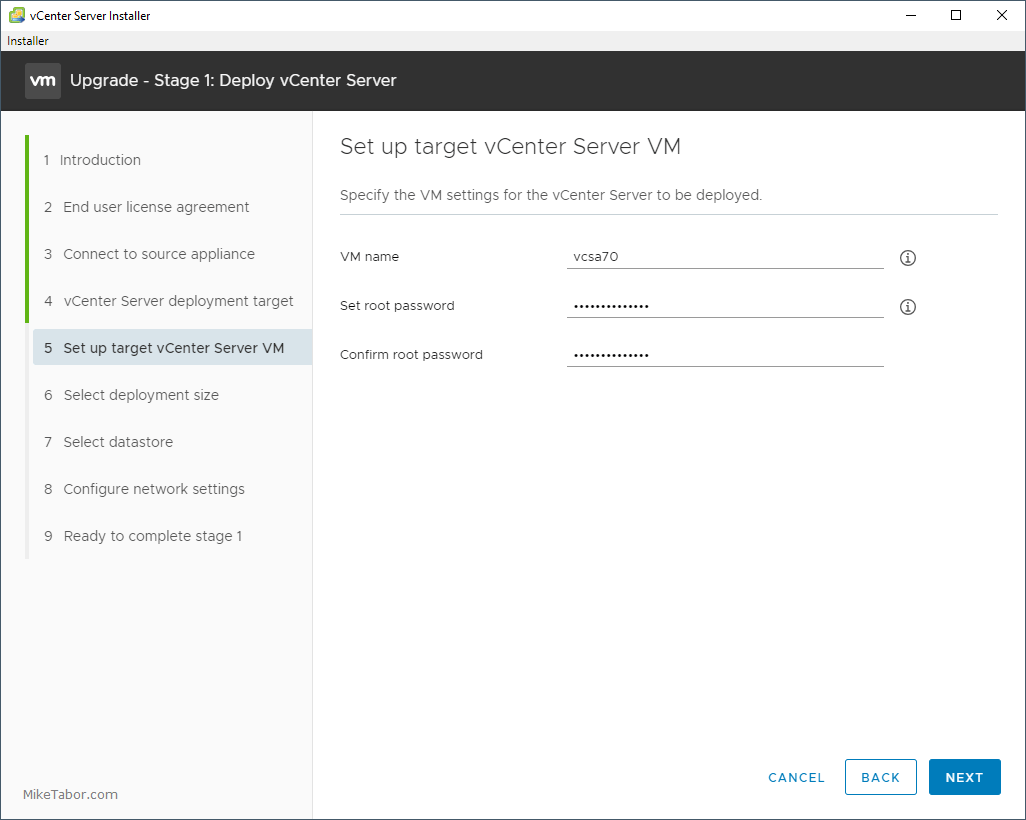
  7. Next specify a VM name and root password for the new 7.0 VCSA.
    vcenter 7.0 installer target vcenter server vm
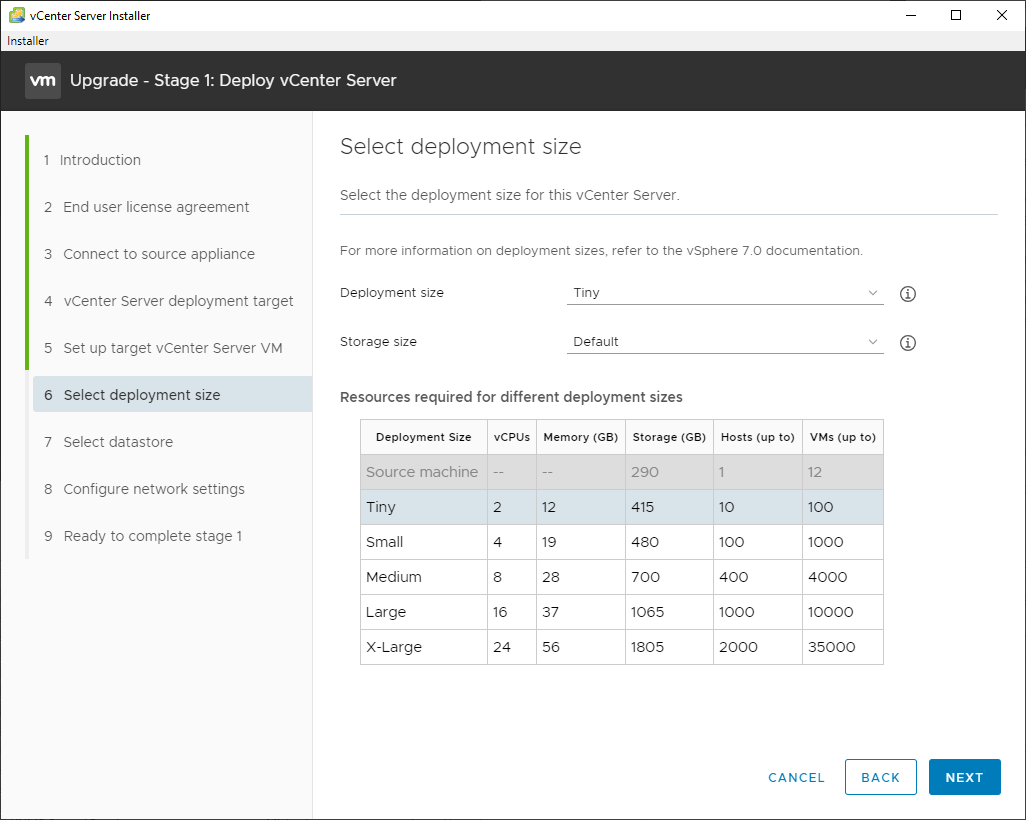
  8. Select an appropriate deployment size for your environment.
    vcenter 7.0 installer deployment size
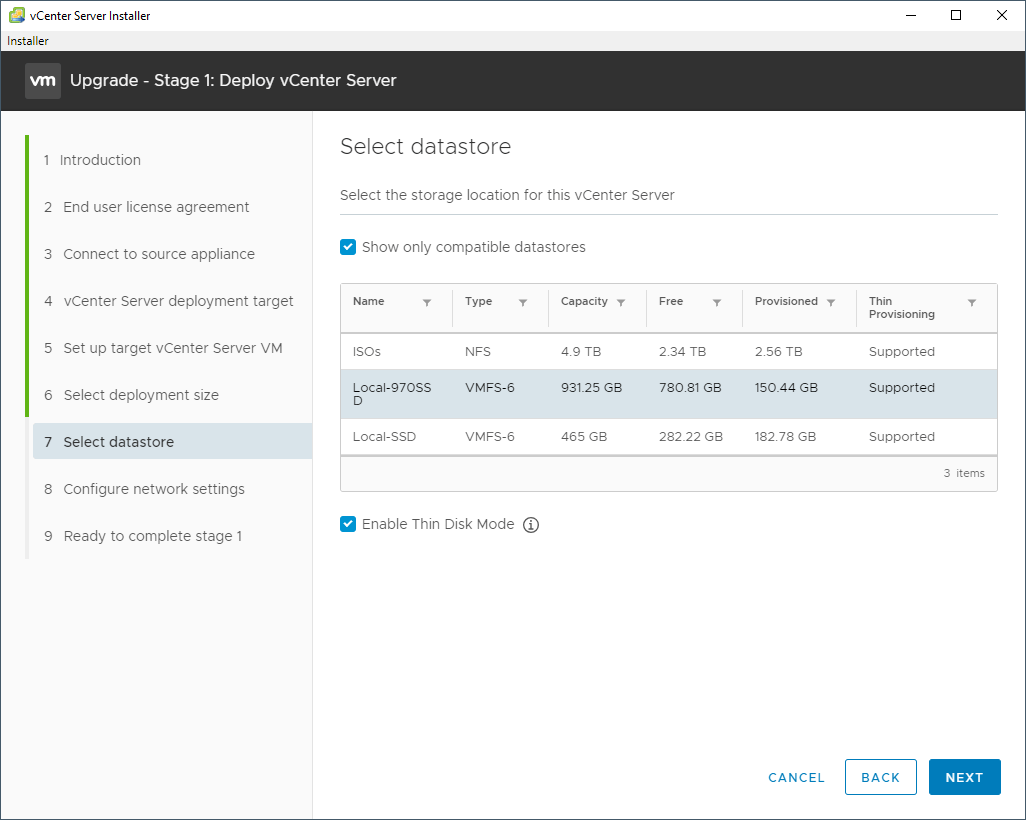
  9. Select a datastore you want the new vCenter 7.0 appliance to be stored.
    vcenter 7.0 installer datastore
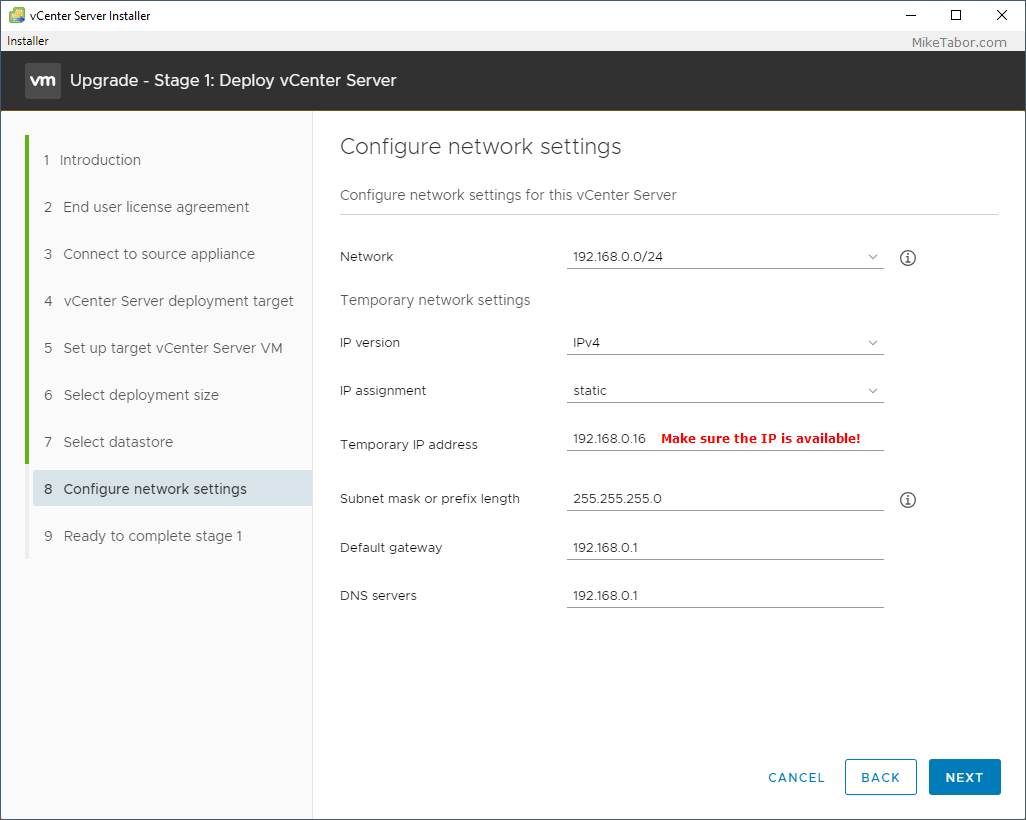
  10. Next configure a temporary network configuration. Once Stage 2 of the upgrade has been completed the new 7.0 VCSA will take the network identity of the old existing VCSA.
    vcenter 7.0 installer temp network settings
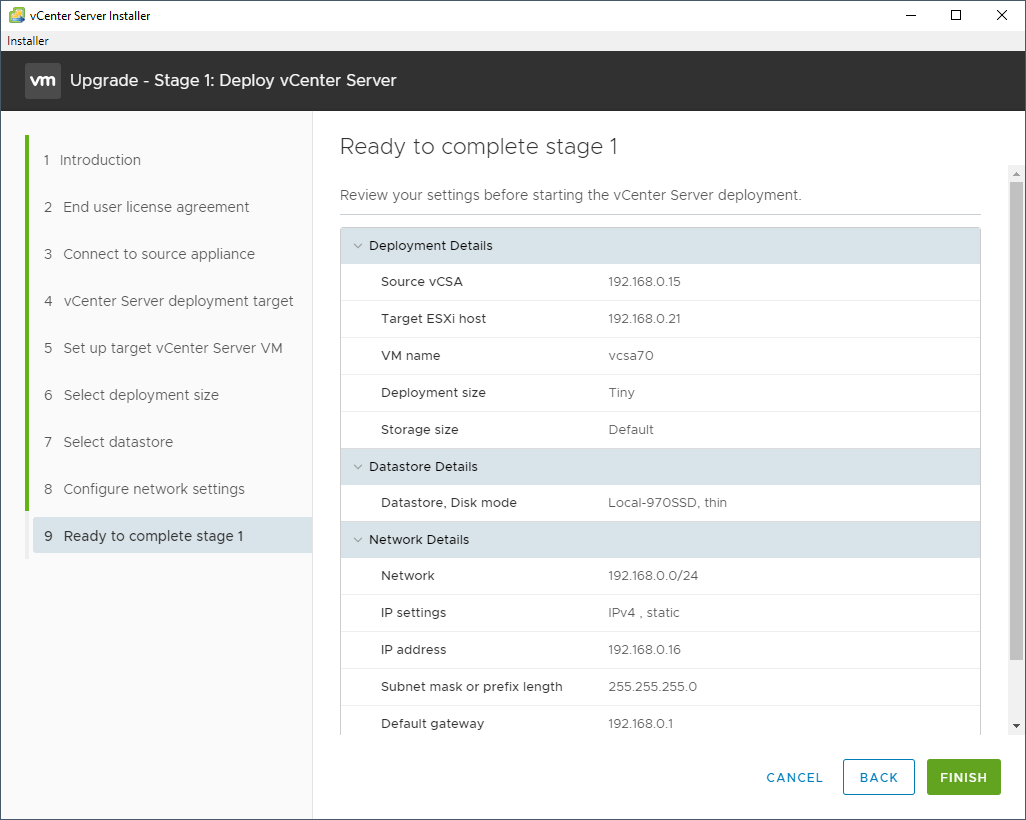
  11. Review the Stage 1 summary and click on Finish.
    vcenter 7.0 installer stage 1 review
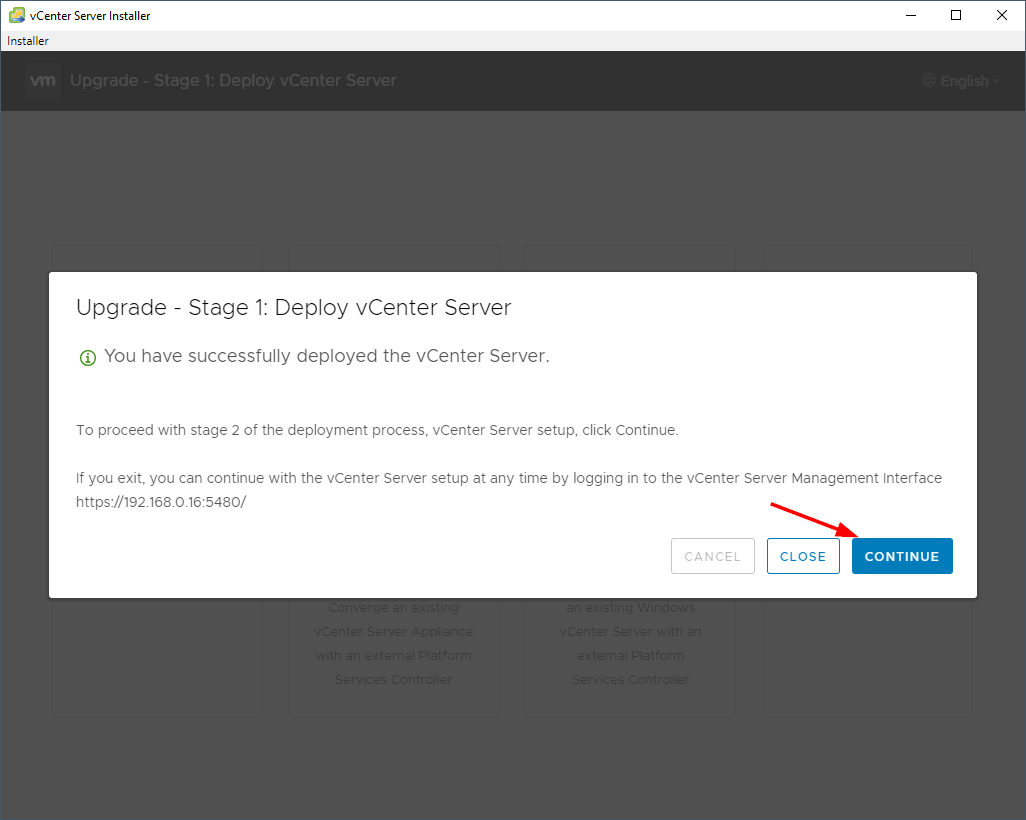
  12. Once Stage 1 of the vCenter 7.0 upgrade completes, click on Continue to move on to Stage 2.
    vcenter 7.0 installer stage 1 complete

Stage 2 – Upgrade vCenter Server Appliance 6.7 to 7.0, copying VMware vCenter data

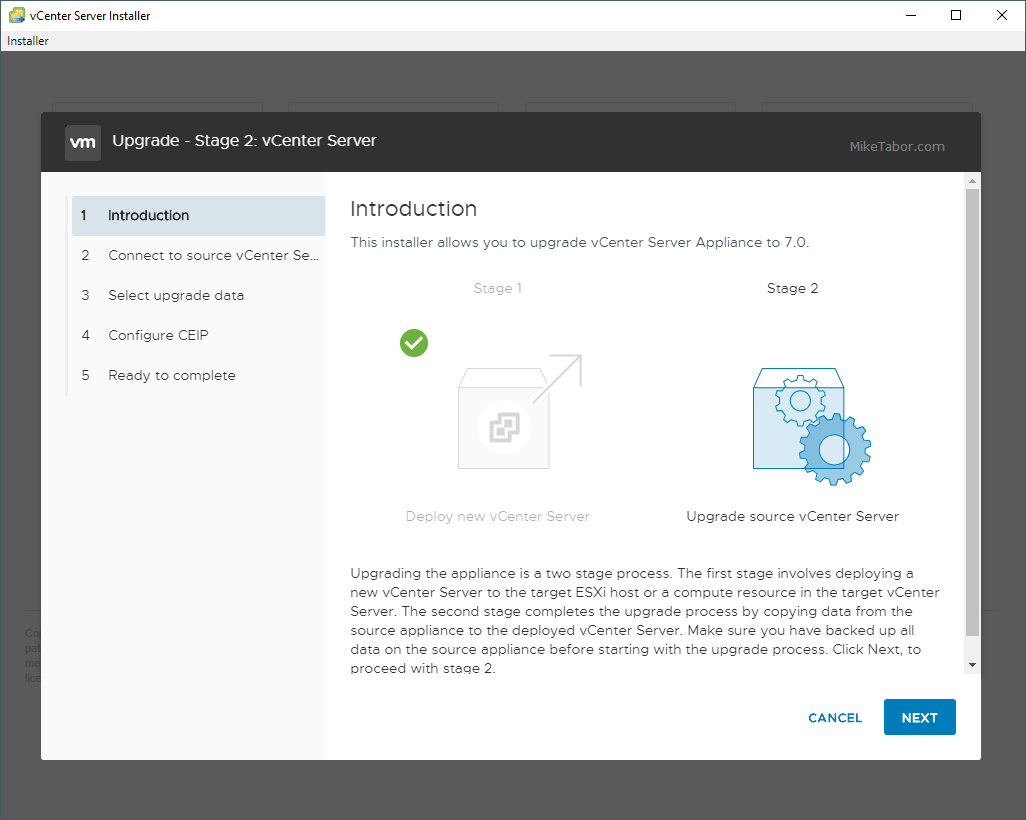
  1. Click on Next through the VCSA Stage 2 Introduction.
    vcenter 7.0 installer stage 2 intro
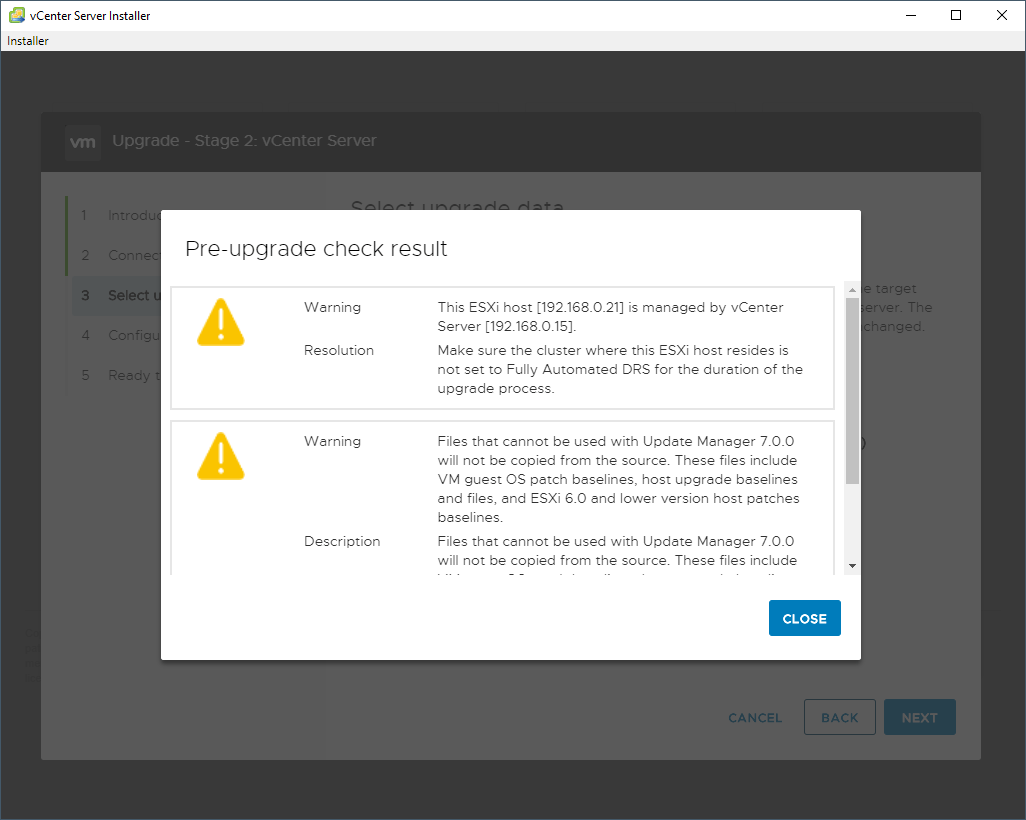
  2. The installer will then automatically run a Pre-Upgrade check on your existing VCSA. Make sure to review those results, then click on Next. Note: Be sure that DRS is disabled if you have more than one host. I only have one host, so DRS isn’t an issue.
    vcenter 7.0 installer stage 2 pre-upgrade check
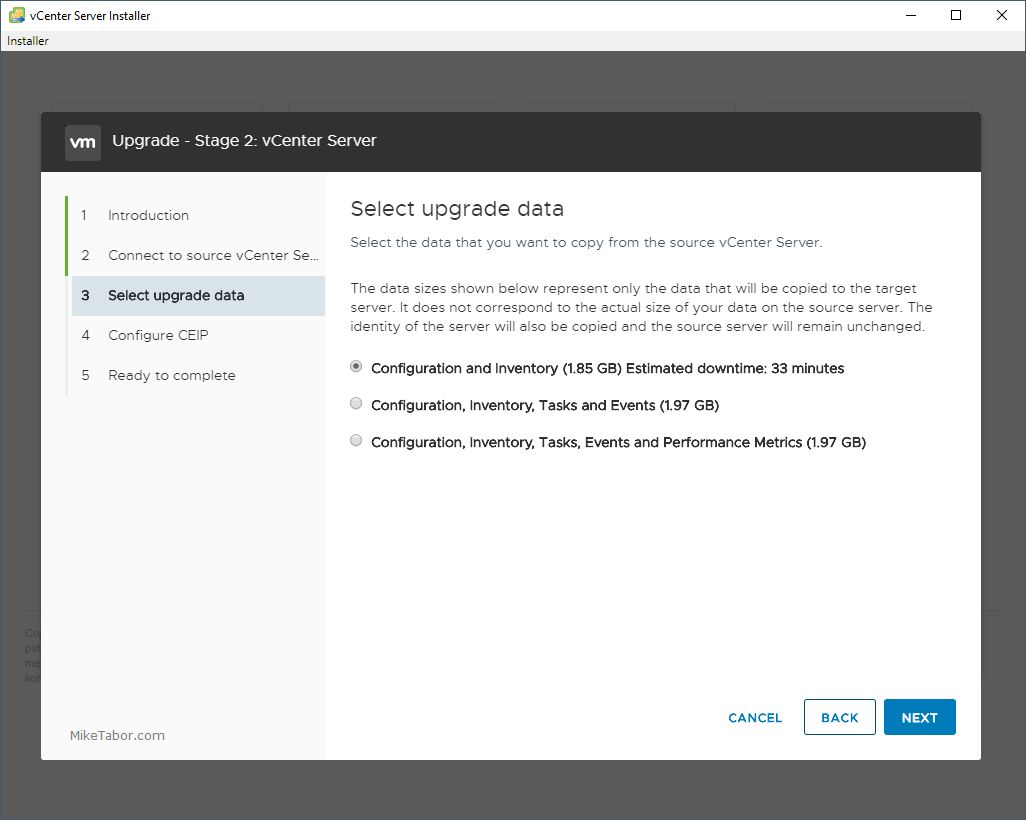
  3. Next select which data you would like to copy from the existing VCSA 6.7 to the new VCSA 7.0 appliance.
    vcenter 7.0 installer stage 2 pre-upgrade data
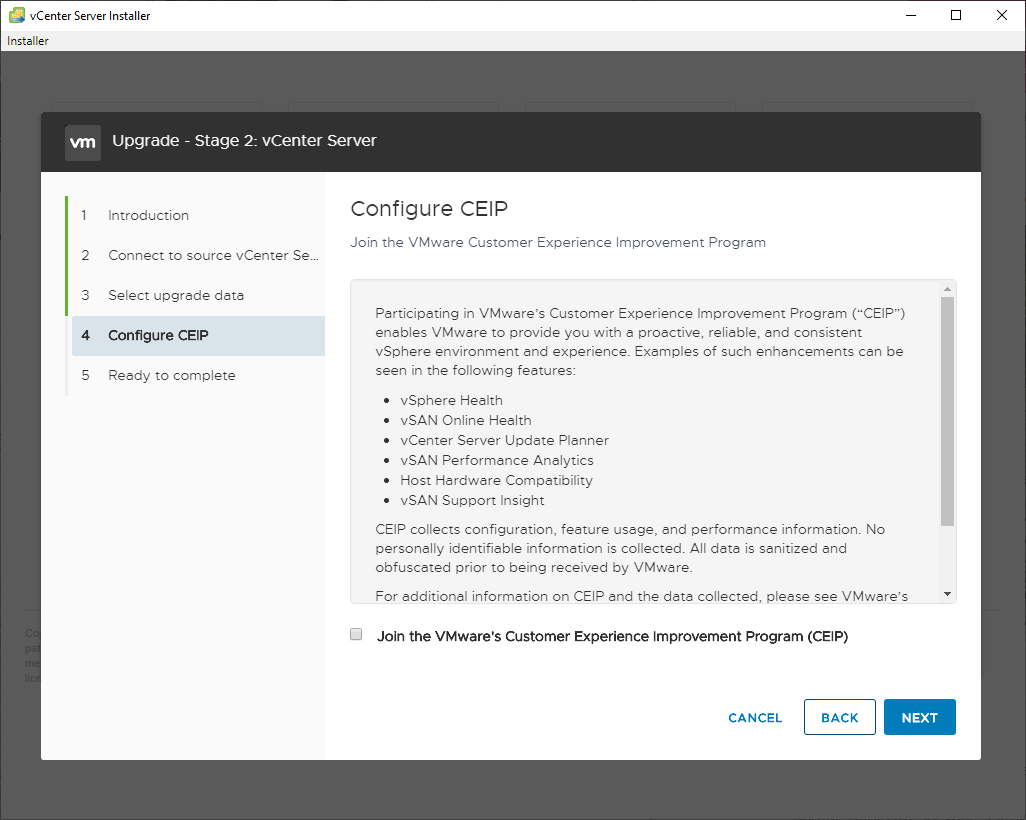
  4. Join the VMware customer experience improvement program, or don’t, and click Next.
    vcenter 7.0 installer stage 2 ceip
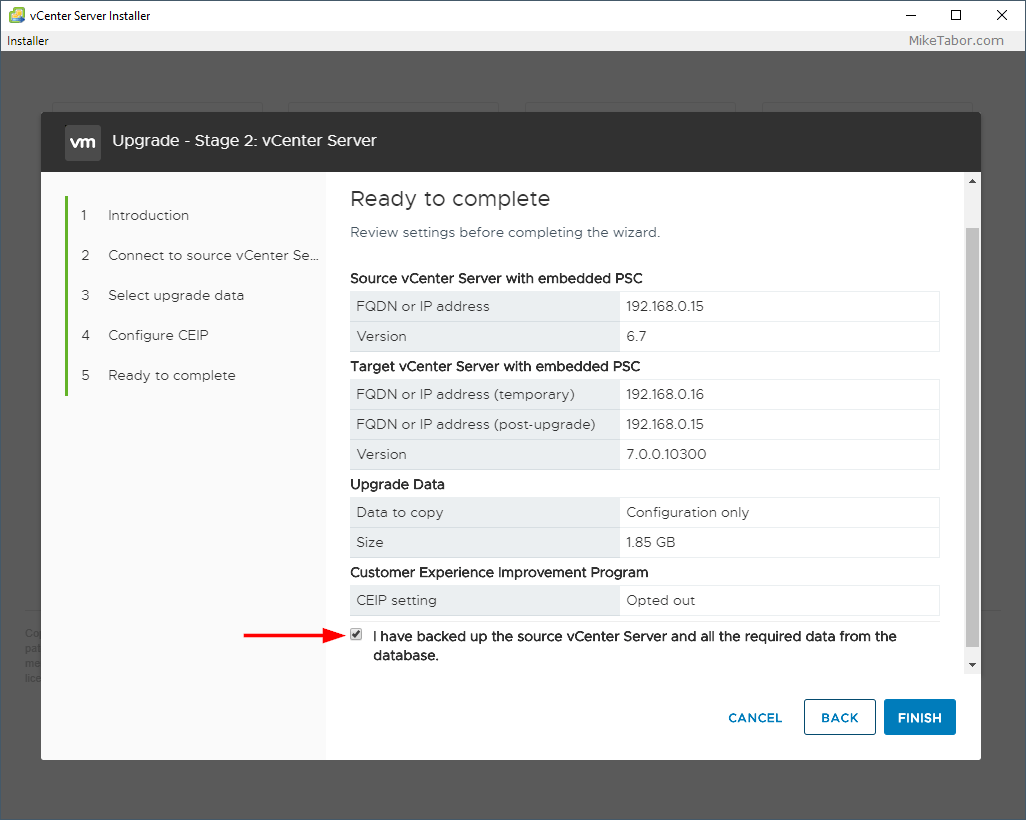
  5. Finally, review the Stage 2 summary and check “I have backed up the source vCenter Server and all the required data from the database” and click Finish.
    vcenter 7.0 installer stage 2 ready to complete
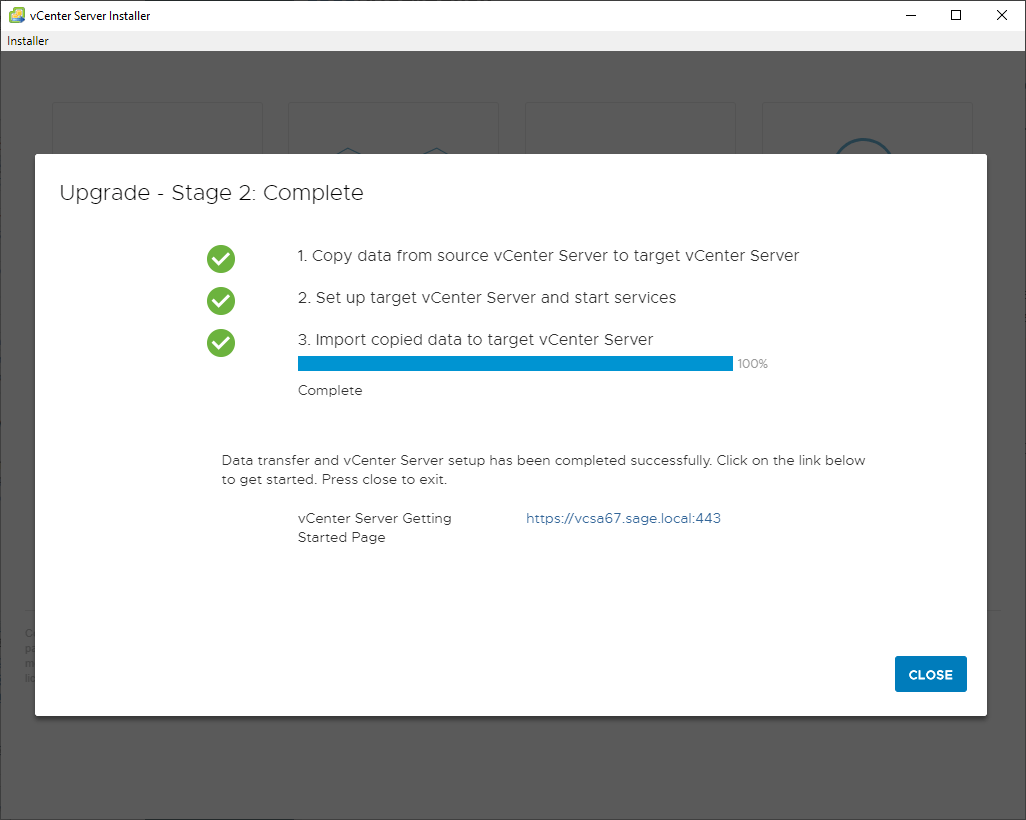
  6. Now at this point, Stage 2 of the upgrade will start copying the data from the old 6.7 vCenter over to the new 7.0 vCenter appliance. After some time, depending on how much data needs to be copied, the upgrade will complete.
    vcenter 7.0 installer stage 2 complete

Now enjoy the new dark theme and all the other improvements that VMware vCenter 7.0 brings. You’re also ready to start upgrading your VMware ESXi hosts to 7.0.